David Herron
Tags: Docker »»»» Self Hosting »»»»
In a homelab, we self-host Internet services on machines installed in our home. While it's easy to access those services at home, accessing them from the Internet takes some preparation. Let's talk about the architecture of publishing Internet services to the Internet from your home network.
Typically a home Internet connection is one way - we sit in our home, browse the Internet, and generally connect from our home to services on the Internet. Internet service providers optimize the service offering for that model.
But, with a little bit of software configuration we can turn that around. Instead of using the internet connection solely for outbound connections, it can also support inbound connections. We can easily run services on a machine on our home network and access it from outside the home.
For example, someone might like the calendaring, document, and file sharing capabilities of the "cloud office" services such as offered by a large megacorporation whose name starts with "G". But, they might be leery of what the "G" corporation does with their data. Such a person might find NextCloud an excellent solution. It is relatively easy to install NextCloud on a computer sitting in ones home as discussed in How to install NextCloud 30.x using Docker Compose: a comprehensive guide. The same is true for many other services. But, how to access self-hosted services from outside your home network?
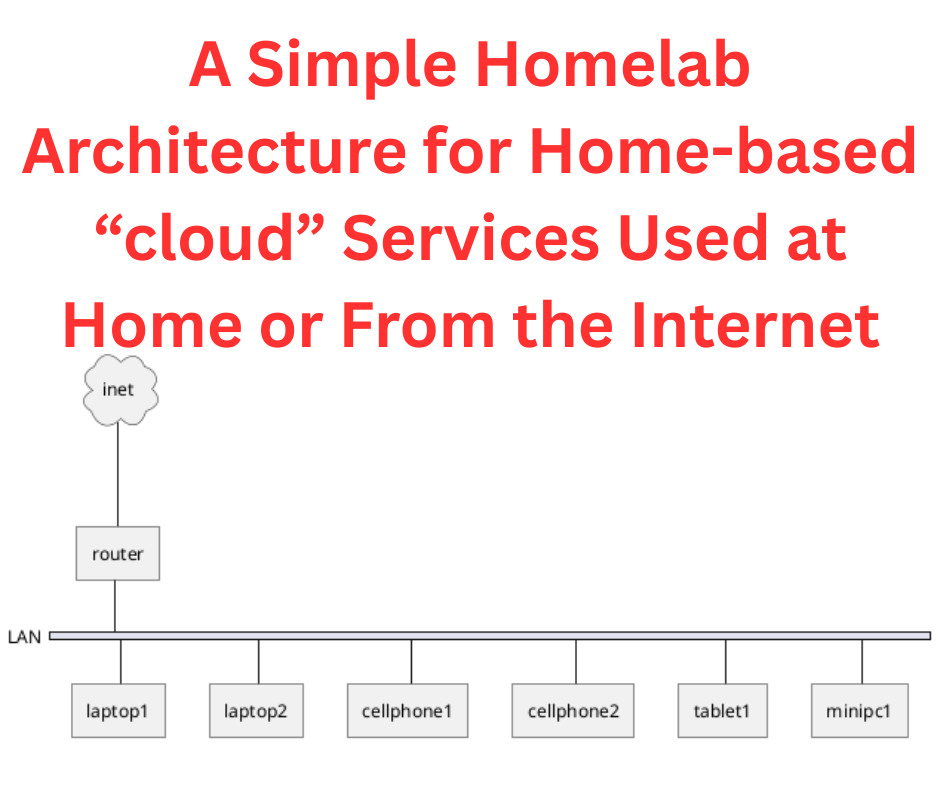
How does the homelab escape the home?
The steps involved are:
- Creating a domain name, or sub-domain name, that you configure with the IP address of your home internet connection.
- Since most internet service providers dynamically assign the IP address, you must set up a "dynamic DNS" solution. One simple solution is discussed in Use DynamicDNS to give your homelab services on your home internet connection a domain name
- Set up a computer in your home which runs Linux, on which you install Docker.
- Plausibly this could be implemented on macOS or Windows, but I've never done so.
- Install a reverse proxy server in that Docker instance. One solution is Caddy, as discussed in Installing Caddy as a homelab reverse proxy, exposing home-based services to the Internet
- Deploy services in that Docker instance, and configure the reverse proxy server so each service responds to a domain
service-name.example.com
This diagram is a visual representation
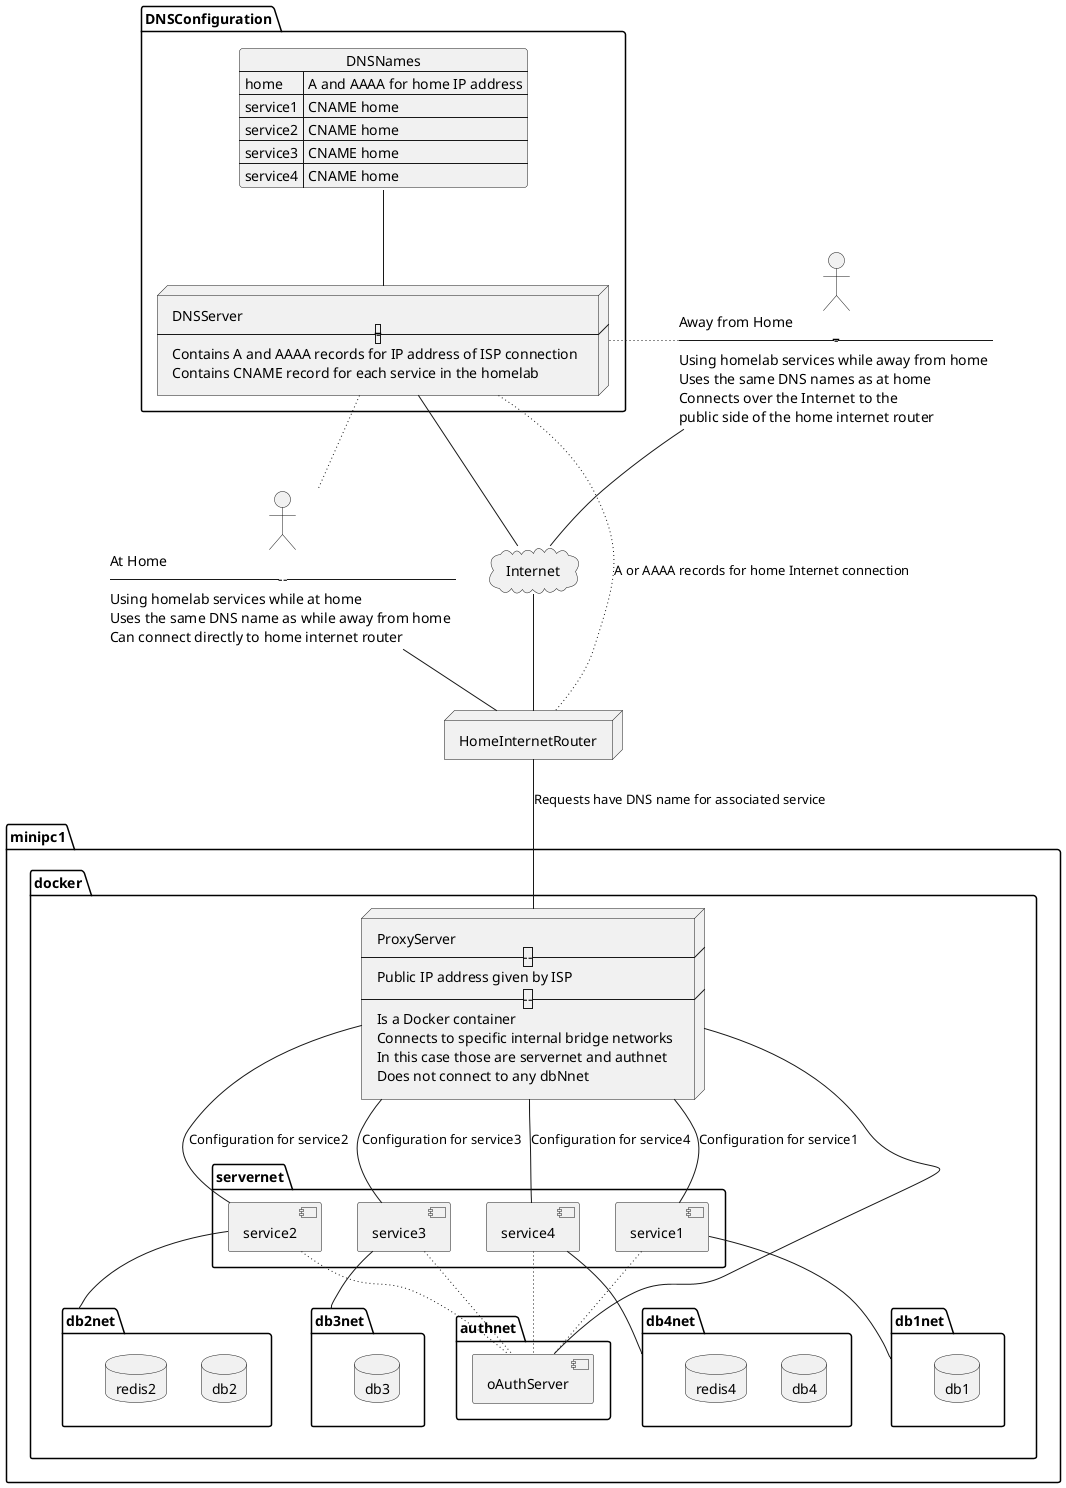
Home internet connections typically have one IP address (IPv4 and possibly IPv6). Having just one IP address doesn't limit us to exposing only one service to the outside world. Instead, we can assign multiple domain names to the one IP address, then configure the ProxyServer to direct traffic to back-end services based on the domain name. This allows multiple services on one IP address by designating a different domain name for each service. That domain name will be in the Host header of each request.
The box labeled HomeInternetRouter is your internet router. The internet service provider assigns an IP address to this router. The router must be configured to send at least HTTP/HTTPS traffic to a computer shown as minipc1 in this diagram.
Earlier we said this computer, minipc1, should run Linux. The key is for it to run Docker containers because they are the easiest way to deploy services. Docker could be replaced by Podman or Kubernetes if you prefer. Or, this could be implemented on Windows or macOS using Docker Desktop. The easiest path in my view is to install Linux, install Docker on that, then go to town using Compose files describing what Docker calls Stacks.
The box labeled DNSConfiguration describes the domain names we must configure. The first might be home.example.com. What I do is to use a domain name, like example.com, and assign sub-domains to each service. The main domain name might be used for other purposes. The domain home.example.com is the one which has A (and optionally AAAA) records for the IP address.
For each service you implement, assign a subdomain with a CNAME record referencing home.example.com. For example cloud.example.com could be a CNAME for home.example.com.
The domain names I currently have registered are
| Service Domain | DNS | Description |
|---|---|---|
home.example.com |
A and optionally AAAA address matching the IPv4 and optionally IPv6 address for the public IP address of my home network | Base domain name mapping to IP address |
reo.example.com |
CNAME referring to home.example.com |
Connects to the ReoLink service on a webcam |
git.example.com |
CNAME referring to home.example.com |
Gitea |
portainer.example.com |
CNAME referring to home.example.com |
Portainer |
assist.example.com |
CNAME referring to home.example.com |
Home Assistant |
stack.example.com |
CNAME referring to home.example.com |
BookStack |
video.example.com |
CNAME referring to home.example.com |
Jellyfin |
cloud.example.com |
CNAME referring to home.example.com |
NextCloud |
By doing this both home.example.com and cloud.example.com reference your home Internet router.
As mentioned earlier, many internet service providers dynamically assign the IP address. It might be 43.23.54.78 on one day, then 43.23.56.48 on another day. Those are made up examples, but the point is that when the ISP dynamically assigns your home internet connection a different IP address you must change the A/AAAA records on home.example.com.
The best solution for that is a dynamic DNS service. There are 3rd party DynDNS services available, some of which are free, others of which are paid. But, a free solution that you can self host on your own hardware is described in Use DynamicDNS to give your homelab services on your home internet connection a domain name
The box labeled ProxyServer is a service that will handle a domain name like service.example.com, handle the SSL certificates so that it is an HTTPS connection, and direct traffic for that domain to its back end service.
In my case, I've deployed Caddy inside Docker to serve as the ProxyServer. All other services are also deployed inside Docker. The network, servernet, is a Docker-internal network through which we connect Caddy to the service containers.
The boxes labeled dbNnet are other Docker-internal networks containing the back-end services, which are typically database servers. These exist for service isolation.
Better security through service isolation
It is meant that each DB network be an isolated internal Docker network so that each service is encapsulated from other unrelated services. Doing so should improve security of your whole system. For example, in this diagram the db2 container can only be accessed by the redis2 and service2 containers. This limits the potential attack surface.
A miscreant might break through a service and end up inside the container. This arrangement limits how many other containers the miscreant can reach.
Using Compose files and Docker "stacks"
The Docker Compose specification is an easy way of defining one (or more) services as Docker containers that are meant to work together. It uses a YAML-file to describe containers, networks, file systems, and more, in a concise but readable way.
There are alternatives - Podman (which I've not used) has its own format rather than the Compose format - Kubernetes is designed for enterprise level deployments way beyond what we need for a homelab.
The Compose file is excellent for the scale we homelabbers require. We're likely to have one solitary server machine, rather than having multiple data centers and zillions of servers available.
In the olden days there was a command, docker-compose. Any tutorial you read referencing this command is a clue that it's an old and possibly out-of-date tutorial. The docker-compose command (with a hiphen character) was deprecated years ago.
In its place the Docker team created the Compose specification, and integrated a superset of the docker-compose functionality as the docker compose command (no hiphen). Any tutorial you see referencing this command is more likely up-to-date.
Docker calls the set of services deployed by a Compose file a Stack.
Exporting ports from containers
You'll often find tutorials showing a Compose file where ports are exposed for the main container using something like this declaration:
    ports:
        - 2080:80
In my approach to homelabbing, this is not required. Instead, the Proxy server should handle all service connections internally, and instead present domain-based access to the services than port-based access.
The tutorial writer wants a simple way to describe how to setup and use the service. As a result, the tutorial says to expose the port, and then you visit http://localhost:2080 to use the service.
But, what if you have 10 stacks (10 sets of services) to deploy. You'll quickly have trouble managing, and remembering, that port 10080 is for service1, port 11080 is for service2, and so on.
The Internet gods of the 1980s invented domain names to make our lives simpler by using names rather than numbers. We should therefore use domain names to access our services.
Do the serviceN containers require exporting their ports? No.
    # ports:
    #    - 2080:80
My recommendation is to comment-out the ports declarations from Compose files appearing in tutorials or README's. That's step one.
Step two is to create a network, such as servernet
$ docker network create servernet
Then, in the Compose files for the proxy server and each stack, you add the following:
networks:
    servernet:
        external: true
Then, in the container definition for the main container of the stack, add this:
    networks:
        - servernet
These steps create a network to which the proxy and all stacks are connected, and it ensures each relevant container is connected to that network.
Docker has a nice feature that each container attached to a Docker-internal network is available, on that network, with a domain name corresponding to the name it has in the Compose file. That is, Docker nicely autogenerates domain names for the containers.
This means the proxy server might use the following internal domain names in its configuration:
| Service Domain | Internal domain name | Proxy server config |
|---|---|---|
reo.example.com |
N/A | The camera has its own IP address - 192.168.8.110:80 |
git.example.com |
gitea |
gitea:3000 |
portainer.example.com |
portainer |
portainer |
assist.example.com |
N/A | Uses host networking - 127.0.0.1:8123 |
stack.example.com |
bookstack |
bookstack:80 |
video.example.com |
jellyfin |
jellyfin:8096 |
cloud.example.com |
nextcloud |
nextcloud:80 |
Generally, your proxy server is configured to connect serviceN.example.com traffic to the serviceN:NNN hostname (and port) on the internal network. This is very easy and straight-forward.
But, there are two exceptions shown here.
Some services require special configuration. For example the security camera has its own web UI on port 80 while supporting RTSP streaming over other ports. The proxy server is configured to send traffic to port 80, while handling HTTPS within the proxy server.
In the case of Home Assistant, there is a complex configuration and it seemed better to follow their recommendation of using host networking so that the container is exposed to the host computer. The proxy server can then reach Home Assistant via localhost.
The box labeled Authnet is presumed to be an OAuth2 authentication server. Such servers may need to be reachable not just from the serviceN containers, but from clients outside the home network.
Ideally, the only service which will export any ports is the ProxyServer. All other services would be attached to servernet allowing the proxy server to reach the services over that network.
Hardware for hosting a simple homelab
As mentioned above one must install a computer in your home on which you run Linux. On that computer is installed Docker, in which all services are installed. The proxy server is one of those services.
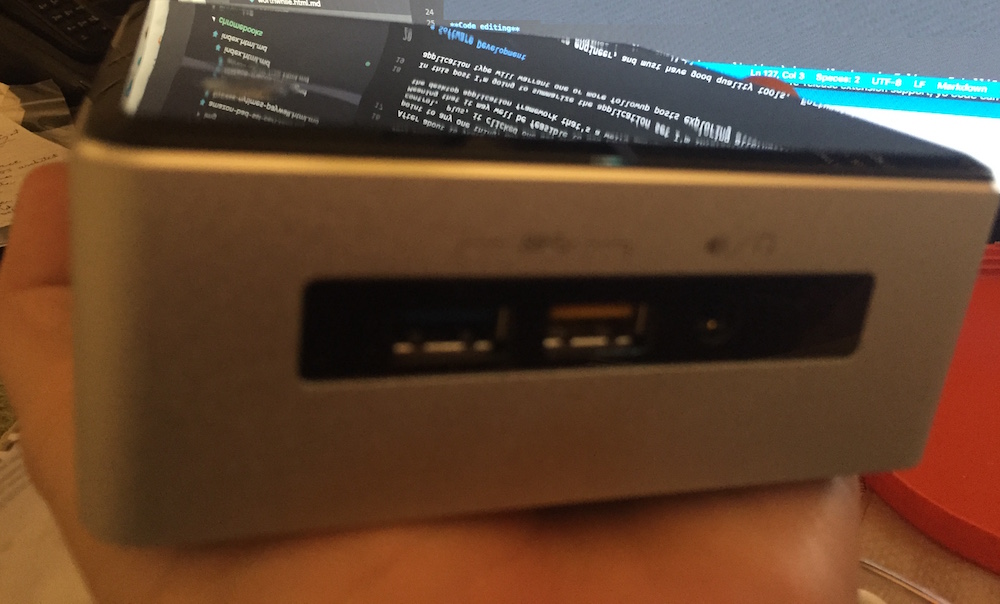
The image shown here is an Intel NUC I used to use for homelabbing. That particular computer had a 2015ish era CPU, 16 GB of memory, and two driveswith a maximum capacity of 8 terabytes. As you can see, the box easily fits in the palm of my hand. I'd installed Ubuntu and it nicely ran several services.
I currently own a GMKTec G3 Plus. This is a very small low-power consumption "NUC" or "MiniPC". It is smaller than the NUC shown above, and has an Intel N150 processor, is rated for 32GB of memory (mine has 16GB), and has two M.2 slots for a maximum storage capacity of 6 terabytes. That's a lot of capability in a tiny box.
I've installed Ubuntu 24.04, and installed Docker. This GMKTec G3 is more powerful than the NUC I'd previously used. Related articles:
- Self-hosted Docker infrastructure in home or office using low-cost computers like Intel NUC
- Intel NUC's perfectly supplant Apple's Mac Mini as a lightweight desktop computer
Summary
Self-hosting "cloud"-like services on a computer in your home is easy, and rewarding, for those with the technical skill. The computer cost quickly pays for itself in saved fees, or the peace of mind gained from controlling your data.
Once the service is on your home computer, you can use it from home, but what if you also want to use it while away from home? You might, while traveling thousands of miles from home, watch videos in your Jellyfin archive at home, for example, or store documents in your NextCloud. A more practical example is that I've configured my Android phone to autostore pictures into a NextCloud folder.
For those with the skills, it's relatively easy to set up the domain name service (DNS) records, dynamic DNS, and the proxy server, to support accessing home-based services from anywhere on the Internet. With modern Internet service, the data rate is very good.
An eye-opening exercise for me a few years ago was being able to use the Gitea and Jenkins services on the Intel NUC in my home in California while traveling for a month in Bucharest. It meant I could continue working on my projects while 10,000 miles from the data.
A homelab, means to host Internet services on your own hardware at home, and then to make those services available to people (or yourself) on the Internet.
This offers you the freedom to own your data in a way Big Tech denies, and ensures your data is private from misuse or abuse.


