David Herron
Tags: Docker »»»» Self Hosting »»»»
Caddy is a popular, enterprise-ready web server, that can be easily use as a reverse proxy for a homelab. Homelabbers need a simple tool for hosting many services on a single IP address and easily provision Lets Encrypt SSL certificates. Caddy makes that easy.
I've used NGINX Proxy Manager in my homelab setup for years. It's been great. With a few clicks in a GUI, you can make a locally hosted service (in Docker usually) visible to the Internet, even handling Lets Encrypt SSL certificate provisioning with ease.
But, while looking into optimization of my NextCloud instance I learned that it's very useful to use FPM between NextCloud and the proxy server. But, the full configuration for this in NGINX Proxy Manager looked to be incredibly difficult. The solution that came up is Caddy, due to its high performance FPM support.
I still haven't implemented Caddy-NextCloud using FPM, because that specific task looks to be complex. But I've found Caddy to be a very cool tool for the reverse proxy task in running a homelab. While it doesn't have a GUI for configuring the services to proxy, the intelligently chosen Caddy defaults means it is a breeze to setup new services.
This article covers implementing Caddy in a homelab environment.
Accessing code
Code examples in this article are available at:
https://github.com/robogeek/homelabbing/blob/main/web-servers-proxies/caddy/README.md
Architecture
Let's first start with an architecture review of a homelab with multiple services made visible to the Internet.
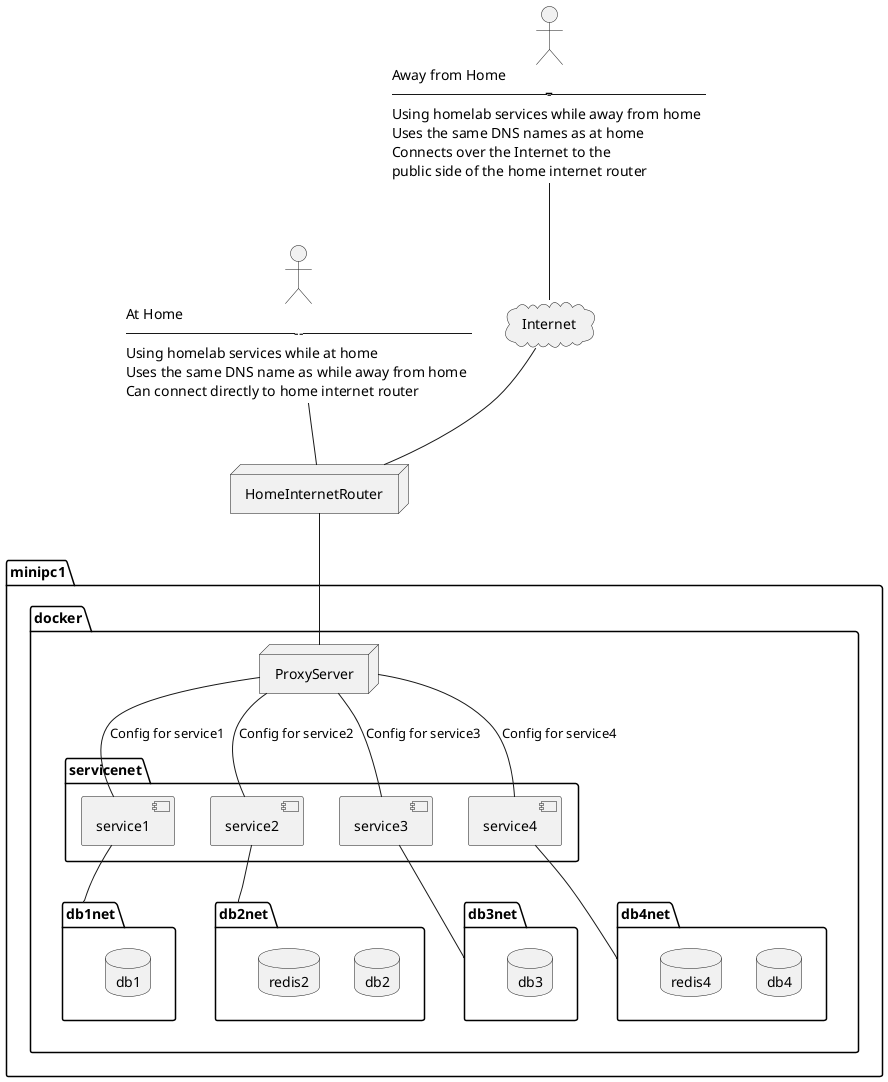
The Caddy server will take the role of ProxyServer in this diagram. It could be NGINX Proxy Manager or Traefik as well, but this article focuses on Caddy.
Home internet connections typically have one IP address (IPv4 and possibly IPv6). Having just one IP address doesn't limit us to exposing only one service to the outside world. Instead, we can assign multiple domain names to the one IP address, then configure the ProxyServer to direct traffic to back-end services based on the domain name. This allows multiple services on one IP address by designating a different domain name for each service. That domain name will be in the Host header of each request.
This homelab has one computer, named minipc1, on which Docker is installed. The ProxyServer is a Docker service, as are all the other services, and Docker internal networking connects the services via virtual networks.
A homelab will have several services running. In my case the list includes Portainer, Kanboard, Bookstack, NextCloud, Gitea, MongoDB, MySQL, and more. Each has its own domain name, and the proxy server has configuration settings for each.
The domain names I currently have registered are
| Service Domain | DNS | Description |
|---|---|---|
home.example.com |
A and optionally AAAA address matching the IPv4 and optionally IPv6 address for the public IP address of my home network | Base domain name mapping to IP address |
reo.example.com |
CNAME referring to home.example.com |
Connects to the ReoLink service on a webcam |
git.example.com |
CNAME referring to home.example.com |
Gitea |
portainer.example.com |
CNAME referring to home.example.com |
Portainer |
assist.example.com |
CNAME referring to home.example.com |
Home Assistant |
stack.example.com |
CNAME referring to home.example.com |
BookStack |
video.example.com |
CNAME referring to home.example.com |
Jellyfin |
cloud.example.com |
CNAME referring to home.example.com |
NextCloud |
The architecture diagram also demonstrates isolating Docker containers into separated bridge networks. This means that even if a miscreant breaks into a Docker-based server, the scope they can access is limited to the containers on the bridge networks to which that service is connected.
The physical location of Docker Container data on the host file-system
Because Docker containers are ephemeral, the configuration files and other data must be persisted outside the container. My preference is to store Docker container files and volume data within a given location within the filesystem. This could be /home/USER-NAME or /opt.
For details see: Setting up Docker for an easy-to-configure self-hosting environment
Following that strategy might result in directories like this:
/home/david/docker/caddy/home/david/docker/nextcloud/home/david/docker/gitea/home/david/docker/jenkins
Putting all container data in one place should make it easier to manage everything.
Installing Caddy as a Docker Container using Compose
I started with the recommended Compose file on the official Docker Hub entry for Caddy, but I made a few changes.
services:
  caddy:
    image: caddy:2-alpine
    restart: unless-stopped
    cap_add:
      - NET_ADMIN
    ports:
      - "80:80"
      - "443:443"
      - "443:443/udp"
    volumes:
      - ${DOCKER_BASE}/docker/caddy/conf:/etc/caddy
      - ${DOCKER_BASE}/docker/caddy/site:/srv
      - ${DOCKER_BASE}/docker/caddy/data:/data
      - ${DOCKER_BASE}/docker/caddy/config:/config
    networks:
      - servernet

networks:
    servernet:
        external: true
This selects Caddy version 2.x, using the Alpine Linux base image because that's much smaller. The changes made were in the volumes and the networks.
Mounting volumes into a container supports persisting data onto the host system. In this case we have configuration files that must be preserved whenever the Caddy container is destroyed and recreated.
I prefer to explicitly declare the filesystem location for such volumes.
As described above the value for $DOCKER_BASE is a path name leading to the docker directory in which all container data resides.
The servernet network is how Caddy will reach other Docker-based services. Those services should also be attached to servernet so that Caddy and the service can find each other. In the diagram above each service had its own private db network to contain its required database services. Any such network, and back-end services, are maintained by each service and are not impacted by the Caddy setup.
To set up this network:
$ docker network create servernet
Configuring the Caddyfile - first service
Caddy doesn't do anything unless you've installed a configuration file, called Caddyfile. The Caddyfile is where we configure services and other aspects of running a Caddy server.
At the moment if you run the Compose file you'll get this error:
caddy-1 | Error: reading config from file: open /etc/caddy/Caddyfile: no such file or directory
The /etc/caddy directory inside the container corresponds to this mount: ${DOCKER_BASE}/docker/caddy/conf:/etc/caddy.
Start with this:
$ mkdir -p ${DOCKER_BASE}/docker/caddy/conf
$ mkdir -p ${DOCKER_BASE}/docker/caddy/site
$ mkdir -p ${DOCKER_BASE}/docker/caddy/data
$ mkdir -p ${DOCKER_BASE}/docker/caddy/config
This creates the directories named in the Compose file. In the conf directory create a file named Caddyfile containing:
localhost {
	respond "Hello, world!"
}
Then start the Caddy stack with this command:
$ docker compose up -d
After a couple moments run docker ps to see if the Caddy container has started. Look at the STATUS column and verify that it is Up, then look in PORTS and you should see: 0.0.0.0:80->80/tcp, 0.0.0.0:443->443/tcp, 0.0.0.0:443->443/udp, 2019/tcp. The entries for port 80 and 443 are what we configured in the Compose file.
The 2019 port is a Caddy administrative port WHICH MUST NOT BE EXPOSED BEYOND THE CONTAINER.
We haven't set up anything for accessing Caddy from outside your home Internet. Instead, our first steps will be within our laptop.
Run this command:
$ curl -f https://localhost:80
No output is given. Caddy by default sets up HTTPS and seems to turn off HTTP. Querying port 80 silently gives zero output. We'll work on that later.
Let's instead try a slightly different command, specifying the HTTPS protocol.
$ curl -f https://localhost
curl: (60) SSL certificate problem: unable to get local issuer certificate
More details here: https://curl.se/docs/sslcerts.html

curl failed to verify the legitimacy of the server and therefore could not
establish a secure connection to it. To learn more about this situation and
how to fix it, please visit the web page mentioned above.
We're getting an error about being unable to validate the SSL certificate. What happens is Caddy self-issues SSL certificates, which aren't recognized as valid. Entering https://localhost into a web browser will give you a similar error. If you tell the browser to proceed to the "insecure" site, you'll see the Hello world message.
To tell CURL to make an insecure request:
$ curl -f --insecure https://localhost
Hello, world!
If you add -v there's a message saying SSL certificate problem: unable to get local issuer certificate, because the Caddy self-issued certificates are not recognized. In any case, we received the output, and successfully configured Caddy.
That's a good first step, but we really want to test the reverse proxy feature.
Adding a simple Docker container for experimentation
In ${DOCKER_BASE}/docker add another directory, nginx-simple, containing this Compose file:
services:
  nginx:
    image: nginx
#    ports:
#     - "8080:80"
    environment:
     - NGINX_PORT=80
    networks:
     - servernet

networks:
  servernet:
    external: true
NGINX is also a web server with reverse proxy features. But, when run this way, the default behavior of this unconfigured container is to put up a simple web page. This way we have a simple-to-deploy service that easily and reliably gives us a simple viewable result. More importantly it is an easy way to verify Caddy's reverse_proxy mode.
Run:
$ docker compose up -d
As before, run docker ps and verify the STATUS is Up. In the PORTS column you should see 80/tcp. This means port 80 is active, but it is not exported from the container.
In the last column you'll see the container name. On my laptop it is: nginx-default-nginx-1
Notice that both the NGINX and Caddy Compose files attach the container to the servernet network. This means you can run:
$ docker network inspect servernet
[
    {
      ...
        "Containers": {
            "3f42796588b0d...": {
                "Name": "nginx-default-nginx-1",
                "EndpointID": "d56273435c29f5e...",
                "MacAddress": "02:42:ac:13:00:03",
                "IPv4Address": "172.19.0.3/16",
                "IPv6Address": ""
            },
            "766f6a806383f5...": {
                "Name": "caddy-caddy-1",
                "EndpointID": "bbc937a5c0d5...",
                "MacAddress": "02:42:ac:13:00:02",
                "IPv4Address": "172.19.0.2/16",
                "IPv6Address": ""
            }
        },
      ...
    }
]
This shows both NGINX and Caddy connected to the servernet network. They are assigned virtual IPv4 addresses.
An important aspect of Docker virtual (bridge) networks is that Docker runs an internal DNS server, and it automatically configures A records for each container. This means the DNS name nginx-default-nginx-1 has an A record with the value 172.19.0.3.
That means you can do this:
$ docker exec -it caddy-caddy-1 sh
/srv # wget -O - http://nginx-default-nginx-1
Connecting to nginx-default-nginx-1 (172.19.0.3:80)
writing to stdout
<!DOCTYPE html>
<html>
<head>
<title>Welcome to nginx!</title>
...
Because the Caddy container is an Alpine Linux container, the shell is sh rather than bash. Also, wget is installed by default rather than curl.
This makes an HTTP request to the NGINX container, and it responds with the HTML of the simple web page.
Next, in the Caddyfile make this change:
localhost {
#       respond "Hello, world!"
    reverse_proxy nginx-default-nginx-1:80
}
Then, restart the Caddy container with:
$ docker compose down
[+] Running 1/1
 ✔ Container caddy-caddy-1  Removed
$ docker compose up -d
[+] Running 1/1
 ✔ Container caddy-caddy-1  Started
You can now use the CURL command above, or visit the https://localhost URL in your browser. Both will show you the NGINX welcome page.
Experiment done, move on to concrete results
We've seen the basics of installing, launching, and configuring Caddy. But of course our goal is exposing Caddy to the Internet and using it as a reverse proxy for the services we want to run. Each service must be reachable via a domain name which we'll configure in the Caddyfile. Finally, each service must use HTTPS with widely-recognized SSL certificates.
We'll spend the next few sections building this out, using the default nginx service as our service.
Configuration for Automatic HTTPS using Lets Encrypt
Caddy includes built-in support for provisioning SSL certificates from Let's Encrypt. That's the well-known service for free SSL certificates which can be auto-provisioned. Upon configuring a site in the Caddyfile, Caddy automatically connects with Let's Encrypt for transparent HTTPS support. All that's required is simple configuration settings in Caddyfile.
The default mode is to use the HTTP Challenge with Let's Encrypt. There are many other options that include interfacing with DNS providers (for the DNS Challenge) and even other SSL certificate providers such as ZeroSSL.
You may want to review the Caddy documentation:
The official documentation starts with:
https://caddyserver.com/docs/automatic-https .. But, I found that confusing. The main thing to learn there is that Caddy offers automatically provisioned SSL certficates, and that for a server listening to the HTTP port an automatic redirect from HTTP to HTTPS is inserted.
Later on that page -
https://caddyserver.com/docs/automatic-https#acme-challenges - is where the documentation discusses ACME challenges. ACME is the automatic certificate management protocol used by Lets Encrypt, ZeroSSL, and perhaps others. By default the HTTP challenge is used, which in turn requires that port 80 be open to the public.
Later on that page -
https://caddyserver.com/docs/automatic-https#using-on-demand-tls - is the discussion of On Demand TLS. Associated to this is documentation for the tls directive: https://caddyserver.com/docs/caddyfile/directives/tls
We're going to use the default HTTP Challenge with Let's Encrypt, because it is the simplest way to get Caddy to provision SSL certificates.
Namely, there's one thing to do, and the defaults will ensure any site you configure is automatically provisioned with SSL.
At the top of your Caddyfile, add this:
{
    email yourname@example.com
}
This is what Caddy calls the Global Options Block. Documentation:
https://caddyserver.com/docs/caddyfile/options
Global options are options which are default values or otherwise apply to all sites handled by a Caddy instance.
This email option is used in the ACME protocol, where it is required as part of the identification.
Is there anything else you need to do? Nope.
If you want to deep dive into TLS specifics, look at the tls directive. You can also configure each site with different SSL/TLS settings. Caddy sure has a lot of capabilities. But, they've ensured the defaults produce excellent results.
Configuring DNS for your home network
Earlier we described needing a A and AAAA DNS records for home.example.com supporting both IPv4 and IPv6 networking. We then need CNAME records for serviceNNN which points to the home domain.
The IP address assigned by our Internet Service Provider (ISP) is configured for the A and AAAA records.
The result is that any requests/traffic for our service domain names will arrive at the HomeInternetRouter.
If your internet service provider gives you a static IP address then you go to your domain name registrar and add a record named home.example.com with an A record listing that IP address. If your ISP offers an IPv6 address, then you also add an AAAA record with that IPv6 address.
Otherwise you need to use a Dynamic DNS technique. A simple DynDNS technique is discussed in Use DynamicDNS to give your homelab services on your home internet connection a domain name.
Telling Caddy to respond to the home.example.com domain name
At this point we have a DNS name, such as home.example.com, corresponding to our HomeInternetRouter. We can ping that address, but we want to access it via a web browser.
Remember from the diagrams above, that HomeInternetRouter is the box connecting to the wire that connects to the Internet Service Provider. A second box, minipc1, is where we've been playing with the Docker software and now ddns-updater.
We need to configure HomeInternetRouter to send HTTP and HTTPS traffic to the box being called minipc1. You don't have to use that name for that machine. While we're at it, we can also configure it to send SSH traffic to the same box, allowing us to remotely login to our server from elsewhere on the Internet.
The specifics vary based on the router you're using. In my case, I have a GL-INET router, but have done the same task on many other routers.
The first setting is to assign a fixed IP address to minipc1. The GL-INET routers do not, as far as I could determine, have the ability to assign a fixed IP address to a machine. Your router may have a configuration screen for Static IP Address Binding, or a similar phrase, on which you can assign a fixed IP address.
In my case, the machine in question is running Ubuntu. In the network settings, the ethernet adapter and wifi adapter were both configured with a fixed IP address. The default is to be assigned an address by DHCP, which is running on the router.
Suppose the address you designate is: 192.168.8.10
In the router dashboard, find the page for port forwarding. In the GL-INET router this page is labeled FIREWALL.
On that page configure port 22 (SSH), port 80 (HTTP), and port 443 (HTTPS), to forward to the IP address designated for minipc1.
If you have a command-line environment outside of your home, such as a web hosting account, you can now try to SSH to your home machine:
web-hosting-service$ ssh -l USER home.example.com
For this to work you may need to do some configuration, such as enabling remote login. If you've been successful, this should succeed and you should be able to login to your home machine from outside your home network.
In the Caddyfile, add this:
https://home.example.com {
    reverse_proxy nginx-default-nginx-1:80
}

http://home.example.com {
  redir https://{host}{uri} permanent
}
Restart the Caddy service:
$ cd ${DOCKER_BASE}/docker/caddy
$ docker compose down
$ docker compose up -d
$ docker compose logs -f
The back-end service should be configured to solely export port 80 HTTP. This configuration auto-redirects traffic arriving as HTTP over to the HTTPS port. Traffic arriving on the HTTPS port is proxied to the HTTP port of the back-end service.
Success here is to see the default NGINX page, and to see that it has correct SSL certificates from Lets Encrypt.
Telling Caddy to respond to service domain names
We have successfully configured Caddy to respond to home.example.com, a DNS name with A/AAAA records for the home internet address.
We can now replicate this under additional domain names. We don't have any services to deploy other than this default NGINX thing. We can reuse that service because it's a quick way to validate the ability to deploy a service associated with a domain name.
In the DNS provider account, add several records with the name serviceN, the type CNAME, and the value/address of home.example.com.
In the Caddyfile, add this:
https://serviceN.example.com {
    reverse_proxy nginx-default-nginx-1:80
}

http://serviceN.example.com {
  redir https://{host}{uri} permanent
}
Repeat this for every service domain name.
Restart the Caddy service. And, you should be able to use each domain name to connect with your services.
Testing access from outside your home network
One of our goals is to access services on our home network from outside the home network.
The easiest way to test this is with your mobile phone or tablet.
Turn off WiFi support on the device, and make sure to enable data service through your cell phone connection. Then, use the mobile web browser to access the service domain names you've configured.
Summary
The length of this article was due to the architecture review. Setting up Caddy and configuring it to hsdfandle most web services is very easy and fast to implement. So long as your web service is relatively simple - just an HTTP port, for example - the Caddy configuration is simply this:
https://serviceN.example.com {
    reverse_proxy nginx-default-nginx-1:80
}

http://serviceN.example.com {
  redir https://{host}{uri} permanent
}
This simplicity is because the Caddy team has intelligently chosen default settings. The intelligently chosen default means we can quickly add a new service by simply adding a few lines of configuration.
I can't help but contrast this with NGINX Proxy Manager after several years of using it. With N.P.M. a few clicks in its dashboard sets up a service, making it similarly easy to deploying a service on Caddy. With Caddy you copy/paste/modify a few lines of configuration, while in N.P.M. it's a few mouse clicks. That is, if it's an easy-to-deploy service.
I came to Caddy because interfacing NextCloud-FPM to N.P.M. was so complex that it was impossible in N.P.M. The issue is how N.P.M. generates the NGINX configuration, and that it does not have the flexibility to handle NextCloud-FPM. With Caddy, you're just editing the Caddyfile so there isn't a GUI interfering with creating the configuration. It's still complex to configure Caddy for NextCloud-FPM, but at least it is possible.


")


