David Herron
Tags: Docker »»»» Docker MAMP »»»» Self Hosting »»»»
Using Docker, and a simple small computer, you can build a powerful computing "cloud" in your home, on your desktop, at low cost, giving you control over your data. If you need more power, adding another computer or three to the mix quickly adds more capabilities. For almost any popular 3rd party service like Github, Dropbox, and Trello, there is an open source package that might even be better. With open source operating systems, open source packages like Gitea, Nextcloud, and Kanboard, you gain control over your destiny.
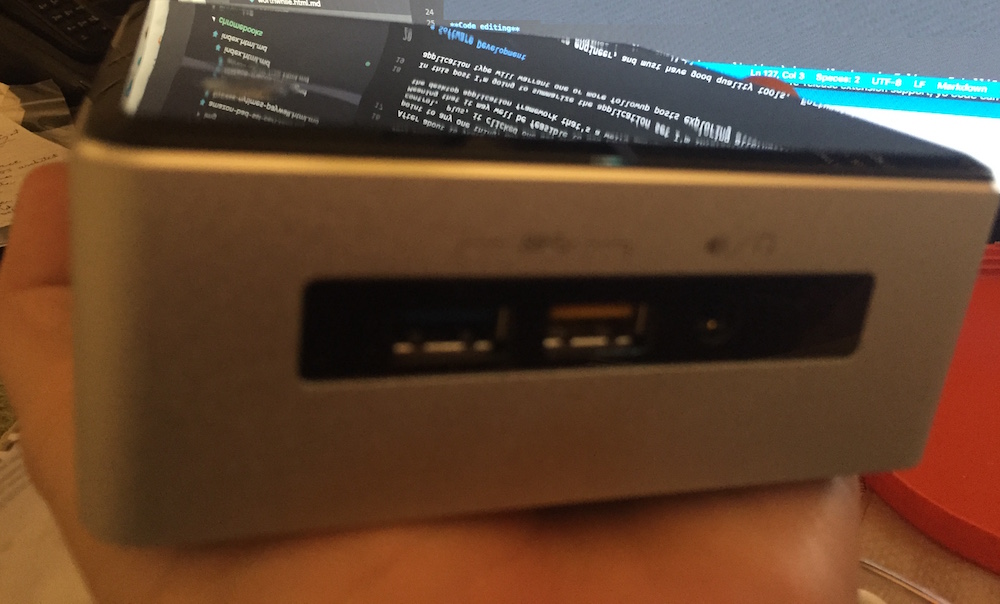
The computer pictured here, an Intel NUC, is small, consumes very little electricity, but packs a lot of computing power. This particular computer has 16GB of memory, with over 2 terabytes of disk internally, and another 15 terabytes or so of external drives attached. Because it's built with parts normally used in laptops, the NUC consumes extremely little energy. The 5th generation Core i5 is no slouch, and I have it running Gitea, Jenkins, NextCloud, Plex, Bookstack, and more. In other words, it's my own private development server, that's far more secure and lower cost than if I'd used any of the popular 3rd party services.
Computers like this are small enough to stick into an out of the way corner. My Intel NUC sits on the desk buried under piles of loose papers and other stuff. It stays running for weeks at a time, requiring very little maintenance.
Self-hosting Docker services on a computer in your home starts with setting up a suitable computer. You then install the services you want available. Then to access these services from outside your home, you must point suitable domain names to your home DSL/Cable connection, and configure your router to allow inbound traffic to reach the Docker host.
With my computer, I can access any service hosted on this computer from anywhere on the Internet. For example, when living in Bucharest a couple years ago, I used this computer (it's located in California) as if it was in the other room.
Here's an article about this machine: Intel NUC's perfectly supplant Apple's Mac Mini as a lightweight desktop computer
Setting up a single NUC/SFF/USFF computer for local Docker infrastructure
As we said, setting up a local Docker infrastructure, for home or office, starts by selecting a suitable computer. Depending on your needs the computer can be a Small Form Factor (SFF/USFF) computer, or even a mid-tower or full-tower desktop PC. Since it's best to use Linux to host Docker, look for a computer that doesn't have a Windows license to minimize your cost. You must choose ample memory, at least 16 GB, and enough data storage for your needs.
The advantage of SFF/USFF computers is ultra-low electricity consumption, small size, and less noise. But the tradeoff is less upgradability. That's where the tower PC's shine, because you can easily upgrade parts on the logic board, add cards to the PCI slots, and can add several internal drives.
Once you've bought and configured the hardware, it's time to set up the operating system. Linux is recommended for two reasons, only one of which is minimizing the cost. A computer with a bundled Windows license adds cost to that computer. To see that cost, go to the Dell website and search for their Linux solutions. I'm looking at the Precision 3240 Compact Workstation and see these operating system costs:
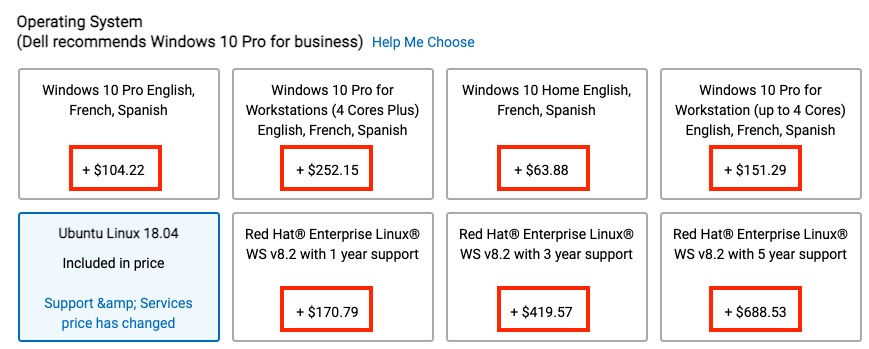
Notice that Ubuntu is $0 cost relative to the other choices. The cost for the Red Hat choices is because they require a support contract with Red Hat. Other versions of Linux, like Ubuntu, cost $0. If you need a support contract, the Linux vendor will usually have options available.
The more important reason to use Linux is because Docker is native to Linux. You might be comfortable with Windows or macOS because you use one or both on your desktop computers. While Docker runs on both, it is not native to either, and therefore there is higher overhead to running Docker on Windows or macOS. That overhead doesn't exist on Linux, again because Docker is native to Linux.
It is important to use a physical ethernet cable to attach this computer to your Internet router. A physical ethernet connection is far more reliable than if it's attached using WiFi. In fact, you should probably turn off WiFi in this computer, and you'll have one less source for stray EMF signals in your home. Do we understand with certainty that electromagnetic signals do not have negative health consequences?
Once you've installed the operating system, you next setup Docker. We went over Docker setup in this article:
Pay attention to the Linux section. Docker does run on other operating systems, if you prefer, but that requires another layer which implements a Linux virtual machine within which is running the Linux version of Docker. By running natively on Docker you skip that virtual machine layer.
Configuring a Docker server to be easily used on home network
You've got the chosen computer configured and it's running Docker, and you have run a few sample Docker commands on that computer. What's next is to ensure you can easily access the local Docker host from other computers on your home network.
Of course the Docker host has an IP address, but using IP addresses is inconvenient. There's a feature made popular by macOS in which local computers are automatically available as hostname.local. Apple variously called this Rendezvous or Bonjour, and it many useful things like automatically sharing printers and other devices around a local network.
The end goal is for your Docker host to be accessible as hostname.local (note - .local domain name) from hosts on the local network.
$ ping nuc2.local
PING nuc2.local (192.168.1.103): 56 data bytes
64 bytes from 192.168.1.103: icmp_seq=0 ttl=64 time=0.432 ms
64 bytes from 192.168.1.103: icmp_seq=1 ttl=64 time=0.445 ms
^C
Fortunately this feature is based on several Internet protocols, including multicast DNS (mDNS) and DNS Service Discovery (DNS-SD). We shouldn't have to get too deep into what that means, because for the most part use of those protocols is transparent. Any user of macOS machines, and possibly any Windows user, have used these protocols for years without being aware. There are open source implementations that run on Ubuntu and other Linux distros.
In my case the NUC can be accessed as nuc2.local from both my macOS and Windows laptops. Unfortunately I don't remember whether this required any special configuration on Ubuntu.
In case this does require special configuration, it appears one must install the following packages:
$ sudo apt install avahi-utils libnss-mdns
Avahi is a Linux service for facilitating service discovery on a local network via mDNS/DNS-SD. That may sound like mumbo-jumbo, but these are the protocols which macOS and possibly Windows machines use for zero-configuration access to local hosts. Simply installing these two packages should be enough to make the Docker host visible to other computers as hostname.local. For information see
https://github.com/lathiat/avahi, but expect to be confused because the information is very terse.
The second package, libnss-mdns, has to do with configuring the Docker host to look for host names the same way. It configures GLIBC on the Linux/Docker host on resolving the names for things. The
documentation shows a configuration file,
/etc/nsswitch.conf, to configure on the Linux host.
Success for this section is to run a service on Docker on the Docker host, then to access it as http://hostname.local:###.
Configuring WiFi/DSL router for public access to in-home server
By default a home router prevents inbound traffic into the home network. In general, it's not desirable to host a public website from a home Internet connection. The home Internet connection doesn't have the necessary reliability level, nor the bandwidth, to support anything but infrequently used web services.
Internet Service Providers therefore configure home Internet connections for consuming Internet services. But with some careful configuration we can expose some web services on the public Internet from our home-based computer.
First, ask whether you want to expose a service to the public Internet. What if an intruder invaded your home network, for example? Is it truly necessary to access Docker services self-hosted at home from outside your home network?
Accessing Docker services hosted on your home network is fairly simple. You start by assigning one or more domain names to the home network, probably working with a Dynamic DNS provider to do so. You then reconfigure the Cable/DSL router to direct at least HTTP (port 80) and HTTPS (port 443) inbound traffic to your home Docker host.
This is exactly what I've done for my home network, and as mentioned earlier that let me use services on my Intel NUC from over 10,000 miles away. Your need might not extend beyond the coffee shop down the street. In either case you're facing the same problem, which starts with the fact that a home internet connection by default does not support hosting services at home. But, we can fix that and do it anyway.
The end goal of this section is that you can access services on your home network using a normal domain name like service.myhomenet.xyz. For the purpose of discussion, we'll assume these services:
- Gitea at
git.myhomenet.xyz - Jenkins at
build.myhomenet.xyz - and NextCloud at
cloud.myhomenet.xyz
You must have already registered your domain, myhomenet.xyz, with a domain name registrar, of course.
The simplest route is if your internet service provider (ISP) offers fixed IP addresses. If so, make sure your home Internet connection has a fixed IP address. However, most ISP's instead use dynamic IP address assignment, meaning your public IP address will change from time to time.
To get around that we'll turn to a Dynamic DNS provider. These services help with assigning a domain name to your home network, accommodating changes to the IP address. One such service is DuckDNS, a free Dynamic DNS provider.
The bottom line is that you'll configure your Docker host with a Cron Job that fetches a specific URL every five minutes or so. The DuckDNS service uses that URL fetch to automatically update your domain name record. The process is very simple.
This gives you a DuckDNS-provided domain name like my-name.duckdns.org. To associate your preferred domain name use a CNAME record like: git.myhomenet.xyz CNAME my-name.duckdns.org, like so:
git.myhomenet.xyz CNAME my-name.duckdns.org
*.git.myhomenet.xyz CNAME my-name.duckdns.org
build.myhomenet.xyz CNAME my-name.duckdns.org
*.build.myhomenet.xyz CNAME my-name.duckdns.org
cloud.myhomenet.xyz CNAME my-name.duckdns.org
*.cloud.myhomenet.xyz CNAME my-name.duckdns.org
CNAME records are a kind of alias in the Domain Name System. It says that anyone requesting git.myhomenet.xyz is given the DNS records for my-name.duckdns.org. The second record, for *.service.myhomenet.xyz, is there to handle any subdomains you might use.
If, instead, you had a fixed IP address the DNS records would look like this:
git.myhomenet.xyz A 123.231.123.231
*.git.myhomenet.xyz A 123.231.123.231
build.myhomenet.xyz A 123.231.123.231
*.build.myhomenet.xyz A 123.231.123.231
cloud.myhomenet.xyz A 123.231.123.231
*.cloud.myhomenet.xyz A 123.231.123.231
In the domain name system (DNS), an A record gives the IP address of a DNS name, while a CNAME record is an alias connecting one domain name to another. The A record only supports IPv4 addresses, and if you instead have an IPv6 address you would use the AAAA record instead.
That configures some domain names pointing at your home network. To test, you should be able to use your mobile device (cell phone). Turn off its WiFi access, then type the domain name into the web browser. If nothing else you won't see a Host Not Found error.
This still isn't enough because the routers supplied by Internet Service Providers do not allow incoming traffic, only outgoing traffic. Remember, the home Internet connection is designed for consumption of Internet services, and is not about providing public Internet services. We are looking to provide our own services for ourself at a personal scale, and therefore need to do one more thing to work around the ISP-provided router.
Namely, most ISP-provided routers allow us to forward ports through the router to an internal IP address. To support a web service we must forward both HTTP (port 80) and HTTPS (port 443) to the Docker host. To support SSH access, we must forward port 22.
This means, at the minimum, we configure the ISP-provided router to forward HTTP, HTTPS and SSH traffic to the Docker host on our home or office network. You may have other services to expose that requires forwarding other ports. It is important, for security, to forward only the ports absolutely required by your needs. Any service you expose to the Internet could possibly be found by a miscreant, and is therefore a possible hole through which they can intrude your home or office network.
Since each router is different we cannot tell you exactly what to do. DuckDNS recommends this website: http://portforward.com/
Hosting multiple Docker applications on a single computer
We've configured the domain names git.myhomenet.xyz, build.myhomenet.xyz, and cloud.myhomenet.xyz to point to our home Internet connection. And, we've configured the ISP-provided router to forward all HTTP and HTTPS traffic to the Docker host. But that's not enough, since there's nothing configured to direct inbound traffic to the corresponding container.
What's needed is something like this:
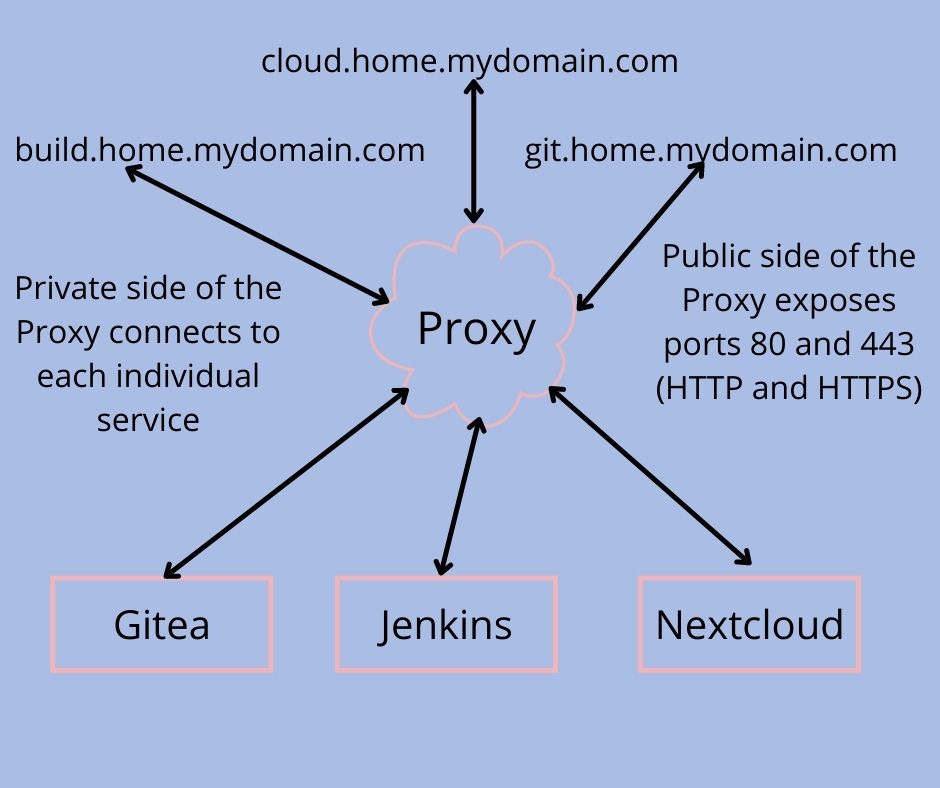
What's shown here is to use what's called a Reverse Proxy to handle traffic for multiple domain names. All that means is to configure a server like NGINX to recognize those domains, and depending on the domain used for each request to route the data to the correct backend server.
A highly recommended reverse proxy application is NGINX Proxy Manager. It is easy to deploy in Docker, and is easy to configure multiple backend services. It even simplifies getting HTTPS/SSL support.
To handle the three domains we mentioned earlier, the server would run containers for the proxy manager, Gitea, Jenkins, and Nextcloud, plus additional containers for any required database servers.
| Outbound domain | Backend service |
|---|---|
git.myhomenet.xyz |
Gitea |
build.myhomenet.xyz |
Jenkins |
cloud.myhomenet.xyz |
Nextcloud |
| NOT PUBLIC | MySQL? |
admin.myhomenet.xyz |
PHPMyAdmin? |
Configuring multiple computers for local Docker Swarm or Kubernetes infrastructure
Maybe you won't be happy with a single computer. If so, Docker makes it easy to deploy services across multiple servers.
Deploying Docker services across multiple computers requires a Container Orchestration service. Setting one up requires setting up multiple computers, each running Linux, each having Docker installed, then to initialize the Orchestration service on each.
The simplest-to-setup Container Orchestrator is Docker Swarm. On one of your computers you simply run docker swarm init, and it gives you a command to execute on each Docker host.
For more details see:
Summary
This tutorial was purposely kept at a high level, because getting down into the weeds of every last step to implement all this would take 10x the amount of space. Instead, we have provided a high level overview of why and how.


