David Herron
Tags: Docker »»»» Self Hosting »»»» Photo Backup »»»»
With high quality cameras in our smart phones, we can take as many pictures as we like. We now take lots of pictures, creating the question of how to preserve those pictures for posterity, and make good use of them.
The tech industry wants us to store our pictures on their photo gallery services. But, what will they do with our pictures? As they say, since we're not paying for the service, we're not the customer, we're the product. That means, the big tech companies use our pictures as data from which they build other services for which they can charge money.
The bottom line question is - why should the big tech companies get posession of our pictures? The pictures we take are very private, and we should be in control over the pictures, not the big tech companies.
The need we face is
- Backup of photos and videos we shoot - with laptops - smart phones - regular cameras
- Sharing photos with others - social media - friends
- Indexing and sorting photos - galleries - albums - tags - date/time
- Geolocating images, indexing by map location
- Reliable storage
- Transparent download from smart phones or other devices
- Apps for use on smart phones or tablets
- Object/face detection - autogenerated tags
On a list of
open source photo gallery applications I find the best choice is the one many have recommended. Immich.
This article focuses on hosting Immich, in Docker, behind the Caddy reverse proxy server, configuring Immich for access not only on the home WiFi network but remotely over the Internet, and configuring the mobile Immich application for auto-backup of images from an Android smart phone.
Reverse proxy setup for Immich -- Architecture review
It's important that your Immich instance be visible on the Internet while running in a computer hosted on your home network. In other words, you'll install Immich in your homelab with configuration settings making it visible on the open Internet. This is needed for at least sharing images with others, and using Immich from the smart phone application.
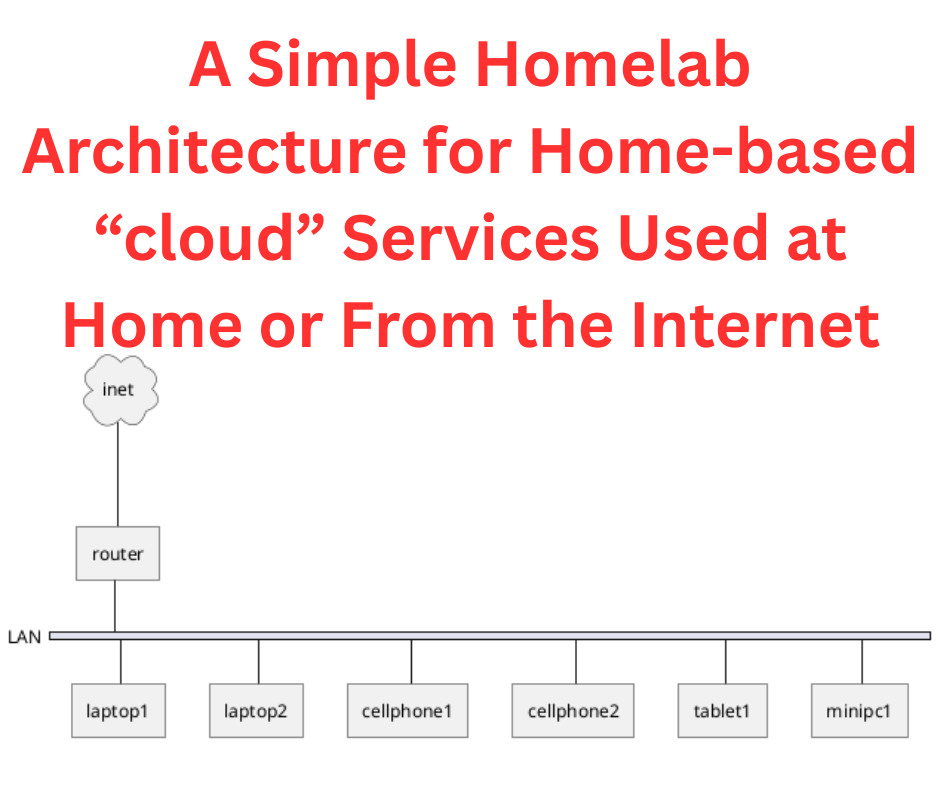
For a discussion of the architecture see Homelab architecture, how to safely expose home-based services to the Internet
A key to the architecture is using a "reverse proxy" server to direct requests to a given domain to the desired service. In other words, requests to https://images.example.com must go to the service at immich-service.
After many years of using NGINX Proxy Manager for this, I've switched to Caddy.
For a discussion of installing Caddy see Installing Caddy as a homelab reverse proxy, exposing home-based services to the Internet
What follows should be applicable if you use another proxy server. The Immich administration section has a page discussing hosting Immich behind a reverse proxy.
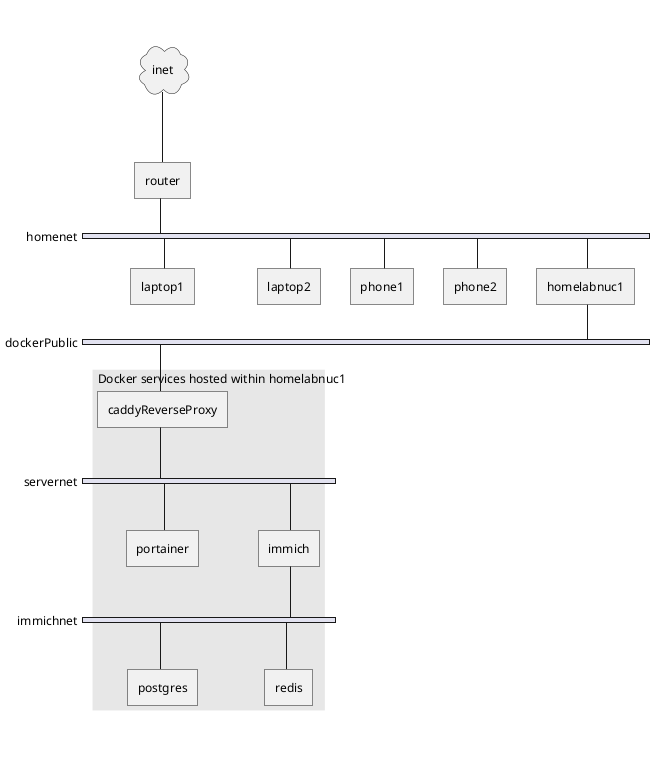
The architecture for installing Immich in a homelab looks like this:
This means your home WiFi router has both a public IP address - assigned by your internet service provider - and an IP address range for your home network.
As discussed in Use DynamicDNS to give your homelab services on your home internet connection a domain name you must set up two domain names:
home.example.comwhich has the A and optionally AAAA addresses for your public IP addressimages.example.comas a CNAME tohome.example.com
That results in the public domain name, home.example.com, resolving to your home IP address. In Use DynamicDNS to give your homelab services on your home internet connection a domain name you find instructions for handling either a fixed IP address, or a dynamically assigned IP address.
The next step is:
- With a home computer running Linux/Docker on which is installed a reverse proxy
- Ensure the router knows to send traffic from the public internet to that computer
- Configure the reverse proxy to send traffic from
immich.example.comto the Immich service we'll install in a later section
The article Installing Caddy as a homelab reverse proxy, exposing home-based services to the Internet discusses installing Linux and Docker on a computer in your homelab, and using Caddy as the reverse proxy.
Traffic arriving at your home internet router must be forwarded to this computer labeled homelabnuc1 in the diagram. Forwarding is configured in the home internet router.
As a result, traffic for home.example.com, immich.example.com, and any other service you expose to the Internet, will arrive on the homelabnuc1 computer. The reverse proxy service, Caddy in this case, has the job of forwarding that traffic to the service container.
The Caddy article explains what to do. After following those instructions, handling the Immich service requires this in the Caddyfile:
http://images.example.com {
  redir https://{host}{uri} permanent
}

https://images.example.com {
        reverse_proxy  immich_server:2283
}
For my Immich instance, I used the subdomain images.FOO.COM. The host immich_server:2283 is derived from the Compose file discussed in the next section.
This configuration automatically configures HTTPS/SSL certificates, using Lets Encrypt, ensuring your connection to your Immich instance is encrypted and secure.
Docker Compose for Immich hosting
The Docker Compose installation is recommended, and is what we use here.
https://immich.app/docs/install/docker-compose
Following their instructions we do this:
$ mkdir -p ~/docker/immich
$ cd ~/docker/immich
$ wget -O docker-compose.yml https://github.com/immich-app/immich/releases/latest/download/docker-compose.yml
$ wget -O .env https://github.com/immich-app/immich/releases/latest/download/example.env
This downloads two files, docker-compose.yml and .env. The latter is in the format of a shell script, and contains configuration settings used in the Compose file. The former is the Compose file describing the configuration of the Docker services.
The Compose file provided by the Immich team is pretty good. However, my deployment preferences require some changes to this file.
First - remove the name: immich at the top of the file.
Second - add these network declarations at the bottom of the file.
networks:
    servernet:
        external: true
    immnet:
        external: true
I prefer all connections between Docker containers to be handled by Docker networking, rather than handling it via the host computer. This improves security, and is much cleaner.
The immnet network is to be used to connect the services together. To support this, in every service listed in the Compose file add this:
    networks:
      - immnet
As a result, every service container is connected to immnet, and they can all find each other that way.
The servernet network is used for connecting immich-server to the reverse proxy. By using a Docker network, this connection runs internally to Docker.
On the immich-server declaration use this:
    networks:
      - servernet
      - immnet
Also, on all services remove any ports declaration. Ports causes a container to expose a port to the host machine. By using these Docker networks, the ports declaration is unnecessary, because the container connects to the reverse proxy by a Docker internal network.
Run this command:
$ docker network create servernet
$ docker network create immnet
Because those networks are declared as external: true we must create the networks by running these commands.
In the .env file change UPLOAD_LOCATION and DB_DATA_LOCATION to refer to reasonable locations in the file system. I prefer to create a directory like /opt/docker within which I place one directory per service. Hence:
UPLOAD_LOCATION=/opt/docker/immich/library
DB_DATA_LOCATION=/opt/docker/immich/postgres
Also add a password in DB_PASSWORD. The documentation suggests running pwgen to generate a password. I hadn't heard of this tool but it's very interesting:
$ pwgen
ecuin3eG aiKoog5i Xae5eibe aolais1F ta7Mae9v Oopuiwo4 Aek4eixe xu5Bie0f
ToW8ohbu iehoh1uR Fux6Juot ohNgae3I ohju7Igh Ahpeip8j Quu2jeig eiVoo1Fo
mei4ua6O Ki6Ahvah Aethah2f Peeshe6v tu2aeFee ZieNae2t dieC2cha Iem5AhPh
ShauQui8 eeB0Uboh UiH8wai8 Waz8Keen Eithe8Wu Aise7ohC Yielo0qu Aet1Au3a
ahX3Oor5 ohN3kee0 Sha8eiCu Fae1leiB ahg6Gaih ieKa1tha aSh0aeQu ahRuk6Ph
Sooseim5 Ca4lahyo yoW9naNg ith7aeZa HooJ3aeP hai4BohX uQu5Kohp taipah8U
Ohmeech2 rooSh6mu coo7Eex3 voog8Yee UleN9zai yaiL6Pee jeen0Tho Aev1peof
zeiFee1o hu9Aechi cheeG8yu Ohdahch8 aif4OhPh Eer8iehe oox5eeCh aiD6rien
eij2JaiR koh0Oeth ikiey5Sh jie7OhRa Aex1uz5e bee0Miik ia5Iech2 tiewai4I
aelah9Wu gie3mieS Cie7ohNg Aex5quee Mohpai0x ievohd6C yaiL5cho ohWoh5go
zumohz5A Oowagh1g Ai6rees4 Eex6iedi Id8thae1 Chait9Xu bee8Ze0l eWeiv9ah
ooBai7sh Iqu3duPh Aes7Iesh Aiz2ohki umei2Oog eeB9lohG aixi3iaK ech0Foo5
me8YieZe Ies5dee6 aeGh0OoZ Ad8quuJi om1Aexei air8Rai8 Nae0uthu ieM1Dohl
bai8ke4U ueVooqu1 NohViel9 Uchie4hi eeBiepe8 OhTh9eli Xa6Laeno johM4wu7
die1mu2R aih6iHah ahRul6om aichohF8 Ahk9ahju nee4yuQu joon5Wah Ij9ahnae
rukoHa7i Iem3pieH eop2Jo2b koh2OhXu nePh7aer ca4ooJ2Z IeL4vahr op1iFie8
AeV4ie1a laaTh8sh vohPh5zo tu3Vi6to ahi1ooGh Thixu8li Ezoh4boh kah0neeV
oul3Eiwo ohki1EiN eereeY1b avaic0Oo OSh7nah6 ooNgei2r oiLeBi7F quoHoh4e
Uwoo7pho reiv2eeF veiK0ahM Oo4yith8 aew1Bie0 HiebiJ2O aeM5Aej6 ShoSoo2s
eiGhee5C upoor6Ah Ohp1col4 Eigh5lai oobui9Oo ra1ibu7X epheeP9I oC5ead0j
So.. pick one that suits your preference.
After making those changes you should be ready to launch Immich:
$ docker compose up -d
After running it, wait a few seconds and then type:
$ docker ps
This will list the containers you have running. You might add | grep immich to focus on just these containers. Or, you might instead run docker compose ps.
The first thing to determine is that yes, indeed, the service containers all launched correctly.
Next, notice that for immich_service the TCP port is shown as 2283/tcp. This means no port is exposed on the host computer, but the service container is available at port 2283 on the Docker network.
That matches up with this declaration in the Caddyfile
https://images.example.com {
        reverse_proxy  immich_server:2283
}
It is necessary to check the port for the immich_server container to ensure it matches with the Caddyfile declaration.
You may decide to use a different reverse proxy. If so, simply make sure the proxy server connects to the host name immich_server on port 2283.
Once you're satisfied the service containers are launched and the ports match up with the Caddyfile, change directory to where your Caddy container is managed and run:
$ docker compose restart
This will cause Caddy to reload its configuration, a side effect of which is to set up the proxy server configuration for the Immich service.
Post-install setup
By the time you reach this step, you will have successfully configured the Compose file, launched the Immich service containers, and made sure your reverse proxy (Caddy) configuration matches. Additionally you will have setup domain names allowing you to connect to https://images.example.com to connect to Immich on your homelab computer.
If all this is correctly setup, you'll be greeted with a screen as shown in the Immich documentation (
https://immich.app/docs/install/post-install) to setup the Admin user.
The first user created in your Immich instance is the Admin user and has full permissions on everything.
You might have friends or family who can use this Immich instance as well. If so, add them to the users.
Uploading your first image
Once you've set up at least one user (the admin user) you can head to the main screen. You'll see that no images have been uploaded, and it suggests you can upload an image.
This is simple - Click on the message, and a file selector dialog pops up. Use that to select an image from your computer, click the Open button, and the picture starts uploading.
Once an image is uploaded the main screen turns into a timeline - with just one picture.
You can click on this picture to view the image. While viewing the image you can view image information (metadata) and perform other operations.
Another thing to explore the Albums feature. Albums let you organize images by topic. You might create an album, then add this picture to that album.
Android and iPhone application setup
Available for both Android and iOS devices is the Immich mobile app. Its most important feature is automatic backup of pictures from your mobile device to Immich.
Go into the App store for each and search for the Immich mobile app. It's free. Install it.
The first step is to sign in to your Immich instance. Simply enter the URL, http://images.example.com, and when prompted enter the e-mail address and password associated with your account on Immich.
Once signed in you can browse what's already been uploaded to Immich.
Summary
Immich is an excellent tool for saving and organizing images from your cell phone or other sources. It has powerful tagging features, and it is easy to arrange auto-backup of images from your phone.
The Immich team provides an easy-to-use Compose file. A few simple changes improves on what they've provided to eliminate exposed ports, and to run it behind a proxy server.


