David Herron
Tags: Docker »»»» NextCloud »»»» Self Hosting »»»»
NextCloud is open source software implementing the equivalent to Google Drive, Dropbox, and the like. Beyond file sharing, it supports document editing, calendars, email, and is attempting to compete with the full breadth of Google Workspace services. It can be self-hosted on your own server, giving you privacy you don't get from commercial cloud services.
NextCloud is an example of the open source community implementing the equivalent of services from a massive tech company. In this case, Google Workspace is a very popular service used by individuals, offering file storage, document editing, email, calendars, and more. But, what about the worries over what Google is doing with all the data we give it?
With NextCloud you gain control over your data, so long as you can handle hosting the software.
There are several models for hosting NextCloud.
- Native installation on Linux -- It is supported on a variety of Linux systems, and requires MySQL 8.0 and PHP 8.x. Simply download and run an installer package on a web host.
- Linux package managers -- NextCloud is available as a "Snap Package" for Ubuntu.
- Virtual Machines on VirtualBox etc -- The NextCloud VM project contains scripts for this purpose.
- Raspbian on Raspberry Pi -- The NextCloudPI scripts focus on that hardware.
- Docker -- Several Docker images for NextCloud are available, but are not officially supported by NextCloud.
In this article we'll discuss the Docker installation for NextCloud. In my eye Docker is preferred for these reasons:
- It is generally safer than hosting native on the system, because the services are isolated.
- It is generally easier than hosting native on the system, because most of the setup is already performed in the container, and our task is to configure the result.
- Docker containers encapsulate everything required to run the service, easing setup.
- If a miscreant breaks through application-level security, containerization limits damage to the running container, which is easily recreated and restarted.
The
unofficial Docker image for NextCloud is maintained by the Docker community. By contrast, NextCloud AIO, a.k.a. All In One, is maintained by NextCloud Gmbh, and contains a number of built-in features and back-end services for a complete NextCloud experience.
In this article we learn how to do a complete NextCloud installation, using the unofficial Docker image, that is ready for production use, and solves several common problems. This includes a MariaDB instance for the database, a REDIS instance for performance improvements, resolving several common issues (timeouts and the like), and correctly configuring the NextCloud Docker container.
The README for that container gives sample Docker Compose files. Since those Compose files have several problems, we show a more complete Compose file for NextCloud that works much better. We also discuss configuration of an NGINX proxy for NextCloud using NGINX Proxy Manger.
Setting up Docker
To run NextCloud under Docker, your system must have the Docker platform installed. The Docker platform - either Docker Desktop or Docker Engine - is required for executing Docker containers.
As we'll see in a minute, with a Docker Compose file we can describe in a relatively small file the deployment of several services required to run NextCloud. This is a huge advantage Docker gives us over deploying software services on the native operating system.
Installing Docker is beyond the scope of this article. In a separate article, I discuss Docker setup on macOS, Windows or Linux: Installing Docker Engine or Desktop on Ubuntu, macOS or Windows
You must decide where you will install NextCloud. You might run it on your laptop to have access to distributed services on several locations. But, typically it is installed on a server which you can access from multiple computers.
On your laptop you're likely to install Docker Desktop, while on that server you're likely to install Docker Engine.
Setting up the Docker hosting environment
It's useful to follow an organized file-system hierarchy for deploying multiple Docker-based services. It's unlikely you'll only host NextCloud, because there are many other services of interest.
It is best that each service be managed in its own directory, and that all Docker-hosted services are sitting next to each other in the file system.
Hence, create a directory - /path/to/docker - on your computer. Then, create one child directory for each service.
# Do this once
$ mkdir -p /path/to/docker
# Do this for each service
$ mkdir -p /path/to/docker/SERVICE-NAME
Therefore you know that for any Docker-related task, you navigate to /path/to/docker as the first step.
For NextCloud, you run this command:
$ mkdir -p /path/to/docker/nextcloud
Some common examples for /path/to/docker are /home/USER-NAME/docker, /opt, /opt/docker, or even just /docker.
Basic Docker Compose file for NextCloud
Let's start this with a simple docker-compose.yml for NextCloud derived from what's shown in the README for the container.
# volumes:
#   nextcloud:
#   db:

services:
  nextcloud_db:
    # This could be a specific version like mariadb:10.6
    image: mariadb
    restart: always
    command: --transaction-isolation=READ-COMMITTED --binlog-format=ROW
    networks:
      - cloudnet
    volumes:
      # - db:/var/lib/mysql
      - /opt/nextcloud/db:/var/lib/mysql
    environment:
      - MYSQL_RANDOM_ROOT_PASSWORD=true
      - MYSQL_PASSWORD=PASSWORD
      - MYSQL_DATABASE=nextcloud
      - MYSQL_USER=nextcloud

  nextcloud:
    # This could be just 'nextcloud' to get the latest version
    image: nextcloud:30-apache
    restart: always
    networks:
      - cloudnet
    # ports:
    #  - 8080:80
    volumes:
      # - nextcloud:/var/www/html
      - /opt/nextcloud/docroot:/var/www/html
    environment:
      - NEXTCLOUD_DATA_DIR=/var/www/html/data
      - MYSQL_PASSWORD=PASSWORD-as-above
      - MYSQL_DATABASE=nextcloud
      - MYSQL_USER=nextcloud
      - MYSQL_HOST=nextcloud_db

networks:
  cloudnet:
    name: cloudnet
    driver: bridge
This contains two services: MariaDB and NextCloud. The configuration for both is fairly straight-forward configurations of each. Let's talk about what's in the file.
The NextCloud image selected is nextcloud:30-apache. The part before the : is the image name, in this case just nextcloud. The part after the : is a tag where the name is selected by the image maintainer. For the NextCloud image, the tag name includes a version name as well as an indication of the technology used. In this case, version 28 corresponds to Nextcloud Hub 7 which is a marketing version number. That it mentions apache means it is executing under Apache with PHP support.
UPDATE: The NextCloud project continues to release new issues. For example, NextCloud Hub 10 was just released (March 2, 2025) which corresponds to NextCloud 31. You should update the version number as you see fit. /UPDATE
The volumes declarations serve to persist the data outside the container. The contents of Docker containers are destroyed when we destroy and recreate the container. In the case of NextCloud, like many services, we need some of the data to be saved (persisted) when that happens.
The effect of a volumes declaration is to map a container pathname to a host pathname, and for a portion of the container filesystem to live on the host. The container can be destroyed and recreated at will without harming the data stored in the host filesystem.
The recommended Compose file uses the volumes declarations which are commented-out here. In such a case, the host directory is in an obtusely-located path within the Docker platform filesystem.
I prefer to explicitly declare the host directory path so that its location is known. The uncommented volumes declarations are how this is done. Going by the best practice named earlier, the whole NextCloud instance is contained within /opt/nextcloud, with the database files stored in /opt/nextcloud/db and the NextCloud files stored in /opt/nextcloud/docroot.
The /opt prefix is chosen because, on the virtual private server (VPS) where I've installed NextCloud, that directory was empty. I've used the /opt directory for storing all Docker-based services installed on that server.
The container README suggests using a links declaration to connect the NextCloud and MariaDB containers. The links setting has been deprecated for years. Instead, the best practice is to set up a bridge network, and connect the containers to that network. That's what is done here, first by declaring cloudnet, then referencing it from both containers.
For a network like cloudnet, Docker ensures each container has a host-name matching the container name. Hence, the MariaDB instance has the hostname nextcloud_db within cloudnet. This is reflected in the MYSQL_HOST setting on the nextcloud container.

This is the NextCloud deployment architecture as described in the Compose file shown earlier.
While it is easy to understand, there's a security issue. The database container should not be publicly reachable. By restructuring the bridge networks, database access can be restricted to the NextCloud container.
Complete Docker subnet setup for NextCloud
My production deployment environment uses NGINX Proxy Manager in front of the several services on the host. The application services (like NextCloud), and N.P.M., are attached to a bridge network. The database containers are kept on a separate bridge network.
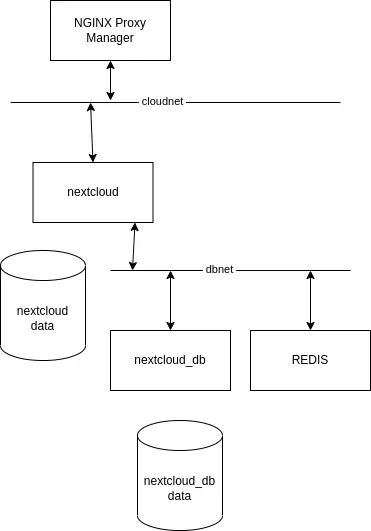
The architecture I use in production is more like this.
An option is:
services:
  nextcloud_db:
    ...
    networks:
      - dbnet
    ...

  nextcloud:
    ...
    networks:
      - dbnet
      - cloudnet
    ...

networks:
    servernet:
        external:
            name: cloudnet
    dbnet:
        external:
            name: dbnet
The two networks, cloudnet and dbnet, provide a layer of separation between the database and miscreants who might break in. The purpose of cloudnet is connecting services, like NextCloud, to the NGINX Proxy Manager. The purpose of dbnet is to connect these services with their database server.
Because these are described as external networks, their existence is maintained outside of the Compose file. That means to either use the docker network command, or an administrative GUI like Portainer. My production system has Portainer installed.
Any Compose file using these networks will reference them using an external network declaration as shown here.
Running initial setup for NextCloud
Save the docker-compose.yml into an empty directory, then run the following:
$ docker network create cloudnet
$ docker network create dbnet
This sets up the networks, as just discussed. If you prefer, a Docker administrative GUI like Portainer offers a nicer point-and-click experience.
$ docker compose up -d
Notice, it is docker compose rather than docker-compose. The latter has been deprecated by the Docker team. The features that had been in docker-compose are now incorporated in the main docker command.
The docker compose up command launches the stack described by the Compose file. The -d option says to detach the terminal from the logging output.
To watch the logging output, run docker compose logs -f.
Using the Compose file shown above, NextCloud will be at http://SERVER on port 80. You can connect directly to this port using your web browser. But it's recommended to instead place services behind a proxy manager. That's where NGINX Proxy Manager comes into play.
The ports directive to remap that to another port number, if needed. For example, you can map the service to port 4080 with this:
services:
  ...
  nextcloud:
    ...
    ports:
      - 4080:80
    ...
In this case you would connect your browser to http://SERVER:4080.
Since it's recommended to put services behind a proxy, let's look at what's required for use with NGINX Proxy Manager.
Configuring NextCloud behind NGINX Proxy Manager
NGINX Proxy Manager (N.P.M.) is an excellent tool to place between your users and your service. Proxy servers provide a layer of security because it prevents direct access to the service. N.P.M. simplifies assigning domain names to your services, and provisioning SSL certificates from Lets Encrypt to enable HTTPS protection for your server.
You might do, as I do, host several services on one server. They cannot all be visible on ports 80 and 443. N.P.M. makes it easy to connect each service to a specific domain name. Traffic arrives at N.P.M. for a domain, like cloud.example.com, and the N.P.M. proxy directs that traffic to the nextcloud container.
Installing and configuring N.P.M. is way outside the scope of this article. It's easy to setup if you don't have it running, or else you can skip this section and connect directly to the NextCloud service.

This is the desired end-goal. NextCloud is available on a domain name of your choosing. The proxy manager routes traffic to the named Docker container. Lets Encrypt is used for SSL.
This starts by defining a domain name. Go to your domain registrar and configure one. The details are dependent on the registrar you use, and many other considerations.
In my case, the VPS where the services are installed have an IP address provided by the web hosting provider. I've configured a domain name like host001.example.com with an A record containing that IP address. Domain names for each service are implemented with a CNAME record, such as cloud.example.com, naming the host, such as host001.example.com.
In the NGINX Proxy Manager dashboard, click on Add Proxy Host, and you'll see a popup window looking like this:
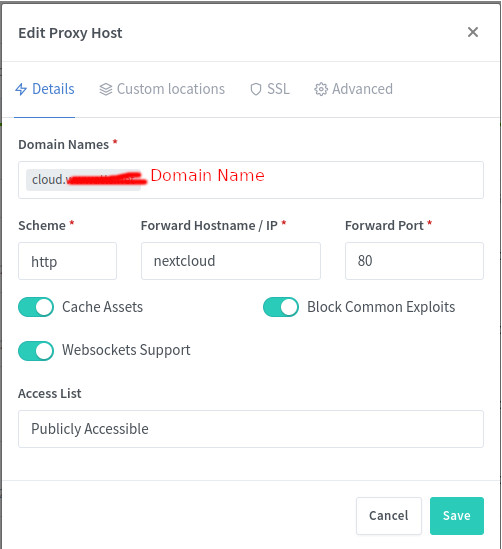
At the top, enter your public domain name, such as cloud.example.com. Below that, leave the scheme as http, enter the name for the docker container, such as nextcloud, and the port number, such as 80. In my case, even though a ports directive was used, N.P.M. was unable to connect to the NextCloud service using the mapped port. Instead, it worked to use the host name nextcloud and port 80. Enable the other settings shown here. Then close this window by clicking the Save button.
A section will appear in the N.P.M. dashboard similar to what's shown above.
Next, we need to provision an SSL certificate. N.P.M. can do this via Lets Encrypt.
On the far right-hand-side of the list of proxy hosts, you'll find a vertical ... button. Clicking on that opens a menu, where one of the choices is Edit. The Edit choice reopens the dialog window. Click on the SSL tab.

Enter your domain name in the box.
A drop-down menu will appear in which you can choose to provision an SSL certificate from Lets Encrype.
Lets Encrypt is a free service for SSL certificates. Normally such certificates are expensive, so Lets Encrypt is performing a valuable public service.
If this is your first time using Lets Encrypt you must register. Simply provide an email address and agree to some terms of services. This can be handled through the N.P.M. user interface.
Click the options shown here. Then click Save.
Once you've done this you should be able to paste https://cloud.example.com into your browser and the NextCloud setup will appear.
Initial configuration of NextCloud
Enter the correct URL in your browser. There will be boxes to enter a user name for the ADMIN user, as well as a password. There may be a checkmark to tell NextCloud to install some recommended applications. In NextCloud-ese, an application is an addon which can be installed to expand the functionality available in your NextCloud instance.
It's recommended to not use admin as the administrator user name, since that's easy to guess.
Click on the Install button, and be prepared to wait for awhile.
My experience was that this step timed out in the browser. I simply reloaded the browser window, and found NextCloud ready to be used. I've looked for solutions and found no recommendations which helped.
During the setup phase, you gave a user name and password for the ADMIN user. Login using that combination, and you'll be in NextCloud. From there, you can explore the features, change some settings, install NextCloud applications, and so forth. What you do with it is up to you, and what we're focused on here is setup of NextCloud.
Handling Setup and Security Warnings
A very important check to make is in the Settings area. In the upper-right corner click on the button, like so:

There are many useful choices here, and for now we are interested in Settings. On the current NextCloud version, the Settings choice may be split into Personal Settings and Administration Settings. If so, choose the latter.
In the Settings area, there is a list of tabs in a column on the left-hand side. Scroll down to the Administration section, and click on the Overview choice. This page gives an overview of your NextCloud instance.
On this page, there is some JavaScript code which will execute to check for common issues. It should show something like this:
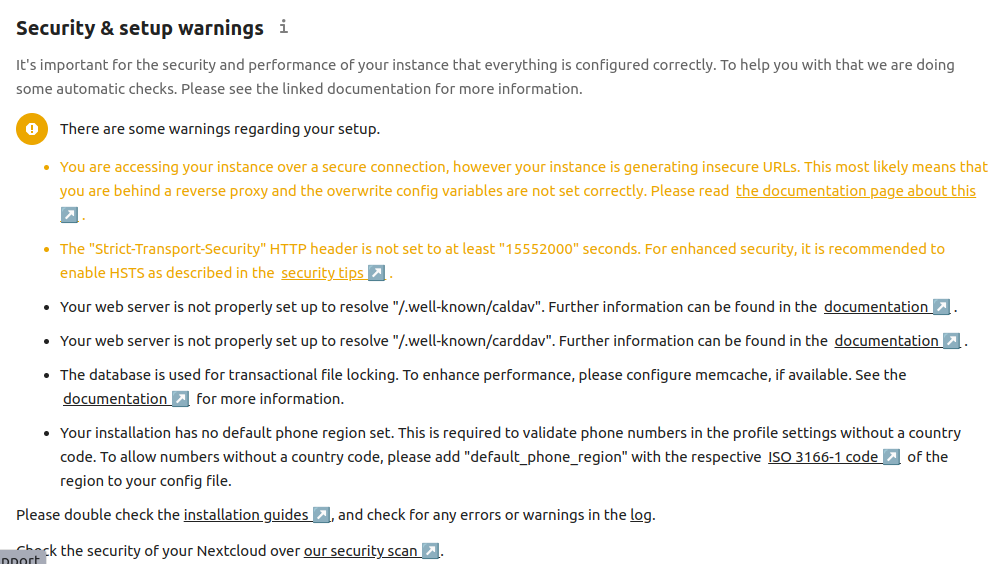
There are several issues shown on this page which turned up as I fixed issues. Lets see how to fix issues in NextCloud. It's important to notice that every message is marked with a severity rating, and includes a link to documentation discussing the issue.
In the following sections we discuss solutions for these issues:
- The "Strict-Transport-Security" HTTP header is not set to at least "15552000" seconds. For enhanced security, it is recommended to enable HSTS as described in the security tips.
- Your web server is not properly set up to resolve "/.well-known/caldav". Further information can be found in the documentation.
- Your web server is not properly set up to resolve "/.well-known/carddav". Further information can be found in the documentation.
- Last background job execution ran 2 hours ago. Something seems wrong. Check the background job settings.
- You are accessing your instance over a secure connection, however your instance is generating insecure URLs. This most likely means that you are behind a reverse proxy and the overwrite config variables are not set correctly. Please read the documentation page about this
- Your remote address was identified as "10.0.0.2" and is bruteforce throttled at the moment slowing down the performance of various requests. If the remote address is not your address this can be an indication that a proxy is not configured correctly. Further information can be found in the documentation
- Your installation has no default phone region set. This is required to validate phone numbers in the profile settings without a country code. To allow numbers without a country code, please add "default_phone_region" with the respective ISO 3166-1 code of the region to your config file.
- The database is used for transactional file locking. To enhance performance, please configure memcache, if available. See the documentation for more information.
- The reverse proxy header configuration is incorrect, or you are accessing Nextcloud from a trusted proxy. If not, this is a security issue and can allow an attacker to spoof their IP address as visible to the Nextcloud. Further information can be found in the documentation
- You have not set or verified your email server configuration, yet. Please head over to the Basic settings in order to set them. Afterwards, use the "Send email" button below the form to verify your settings.
- Server has no maintenance window start time configured. This means resource intensive daily background jobs will also be executed during your main usage time. We recommend to set it to a time of low usage, so users are less impacted by the load caused from these heavy tasks.
- The database is missing some indexes. Due to the fact that adding indexes on big tables could take some time they were not added automatically. By running "occ db:add-missing-indices" those missing indexes could be added manually while the instance keeps running. Once the indexes are added queries to those tables are usually much faster. Missing optional index "
mail_messages_msgid_idx" in table "mail_messages".
The following sections discuss the solutions for these problems.
Fixing the Strict-Transport-Security warning
This is easy to fix. Look at the N.P.M. setup recommended earlier and you see HSTS was not checked. To fix this, open the configuration dialog, navigate to the SSL tab, and click the HSTS button, then click Save. After reloading the settings overview page, this message should go away.
Fixing the Last background job execution ran 2 hours ago error
As with many frameworks, there are background tasks which must execute every so often. In this case, click on the URL to documentation and you see three choices to handle background task execution. These choices are:
- AJAX - Which executes tasks when pages are loaded.
- Webcron - This is a kind of web service which is a "hosted cron". This means an external service will be configured in a cron-like way to make a request on
cron.php. - System Cron - Instead of using an external Cron service, use one on the host system.
On Unix/Linux-like operating sytems, Cron is a background process for scheduling tasks. The classical example is running a shell script at 3AM to run a backup procedure.
Unfortunately the NextCloud Docker container does not have a Cron running. However, I have developed a suitable Cron container. Using it simply requires deploying the container on the Docker infrastructure, then dropping a shell script into a directory.
It's possible to use the Cron service on the Docker host system.
An external Webcron service is a simple option. There are many 3rd party services where you can schedule tasks via a web GUI. You would use one if you're unwilling to host another Docker container. Alternatively, you can use Cron on the host where your Docker instance is runnign.
But, let's discuss setting up a Crond container to your local Docker instance. The advantage of
robogeek/crond is that it's extremely light-weight (built on Alpine Linux), and is easy to configure. I've written a blog post about it at Scheduling background tasks using cron in a Docker container.
Each service uses a directory /opt/SERVICE-NAME to hold files related to that service. Again, this is the best practice named earlier. For Crond, a directory named scripts is created in this directory. Hence, the setup of a script to trigger the NextCloud cron.php looks like this:
$ mkdir /opt/nextcloud/scripts

$ cat /opt/nextcloud/scripts/15min.sh
#!/bin/sh

wget http://cloud.EXAMPLE.COM/cron.php -o /dev/null

$ chmod +x /opt/nextcloud/scripts/15min.sh
In other words, there is a directory /opt/nextcloud/scripts and in that directory we create a shell script named 15min.sh. It uses wget because the Alpine container for NextCloud does not have curl.
The Compose file used for Crond is:
services:
    crond:
        image: robogeek/crond:latest
        container_name: crond
        networks:
            - cloudnet
        volumes:
            - ...
            - /opt/nextcloud/scripts/15min.sh:/etc/periodic/15min/nextcloud:ro
            - ...

networks:
    servernet:
        external:
            name: cloudnet
This is a separate Compose file from the NextCloud Compose file discussed earlier. Going by the best practice named earlier, it is stored in /opt/crond as docker-compose.yml. The Crond service can be, and in my case is, used by multiple services running on the VPS.
Simply connect Crond to the cloudnet bridge network as shown here. That gives it access to all deployed services.
The 15min.sh script is mounted into /etc/periodic/15min and is named nextcloud. Because the Crond container uses Alpine Linux, which uses Busybox, the Cron implementation is supplied by Busybox. For folks familiar with old-school Cron (I started in 1984), configuration of the Busybox Crond is unusual. But, as pointed out in Scheduling background tasks using cron in a Docker container, the robogeek/crond container is only 5 MB in size versus the 222 MB required to use Debian and a more normal Cron.
In this case any script in the /etc/periodic/15min directory is executed every 15 minutes. Hence, the script shown earlier pings the NextCloud URL often enough to keep NextCloud happy.
Fixing the NextCloud "maintenance window start time" error
This issue covers certain background tasks. We just configured a Cron service that gets NextCloud to run background tasks. Some of these tasks are not time sensitive, and can be executed in the wee hours of the morning.
The
NextCloud documentation contains two solutions:
- Login to BASH inside the NextCloud container and run an
occcommand. - Edit the configuration file
To run the occ command, connect to the NextCloud container like so:
$ docker exec -it nextcloud_app.1.tfywzr4ixrsfja0cuz2co109m bash
root@ae0a09da9430:/var/www/html#
exit
But, wait, as noted later in this article, there is an issue with running occ that requires using user-ID 33. This docker exec command gave us a root (user ID 0) shell inside the container.
Instead, run this:
$ docker exec -u 33 -it nextcloud_app.1.tfywzr4ixrsfja0cuz2co109m bash
www-data@ae0a09da9430:~/html$ ./occ config:system:set maintenance_window_start --type=integer --value=1
System config value maintenance_window_start set to integer 1
Adding -u 33 runs the shell as user ID 33. This occ command sets the maintenance window to start at 1AM.
Upon reloading the administrative settings page, this issue will go away.
Fixing the NextCloud database indexes issue
As the message says, the database indexes affect performance. In my case this may be a side effect of having upgraded from the version 27 container to the version 28 container.
The solution is simply to run the occ command mentioned in the message.
$ docker exec -u 33 -it nextcloud_app.1.tfywzr4ixrsfja0cuz2co109m bash
www-data@ae0a09da9430:~/html$ ./occ db:add-missing-indices
Adding additional mail_messages_msgid_idx index to the oc_mail_messages table, this can take some time...
oc_mail_messages table updated successfully.
www-data@ae0a09da9430:~/html$
Once you've done this, reload the administrative settings page, and the message will be gone. Poof.
Properly setting up to resolve "/.well-known/caldav" and "/.well-known/carddav"
To fix the issues with /.well-known/caldav and /.well-known/carddav we must return to NGINX Proxy Manager, open the configuration window, and navigate to the Custom Locations tab. If you read the NextCloud documentation, it describes setting up Apache with .htaccess, and in NGINX setting up location directives in the NGINX config file. With N.P.M. we can use this Custom Locations tab.
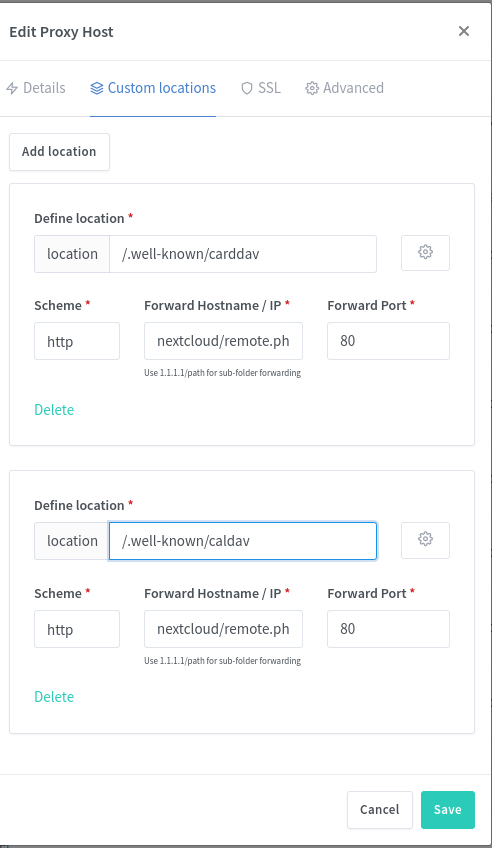
This configures the two URL locations to pass requests to a back-end URL in the NextCloud instance. The URL locations starting with /.well-known are defined by the Internet standards committees, and are a "well known" URL path through which to access specific services. The NextCloud documentation says to pass these locations to /remote.php/dav/, and for the purpose of NGINX Proxy Manager configuration we must enter nextcloud/remote.php/dav/.
There are two locations to enter, so click the Add Location button twice. Enter the /.well-known/caldav and /.well-known/carddav locations as shown in the image. For each, the Scheme box will contain http, the Forward Hostname / IP box will contain nextcloud/remote.php/dav/, and the Forward/Port box will contain 80. Below this box is instructions reading Use 1.1.1.1/path for sub-folder forwarding, which means the text starts with the host name or IP address, and then continues with any additional path. The hostname is nextcloud and the path is /remote.php/dav/. The hostname should correspond to the container name in your Compose file.
As soon as you save the N.P.M. configuration, it will rebuild the NGINX config file, and then in the NextCloud overview page the issues named above will be resolved.
Fixing the remote address was identified as "10.0.0.2" error
In this case the documentation link is misleading. The documentation says to edit config/config.php and to add entries to the trusted_proxies array.
This file will be in the directory mounted to the host file system, such as /opt/nextcloud/data.
Going by the documentation it should be this simple:
  'trusted_proxies' =>
  array(
    0 => '10.0.0.2',
  ),
But, this doesn't change the error message.
Instead, in the
NextCloud support area is a discussion saying to enable the Bruteforce Settings application. You'll find this in the Apps area, under Security.
Once enabled, you find the Bruteforce settings in the Security configuration page. Scroll down to find Brute-force IP whitelist. You must then add an IPv4 CIDR to the list. For my host, 10.0.0.2, I added the CIDR 10.0.0.0/8.
Fixing the This server has no working internet connection: Multiple endpoints could not be reached. problem
This appears to be a widespread problem, but it just struck my Nextcloud installation. The status/setup checks gives this error message:
Internet connectivity: This server has no working internet connection:
Multiple endpoints could not be reached. This means that some of the
features like mounting external storage, notifications about updates
or installation of third-party apps will not work. Accessing files
remotely and sending of notification emails might not work, either.
Establish a connection from this server to the internet to enjoy
all features.
By the words, this suggests that Nextcloud cannot make outbound connections to external services. For example, this Nextcloud instance has some external S3-compatible storage services defined, which requires sending S3 protocol requests to the relevant servers.
Perhaps, one might think, there's a firewall rule disallowing outbound requests. Or, it could be something else. There are a lot of people talking about this exact error message from Nextcloud. The Nextcloud documentation does not discuss what to do, nor does this error message include a link to any useful documentation.
One recommendation I saw was running an SELinux command. I didn't think that was relevant to me, since my server is Ubuntu, so I kept looking and found lots of people talking about DNS setup.
A simple test is to run this command inside the container:
www-data@9cc4f3063f80:~/html$ curl -f https://example.com
curl: (6) Could not resolve host: example.com
Choose an appropriate DNS name, and if you like add the -v flag. Normally I'd use ping for this test, but that wasn't installed in the container, while curl was installed. The purpose here isn't to fetch the text of the web page, but to test whether the container can resolve an external domain name, and whether it can make an outbound request.
This behavior seen here says that the DNS system in the container was unable to resolve the domain name.
Most of the discussion about resolving this error focuses on using dnsmasq to fiddle with something. I, instead, found a much simpler approach.
In Docker (running on Linux) containers are given an /etc/resolv.conf derived from the host copy of that file. The container in question had this:
www-data@9cc4f3063f80:~/html$ cat /etc/resolv.conf
# Generated by Docker Engine.
# This file can be edited; Docker Engine will not make further changes once it
# has been modified.

nameserver 127.0.0.11
search .
options edns0 trust-ad ndots:0

# Based on host file: '/etc/resolv.conf' (internal resolver)
# ExtServers: [host(127.0.0.53)]
# Overrides: []
# Option ndots from: internal
The very simple solution I'm using is to edit /etc/default/docker and add this line:
# Use DOCKER_OPTS to modify the daemon startup options.
DOCKER_OPTS="--dns 127.0.0.53 --dns 1.1.1.1 --dns 8.8.8.8 --dns 8.8.4.4"
The first is from the nameserver line in my host /etc/resolv.conf (Ubuntu 24.04). I expect this causes DNS names to be resolved through systemd. The other three are the standard public DNS servers from well connected well regarded DNS hosts.
After making this change, and after rebooting the computer, this particular error message no longer appears. More importantly, Nextcloud started operating correctly.
Hence, for this case, changing the configuration for DNS resolution fixed the problem, and therefore the container was innately capable of making an outbound request. If changing the DNS configuration doesn't resolve your specific issue, then you should be looking at firewall rules.
Fixing the no default phone region set problem
This is a case where the documentation is absent, and the warning message is unclear as to what to do. Fortunately the fix is simple.
In the config/config.php file mentioned earlier, add the following entry:
'default_phone_region' => 'US',
The value for default_phone_region should be your two-letter country code. The warning message helpfully includes a link to a Wikipedia page listing these codes.
Fixing the transactional file locking problem
The message is a little confusing, since it talks about Memcache, when the solution is to install REDIS. In any case, performance is important.
In the Compose file, make this change:
services:
  ...

  nextcloud:
    ...
    environment:
      ...
      - REDIS_HOST=redis
      ...
  ...
  redis:
    image: redis:alpine
    restart: always
    networks:
      - cloudnet
Adding REDIS will theoretically improve performance by caching things in memory.
If you need to install REDIS without deleting and recreating the NextCloud installation, the equivalent in config.php is approximately this:
  'filelocking.enabled' => true,
  'memcache.distributed' => '\\OC\\Memcache\\Redis',
  'memcache.locking' => '\\OC\\Memcache\\Redis',
  'redis' =>
  array (
    'host' => 'redis',
    'password' => '',
    'port' => 6379,
  ),
In the documentation, two purposes for using REDIS are given. The first is to move file locking to the REDIS server, because doing it in the database is very slow. The second is to cache some data in memory to improve performance.
Fixing the reverse proxy header configuration is incorrect problem
The link included with this message refers again to the Reverse Proxy documentation.
The Docker networks in use on this VPS are on the 10.0.x.x range. Therefore, in config/config.php, add this:
  'trusted_proxies' =>
  array(
          0 => '10.0.0.0/16',
  ),
The trusted_proxies array is defined to take either IPv4 addresses or IPv4 CIDRs. This CIDR whitelists any 10.0.x.x address. The value you choose depends on your local network configuration.
Fixing the not set or verified your email server configuration error
It's helpful that NextCloud be able to send notifications. For example, an appointment entered in a NextCloud calendar should send you a reminder e-mail, just like the calendar system from a certain G-flavored system.
The error message contains a link to the Basic Settings section in which you can configure an outgoing SMTP server. To do this you'll need to discover the particulars of the SMTP service you plan to use. For this section, I'm assuming your NextCloud instance is hosted on a web hosting provider which runs an SMTP service for its clients.
In my case, I use Dreamhost, and it offers free mail service including any number of e-mail boxes (full SMTP and IMAP support) with a webmail client. Their support area has some help documents describing configuration of an e-mail client, and configuring the WP Mail SMTP plugin for Wordpress. Between the two it's feasible to work out the following required parameters:
- What SMTP encryption to use - either STARTTLS or SSL
- What SMTP port to use - SSL is usually port 465, and STARTTLS is usually port 587
- What SMTP host to use
- Are "login" credentials required to use SMTP? Such as a user-name and password combination.
- What IMAP encryption to use - either STARTTLS or SSL
- What IMAP port to use - STARTTLS is port 993
- What IMAP host to use
- What IMAP "login" credentials to use
I found it helpful to first configure the NextCloud email client, as well as the web hosting provider webmail client, to test both sending and receiving e-mail to/from the email address. To do this, in the Administration menu there is an Apps choice. These applications extend NextCloud's capabilities, and are the primary reason for using NextCloud. The Mail application is in both the Featured and Office & Text collections. Simply enable the application, and a mail-envelope icon shows up in the top bar.
It's helpful to set up a brand new email address just for the purpose of sending notifications from NextCloud. For Dreamhost, the control panel has an area named Manage Email in which you create e-mail addresses. Create a fully managed e-mail address, and select a good password. From this section of the control panel, there's a button giving direct access to the webmail client.
Login to the webmail client, and then send and receive a few e-mails with another e-mail address. That lets you verify that the e-mail address is working.

Also login to the NextCloud e-mail client. Start by clicking on the envelope icon shown here.
For your first time, you'll be asked to connect to your mail account.

Simply fill in the settings you gathered earlier. It will ask for both IMAP and SMTP settings, giving you a chance to test both.
You'll see the same e-mails in both user interfaces. That's because the IMAP connection is, in both cases, going to the same IMAP service. You can also use an e-mail client like Thunderbird to do the same.
For testing, you must have a completely separate e-mail account.
After ensuring the e-mail address works, it's safe to proceed to the Basic Settings page.
A warning first about the environment variables for configuring NextCloud. The DockerHub README shows some variables for SMTP settings. It's possible to configure the notification e-mail service this way. If you do this, the configuration form on the Basic Settings page will be frustratingly difficult to use. You'll enter the configuration, only to have the configuration reset to the values from the environment variables.
Either configure SMTP using environment variables or using the Basic Settings page. Trying to do both is an exercise in frustration.
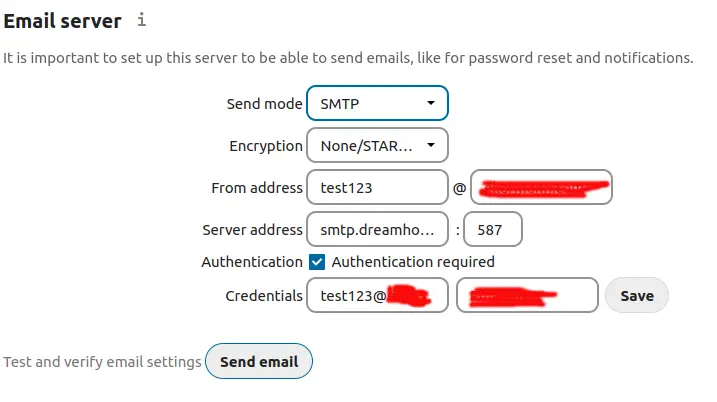
Having gathered the required settings earlier, you simply plug them into this form.
With Dreamhost, the SMTP service uses STARTTLS, at smtp.dreamhost.com, port 587. The credentials are the e-mail address you created earlier, along with the login password.
As it says, the Send email button lets you verify that things are working. If not, there will be an inscrutable error message which tells you to consult your mail server logs. Good luck on figuring out where that is. But, by preverifying the settings using the NextCloud E-Mail app, you understand the SMTP settings, and this form should just work.
The test e-mail will arrive in the e-mail you configured in the personal settings of your NextCloud account.
Success is indicated by receiving this e-mail:

Congratulations on getting NextCloud e-mail notification setup.
Fixing an error when the PHP OPcache buffer is full
The status may include this message:
The PHP OPcache module is not properly configured. The OPcache buffer is nearly full. To assure that all scripts can be hold in cache, it is recommended to apply "
opcache.memory_consumption" to your PHP configuration with a value higher than "128".
The message includes a
link to the NextCloud documentation.
It boils down to making this change in data/config/config.php:
$ sudo tail data/config/config.php
  'maintenance' => false,
  'loglevel' => 2,
  'maintenance_window_start' => 1,
  'opcache.memory_consumption' => 192,
);
That final line sets the value mentioned above.
After restarting the Docker containers, the message should disappear from the NextCloud overview page. But, consider what this message says, namely that the cache is of a certain size, and that it was full. It's likely that over time the cache fills up, and that initially after restarting the container the cache has not yet filled up. Therefore testing if this is the correct cache size likely requires revisiting this page after a week or two.
The number, 192, was chosen solely because it is the sum of 128 and 64. It may be a larger, or smaller, cache than is required.
Performing a security scan of your NextCloud instance
The settings page also includes a link to a security scanning service at
https://scan.nextcloud.com/
Simply go to that page, and enter the public URL for your NextCloud instance. In my case, after performing all the above updates, my server got an A+ rating.
Configuring NextCloud to use the GMAIL SMTP service to send e-mails
Earlier we configured NextCloud to sent emails (password resets, reminders, etc) using your web hosting provider SMTP service. A popular alternative is to use GMAIL to send email via SMTP. GMAIL isn't just a place to read and write e-mails. You can configure desktop e-mail clients, like Thunderbird, to read and send e-mail via GMAIL, and you can do the same with website software like NextCloud.
You probably have a Google Account, and therefore have a GMAIL account. It's possible to configure NextCloud to use the GMAIL SMTP server.
NextCloud is still installed on your web hosting service as discussed above. What's different is the SMTP settings on the Basic Settings page we visited earlier.
You're not limited to your web hosting provider, or to GMAIL, for an SMTP server. There are many 3rd party paid SMTP services, and it's also possible to install your own SMTP server. No matter the SMTP service you're using, whether it's GMAIL or otherwise, you simply put the particulars in the NextCloud SMTP configuration screen.
In my case, the domain on which I've hosted NextCloud is associated with a Google Workspace account. Therefore the email for this domain is handled by the GMAIL part of Workspace.
Earlier we configured NextCloud to use the SMTP server operated by your web hosting provider. That used a user-name and password to authenticate with the SMTP server. It is desired for all SMTP servers to require authentication as one of a range of measures to fight against SPAM.
The process to configure NextCloud to use GMAIL's SMTP server is is similar to how we configured NextCloud to use the web hosting provider SMTP service. It takes these steps:
- We'll first get an App Password for the Google Account,
- then we'll configure the NextCloud mail agent to access the GMAIL on that account to test the user-name and app password combination,
- then we'll configure NextCloud to use these credentials.
Getting an App Password for a Google Account
When using the GMAIL SMTP server, one cannot simply use the password for your Google Account to authenticate with the GMAIL SMTP server. Instead it is necessary to set up an App Password for your Google Account. See:
https://support.google.com/accounts/answer/185833
Notice that Google recommends against setting up App Passwords. Such passwords are a text string just like a regular password, they're simply provisioned by Google and are relatively unguessable. If that password leaks to the public the miscreants can hijack your Google account.
To do this, while logged in to GMAIL click on the identity icon in the upper-right corner, and you'll see a button marked Manage Google Account.
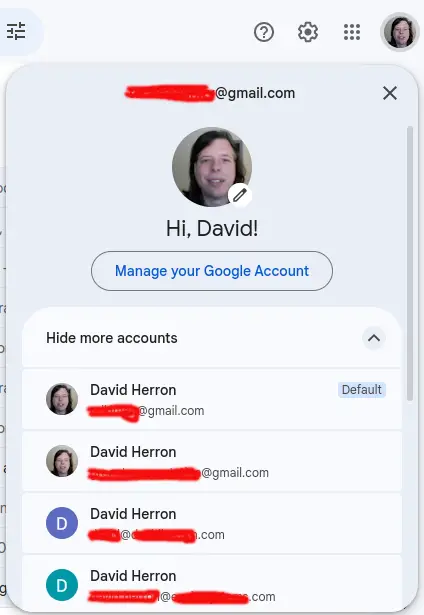
Click on the Manage your Google Account button. On the subsequent page, then click on the Security choice in the left-hand menu.
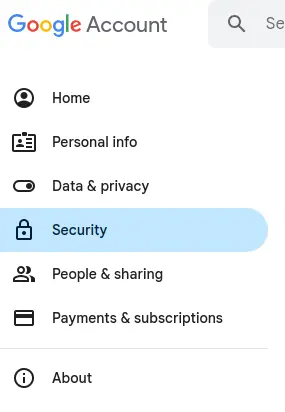
In that page find the section named Signing into Google, or How you sign in to Google.

In that section click on 2-Step Verification, and scroll to the bottom of the page where you'll find App Passwords.
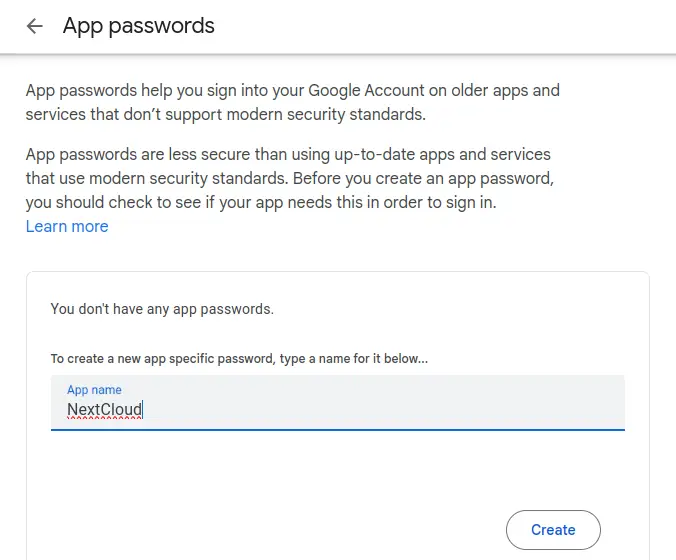
This page shows the list of App Passwords, and lets you create a new one. To start, type in the name of the application for which the password is created. In this case, use NextCloud. Google may ask you to verify yourself in this process.

This shows your generated App Password. This is the only time in this or any other universe where you'll be shown this password. As the instructions say, save this somewhere secure. When finished, click Done.

The App Password you just created is now shown on the list.
I just showed you the generated password. This means I've leaked the password to the public. If your password leaks, it's necessary to revoke the leaked password, and create/use a new one.
To revoke a password, click on the trash-can icon shown here. Simply click on that button, and the entry will disappear from the list. Poof.
Setting up NextCloud E-Mail to use GMAIL with App Password As we did earlier, in NextCloud navigate to the e-mail section. If you do not have a currently configured e-mail account, you'll be asked for configuration. If you have an account setup, delete the account so that we can configure a new one.
For GMAIL, I found it's possible to use the Auto mode for configuring use of a GMAIL account. Simply enter the email address for your Google account, then enter the App Password that Google gave you, but remove the spaces. Instead of entering xcqv xnmo ucvd idhn, enter xcqvxnmoucvdidhn.
The settings which came up for me are:
- IMAP Host:
imap.gmail.com - IMAP Security: SSL/TLS
- IMAP Port:
993 - IMAP User: my e-mail address
- IMAP Password: the App Password (with spaces removed)
- SMTP Host:
smtp.gmail.com - SMTP Security: SSL/TLS
- SMTP Port: 465
- SMTP User: my e-mail address
- SMTP Password: the App Password
Test sending an email:
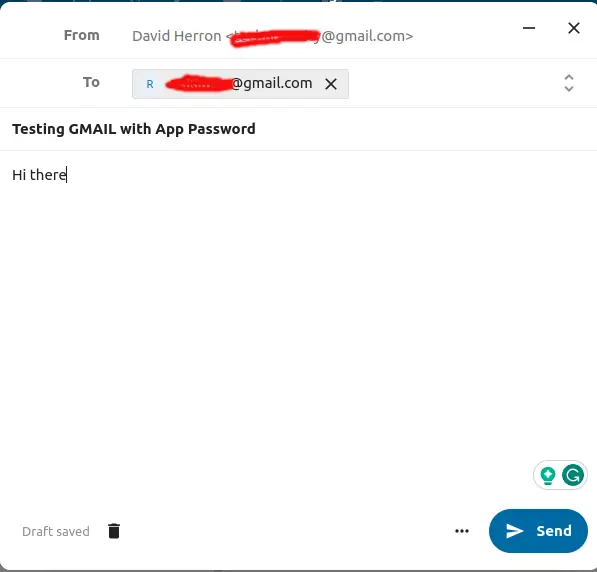
Notice that the To address is a button with an X choice, and that the Send button is enabled. To achieve this status, it's not enough to just enter the To address text. NextCloud shows you a dropdown menu with the address. Click on that, and the screen will shown up as shown here.
After sending the email, check the destination account.
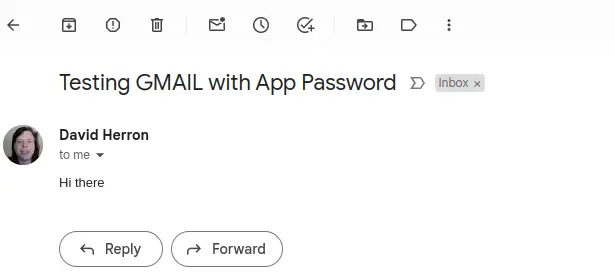
So long as you get this, you've verified that the NextCloud email client can send and receive emails on GMAIL using an App Password.
Configuring NextCloud to use a GMAIL App Password for sending notifications Now that we've verified that the App Password works, let's configure the Basic Settings as we did before.
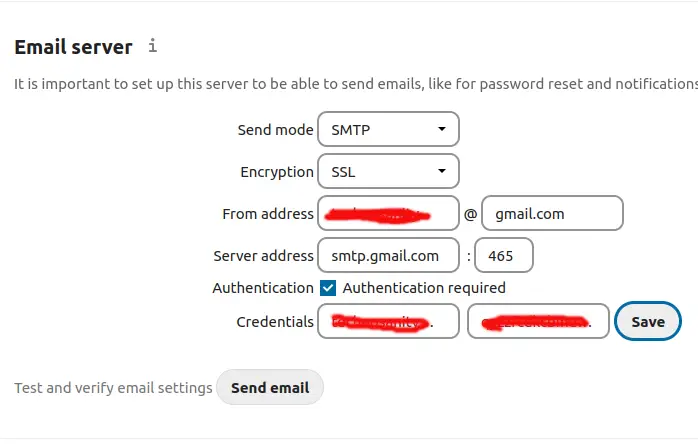
This shows the settings determined earlier entered into the NextCloud Basic Settings for the email server.
- Send mode
SMTPwith Encryption set toSSL - From address set to YOUR-EMAIL at
gmail.com - Authentication method set to Login with Authentication required
- Server address set to
smtp.gmail.comon port 465 - Credentials
YOUR-EMAIL@gmail.comand the App Password as you used it earlier.
After completing that there is a button for sending a test email. Make sure to first click the Save button, then click on the Send email button. If all is well you'll shortly receive an email.
A caveat with using GMAIL to send emails
All the sent emails land in the Sent folder of the GMAIL account.
This means that Google's information snarfing operation will collect data from those Sent emails. It also means the emails sent by NextCloud use up the email quota of that Google account.
You may prefer to use a different SMTP/IMAP account than GMAIL.
What to do if NextCloud is stuck in maintenance mode
While administering my NextCloud instance, I wanted to update the installed applications. This is done by selecting the Apps item in the menu. The list of installed applications shows buttons for any App which can be updated.
Somehow in my case, this got NextCloud into maintenance mode, and it stayed in that mode for a couple of days. When in this mode, any access to NextCloud shows this screen:

To get it out of this mode requires starting a command-line shell inside the Docker image, then running the occ command.
I started by using ssh to login to my virtual private server. On the VPS, I ran this:
$ docker ps

  --- or ---

$ docker ps | grep nextcloud
This lists the currently executing Docker containers, and the actual container name. Because this is launched with docker compose the actual container name includes a code number.
Next:
$ docker exec -it nextcloud_app.1.pdcj8d464luc49wdd9niltlz8 bash
This executes bash inside the named container. Notice that this has the code number for the container.
The command-line shell starts in the /var/www/html directory, and among the files there is occ which has execute permissions:
# ls -l occ
-rwxr-xr-x 1 www-data www-data 283 Nov  2 20:49 occ
The command to run is occ maintenance:mode --off, but because the shell is executing as user ID 0 (a.k.a. root) this error is printed:
# ./occ maintenance:mode --off
Console has to be executed with the user that owns the file config/config.php
Current user id: 0
Owner id of config.php: 33
The output goes on to recommend using sudo -u #33, but the sudo command is not installed in this container. Resolving this message requires getting a command shell with user ID 33.
After some experimentation, this did the trick:
# su www-data --shell /bin/bash
The NextCloud image chosen in the Compose file is based on Apache, which uses the www-data user name. In /etc/password that user has the ID 33, matching the error message shown above.
The faster method is to modify the docker exec command to this:
$ docker exec -u 33 -it CONTAINER-NAME bash
This directly starts the shell inside the container with the correct user ID.
As a result, a new command shell is started with the correct user ID, and we can run this:
$ ./occ maintenance:mode --off
Maintenance mode disabled
And, refreshing the web browser tab gets NextCloud back into normal mode.
NOTE that forcibly turning off maintenance mode does not fix any underlying problem. If there was a problem, that problem still exists.
Summary
NextCloud is an excellent tool for replacing many commercial cloud services. We wish that setup would be more straight-forward, since that would open its use to even more people.
As we saw, the community-maintained Docker container for NextCloud does not result in a smooth experience after deployment. Instead there are several issues to resolve, some of which are inscrutable. But, the recommendations above are mostly easy to implement and take care of all the issues I saw during setup.


")


