David Herron
Tags: Docker »»»» Docker MAMP »»»»
MySQL might throw an error when an application connects without using SSL to encrypt the connection. Therefore the MySQL team clearly hints it is best to use SSL connections to MySQL servers. Clearly a database connection has critical data that you don't want to leak to 3rd parties, and encryption is a great counter-measure. The official MySQL Docker container automatically generates a set of SSL certificates to use for connections, so let's see how to put those certificates to use.
Using TLS/SSL while connecting to MySQL means your database connection is encrypted, and has a higher degree of authentication. The connection is authenticated by the SSL certificate, giving you more certainty for each database connection. And because it is encrypted, a 3rd party is less able to listen in on your database transactions. The cost is that every database interaction becomes slower and more resource intensive, because of the encryption algorithm.
A typical Wordpress site hosted on a typical web hosting provider we'll use a simple user name and password to authenticate with the MySQL server. That's only as safe as the username/password combination. Someone might go for years without an intrusion into their database, but that doesn't make it a safe practice.
What does it take to authenticate MySQL connections using SSL/TLS?
As with any TLS/SSL connection, there must be a "root certificate authority" to help with certificate authentication. Next you create SSL certificates for both the MySQL server, and the MySQL client, that are signed by the Root Certificate Authority (Root CA). Next you start the MySQL server using the server certificates, and in MySQL clients you configure use of the client certificates.
As we will see, MySQL can be configured to several levels of security. For instance it can require SSL certificates for all incoming connections, and can even support password-less access authenticating user ID's solely from an SSL certificate.
The SSL certificates being used are the same technology as the certificates used in HTTPS connections. Like with HTTPS SSL certificates the "Root CA" is the root of an authority chain through which the certificate is authenticated. In the case of HTTPS, the Root CA's are highly guarded service providers that undergo careful auditing. Each browser maker bakes into the web browser the list of Root CA's which are trusted by that browser, for example. Some Root CA operators have been rejected by browser makers because of malpractice.
But for MySQL, it seems common practice to build your own Root CA for MySQL SSL certificates, even in production. For example, the MySQL server has a built-in capability to generate the required SSL certificates. That's what we'll do in this tutorial, build a Root CA and generate both server and client SSL certificates.
A git repository for everything shown in this article is:
https://gitlab.com/damp-stack/mysql-ssl-docker
Pondering the SSL certificates generated by the MySQL Docker Container
A companion tutorial goes over setting up MySQL: Set up MySQL using Docker on your laptop
In that article we noticed that PEM certificate files are automatically generated when the MySQL container is started:
$ ls mysql-data/
auto.cnf           client-key.pem     ib_logfile1        private_key.pem    sys
ca-key.pem         foodb              ibdata1            public_key.pem
ca.pem             ib_buffer_pool     mysql              server-cert.pem
client-cert.pem    ib_logfile0        performance_schema server-key.pem
This directory is mounted into the MySQL container at /var/lib/mysql and contains not only the database files, but default SSL certificates. Documentation for the official MySQL container is silent on where these came from, or how to use these certificates. However, the official MySQL documentation describes a couple tools distributed with MySQL to generate SSL certificates, so these PEM files must have come from those tools. As for using them, we'll see later in this tutorial what to do.
It's possible to go ahead and use these files. But our geek skills become stronger by learning how to generate our own certificates. Further, you may have legitimate business reasons to generate certificates instead.
Using a Docker container to generate certificates
Generating the certificates requires the OpenSSL tools be installed on your computer. Since that library is widely used, OpenSSL may already be installed. But, in theory, it's best to reduce unnecessary dependencies. Therefore, we can create a Docker container, or use an existing container, that has OpenSSL tools installed, containing everything required to generate MySQL SSL certificates, and you don't have to rely on OpenSSL anything being installed on your laptop.
Rather than create a Docker container (in the Gitlab repository there is a suitable Dockerfile if you're interested) let's use an existing container that has OpenSSL tools installed. Namely, the official Nginx container.
Create a shell script, genroot.sh, that will generate the Root CA:
# Generate new CA certificate root-ca.pem file.

OPENSSL_ROOT_CA=$1

docker run --rm -v $PWD/certs:/certs -it nginx \
    openssl genrsa 2048 > certs/root-ca-key.pem

docker run --rm -v $PWD/certs:/certs -it nginx \
    openssl req -new -x509 -nodes -days 3600 \
        -subj "${OPENSSL_ROOT_CA}" \
        -key /certs/root-ca-key.pem -out /certs/root-ca.pem
This script generates some random data to use as the key for the Root CA certificate. It then generates an X.509 certificate using an X.509 Distinguished Name that we'll pass on the command line.
Notice that the pattern is to use docker run to execute the nginx container, and to pass in an openssl command. If you have OpenSSL tools installed on your laptop feel free to remove the docker run portion of these scripts to run the openssl command directly. By doing this, we're eliminating the need to install OpenSSL because it's available as a Docker container.
Notice that we're mounting a local directory, certs, into this container as /certs. Then also notice that the file names to the -key and -out options start with /certs. This is so they read and write files from this certs directory.
For the first command, openssl genrsa, the standard out is redirected to certs/root-ca-key.pem. Why is that? Ponder this, and you'll realize that the standard-out redirection is happening in the shell running on the host system. This means the openssl genrsa is run inside the container, then the output of the container appears on the standard output of the docker run command, and we redirect to a file inside the certs directory.
Next create a file named genserver.sh containing:
# Create the server-side certificates
# This has more interaction that must be automated

OPENSSL_SERVER=$1

docker run --rm -v $PWD/certs:/certs -it nginx \
    openssl req -newkey rsa:2048 -days 3600 -nodes \
        -subj "${OPENSSL_SERVER}" \
        -keyout /certs/server-key.pem -out /certs/server-req.pem

docker run --rm -v $PWD/certs:/certs -it nginx \
    openssl rsa -in /certs/server-key.pem -out /certs/server-key.pem

docker run --rm -v $PWD/certs:/certs -it nginx \
    openssl x509 -req -in /certs/server-req.pem -days 3600 \
        -CA /certs/root-ca.pem -CAkey /certs/root-ca-key.pem \
        -set_serial 01 -out /certs/server-cert.pem

# Verify the certificates are correct
docker run --rm -v $PWD/certs:/certs -it nginx \
    openssl verify -CAfile /certs/root-ca.pem /certs/server-cert.pem
This script generates an SSL certificate and key to use with the MySQL server. It again takes an X.509 Distinguished Name on the command line.
It will help in reading this script to remember that CA means Certificate Authority. That means the options -CA /certs/root-ca.pem -CAkey /certs/root-ca-key.pem pass in the Root CA certificates.
Next let's generate certificates to use from client programs. Create a file named genclient.sh:
# Create the client-side certificates

OPENSSL_CLIENT=$1

docker run --rm -v $PWD/certs:/certs -it nginx \
    openssl req -newkey rsa:2048 -days 3600 -nodes \
        -subj "${OPENSSL_CLIENT}" \
        -keyout /certs/client-key.pem -out /certs/client-req.pem

docker run --rm -v $PWD/certs:/certs -it nginx \
    openssl rsa -in /certs/client-key.pem -out /certs/client-key.pem

docker run --rm -v $PWD/certs:/certs -it nginx \
    openssl x509 -req -in /certs/client-req.pem -days 3600 \
        -CA /certs/root-ca.pem -CAkey /certs/root-ca-key.pem \
        -set_serial 01 -out /certs/client-cert.pem

# Verify the certificates are correct
docker run --rm -v $PWD/certs:/certs -it nginx \
    openssl verify -CAfile /certs/root-ca.pem /certs/client-cert.pem
This script generates an SSL certificate and key to use with MySQL client tools. It again takes an X.509 Distinguished Name on the command line.
Because of the -subj and -nodes options, there is no interactive querying for inputs by these commands. This lets us simply run the container to automatically generate certificates without requiring human input. That's great for automation.
What we've done is to concoct a fake Certificate Authority, and then with the power we've duly invested ourselves with, we signed some certificates. It works for this case because our universe of exposure is completely limited to our server and our client application, therefore it is not necessary to procure certificates from some blessed official certificate authority.
We can rationalize doing this because the MySQL distribution includes a similar tool.
The next step is to create a build script to run the above process. There are a number of tools we could use, for instance in the Gitlab repository is a package.json letting us drive the process using the npm tool that's distributed with Node.js. For more information on using npm to drive build processes see How to use npm/yarn/Node.js package.json scripts as your build tool
In this case the simplest is another shell script, so create a file named gencerts.sh containing:
mkdir -p certs

OPENSSL_SUBJ="/C=US/ST=California/L=Santa Clara"
OPENSSL_CA="${OPENSSL_SUBJ}/CN=fake-CA"
OPENSSL_SERVER="${OPENSSL_SUBJ}/CN=fake-server"
OPENSSL_CLIENT="${OPENSSL_SUBJ}/CN=fake-client"

sh ./genroot.sh "${OPENSSL_CA}"
sh ./genserver.sh "${OPENSSL_SERVER}"
sh ./genclient.sh "${OPENSSL_CLIENT}"
This generates X.509 Distinguished Names (DN's) to use with each component. It then runs each script in turn. The output looks like this:
$ sh -x ./gencerts.sh
+ mkdir -p certs
+ OPENSSL_SUBJ='/C=US/ST=California/L=Santa Clara'
+ OPENSSL_CA='/C=US/ST=California/L=Santa Clara/CN=fake-CA'
+ OPENSSL_SERVER='/C=US/ST=California/L=Santa Clara/CN=fake-server'
+ OPENSSL_CLIENT='/C=US/ST=California/L=Santa Clara/CN=fake-client'
+ sh ./genroot.sh '/C=US/ST=California/L=Santa Clara/CN=fake-CA'
+ sh ./genserver.sh '/C=US/ST=California/L=Santa Clara/CN=fake-server'
Ignoring -days; not generating a certificate
Generating a RSA private key
................................................................................................................+++++
...................................+++++
writing new private key to '/certs/server-key.pem'

writing RSA key
Signature ok
subject=C = US, ST = California, L = Santa Clara, CN = fake-server
Getting CA Private Key
/certs/server-cert.pem: OK
+ sh ./genclient.sh '/C=US/ST=California/L=Santa Clara/CN=fake-client'
Ignoring -days; not generating a certificate
Generating a RSA private key
...................................................................................+++++
..+++++
writing new private key to '/certs/client-key.pem'

writing RSA key
Signature ok
subject=C = US, ST = California, L = Santa Clara, CN = fake-client
Getting CA Private Key
/certs/client-cert.pem: OK
The result:
$ ls -l certs/
total 64
-rw-r--r--  1 david  admin  1119 Mar 17 18:44 client-cert.pem
-rw-------  1 david  admin  1679 Mar 17 18:44 client-key.pem
-rw-r--r--  1 david  admin   968 Mar 17 18:43 client-req.pem
-rw-r--r--  1 david  admin  1827 Mar 17 18:43 root-ca-key.pem
-rw-r--r--  1 david  admin  1261 Mar 17 18:43 root-ca.pem
-rw-r--r--  1 david  admin  1119 Mar 17 18:43 server-cert.pem
-rw-------  1 david  admin  1675 Mar 17 18:43 server-key.pem
-rw-r--r--  1 david  admin   968 Mar 17 18:43 server-req.pem
We have certainty about how these SSL are generated, and precisely know their provenance.
Launching a MySQL container using server SSL certificates
To use MySQL with SSL certificates requires the correct configuration. We can either use a custom my.cnf file or we can use mysqld command-line options to implement that configuration. In the companion Gitlab repository you'll find a Dockerfile and my.cnf that can be used to construct a custom MySQL container that uses SSL. But instead let's create a Docker Compose file, and pass mysqld command-line arguments to set up SSL service.
In several other posts we've discussed using Docker Compose to launch a MySQL container
- Deploying MySQL to get started using a Docker Compose file
- Wordpress local development environment with Docker and Docker Compose on your laptop
Let's extend the Compose file used earlier as so:
version: '3.8'

services:

    mysql:
        image: "mysql/mysql-server:8.0.21"
        container_name: mysql
        command: [ "mysqld",
                    "--character-set-server=utf8mb4",
                    "--collation-server=utf8mb4_unicode_ci",
                    "--bind-address=0.0.0.0",
                    "--require_secure_transport=ON",
                    "--ssl-ca=/etc/certs/root-ca.pem",
                    "--ssl-cert=/etc/certs/server-cert.pem",
                    "--ssl-key=/etc/certs/server-key.pem",
                    "--default_authentication_plugin=mysql_native_password" ]
        # ports:
        #     - "3306:3306"
        volumes:
            - type: bind
              source: ./database
              target: /var/lib/mysql
            - type: bind
              source: ./certs
              target: /etc/certs/
        restart: always
        environment:
           MYSQL_ROOT_PASSWORD: "r00tr00t"
           MYSQL_ROOT_HOST: "%"
This adds the bind-address, require_secure_transport, ssl-ca, ssl-cert, and ssl-key configuration settings. These settings require that incoming connections use SSL certificates, and then configure the server certificates to use. Those certificates will be mounted into the /etc/certs directory.
We give a root password and to allow root to connect from outside the container using the MYSQL_ROOT_HOST variable. This isn't a best practice of course, but it will simplify our examples coming up.
To launch this run: docker-compose up. During server startup you'll see this message: [Warning] [MY-010068] [Server] CA certificate /etc/certs/root-ca.pem is self signed.
Using client certificates in the MySQL client application
We have configured MySQL with SSL certificates, but we need to know how to use them. To start let's try the simplest scenario which is to run the mysql CLI tool inside the mysql container:
$ docker exec -it mysql bash
bash-4.2# ls /etc/certs/
client-cert.pem  client-key.pem  client-req.pem
root-ca-key.pem  root-ca.pem     server-cert.pem
server-key.pem   server-req.pem
This gives us a command-line within the container, and verifies that the PEM files are visible there.
bash-4.2# mysql  -u root -p \
        --ssl-ca=/etc/certs/root-ca.pem \
        --ssl-cert=/etc/certs/client-cert.pem \
        --ssl-key=/etc/certs/client-key.pem
Enter password:
Welcome to the MySQL monitor.  Commands end with ; or \g.
Your MySQL connection id is 17
Server version: 8.0.21 MySQL Community Server - GPL
...
This is a fairly normal method to connect with a MySQL server on the same host using the command-line tool. The difference is that we've added the SSL certificates to the command-line options. Notice that we've had to specify the -p option and also supply a password. This means the SSL certificates don't eliminate the need for passwords.
mysql> status

mysql  Ver 8.0.21 for Linux on x86_64 (MySQL Community Server - GPL)

Connection id:      2
Current database:
Current user:       root@localhost
SSL:                Cipher in use is ECDHE-RSA-AES128-GCM-SHA256
Current pager:      stdout
Using outfile:      ''
Using delimiter:    ;
Server version:	    8.0.21 MySQL Community Server - GPL
Protocol version:   10
Connection:         Localhost via UNIX socket
Server characterset:  utf8mb4
Db     characterset:  utf8mb4
Client characterset:  latin1
Conn.  characterset:  latin1
UNIX socket:        /var/lib/mysql/mysql.sock
Uptime:	            11 sec

Threads: 1  Questions: 5  Slow queries: 0  Opens: 105  Flush tables: 1  Open tables: 98  Queries per second avg: 0.454

mysql> show global variables like '%ssl%';

+---------------+----------------------------+
| Variable_name | Value                      |
+---------------+----------------------------+
| have_openssl  | YES                        |
| have_ssl      | YES                        |
| ssl_ca        | /etc/certs/root-ca.pem     |
| ssl_capath    |                            |
| ssl_cert      | /etc/certs/server-cert.pem |
| ssl_cipher    |                            |
| ssl_crl       |                            |
| ssl_crlpath   |                            |
| ssl_key       | /etc/certs/server-key.pem  |
+---------------+----------------------------+
9 rows in set (0.00 sec)
These commands verify that SSL is actually in use, and gives some specifics. The SSL line tells us the encryption algorithm used. In the global variables we see several verifications that SSL is in use.
bash-4.2# mysql -u root -p
Enter password:
ERROR 1045 (28000): Access denied for user 'root'@'172.17.0.1' (using password: YES)
And if you do not supply the SSL certificates, you cannot authenticate with the server. That behavior is controlled by the require_secure_transport = ON option.
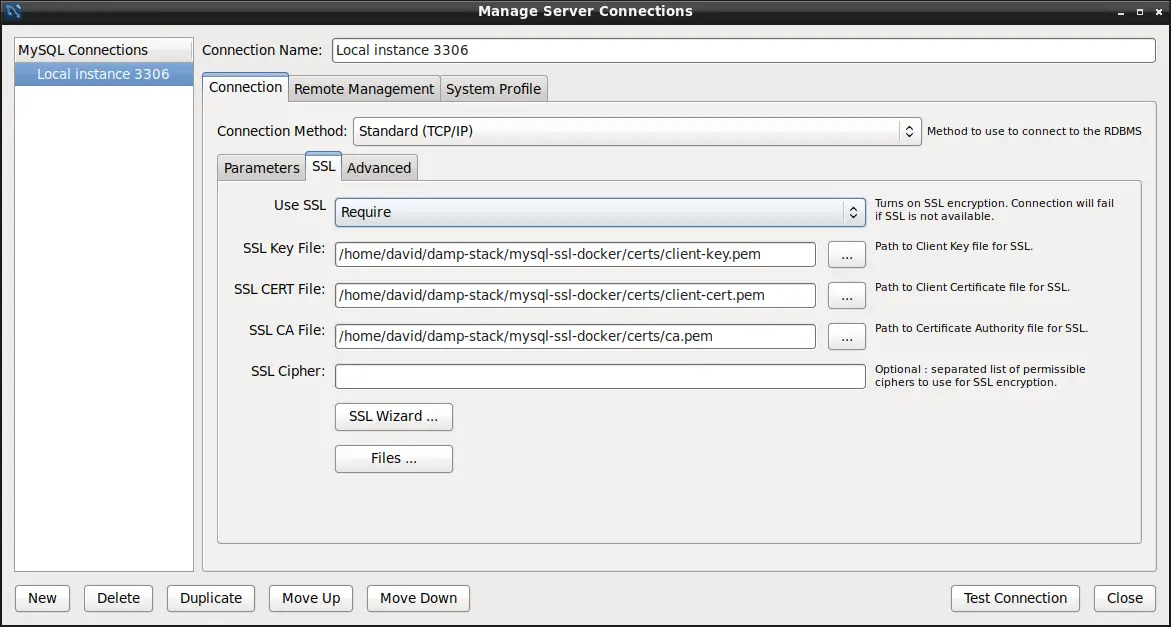
MySQL Workbench is an excellent desktop application for interacting with a MySQL server. This shows an example of how an application is configured to access the database. By definition the Workbench application is not running inside the container, so let's talk about accessing this MySQL container from elsewhere.
Remember that we set MYSQL_ROOT_HOST to %. We learned from debugging the "Access Denied" error that the % pattern will allow us to login with the root user ID from any host on the Internet. Normally this is not done with the root user ID since it is configured to have complete control over the server.
With Workbench configured as above, you'll simply connect to the database. But to connect to it from another Docker container requires a small bit of reconfiguration. In docker-compose.yml make these changes:
version: '3.8'

services:

    mysql:
        ...
        ports:
            - "3306:3306"
        networks:
            - wpnet
        ...

networks:
    wpnet:
        driver: bridge
Here we've defined a Docker virtual network, wpnet. We're also publishing port 3306 so that software on our laptop can connect. Killing and restarting the Docker container we'll see this:
$ docker-compose up
Creating network "mysql-ssl-docker_wpnet" with driver "bridge"
Recreating mysql ... done
Attaching to mysql
mysql    | [Entrypoint] MySQL Docker Image 8.0.21-1.1.17
mysql    | [Entrypoint] Starting MySQL 8.0.21-1.1.17
The actual name for the network is mysql-ssl-docker_wpnet because that's the name of the current directory.
We can then run this:
$ docker run  --rm -it --network mysql-ssl-docker_wpnet -v `pwd`/certs:/etc/certs \
        imega/mysql-client \
        mysql -h mysql -u root -p \
                --ssl-ca=/etc/certs/root-ca.pem \
                --ssl-cert=/etc/certs/client-cert.pem \
                --ssl-key=/etc/certs/client-key.pem
Enter password:
Welcome to the MariaDB monitor.  Commands end with ; or \g.
Your MySQL connection id is 13
Server version: 8.0.21 MySQL Community Server - GPL

Copyright (c) 2000, 2018, Oracle, MariaDB Corporation Ab and others.

Type 'help;' or '\h' for help. Type '\c' to clear the current input statement.

MySQL [(none)]>
The imega/mysql-client container is a conveniently available MySQL client container. We can use this to start the mysql command in another container, verifying that we can connect using SSL across containers.
Of course what we really want is for our application code to use the SSL certificates to connect with the MySQL server. The details are different in each programming language, so let's see how we can do it in Node.js.
const fs = require('fs');
const mysql = require('mysql');

var connection = mysql.createConnection({
    host: '127.0.0.1',     // USE CORRECT HOST NAME HERE
    port: '3306',
    user: 'root',
    password: 'r00tr00t',  // USE CORRECT PASSWORD HERE
    // database: 'test',
    ssl: {
        ca: fs.readFileSync(__dirname + '/certs/root-ca.pem'),
        key: fs.readFileSync(__dirname + '/certs/client-key.pem'),
        cert: fs.readFileSync(__dirname + '/certs/client-cert.pem')
    }
});

connection.connect();

connection.query('SELECT 1 + 1 AS solution', function (error, results, fields) {
    if (error) throw error;
    console.log('The solution is: ', results[0].solution);
});

connection.end();
The online documentation for the driver (
https://www.npmjs.com/package/mysql) is a little incomplete as to what we do. We came up with this example by browsing the issue queue. For more discussion on doing this with Node.js Using SSL to connect to MySQL database in Node.js
To run this program:
$ npm install mysql --save
$ node test.js
The solution is:  2
The script simply runs SELECT 1+1 which of course computes the result, 2, shown here. What this demonstrates is we can access the database and run an SQL command. The SQL commands can of course be anything we wish.
Configuring a MySQL user ID for password-less login using SSL
It's possible to configure a MySQL user ID to support logging-in without a password, only using the SSL certificate.
To get started let's reconfigure the database environment settings as so:
environment:
    MYSQL_ROOT_PASSWORD: "r00tr00t"
    # MYSQL_ROOT_HOST: "%"
    MYSQL_USER: wpuser
    MYSQL_PASSWORD: w0rdw0rd
    MYSQL_DATABASE: wpdb
This converts the root account back to being accessible only from its container, and creates a new user wpuser. We know from the exploration of the Access Denied error that this user ID will have full privileges on the wpdb database, and be configured to use this password.
To implement this we must delete the existing database, and relaunch the container with these new settings, in order to set up the database with this table and user ID.
^CGracefully stopping... (press Ctrl+C again to force)
Stopping mysql   ... done
$ rm -rf database/
$ mkdir database
$ docker-compose up
Recreating mysql ... done
Attaching to mysql
mysql    | [Entrypoint] MySQL Docker Image 8.0.21-1.1.17
mysql    | [Entrypoint] Initializing database
The next step is to create a new user ID that can connect to the wpdb database, using SSL.
$ docker exec -it mysql bash
bash-4.2# mysql -u root -p \
        --ssl-ca=/etc/certs/root-ca.pem \
        --ssl-cert=/etc/certs/client-cert.pem \
        --ssl-key=/etc/certs/client-key.pem
Enter password:
Welcome to the MySQL monitor.  Commands end with ; or \g.
Your MySQL connection id is 9
Server version: 8.0.21 MySQL Community Server - GPL
...
mysql> show databases;
+--------------------+
| Database           |
+--------------------+
| information_schema |
| mysql              |
| performance_schema |
| sys                |
| wpdb               |
+--------------------+
5 rows in set (0.07 sec)

mysql> show grants for wpuser@'%';
+--------------------------------------------------+
| Grants for wpuser@%                              |
+--------------------------------------------------+
| GRANT USAGE ON *.* TO `wpuser`@`%`               |
| GRANT ALL PRIVILEGES ON `wpdb`.* TO `wpuser`@`%` |
+--------------------------------------------------+
2 rows in set (0.00 sec)
This demonstrates the wpdb database exists, and describes how the wpuser account is configured.
mysql> CREATE USER 'wpuserssl'@'%' REQUIRE SSL;
Query OK, 0 rows affected (0.12 sec)

mysql> GRANT ALL PRIVILEGES ON `wpdb`.* TO 'wpuserssl'@'%';
Query OK, 0 rows affected (0.85 sec)
This creates a new user ID, wpuserssl, that uses SSL instead of a password. This ID has the same access to wpdb as does wpuser.
This only requires the use of a valid SSL certificate. It's useful to be more strict than that, such as this:
CREATE USER 'wpuserssl'@'%'
  REQUIRE SUBJECT '/C=SE/ST=Stockholm/L=Stockholm/
    O=MySQL demo client certificate/
    CN=client/emailAddress=client@example.com'
  AND ISSUER '/C=SE/ST=Stockholm/L=Stockholm/
    O=MySQL/CN=CA/emailAddress=ca@example.com';
This implicitly requires an SSL certificate, that explicitly uses the named Distinguished Names.
$ docker run  --rm -it --network mysql-ssl-docker_wpnet -v `pwd`/certs:/etc/certs \
        imega/mysql-client \
        mysql -h mysql -u wpuserssl \
                --ssl-ca=/etc/certs/root-ca.pem \
                --ssl-cert=/etc/certs/client-cert.pem \
                --ssl-key=/etc/certs/client-key.pem \
                wpdb
Welcome to the MariaDB monitor.  Commands end with ; or \g.
Your MySQL connection id is 31
Server version: 8.0.21 MySQL Community Server - GPL

Copyright (c) 2000, 2018, Oracle, MariaDB Corporation Ab and others.

Type 'help;' or '\h' for help. Type '\c' to clear the current input statement.

MySQL [wpdb]>
Then we can use the MySQL client to connect to this user ID. Notice that we do not have a -p option, and we are not prompted for a password. Instead we are simply logged-in to the database.
Likewise, in test.js if we reconfigure the connection parameters:
var connection = mysql.createConnection({
    host: '127.0.0.1',
    port: '3306',
    user: 'wpuserssl',
    // password: 'r00tr00t',
    database: 'wpdb',
    ssl: {
        ca: fs.readFileSync(__dirname + '/certs/root-ca.pem'),
        key: fs.readFileSync(__dirname + '/certs/client-key.pem'),
        cert: fs.readFileSync(__dirname + '/certs/client-cert.pem')
    }
});
Here we are using the wpuserssl user ID, with no password. And, the program runs as expected:
$ node test.js
The solution is:  2
The output is as expected, with no error messages. That means we got a successful connection to the database using solely SSL certificates, with no password.
Summary
We started this tutorial with the question of properly configuring MySQL to encrypt connections using SSL. But this naturally led to whether we can solely use an SSL certificate to authenticate a MySQL connection. Turns out that indeed we can.
Links
Generating the SSL certificates for MySQL
https://dev.mysql.com/doc/refman/5.7/en/creating-ssl-files-using-openssl.html
Using encrypted connections with MySQL
https://dev.mysql.com/doc/refman/5.7/en/encrypted-connections.html
Shows encrypted connections using PHP and Python drivers -
https://www.percona.com/blog/2013/06/22/setting-up-mysql-ssl-and-secure-connections/


