David Herron
Tags: Node.JS »»»»
To Node.js the package.json simply tracks a few things about a package like its main module. To npm and yarn this file serves more purposes, from package management data, to dependencies lists, to package installation and project management scripts. The scripts tag may have a humble originating purpose, but by overusing it package.json becomes powerful platform for running command-line software processes like building websites or building software products.

Bundled with the Node.js platform is an under-appreciated feature of the package management tool, npm. The primary purpose for npm is accessing a very large library of packages that run on Node.js. But it includes a feature, the scripts tag, that is itself very powerful. With that tag, it is possible to construct complex data manipulation systems using any command line utility.
With the scripts tag, we can record named commands in a package.json file. For example a deploy script might using rsync to upload files to a server. By itself this tag isn't terribly powerful, even though with it we can run any command-line tool. But, some available tools in the npm repository can be used to build complex processing architectures in the scripts section. Add to that the vast library of available Node.js packages, and we have a powerful environment with which to implement build systems, web publishing systems, or even systems as far afield as training machine learning models.
The scripts tag in package.json was introduced by the npm project. Its primary use is supporting package installation, other package management tasks, and simple project scripts like the method for starting a server. The primary target was Node.js package or application authors.
Just because that was the design goal doesn't mean we can't use the scripts tag for other purposes. The ability to run any command-line tool, and to use add-ons letting you build complex processing hierarchies, gives us potent combination.
Instead of using package.json to develop a Node.js package, or application, or server, let's consider a different kind of project. For example, you've built a Docker container, and you want to automate building it and publishing it to a Docker repository. You could write a shell script, a Makefile, or you could implement the publishing process with npm and package.json. That requires recording docker login, docker build, and docker push commands into the scripts section of a package.json. You may need to support running the build on Windows, Linux and macOS machines, and there is a Node.js tool available to help run the commands across platforms.
It's possible to automate this task, and many others, with package.json, or with many other tools. The choice is up to you. This article will introduce you to using package.json for purposes other than it's primary design goals.
Where this makes the most sense is for those already using the Node.js platform, either for writing Node.js packages or applications, or else using tools that are written in Node.js. Such people are probably already using package.json files, and can easily extend that file into use as a build tool.
TL;DR if you already know how to use package.json and npm, you will probably find the next few sections boring. This article starts the reader from zero in case they've never seen this material.
What is package.json and the npm/Yarn ecosystem
A big attraction to using package.json is that it is natively supported by Node.js, npm, and Yarn. At our fingertips is not only a powerful programming platform, but a large ecosystem of Node.js packages.
As we just said, there are three realms in which package.json is important. First, it is used by Node.js for describing a package directory. Second, it is used in the npm/Yarn ecosystem for package management. Third, it is used by package or application authors for scripts related to their project.
In this section let's quickly discuss the first two before doing a deep dive on the third.
What does Node.js look for in package.json?
The package.json file was developed for Node.js, but Node.js uses only a small portion of the contents of a modern package.json. For example:
{
    "name": "example-package-json",
    "type": "commonjs",
    "main": "./path/to/main.js"
}
That's about it.
The context is that Node.js treats individual JavaScript files as modules, plus it can treat a correctly constructed directory as a module. In the Node.js documentation look for Folders as Modules. One thing which makes a directory a module is the package.json file. The Node.js runtime looks for a very small number of fields in this file. In addition to the three fields shown here, there is exactly (as far as I can tell) one more field, exports, that is an alternate to the main field.
What does npm or Yarn look for in package.json?
As we said, the package manager applications (npm, Yarn, etc) added a large number of fields to package.json. These fields cover package management, dependency management, and scripts for packaging or project administration.
Running the command npm help package.json shows a list of additional package.json fields.
The fields description, version, repository, keywords, author, license, bugs, and homepage are examples of data which is displayed on package listings on the npmjs.com website. These are examples of what we referred to earlier as package management.
The version field is also used in dependency management, as is the dependencies and devDependencies fields. These fields are used during while installing a package, with the package manager (npm/Yarn) reading entries in those fields for the packages to install. The version field advertises the version number for each instance of each package, and the dependencies fields specify the acceptable version numbers to use. This way the package manager can download the correct version of the required packages. The dependencies fields can also target packages outside the npm registry, such as from a Git repository or an arbitrary URL. These are examples of what we referred to earlier as dependency management.
The primary mechanism for project management is the scripts field. We'll be exploring it in depth in the rest of this article. The scripts field was invented to serve package developers, or application developers. For a description of this field run npm help scripts. When reading that, especially pay attention to the predefined scripts.
Creating a package.json file
To start let's learn how to create a package.json using npm (or Yarn). It's very simple:
$ mkdir example1
$ cd example1
$ npm init -y
Wrote to /Volumes/Extra/nodejs/npm-build-scripts/example1/package.json:

{
  "name": "example1",
  "version": "1.0.0",
  "description": "",
  "main": "index.js",
  "scripts": {
    "test": "echo \"Error: no test specified\" && exit 1"
  },
  "keywords": [],
  "author": "David Herron <david@davidherron.com>",
  "license": "ISC"
}
That's the fastest way of building a package.json. Leave off the -y option and you'll be asked a few questions about the project, while using this option the default values for each option are taken.
You can set some npm config settings to help auto-populate the generated package.json with the correct values:
npm config set init.author.name "..."-- Sets the author namenpm config set init.author.email ...@...-- Sets the author e-mail addressnpm config set init.author.url https://...-- Sets the author home page URLnpm config set init.license ...-- Sets the default license to use
To learn about config settings run npm help 7 config.
Once you have the package.json in hand you can move forward.
Familiarizing ourselves with the scripts tag in package.json
The scripts section of package.json contains a list of named scripts. When npm generates this file, as just shown above, it includes a test script. It is run as so:
$ npm run test

> example1@1.0.0 test /Users/David/nodejs/npm-build-scripts/example1
> echo "Error: no test specified" && exit 1

Error: no test specified
npm ERR! code ELIFECYCLE
...
This script runs an echo command and then runs exit 1. The last is what makes npm believe an error occurred.
We can also run this as npm test, leaving out run. This is because npm has several pre-defined script names that correspond to npm subcommands:
npm test-- Runs a test scriptnpm start-- Runs a command to start a servernpm restart-- Runs a command to restart a servernpm stop-- Runs a command to stop the running server
For any other script it is executed as npm run script-name. Running npm help scripts gives more information about how this is interpreted. The pre-baked scripts are designed to handle lifecycle events meaning they are executed at certain phases of installing or using or developing Node.js packages in Node.js applications.
Using pre- and post- scripts
The mechanism supports a rudimentary control flow. Consider:
"scripts": {
    "test": "echo \"Error: no test specified\" && exit 1",
    "prestart": "echo 'Pre-start runs before start'",
    "start": "echo 'START'",
    "poststart": "echo 'Post-start runs after start'"
},
As the script names suggest, for a script named foo, the prefoo script runs before foo, and the postfoo script runs after foo. It looks like this:
$ npm start

> example1@1.0.0 prestart /Users/David/nodejs/npm-build-scripts/example1
> echo 'Pre-start runs before start'

Pre-start runs before start

> example1@1.0.0 start /Users/David/nodejs/npm-build-scripts/example1
> echo 'START'

START

> example1@1.0.0 poststart /Users/David/nodejs/npm-build-scripts/example1
> echo 'Post-start runs after start'

Post-start runs after start
If you want an infinite loop, change poststart to this:
"poststart": "echo 'Post-start runs after start' && npm run start"
Since the text inside the script is treated like a Unix shell script, and a command structure cmd && cmd runs the commands one after another, what this does is cause the poststart script to again run start. Which ... causes the whole prestart/start/poststart sequence to execute again.
Passing arguments to a script
It is possible to pass args from the npm command line to a script. Consider:
"withargs": "echo ARGS"
Then we run this:
$ npm run withargs -- Hello World

> example1@1.0.0 withargs /Users/David/nodejs/npm-build-scripts/example1
> echo ARGS "Hello" "World"

ARGS Hello World
Everything after -- is passed on the command line of the executed script.
Using shell pipelines
Since the scripts use Unix shell scripting syntax, that includes building pipelines.
Consider:
"pipeline": "echo one two three four | wc"
If you've made it this far, you probably know that the wc command prints the word count of whatever is on the standard input. It was the first trivial pipeline example I could come up with. Let's see how this runs:
$ npm run pipeline

> example1@1.0.0 pipeline /Users/David/nodejs/npm-build-scripts/example1
> echo one two three four | wc

       1       4      19
Yes, the input is one line, with four words, and nineteen characters, just like the wc command says. This was a trivial example, but there are of course somewhere close to a zillion different possible pipelines you could build and use here.
These trivial examples were meant to familiarize yourself with some of the possibilities. With this in mind let's look at some more comprehensive examples.
Running a series of scripts, one after the other
In Unix command lines we can execute cmd && cmd && cmd to run a series of commands in a row. In package.json scripts we've already seen we can do the same to run a set of commands one after another. Think about how you could implement a multi-step process using && in a package.json script.
In a new directory, called build-site, start a new project (running npm init -y). In that directory install these packages:
$ npm install lessc mustache html-minifer --save
Then consider that in the build-site directory is another directory, site, containing a file named style.less containing a stylesheet written in the LESS syntax, and a Mustache template meant to be rendered into a file named index.html.
In the package.json add these script tags:
"scripts": {
    "build-site": "npm run less && npm run render && npm run deploy",
    "less": "lessc site/style.less build/style.css",
    "render": "mustache data.json site/index.mustache build/index.html",
    "deploy": "cd build && rsync --archive --delete --verbose ./ user-name@remote-host.com:docroot-directory/"
},
We won't take the space to show you the individual files, so use your imagine that those files exist and have reasonable contents. The build-site tag describes a multi-stage process, where each stage is another script command. The first stage uses lessc to compile the stylesheet, the second uses mustache to render the template and html-minifier to minify the HTML, and the last uses rsync to deploy to a server.
If we mock up some data so this runs:
$ mkdir site
$ touch site/style.less site/index.mustache
$ echo '{}' >data.json
$ mkdir build
Again, pretend that there are real files here. For example the data.json could be the result of a database query that we run in another stage of this process.
We can run the build like so:
$ npm run build-site

> build-site@1.0.0 build-site /Users/David/nodejs/npm-build-scripts/build-site
> npm run less && npm run render  && npm run deploy


> build-site@1.0.0 less /Users/David/nodejs/npm-build-scripts/build-site
> lessc site/style.less build/style.css


> build-site@1.0.0 render /Users/David/nodejs/npm-build-scripts/build-site
> mustache data.json site/index.mustache | html-minifier -o build/index.html


> build-site@1.0.0 deploy /Users/David/nodejs/npm-build-scripts/build-site
> cd build && rsync --archive --delete --verbose ./ user-name@remote-host.com:docroot-directory/

...
It is a good practice to separate each stage into its own scripts entry. That way we can run stages individually, if needed to debug one, while also making each script easier to read. Consider what the build-site script would be like if you wrote everything on one line. After you finish shuddering at the thought, praise the fact that npm (and Yarn) lets you use this technique.
Improving sequential script execution with npm-run-all
The build-site example is interesting since it points towards the ability to construct a complex process using package.json. Obviously the number of stages can be expanded. For example we suggested the data.json could be generated from a database query, and we could easily write a custom Node.js script to do that query. There are other tools to consider, like using the TypeScript compiler to generate JavaScript files from TypeScript source. Or to use lint tools to ensure the resulting code is clean. And maybe some image processing steps are required. And of course the website could have multiple pages to render.
One issue is that the build-site script itself is a bit unwieldy. The more of those ideas we implement, this script becomes more and more unwieldy until it becomes downright unmanageable. Fortunately there is a tool, npm-run-all, that can simplify that setup.
For documentation see
https://www.npmjs.com/package/npm-run-all
To experiment with this, duplicate the build-site directory as build-site-2 and then run this command:
$ cd build-site-2
$ npm install npm-run-all --save-dev
And then rewrite the scripts section to this:
"scripts": {
    "build-site": "npm-run-all build:less build:render build:deploy",
    "build:less": "lessc site/style.less build/style.css",
    "build:render": "mustache data.json site/index.mustache | html-minifier -o build/index.html",
    "build:deploy": "cd build && rsync --archive --delete --verbose ./ user-name@remote-host.com:docroot-directory/"
},
That's a little cleaner. The build-site script is a little easier to read, and it has more room to grow since it's more compact. By itself those are small wins, but there is another feature of npm-run-all that will make it an even bigger win. Specifically: Wildcards
Change the script to this:
"build-site": "npm-run-all build:*",
The build:* pattern matches, as you might expect, every script name starting with build.
The way this works is that npm-run-all reads all the scripts from package.json and uses glob-style pattern matching to select the scripts to run. Using a single asterisk, it runs "sub scripts" of the patterns shown here, but it does not run "sub sub scripts" like build:render:index. To run sub-sub-script use the "globstar", or build:**.
The resulting script execution looks like this:
$ npm run build-site

> build-site@1.0.0 build-site /Users/David/nodejs/npm-build-scripts/build-site-2
> npm-run-all build:*


> build-site@1.0.0 build:less /Users/David/nodejs/npm-build-scripts/build-site-2
> lessc site/style.less build/style.css


> build-site@1.0.0 build:render /Users/David/nodejs/npm-build-scripts/build-site-2
> mustache data.json site/index.mustache | html-minifier -o build/index.html


> build-site@1.0.0 build:deploy /Users/David/nodejs/npm-build-scripts/build-site-2
> cd build && rsync --archive --delete --verbose ./ user-name@remote-host.com:docroot-directory/
It's about the same as before, but the build-site script is now much easier to manage. We can add or delete the scripts in the build group without having to then edit the build-site script.
Parallel script execution
With npm-run-all we're not limited to sequential execution, one step after another. It can also run the steps in parallel, which might be useful in some cases. To do that simply add the --parallel option to the command line.
In our build-site example, the build steps are independent of one another and do not have to be run sequentially. That means we could add -parallel, like this:
$ npm-run-all --parallel build:*
We'll see in the next section a practical example of using this feature.
Automatically rebuilding when files change using onchange
The simple "build HTML page" scenario just described could go in several directions. One common direction to take is to automatically watch the source files, and rebuild any files that were changed. The coder would be editing the website code, save a change, the automated rebuild happens, and in a web browser they reload the screen. That's the normal edit-build-test cycle of iterative development.
For example, if this were an actual project the HTML page might include a Vue.js or React client to a back-end service. Any edit in the files related to the application should trigger a rebuild.
Let's stop pretending and make some real files, but lets keep it simple and concise.
Create a directory to work in:
$ mkdir build-site-3
$ cd build-site-3
$ cp ../build-site-2/package.json .
That gives us a known starting point from the previous section. In the package.json delete the build:deploy script since we don't actually need it. Then install these packages:
$ npm install onchange live-server --save
$ npm install
The onchange package is a tool for watching sets of files and running commands based on changes to those files. We'll use this to trigger autorebuilds. For documentation, see
https://www.npmjs.com/package/onchange
The live-server package is a simple web server that supports automatically reloading the browser page when files change. For documentation, see:
https://www.npmjs.com/package/live-server
Before we see how to use those packages, lets create a few simple source files to play with.
Create a site directory, and in that directory create a file named index.mustache:
<html>
<head>
    <title>{{ title }}</title>
    <link rel="stylesheet" href="/style.css">
</head>
<body>
    <h1>{{ title }}</h1>
    <form>
        <label for="labelFibonum" class="form-label">{{ fibolabel }}</label>
        <input type="text" class="form-control" id="inputFibonum">
    </form>
    <div id="fiboVal"></div>
    <script src="/fibocalc.js"></script>
</body>
</html>
What we have is a trivial HTML page that we can process with Mustache to produce an index.html. There are a few text values that we'll pull from the JSON file. We'll use the JSON file as a simplistic I18N implementation, letting us store text strings in the JSON and substitute different JSON files for different languages. In fibocalc.js we will write a small JavaScript application to calculate Fibonacci values. The user will enter a number in the input field, and the code will see that value and calculate the corresponding Fibonacci number.
In the parent directory, next to package.json, create a file named labels.en.json:
{
    "title": "Fibo Calculator",
    "fiboLabel": "Enter a number to calculate Fibonacci number"
}
We'll use this file as a simplistic internationalization (I18N) method. The values for title and fibolabel becomes the title and fibolabel variables when processing the template. Hence, when we run the mustache command, these values will be picked up from this file, and inserted into the rendered output. We'll also need to change the build:render script to reference labels.en.json instead of data.json.
In the site directory add a file named fibocalc.js containing:
document.addEventListener("DOMContentLoaded", function() {

    let input = document.getElementById('inputFibonum');
    let display = document.getElementById('fiboVal');

    input.oninput = function(e) {
        let entered = e.target.value;
        let fibonum = Number.parseInt(entered);
        if (Number.isNaN(fibonum)) {
            display.textContent = `ERROR: Non-number entered ${entered}`;
        } else {
            let fiboval = fibonacciLoop(fibonum);
            display.textContent = `Fibonacci ${fibonum} = ${fiboval}`;
        }
    }

    function fibonacciLoop(n) {
        let fibos = [];
        fibos[0] = 0;
        fibos[1] = 1;
        fibos[2] = 1;
        for (let i = 3; i <= n; i++) {
            fibos[i] = fibos[i-2] + fibos[i-1];
        }
        return fibos[n];
    }
});
We're using pure JavaScript/DOM code here instead of a framework like jQuery. The outer wrapper for this is equivalent to the jQuery $(document).ready construct, where the purpose is to wait for the page to finish loading before running the JavaScript.
In the JavaScript we get the handles for the #inputFibonum and #fiboVal elements. For #inputFibonum we set up an oninput handler function causing this function to be called for any character typed into the input field.
In the handler we try to parse the text as an integer. If that fails we output an error message into the #fiboVal display area. Otherwise we run a simple Fibonacci calculation, and display the result in the display area.
To round it out, add a file named style.less in site containing:
#fiboVal {
    border: 3px dashed red;
}
This will throw a little border around the display area.
We now have a simple little browser-side application, and a build process to render files from the site to build directory. Since we started this section talking about automatic rebuilds, lets take care of that.
The onchange command takes a list of file name patterns to watch, and a command to run. For example:
$ onchange 'site/**.less' -- npm run build:less
This will watch for a change to any .less file in the site directory, and run the build:less script.
With that in mind, let's change the scripts section in package.json to this:
"scripts": {
    "build-site": "npm-run-all build:*",
    "build:less": "lessc site/style.less build/style.css",
    "build:render": "mustache labels.en.json site/index.mustache | html-minifier -o build/index.html",
    "build:js": "cp site/fibocalc.js build",
    "preview": "cd build && live-server --port=3333 ",
    "watch": "npm-run-all --parallel watch:* preview",
    "watch:less": "onchange 'site/**.less' -- npm run build:less",
    "watch:js": "onchange 'site/**.js' -- npm run build:js",
    "watch:html": "onchange 'labels.en.json' 'site/**.mustache' -- npm run build:render"
},
The build scripts are pretty much as we had them before. We've added a build:js script which simply copies the file to the build directory. That script could do a lot more, for example use Babel to convert modern ES2019 code into ES5 code that runs on any browser.
The preview script runs the live-server tool inside the build directory. This is a simple web server that includes automatic live reload. It watches the files it is serving to web browsers, and upon detecting a change will cause the browser to reload the page.
Then we have the watch scripts. The watch:* scripts follow the pattern just mentioned, where the onchange command is watching certain files and then running the corresponding build:* script.
For example, run npm run watch:js then edit fibocalc.js. On every edit this is printed:
> build-site@1.0.0 build:js /Users/David/nodejs/npm-build-scripts/build-site-3
> cp site/fibocalc.js build
In other words, on every edit the build:js script is executed, just as the watch:js script says will happen.
The watch script itself uses the npm-run-all --parallel option. What this does is to simultaneously run every watch:* script, plus the preview script. That way we have automatic rebuilds of the source files, plus automatic browser reloading.
Then, we can run this:
$ npm run watch

> build-site@1.0.0 watch /Volumes/Extra/nodejs/npm-build-scripts/build-site-3
> npm-run-all --parallel watch:* preview


> build-site@1.0.0 watch:less /Volumes/Extra/nodejs/npm-build-scripts/build-site-3
> onchange 'site/**.less' -- npm run build:less


> build-site@1.0.0 watch:html /Volumes/Extra/nodejs/npm-build-scripts/build-site-3
> onchange 'labels.en.json' 'site/**.mustache' -- npm run build:render


> build-site@1.0.0 watch:js /Volumes/Extra/nodejs/npm-build-scripts/build-site-3
> onchange 'site/**.js' -- npm run build:js


> build-site@1.0.0 preview /Volumes/Extra/nodejs/npm-build-scripts/build-site-3
> cd build && live-server --port=3333

Serving "/Volumes/Extra/nodejs/npm-build-scripts/build-site-3/build" at http://127.0.0.1:3333
Ready for changes
This starts the scripts running in parallel. The live-server process is what tells us it is ready for changes.
The live-server also automatically opens a browser tab, and you'll see this:
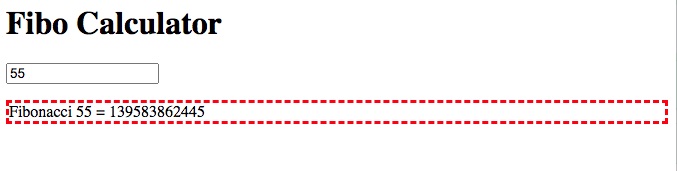
Well, you'll see that after entering 55 in the input field.
Now, edit site/fibocalc.js with this change:
display.textContent = `Fibonacci CHANGE ${fibonum} = ${fiboval}`;
As soon as you save the change, this prints in your terminal:
> build-site@1.0.0 build:js /Volumes/Extra/nodejs/npm-build-scripts/build-site-3
> cp site/fibocalc.js build

Change detected /Volumes/Extra/nodejs/npm-build-scripts/build-site-3/build/fibocalc.js
First, onchange detected that the JavaScript file changed, and ran the build:js script. Second, the live-server detected that the site/fibocalc.js changed, and caused the browser to reload. Enter a new number to calculate, and the message changes to this:
Fibonacci CHANGE 55 = 139583862445
Back out that change, the same automatic rebuild events occur, and the message changes back.
The same happens if you edit style.less, labels.en.json or index.mustache.
For example, edit labels.en.json with this change:
"title": "Fibo Calculator - Hi Mom!",
The change is detected, and the following runs:
> build-site@1.0.0 build:render /Volumes/Extra/nodejs/npm-build-scripts/build-site-3
> mustache labels.en.json site/index.mustache | html-minifier -o build/index.html

Change detected /Volumes/Extra/nodejs/npm-build-scripts/build-site-3/build/index.html
And then, as if by magic, the browser shows the message: Fibo Calculator - Hi Mom! Make another change, those commands run again, and the browser automatically updates to match.
What we've demonstrated in this and the previous section is that npm-run-all lets us build a multidimensional hierarchy of script executions in a package.json file. Okay, maybe calling it multidimensional is silly, but we do have lots of freedom in two dimensions to construct complex command execution hierarchies. That's because we can handle both parallel and sequential task execution.
npm configuration settings and environment variables
Another feature of npm is the configuration settings. I don't know if what I'm about to show works the same in Yarn. We already looked at a couple configuration settings, and saw it used for customizing npm's behavior. An interesting detail is that the configuration values are available in package.json scripts as environment variables.
Before starting this section, run the following commands:
$ mkdir build-site-4
$ cp -r build-site-3/site build-site-3/package.json build-site-3/.gitignore build-site-4
$ cd build-site-4
$ npm install
This gives us a clean working area in which to do the following experimentation.
When npm executes a script, it sets a lot of values in its environment. Every field in package.json is set as an environment variable beginning with npm_package_. We can explore this by adding the following to the scripts section:
"env": "env"
The env script lets you see the variables that are available. Run this command and you'll see that many have the prefix npm_config_
Let's consider two things in our build scripts which we might want to override. The first is the file labels.en.json which we suggested was a simplistic internationalization implementation. For that purpose we would have parallel files named labels.ro.json (Romanian) or labels.fr.json (French). The second configuration value is the port number to use for the preview server.
Let's focus on the latter.
In package.json we can put values like this:
"config" : {
    "port" : "8080"
}
And we can see it in the environment:
$ npm run env | grep port

...
npm_package_config_port=8080
...
This means entries in the config section of package.json show up as environment variables with the prefix npm_package_config_.
This value can be overridden by running this command:
npm config set build-site:port 9090
The npm config command sets configuration values, and we can set our own values if desired. Any values we set become environment variables in executed scripts.
$ npm config get build-site:port
9090
$ npm run env | grep port
...
npm_config_build_site_port=9090
npm_package_config_port=9090
...
This actually sets two environment variables, which is interesting. But the important thing is that npm_package_config_port was overridden. Inside package.json the value is 8080 but we've now set it to 9090.
The prefix build-site: is because that's the value of the name field in the package.json. If we leave off the prefix, in other words run npm config set port 9090, then a different environment variable (npm_config_port) gets set instead. In order to override npm_package_config_port we must use the prefix.
That means we can now make this change in the preview script:
"preview": "cd build && live-server --port=${npm_package_config_port} "
We changed this from the hard-coded value used earlier, to one referencing this environment variable. Then, we run this command:
$ npm run preview

> build-site@1.0.0 preview /Volumes/Extra/nodejs/npm-build-scripts/build-site-4
> cd build && live-server --port=${npm_package_config_port}

Serving "/Volumes/Extra/nodejs/npm-build-scripts/build-site-4/build" at http://127.0.0.1:9090
Ready for changes
And indeed, the preview server is listening on port 9090.
Then if we want to erase the override:
$ npm config delete build-site:port
$ npm config get build-site:port
undefined
$ npm run env | grep port

npm_package_config_port=8080
As soon as we delete the configuration value, the environment variable reverts to the value set in the config tag of the package.json file. Run npm run preview again, and the preview server opens on port 8080.
Additional tools for package.json scripts
There are a large number of tools available for use with scripts in package.json files. We've seen so far that this can be very powerful, and these other tools add even more capabilities.
Cross platform scripts: In the previous section we added an environment variable reference to one of the scripts. While this is nice and easy, it does not work on Windows since cmd.exe has a different syntax for variable references. There are two packages that cover different aspects of erasing cross platform differences.
- cross-env handles portably setting environment variables in a command line. See documentation:
https://www.npmjs.com/package/cross-env
- cross-var handles environment variable references on the command line. See documentation:
Cross platform equivalents to Unix commands: It is a best practice for your package.json scripts to support execution on Windows as well as Unix-like systems. There are times you want to run normal commands like rm -rf build in a script, but of course Windows doesn't have that command.
- rimraf is equivalent to
rm -rf. See documentation - mkdirp is equivalent to
mkdir -pfor creating a directory hierarchy. See documentation: - open-cli is equivalent to the macOS command
open, the Windows commandstart, and the Linux commandxdg-open. These commands "open" a file using the correct application. This CLI tool makes that portable, selecting the correct command based on the platform. See documentation: - shx implements a large number of Unix-like commands in portable Node.js code. See documentation:
- shelljs is the API used for implementing shx, and it lets you write a Node.js script which uses Unix-like commands. See documentation:
Integrate with Git hooks using Husky: The Husky package lets you add a section to package.json specifying commands that will execute for certain Git lifecycle hooks. A Git hook is a shell script conventionally stored in .git/hooks corresponding to different points of time in the lifecycle of a Git repository. For example you might use a pre-commit hook to run a few tests to guard against committing bad code.
See the documentation:
https://www.npmjs.com/package/husky
Code development tools: There are a long list of software development tools available on the Node.js platform. We touched on a couple, like the Less compiler, but here's a few more.
- postcss is a family of powerful tools for CSS processing and linting. See documentation:
- node-sass handles processing SASS/SCSS files, and is a Node.js binding to LibSass. See documentation:
- @babel/core is the core of an extensive toolset for processing and transpiling JavaScript files. For example with the correct configuration you can write ES2019 syntax JavaScript, compiling it down to ES5 JavaScript for execution on old browsers. See documentation:
https://babeljs.io/
- eslint is a popular tool for checking JavaScript code for correctness. See documentation:
- stylelint is a tool for checking CSS code for correctness. See documentation:
Summary
In this article we've seen that the package.json has a hidden superpower that can be used for any data processing task.
There are close to a zillion different possible projects involving input data, whether it be source code, HTML/CSS files, data files, datasets for machine learning projects, weather report data, or anything else. The input data would be processed using tools required for the project, producing an output, which could be a website, a software package, a machine learning model, or anything else.
While there are many kinds of build tools we could use for automating such projects, the package.json file is possibly already installed on your computer, and is up to the task.

Books by David Herron

(Sponsored)


")


