David Herron
Tags: Node.JS »»»» Docker »»»» Terraform »»»»
Amazon's AWS Elastic Container Service (ECS) lets us deploy Docker containers to the AWS cloud. In earlier postings of this series we have hosted a NGINX/Node.js application stack using Docker on our laptop, and on AWS ECS, then we hosted it on AWS ECS using Terraform. In this tutorial we switch to hosting the application using two AWS ECS Service instances, and use AWS Service Discovery between the instances.
Amazon's AWS service is an extremely complex system that has huge capabilities. In one small corner of the AWS universe is the Elastic Container Service that lets us host Docker containers on AWS infrastructure at scale. A very important requirement is for multi-container systems to have communication enabled between the containers, so that the services can work together.
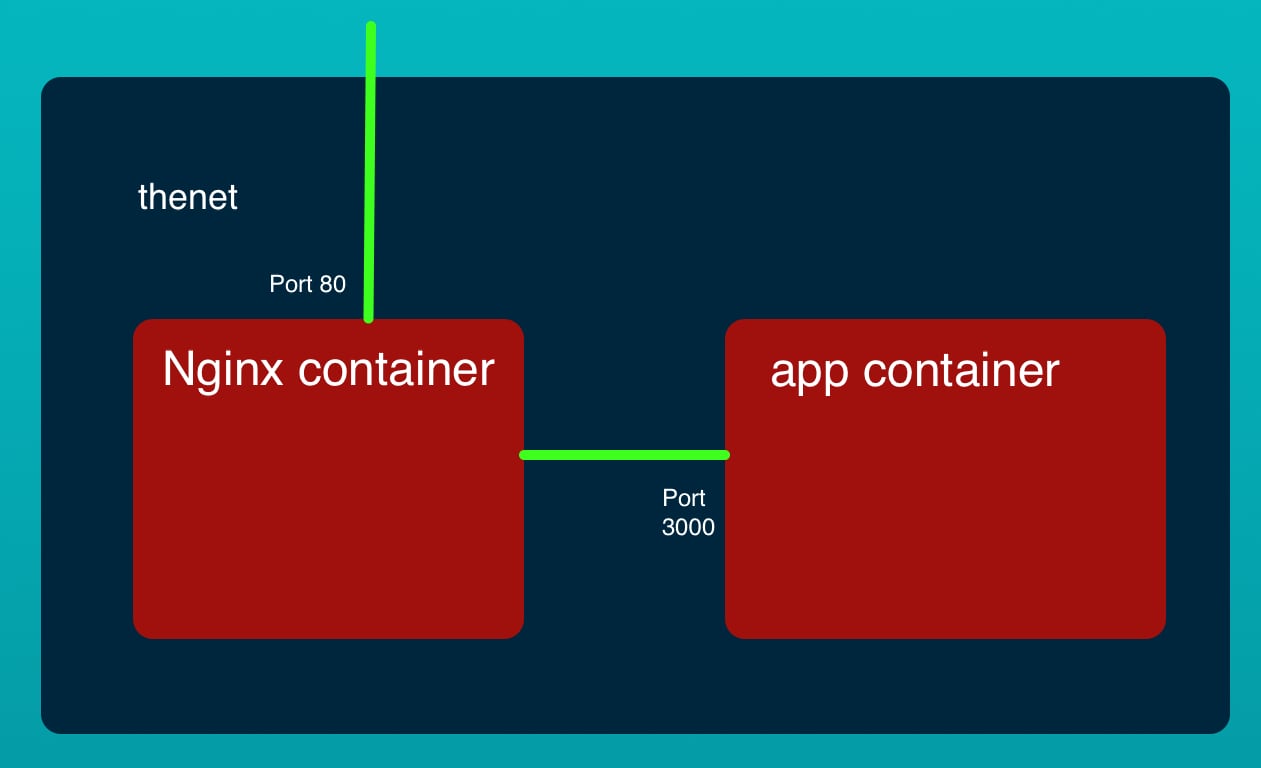
The example application we've developed partly implements that idea. The NGINX container serves as the front end of a multi-tier application. It is configured to proxy incoming HTTP traffic to a Node.js application that serves as the back-end of this multi-tier application.
Deploying a multi-Service system on AWS ECS requires some way for the containers to communicate with each other. Because ECS dynamically deploys containers to various machines, and supports dynamic scaling, it is not possible to predict the IP address for a given container. Instead we must rely on domain names being assigned to containers, and for the domain names to be automatically updated as containers are created and recreated by the ECS service manager.
This example builds off three previous tutorials:
- A simple multi-tier Node.js and Nginx deployment using Docker
- Deploying a simple multi-tier Node.js and Nginx deployment to AWS ECS
- Terraform deployment of a simple multi-tier Node.js and Nginx deployment to AWS ECS
The source code is on Github at
robogeek / aws-ecs-nodejs-sample
The key limitation of the previous tutorials is scaling. That means the ability to increase the number of service containers to match load on the service. For both of the previous deployments to AWS, the two containers were deployed as one unit. Increasing the number of units were possible, but that meant increasing the number of instances of each container in lockstep with the other.
What if your application containers have different scaling requirements? Since NGINX is so lightweight, maybe only one NGINX instance is required, while it might be required to have 10 instances of the back-end service. As it stands there must be 10 NGINX containers to have 10 instances of the back end.
What this post sets out to do is break that connection so that each service can scale independently. It will require a rewrite of the code in the ecs-terraform directory in the Github repository.
Service Discovery
In the previous implementation the NGINX container found the Node.js application by the happy coincidence that all containers in a single Task Definition sit on the same Elastic Network Interface. This meant NGINX could find the Node.js application by proxying to http://127.0.0.1:3000.
In this tutorial the goal is to have two Services where there had been one, and that means the two containers will each be in separate Task Definitions. That means that NGINX will no longer be able to proxy to http://127.0.0.1:3000.
With Docker bridge networking we were able to use the built-in DNS server provided by Docker for service discovery. This meant the NGINX container could proxy to http://app:3000 because Docker made sure the built-in DNS made the host-name app available in the DNS.
But, AWS doesn't provide such simple service discovery. Its service discovery is of course difficult to implement. Like the Docker bridge network, the AWS-provided awsvpc network can work with a DNS service, AWS's Route53, to set up DNS names for each container.
To implement this create a new file, service-discovery.tf, containing this:
resource "aws_service_discovery_private_dns_namespace" "simple-stack" {
  name        = "local"
  description = "simple-stack-nginx"
  vpc         = aws_vpc.main.id
}


resource "aws_service_discovery_service" "simple-stack-nginx" {
  name = "nginx"

  dns_config {
    namespace_id = aws_service_discovery_private_dns_namespace.simple-stack.id

    dns_records {
      ttl  = 10
      type = "A"
    }

    routing_policy = "MULTIVALUE"
  }

  health_check_custom_config {
    failure_threshold = 1
  }
}


resource "aws_service_discovery_service" "simple-stack-app" {
  name = "app"

  dns_config {
    namespace_id = aws_service_discovery_private_dns_namespace.simple-stack.id

    dns_records {
      ttl  = 10
      type = "A"
    }

    routing_policy = "MULTIVALUE"
  }

  health_check_custom_config {
    failure_threshold = 1
  }
}
The first part of this is the declaration of a Private DNS Namespace. With the value for name of local it means the automatically-generated domain names will end in .local. AWS turns around and sets up this domain name as a privately hosted Zone in the Route53 service.
The next two declarations set up DNS names for the NGINX and Node.js containers.
We will end up with two domain names - nginx.local and app.local.
As container instances come and go, they will automatically register and de-register with the Route53 zone. The generated A records will have the Private IP address corresponding to the containers.
Therefore a simple DNS query to app.local will return the IP address or addresses for the currently running Node.js containers. Further, the NGINX container will be able to directly communicate to the Node.js container. That's an improvement over an alternate implementation using an internal Load Balancer, since the Load Balancer incurs a latency penalty.
Security Groups
In security.tf we have a couple tweaks to make, plus we must add another Security Group to handle the Node.js container.
resource "aws_security_group" "lb" {
  name        = "${var.ecs_service_name}-load-balancer-security-group"
  description = "controls access to the ALB"
  vpc_id      = aws_vpc.main.id

  ingress {
    protocol    = "tcp"
    from_port   = 0
    to_port     = var.nginx_port
    cidr_blocks = ["0.0.0.0/0"]
  }
  egress {
    protocol    = "-1"
    from_port   = 0
    to_port     = 0
    cidr_blocks = ["0.0.0.0/0"]
  }
}

resource "aws_security_group" "nginx_task" {
  name        = "${var.ecs_service_name}-nginx-task-security-group"
  description = "allow inbound access to the NGINX task from the ALB only"
  vpc_id      = aws_vpc.main.id

  ingress {
    protocol        = "tcp"
    from_port       = 0
    to_port         = var.nginx_port
    cidr_blocks     = ["0.0.0.0/0"]
  }

  egress {
    protocol    = "-1"
    from_port   = 0
    to_port     = 0
    cidr_blocks = ["0.0.0.0/0"]
  }
}

resource "aws_security_group" "app_task" {
  name        = "${var.ecs_service_name}-app-task-security-group"
  description = "allow inbound access to the Application task from NGINX"
  vpc_id      = aws_vpc.main.id

  ingress {
    protocol    = "tcp"
    from_port   = 0
    to_port     = var.app_port
    cidr_blocks = [ aws_vpc.main.cidr_block ]
  }

  egress {
    protocol    = "-1"
    from_port   = 0
    to_port     = 0
    cidr_blocks = ["0.0.0.0/0"]
  }
}
The small tweak is to set the from_port value to 0.
The major addition is a new Security Group to handle the Node.js container. It is configured to accept connections only from within the Subnets connected to this VPC.
NGINX and the VPC tweaks
In the nginx subdirectory we have a copy of the NGINX container. In the configuration change the proxy_pass declaration to:
proxy_pass http://app.local:3000/;
This way the NGINX container will seek the Node.js container by its domain name.
In network.tf change the VPC declaration to
resource "aws_vpc" "main" {
  cidr_block = "172.17.0.0/16"
  enable_dns_support = true
  enable_dns_hostnames = true

  tags = {
    Name =  "${var.ecs_service_name}-VPC"
  }
}
This enables DNS support in the VPC. The default settings are probably acceptable, but this ensures that DNS will be used. Remember that the Service Discovery configuration earlier will ensure each container registers a DNS name.
Implementing two Services and two Task Definitions
Here's where we get to the meat of the blog post. We are to split the code to have two Task Definitions, and then two Services.
The work is in ecs.tf, so lets get out our hacksaw and start with the surgery.
resource "aws_ecs_task_definition" "nginx" {
  family                   = "${var.ecs_service_name}-nginx-task"
  execution_role_arn       = aws_iam_role.ecs_task_execution_role.arn
  network_mode             = "awsvpc"
  requires_compatibilities = ["FARGATE"]
  cpu                      = var.nginx_fargate_cpu
  memory                   = var.nginx_fargate_memory
  container_definitions    = jsonencode(
        [
            {
                name = "nginx"
                image = data.aws_ecr_repository.nginx.repository_url
                cpu = var.nginx_fargate_cpu
                memory = var.nginx_fargate_memory
                networkMode = "awsvpc"
                logConfiguration = {
                    logDriver = "awslogs"
                    options = {
                        awslogs-group = "/ecs/${var.ecs_service_name}-nginx"
                        awslogs-region = var.aws_region
                        awslogs-stream-prefix = "ecs"
                    }
                }
                portMappings = [ {
                    containerPort = var.nginx_port
                    hostPort = var.nginx_port
                } ]
            },
        ]
  )
}

resource "aws_ecs_service" "nginx" {
  name            = "${var.ecs_service_name}-nginx-service"
  cluster         = aws_ecs_cluster.main.id
  task_definition = aws_ecs_task_definition.nginx.arn
  desired_count   = var.nginx_count
  launch_type     = "FARGATE"

  network_configuration {
    security_groups  = [aws_security_group.nginx_task.id]
    subnets          = aws_subnet.private.*.id
    assign_public_ip = true
  }

  service_registries {
      registry_arn = aws_service_discovery_service.simple-stack-nginx.arn
      container_name = "nginx"
  }

  load_balancer {
    target_group_arn = aws_alb_target_group.nginx.id
    container_name   = "nginx"
    container_port   = var.nginx_port
  }

  depends_on = [ aws_ecs_cluster.main, aws_alb_listener.front_end, aws_iam_role_policy_attachment.ecs_task_execution_role, aws_security_group.nginx_task ]
}
This is the new NGINX service and task definition declarations.
The major change is that the container for the Node.js application is not here at all. Previously it had been declared in this Task Definition.
As a consequence the cpu and memory sizing is different.
We've added the service_registries clause so that this container is registered with a domain name.
resource "aws_ecs_task_definition" "app" {
  family                   = "${var.ecs_service_name}-app-task"
  execution_role_arn       = aws_iam_role.ecs_task_execution_role.arn
  network_mode             = "awsvpc"
  requires_compatibilities = ["FARGATE"]
  cpu                      = var.app_fargate_cpu
  memory                   = var.app_fargate_memory
  container_definitions    = jsonencode(
        [ {
                name = "app"
                image = data.aws_ecr_repository.app.repository_url
                cpu = var.app_fargate_cpu
                memory = var.app_fargate_memory
                networkMode = "awsvpc"
                logConfiguration = {
                    logDriver = "awslogs"
                    options = {
                        awslogs-group = "/ecs/${var.ecs_service_name}-app"
                        awslogs-region = var.aws_region
                        awslogs-stream-prefix = "ecs"
                    }
                }
                portMappings = [ {
                    containerPort = var.app_port
                    hostPort = var.app_port
                } ]
        } ]
  )
}

// Comment this out if using a single Service
resource "aws_ecs_service" "app" {
  name            = "${var.ecs_service_name}-app-service"
  cluster         = aws_ecs_cluster.main.id
  task_definition = aws_ecs_task_definition.app.arn
  desired_count   = var.app_count
  launch_type     = "FARGATE"

  network_configuration {
    security_groups  = [aws_security_group.app_task.id]
    subnets          = aws_subnet.private.*.id
    assign_public_ip = false
  }

  service_registries {
      registry_arn = aws_service_discovery_service.simple-stack-app.arn
      container_name = "app"
  }

  depends_on = [ aws_ecs_cluster.main, aws_alb_listener.front_end, aws_iam_role_policy_attachment.ecs_task_execution_role, aws_security_group.app_task ]
}
And this declares the Task Definition and Service for the Node.js service.
This is more-or-less a simple copy-and-paste and then adjusting the details. The important thing again is the service_registries clause to make sure this Service is registered with the DNS.
Deployment
That's the entirety of the changes required to set up an AWS ECS deployment with two Services and two Task Definitions. To verify that the system works as advertised, and that the two containers are able to communicate, we need to launch the system on AWS.
The first task is to rebuild the containers, and re-upload them to ECR.
As before that involves these commands
$ npm run docker-login
...
$ npm run build
... much output
$ npm run ecr-tag-repos
... much output
$ npm run ecr-push-repos
... much output
$ npm run ecr-repositories
Since the ECR repositories have already been created it is not necessary to execute npm run ecr-create-repos and we can instead focus on ecr-tag-repos and ecr-push-repos. If all goes well the Docker images will be correctly deployed to ECR.
Once the images have been updated it is time to deploy this to AWS.
$ terraform plan
... much output
$ terraform apply
... much output
The plan command lets us check that we haven't made any mistake. Terraform will let us know about syntax errors and other errors.
The apply command is what sets up the system on AWS. This should take a long time, and at the end it finishes with output like this:
Apply complete! Resources: 32 added, 0 changed, 0 destroyed.

Outputs:

alb_hostname = simple-app-load-balancer-1512130265.us-west-2.elb.amazonaws.com
You can paste this DNS name into your browser and should see the application come up. But there might be a delay before the service is fully functioning.
We can also get this DNS name by navigating to the EC2 dashboard, then looking in the list of Load Balancers. The Load Balancer for this cluster will be visible, and looking at its details gives the domain name.
If we navigate to the ECS dashboard, we might find this:
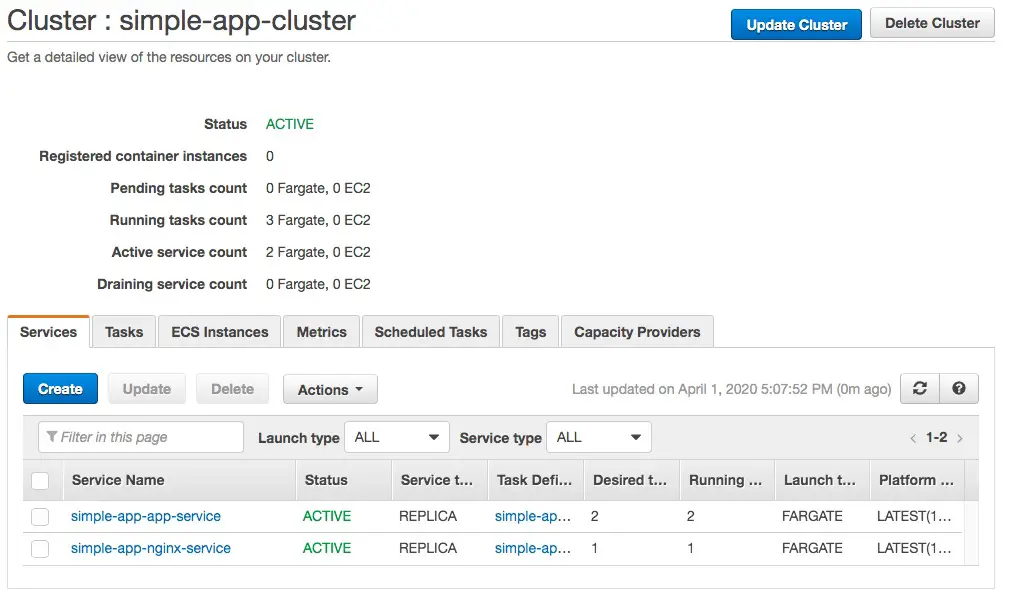
The two services are marked ACTIVE and all looks fine, yes?
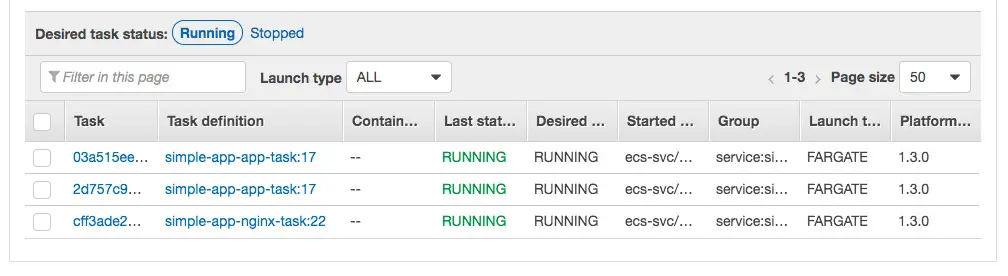
Switching to the Tasks tab shows the list of Tasks and their current status.
The Service tab simply shows the Services, but the actual running software in the Docker containers is shown in the Tasks tab.
This screen capture shows the desired state of the system, all Tasks are fully launched, in the RUNNING state, and continue to have good health. I've observed that it will take a couple minutes for everything to settle down to this status.
The number of instances in this case is due to nginx_count being set to 1 and app_count being set to 2.

We can also inspect the Task details to learn about things like the IP addresses.
It's also useful to browse around the VPC console to inspect the infrastructure that was built.
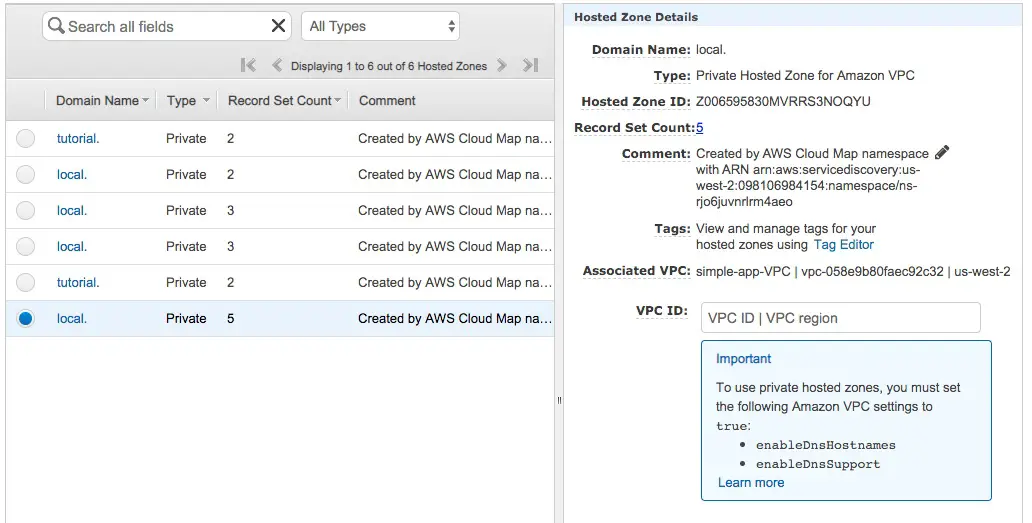
But the most useful is to browse to the Route53 dashboard. Click on the Hosted Zones choice and you can find this. I have several local zones left over from previous iterations of testing this code. The one selected here is currently active and connected to the VPS in question.
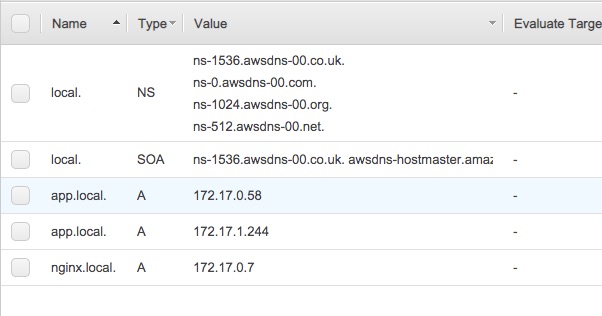
Clicking on the local link brings us to this, showing the domain name configuration and the currently registered domain names.
Compare the IP addresses here with the IP addresses on the Task details page, and you'll find that they match. These A records show the local IP addresses for each container running in the system.
Summary
In this tutorial we learned how to build a multi-Service deployment on AWS ECS, and to use the AWS Service Discovery system to facilitate communication between the service containers.

Books by David Herron

(Sponsored)


