David Herron
Tags: Node.JS »»»» Docker »»»»
Amazon's AWS Elastic Container Service (ECS) lets us deploy Docker containers to the AWS cloud. ECS is a very complex beast to tame, but Amazon offers a method of using Docker Compose to describe an ECS Service. That hugely simplifies the task of launching tasks on AWS ECS.
This example builds off our previous tutorial: A simple multi-tier Node.js and Nginx deployment using Docker
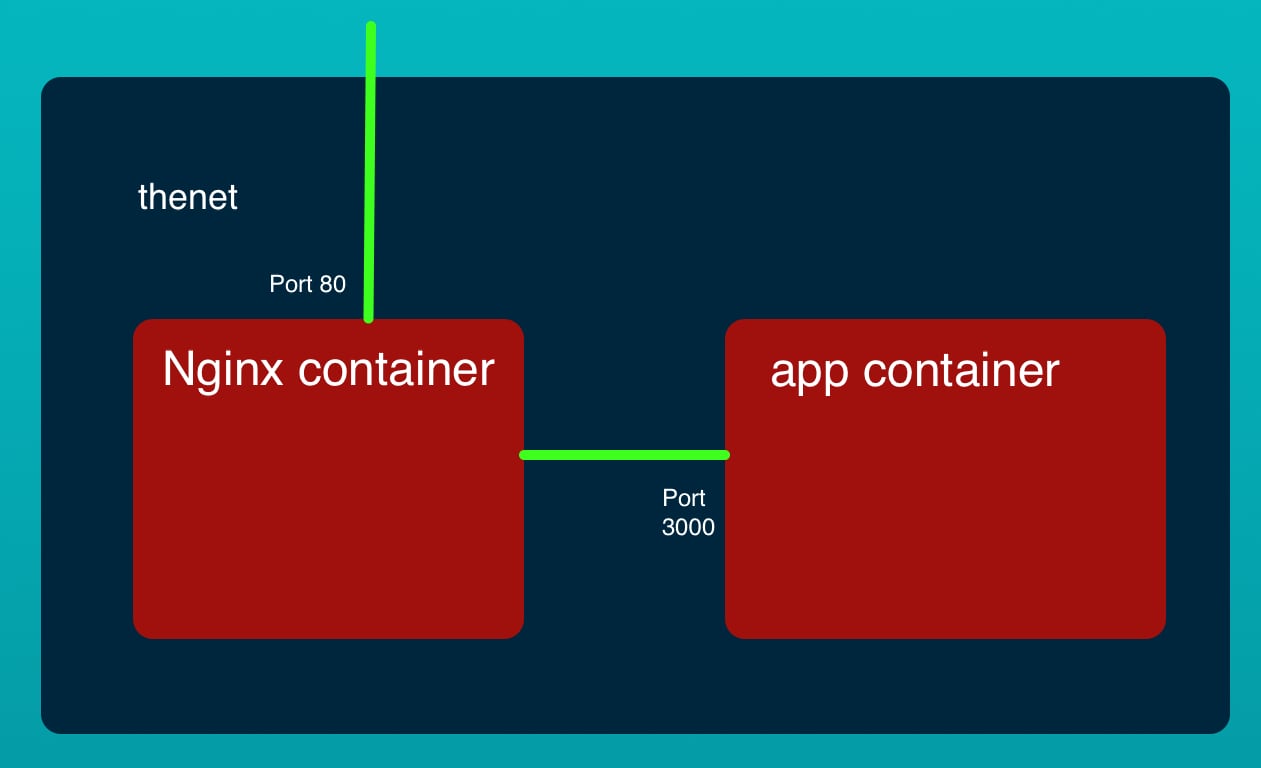
That example is a two-container system that roughly mimics a multi-tier application. The front tier is an NGINX server that has its HTTP port published to the world. The back tier is an extremely simple Node.js service. While it is a trivial example, either of these containers could be far more complex and there could easily be multiple back-end micro-service containers. But to get to that we must start with baby steps.
To familiarize yourself with the application stack visit the earlier tutorial.
The source code is on Github at
robogeek / aws-ecs-nodejs-sample
Setting up AWS and ECS CLI tools
For this application we will be using the CLI tools for AWS and AWS ECS. This will let us write admin scripts to manage things, which is an improvement over point-and-click instructions on the AWS management console website.
We start by installing and configuring the AWS CLI. To install the CLI tool, see the instructions at:

The next step is to set up sign-in credentials. A pre-requisite is to set up:
- An AWS Root Account, which is the main AWS account when you sign up with the service
- Then create an IAM User Account with which we will be doing everything in the tutorial
In the IAM area you'll be able to download access key CSV files for each of these.
In the AWS CLI tool we'll create an AWS Profile for each. The AWS documentation has some discussion about this at
$ aws configure --profile PROFILE-NAME-FOR-ROOT-ACCOUNT
AWS Access Key ID [None]: AKIAIOSFODNN7EXAMPLE
AWS Secret Access Key [None]: wJalrXUtnFEMI/K7MDENG/bPxRfiCYEXAMPLEKEY
Default region name [None]: us-west-2
Default output format [None]: json
$ aws configure --profile PROFILE-NAME-FOR-IAM-USER-ACCOUNT
AWS Access Key ID [None]: AKIAIOSFODNN7EXAMPLE
AWS Secret Access Key [None]: wJalrXUtnFEMI/K7MDENG/bPxRfiCYEXAMPLEKEY
Default region name [None]: us-west-2
Default output format [None]: json
That is, the aws configure command interrogates you about the access keys, plus your desired region code and output format. The access keys were downloaded when you created the accounts. Choose a profile name to go with each account.
This creates two files ~/.aws/credentials and ~/.aws/config which are simple INI-style files containing the data you entered. In fact it's possible to create a profile just by editing these files.
The next step is to download and initialize the ECS CLI tool. Instructions for installation are at:
Then we need to configure a profile for the ECS CLI tool. It is similar to what we did for the AWS CLI tool.
$ ecs-cli configure profile --profile-name PROFILE-NAME-FOR-IAM-USER-ACCOUNT --access-key $AWS_ACCESS_KEY_ID --secret-key $AWS_SECRET_ACCESS_KEY
This is using the same access keys as used for configuring the AWS CLI. For this purpose use the access keys for the IAM account, and use the same profile name.
We'll also learn on that page about some environment variables - ECS_PROFILE, AWS_PROFILE, and AWS_REGION in which we can set the desired values for each.

Uploading Docker containers to AWS ECR Repositories
Before we can deploy Docker containers to ECS they must be in a public Docker repository. AWS offers the Elastic Container Registry to supply you with a Docker suitable repository.
The example repository (
robogeek / aws-ecs-nodejs-sample) contains these directories:
app, containing the Node.js source of the server,nginx, containing an NGINX container for use on your laptop,nginx-ecs-simple, containing an NGINX container for deployment to ECS, and,ecs-simple, containing scripts to aid deployment to ECS.
The difference between the contents of nginx and nginx-ecs-simple is that for ECS deployment the proxy configured in nginx.conf is:
server { # simple reverse-proxy
    listen       80;
    location / {
        proxy_pass      http://127.0.0.1:3000/;
    }
}
For use on our laptop, the proxy_pass declaration points to http://app:3000 but here it points to 127.0.0.1. That's because of the difference between Docker bridge networking, and AWS awsvpc networking.
On a Docker bridge network the containers each have a DNS name related to the container name. For the example we're about to show, the containers are all attached to the same virtual network interface and are therefore able to reach each other via the 127.0.0.1 IP address.
In the ecs-simple directory we have a docker-compose.yml suitable for ECS deployment, an ecs-params.yml file that gives additional ECS configuration, and a package.json containing useful scripts. In this section we'll only go over the latter, and we'll cover the Docker Compose and ECS Params files in the next section.
{
    "scripts": {
        "build": "npm run build-app && npm run build-nginx",
        "build-app": "cd ../app && docker build -t app:latest .",
        "build-nginx": "cd ../nginx-ecs-simple && docker build -t nginx-ecs-simple:latest .",
        "ecr-create-repos": "npm run ecr-create-app && npm run ecr-create-nginx",
        "ecr-create-app": "cd ../app && aws ecr create-repository --profile $AWS_PROFILE --repository-name app --image-scanning-configuration scanOnPush=true --region ${AWS_REGION}",
        "ecr-create-nginx": "cd ../nginx-ecs-simple && aws ecr create-repository --profile ${AWS_PROFILE} --repository-name nginx-ecs-simple --image-scanning-configuration scanOnPush=true --region ${AWS_REGION}",
        "ecr-tag-repos": "npm run ecr-tag-app && npm run ecr-tag-nginx",
        "ecr-tag-app": "cd ../app && docker tag app:latest ${AWS_USER}.dkr.ecr.${AWS_REGION}.amazonaws.com/app:latest",
        "ecr-tag-nginx": "cd ../nginx-ecs-simple && docker tag nginx:latest ${AWS_USER}.dkr.ecr.${AWS_REGION}.amazonaws.com/nginx-ecs-simple:latest",
        "ecr-push-repos": "npm run ecr-push-app && npm run ecr-push-nginx",
        "ecr-push-app": "cd ../app && docker push ${AWS_USER}.dkr.ecr.${AWS_REGION}.amazonaws.com/app:latest",
        "ecr-push-nginx": "cd ../nginx-ecs-simple && docker push ${AWS_USER}.dkr.ecr.${AWS_REGION}.amazonaws.com/nginx-ecs-simple:latest"
    }
}
Note that we're relying on the environment variables mentioned earlier. AWS_PROFILE is the AWS Profile being used, and AWS_REGION is the AWS Region to be used. The value for AWS_USER must be the IAM user ID number. This is not the IAM user name, but the numerical ID number that you'll see in the IAM dashboard.
When we create a container repository in the Elastic Container Registry, it generates for us a container repository name in the format ${AWS_USER}.dkr.ecr.${AWS_REGION}.amazonaws.com/CONTAINER-NAME. Hence the script uses that format.
Before we can run these commands a little setup is required. First, we log-in to the ECR Registry:
$ aws ecr get-login-password --profile PROFILE-NAME --region REGION-NAME | docker login --username AWS --password-stdin USER-ID.dkr.ecr.REGION-NAME.amazonaws.com/app
In that command, PROFILE-NAME is the AWS profile you wish to use. And, REGION-NAME is the AWS region you want the ECR Repository to be in. Finally, USER-ID is the IAM User ID.
With that out of the way, let's talk about building the container images and uploading them to the Elastic Container Registry.
These scripts let us build the container images on our laptop:
$ npm run build
... much output
This builds the images on our laptop.
The next step is creating Docker image repositories on ECR that will store the two images.
$ npm run ecr-create-repos
... much output
This creates the repositories, which you can verify by looking at the ECR dashboard. Or, you can run this command:
$ aws ecr describe-repositories --profile ${AWS_PROFILE} --repository-names app nginx-ecs-simple
{
    "repositories": [
        {
            "repositoryArn": "arn:aws:ecr:AWS_REGION:AWS_USER:repository/app",
            "registryId": "AWS_USER",
            "repositoryName": "app",
            "repositoryUri": "AWS_USER.dkr.ecr.AWS_REGION.amazonaws.com/app",
            "createdAt": "2020-03-21T16:48:07-07:00",
            "imageTagMutability": "MUTABLE",
            "imageScanningConfiguration": {
                "scanOnPush": true
            }
        },
        {
            "repositoryArn": "arn:aws:ecr:AWS_REGION:AWS_USER:repository/nginx-ecs-simple",
            "registryId": "AWS_USER",
            "repositoryName": "nginx-ecs-simple",
            "repositoryUri": "AWS_USER.dkr.ecr.AWS_REGION.amazonaws.com/nginx-ecs-simple",
            "createdAt": "2020-03-24T16:53:24-07:00",
            "imageTagMutability": "MUTABLE",
            "imageScanningConfiguration": {
                "scanOnPush": true
            }
        }
    ]
}
The important piece of data is the repositoryUri value. Record this for later use.
The next step is to tag the repositories, like so:
$ npm run ecr-tag-repos

> @ ecr-tag-repos /Volumes/Extra/nodejs/aws-ecs-nodejs-sample/ecs-simple
> npm run ecr-tag-app && npm run ecr-tag-nginx


> @ ecr-tag-app /Volumes/Extra/nodejs/aws-ecs-nodejs-sample/ecs-simple
> cd ../app && docker tag app:latest ${AWS_USER}.dkr.ecr.${AWS_REGION}.amazonaws.com/app:latest


> @ ecr-tag-nginx /Volumes/Extra/nodejs/aws-ecs-nodejs-sample/ecs-simple
> cd ../nginx-ecs-simple && docker tag nginx:latest ${AWS_USER}.dkr.ecr.${AWS_REGION}.amazonaws.com/nginx-ecs-simple:latest
This prepares the images for being pushed to the ECR repositories.
And finally we push the images to the repositories:
$ npm run ecr-push-repos

> @ ecr-push-repos /Volumes/Extra/nodejs/aws-ecs-nodejs-sample/ecs-simple
> npm run ecr-push-app && npm run ecr-push-nginx


> @ ecr-push-app /Volumes/Extra/nodejs/aws-ecs-nodejs-sample/ecs-simple
> cd ../app && docker push ${AWS_USER}.dkr.ecr.${AWS_REGION}.amazonaws.com/app:latest

The push refers to repository [AWS_USER.dkr.ecr.AWS_REGION.amazonaws.com/app]
4428b5a79a9b: Layer already exists
b5a31e7fd043: Layer already exists
18db616a7fac: Layer already exists
7fac39be7c83: Layer already exists
236d3097407d: Layer already exists
91daf9fc6311: Layer already exists
162804eaaa1e: Layer already exists
d040e6423b7a: Layer already exists
00adafc8e77b: Layer already exists
2c995a2087c1: Layer already exists
latest: digest: sha256:6747b12eca9485c8aceadce063c38564fe8fb45058db1455221794528c89aa42 size: 2422

> @ ecr-push-nginx /Volumes/Extra/nodejs/aws-ecs-nodejs-sample/ecs-simple
> cd ../nginx-ecs-simple && docker push ${AWS_USER}.dkr.ecr.${AWS_REGION}.amazonaws.com/nginx-ecs-simple:latest

The push refers to repository [AWS_USER.dkr.ecr.AWS_REGION.amazonaws.com/nginx-ecs-simple]
62a89b0c27c8: Pushed
bc21985928b6: Pushed
e370c53ec242: Pushed
f2cb0ecef392: Pushed
latest: digest: sha256:43c7a9f24236575c6bb465d04254ed53640a8ed587817776e84e7bd419792a8b size: 1155
One way to verify this worked is with docker pull:
$ docker pull AWS_USER.dkr.ecr.AWS_REGION.amazonaws.com/nginx-ecs-simple
Using default tag: latest
latest: Pulling from nginx-ecs-simple
Digest: sha256:43c7a9f24236575c6bb465d04254ed53640a8ed587817776e84e7bd419792a8b
Status: Image is up to date for AWS_USER.dkr.ecr.AWS_REGION.amazonaws.com/nginx-ecs-simple:latest
AWS_USER.dkr.ecr.AWS_REGION.amazonaws.com/nginx-ecs-simple:latest
With that taken care of we're ready to move on to the next step, deploying the service on AWS ECS.
Using Docker Compose file to deploy an AWS ECS service
AWS ECS would prefer that we use a CloudFormation file, or a Task Definition file. But it happens to allow us to use a Docker Compose file to describe our AWS Services. This means we can use a familiar file to describe AWS Service instances, that is also portable to other places where Docker Compose files can be used.
ECS's support of Docker Compose is incomplete, since it doesn't support the very latest features (it only supports version 3, whereas the Docker team is up to version 3.5). Also it requires we use an ECS Params file.
There are many steps to this which are extrapolated from
ECS requires there be a role, ecsTaskExecutionRole, to allow ECS to execute containers as Tasks in a Service. For that purpose create a file named task-execution-assume-role.json with the following contents:
{
  "Version": "2012-10-17",
  "Statement": [
    {
      "Sid": "",
      "Effect": "Allow",
      "Principal": {
        "Service": "ecs-tasks.amazonaws.com"
      },
      "Action": "sts:AssumeRole"
    }
  ]
}
Then run these commands:
$ aws iam create-role --role-name ecsTaskExecutionRole --assume-role-policy-document file://task-execution-assume-role.json
$ aws iam attach-role-policy --role-name ecsTaskExecutionRole --policy-arn arn:aws:iam::aws:policy/service-role/AmazonECSTaskExecutionRolePolicy
Remember that AWS_PROFILE and AWS_REGION environment variables were set earlier. Otherwise we would need --profile and --region options.
Next we set up ECS CLI configuration to hold the project we're about to create:
$ ecs-cli configure --cluster simple-app-nginx-stack \
     --default-launch-type FARGATE \
     --config-name  simple-app-nginx-stack
INFO[0000] Saved ECS CLI cluster configuration simple-app-nginx-stack.
$ ecs-cli configure profile \
    --access-key AWS-ACCESS-KEY --secret-key AWS-SECRET-ACCESS-KEY \
    --profile-name simple-app-nginx-stack
INFO[0000] Saved ECS CLI profile configuration simple-app-nginx-stack.
We're setting up to use the AWS Fargate sort of ECS cluster, and have given it the configuration name of simple-app-nginx-stack.
Next we create an ECS cluster:
$ ecs-cli up --cluster-config simple-app-nginx-stack \
        --ecs-profile  simple-app-nginx-stack
INFO[0000] Created cluster                               cluster=simple-app-nginx-stack region=us-west-2
INFO[0001] Waiting for your CloudFormation stack resources to be deleted...
INFO[0001] Cloudformation stack status                   stackStatus=DELETE_IN_PROGRESS
INFO[0033] Waiting for your cluster resources to be created...
INFO[0033] Cloudformation stack status                   stackStatus=CREATE_IN_PROGRESS
VPC created: vpc-0b2e149df2e775b07
Subnet created: subnet-06d826a8fdbac9fdb
Subnet created: subnet-0623d082aed3b93c4
Cluster creation succeeded.
Behind the scenes AWS ECS is using Cloudformation to do the work. It shows us the ID strings for an AWS VPC and two Subnets.
If we head over to the AWS Management Console, and study the VPC dashboard, we'll find the two subnets are public -- meaning there is an Internet Gateway attached to the VPC and both subnets are configured to send non-local traffic to the Internet Gateway.
THe next step is to configure the Security Group to allow HTTP traffic.
$ aws ec2 describe-security-groups --filters Name=vpc-id,Values=vpc-0b2e149df2e775b07
{
    "SecurityGroups": [
        {
            ...
            "GroupId": "sg-081e236597b6f8201",
            ...
            "VpcId": "vpc-0b2e149df2e775b07"
        }
    ]
}
There is a lot of information given by this command, but the ID of the security group is what we're looking for.
$ aws ec2 authorize-security-group-ingress \
    --group-id sg-081e236597b6f8201 --protocol tcp --port 80 --cidr 0.0.0.0/0
This configures the named security group to allow HTTP traffic to arrive from anywhere in the universe.
Now we are ready to look at docker-compose.yml and ecs-params.yml.
In docker-compose.yml:
version: '3'

services:
    nginx:
        image: AWS_USER.dkr.ecr.AWS_REGION.amazonaws.com/nginx-ecs-simple
        container_name: nginx
        networks:
            - thenet
        ports:
            - '80:80'
        logging:
            driver: awslogs
            options:
                awslogs-group: simple-stack-nginx
                awslogs-region: AWS_REGION
                awslogs-stream-prefix: nginx
    app:
        image: AWS_USER.dkr.ecr.AWS_REGION.amazonaws.com/app
        container_name: app
        networks:
            - thenet
        logging:
            driver: awslogs
            options:
                awslogs-group: simple-stack-app
                awslogs-region: AWS_REGION
                awslogs-stream-prefix: app

networks:
    thenet:
We've done two things here: a) Instead of using a build directive, we use an image directive, referencing the container images we've pushed to ECR; b) added a logging section referencing the awslogs service.
This describes two containers, one running NGINX, the other running the simple Node.js app. They are both connected to thenet which was important when we ran this on our laptop, but might not be important when deployed to ECS.
What ECS will do is to create a Task Definition from this, and then launch a Service. A side effect of launching multiple containers in a Task Definition is that every such container shares the same Elastic Network Interface. Hence they all can communicate with each other on 127.0.0.1, and therefore we changed nginx.conf to reference http://127.0.0.1:3000.
In ecs-params.yml:
version: 1
task_definition:
  task_execution_role: ecsTaskExecutionRole
  ecs_network_mode: awsvpc
  task_size:
    mem_limit: 0.5GB
    cpu_limit: 256
run_params:
  network_configuration:
    awsvpc_configuration:
      subnets:
        - "subnet-06d826a8fdbac9fdb"
        - "subnet-0623d082aed3b93c4"
      security_groups:
        - "sg-081e236597b6f8201"
      assign_public_ip: ENABLED
This is fairly self-explanatory - note that this file has a looooong list of possible values we can set. We've specified awsvpc network, which is a requirement for AWS Fargate. And we've specified memory and CPU limits allowing this to fit into the free tier. Finally we've specified the Subnets and the Security Group attached to the VPC.
With these two files we can deploy this to the ECS cluster:
$ ecs-cli compose \
    --project-name simple-app-nginx-stack \
    service up \
    --create-log-groups \
    --cluster-config simple-app-nginx-stack \
    --ecs-profile simple-app-nginx-stack
And, we can view data about the running tasks:
$ ecs-cli compose \
    --project-name simple-app-nginx-stack \
    service ps \
    --cluster-config simple-app-nginx-stack \
    --ecs-profile simple-app-nginx-stack
Name                                                           State    Ports                    TaskDefinition            Health
simple-app-nginx-stack/1977ee4f734248cca1c21714e65ce250/nginx  RUNNING  34.217.10.44:80->80/tcp  simple-app-nginx-stack:2  UNKNOWN
simple-app-nginx-stack/1977ee4f734248cca1c21714e65ce250/app    RUNNING                           simple-app-nginx-stack:2  UNKNOWN
An important piece of data here is the IP address of the service.
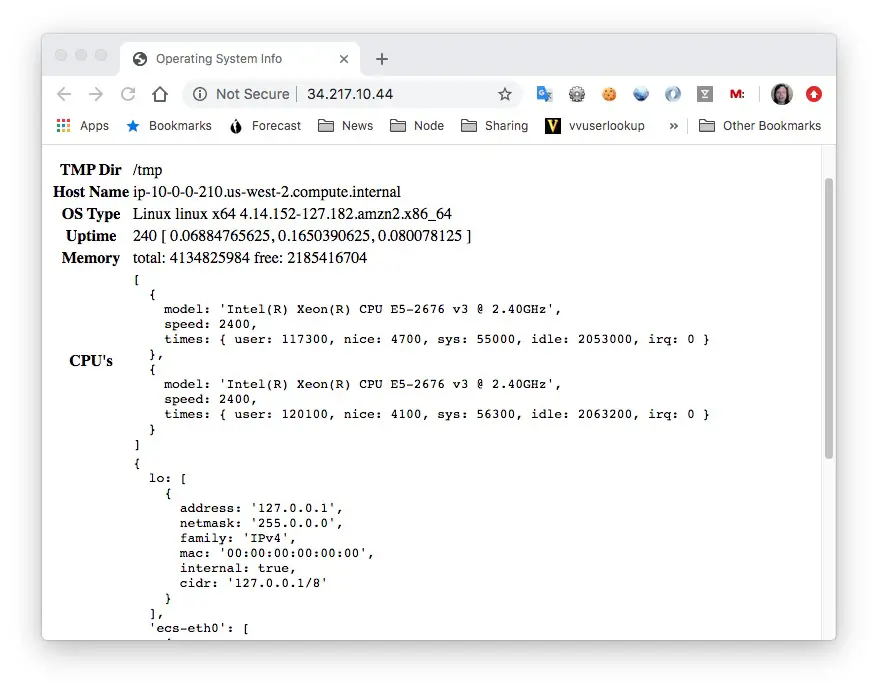
Success! We have deployed a multi-tier service to AWS ECS.
Before we take this down, let's take a look around and see what ECS created for us.

This is the overview of the ECS cluster. Notice there is one running Task, and one running Service.
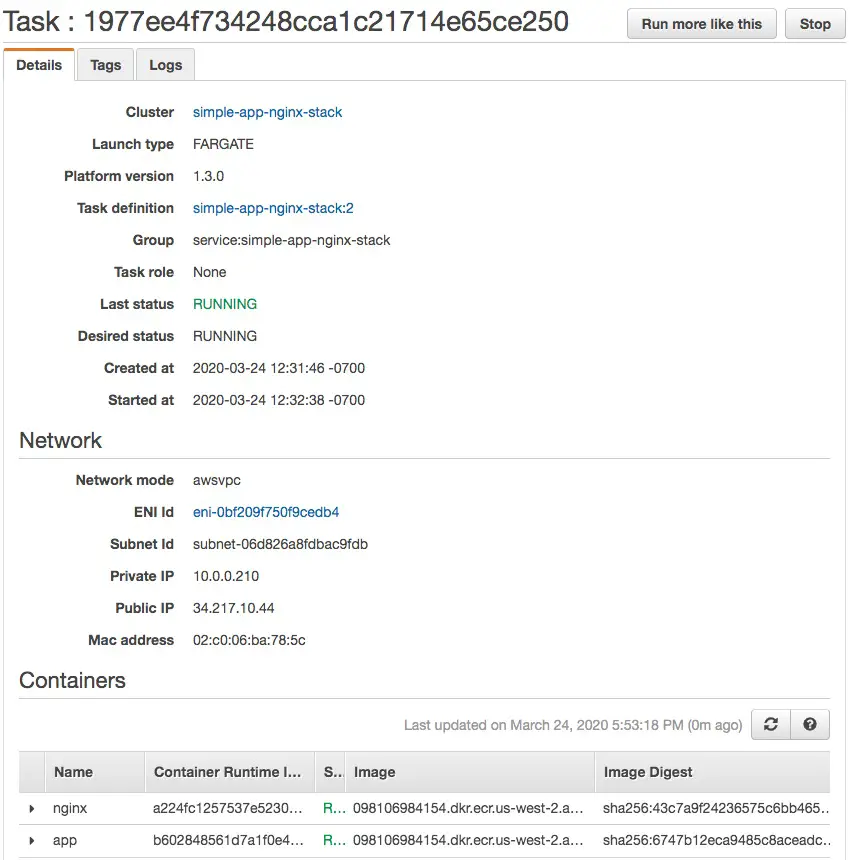
This is the running Task. Notice that it contains the two Containers we declared in the Docker Compose file.
Also notice there is a single ENI (Elastic Network Interface) shared by those containers.

And the VPC details. It has a CIDR of 10.0.0.0/16 and so forth.

Then these subnets were created.
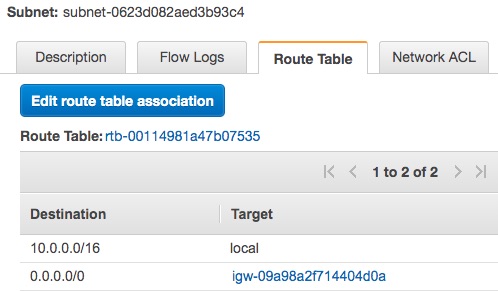
Each has a route table with this configuration. This configuration keeps any traffic for 10.0.0.0/16 local to the VPC, and sends any other traffic to the Internet Gateway.
To learn about the Internet Gateway, or the NAT Gateway, head over to the corresponding section of the VPC area and use the VPC ID as a filter.
The last thing of interest is the Cloudformation Stack that was created. Refer back and you see when the ECS cluster was brought up, a Cloudformation stack was generated. Cloudformation is an AWS service to describe a whole system of services comprising anything that AWS has to offer.
In theory we shouldn't have used a Docker Compose file but should have bit the bullet and just written a Cloudformation Template.
But -- the Docker Compose file is a lot simpler to create. Plus, AWS generated for us a Cloudformation template. In theory we could take that template as a starting point to customize further.
The last thing is to bring the service down. Clearly this service does not need to stay running.
$ ecs-cli compose \
    --project-name simple-app-nginx-stack \
    service down \
    --cluster-config simple-app-nginx-stack \
    --ecs-profile simple-app-nginx-stack
$ ecs-cli down --force \
    --cluster-config simple-app-nginx-stack \
    --ecs-profile simple-app-nginx-stack
After executing these commands, all traces of everything which was created will have vaporized.

Books by David Herron

(Sponsored)


