David Herron
Tags: Node.JS »»»» Docker »»»» AWS »»»»
The AWS Elastic Container Service is supposed to be an excellent place to deploy Docker containers at scale. But unless you're careful with the configuration it is easy to get stuck with the dreaded CannotPullContainerError. AWS's documentation about this is unclear as to the precise cure for this problem. In this post we'll go over the correct way to configure a VPC and deploy a Docker container in an ECS cluster attached to the VPC.
The underlying issue is that AWS tosses you the keys to a kit to build a Ferrari, and the instructions are vague and incomplete. AWS is designed for experts, and is not very friendly to newcomers. Using the AWS management console reminds me of being lost in that maze of twisty caverns all alike which I explored decades ago.
In this post we'll demonstrate an issue that can arise when building an ECS cluster in an AWS VPC. The CannotPullContainerError can be confusing, but there is an easy mistake that can be made.
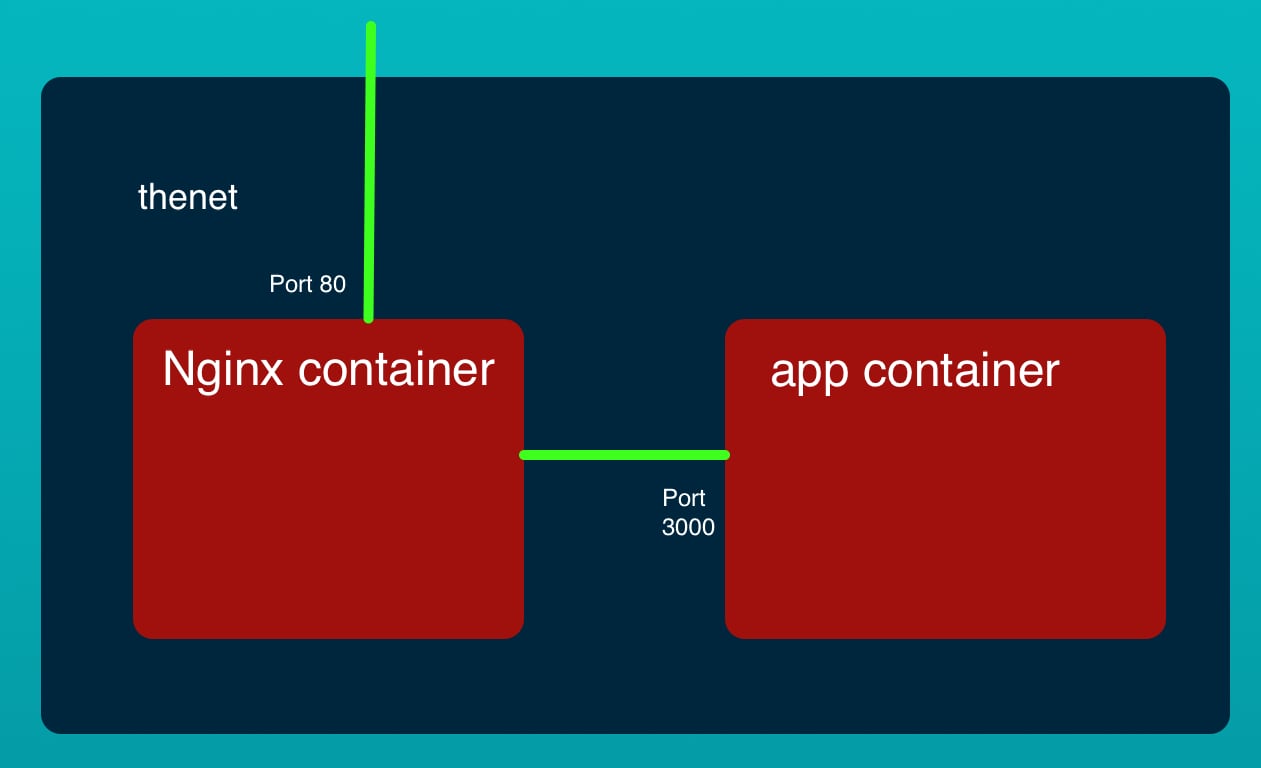
To do this we'll build two AWS VPC's, one with a good configuration and the other with a bad configuration. The application to deploy has an Nginx container as a front end to a Node.js application. We've used this same application in Deploying a simple multi-tier Node.js and Nginx deployment to AWS ECS It's meant to model a simple two-tier architecture, with an Nginx on a public VPC subnet, and a Node.js service on a private VPC subnet.
As a pre-requisite, you should have enough knowledge of AWS, Docker and Node.js that the previous paragraph made sense. Also you should have an AWS account set up and ready to go.
It appears that out-of-the-box AWS does not give you a working AWS VPC on which we can successfully deploy containers into an ECS. Instead one must perform some configuration to the VPC to ensure the ECS cluster can deploy containers.
Maybe you need to do some setup? If so:
- Installing Docker on your laptop Installing Docker Engine or Desktop on Ubuntu, macOS or Windows
- Installing the AWS CLI on your laptop Setting up the AWS Command-Line-Interface (CLI) tool on your laptop
- Setting up at least an AWS root account, and preferably an IAM sub-account
- Setting up an AWS Profile for either of those accounts. We'll use the
--profile profile-nameoption to target the IAM user.
You may already know this - an AWS Virtual Private Cluster (VPC) is kind of what it sounds like. It is a private section of AWS infrastructure to which you can attach AWS resources. The infrastructure pieces attached to a VPC are separated from all other VPC's. Further, AWS guarantees strong boundaries around VPC's such that it is very difficult for miscreants to penetrate your systems, and with care the configuration can be locked down tight.
The AWS Elastic Container Service (ECS) lets us deploy Docker Containers on the AWS infrastructure. We'll be using AWS ECS Fargate rather than the EC2 variety of ECS.
With the correct VPC configuration we're trying to avoid this and other related errors:
CannotPullContainerError: Error response from daemon: Get https://098106984154.dkr.ecr.us-west-2.amazonaws.com/v2/: net/http: request canceled while waiting for connection (Client.Timeout exceeded while awaiting headers)
This error indicates that when ECS tried to pull a container - in this case from an ECR repository - it was unable to access the repository. This error arises because of a misconfigured VPC where the ECS service is unable to access services on the Internet. This will fail similarly with both ECR repositories and repositories on Docker Hub. It is very simple, that ECS tries to make an HTTPS connection to the Docker repository, and the connection attempt hangs until there is a timeout.
By correctly configuring the VPC, ECS is able to access the Internet to access Docker registries and pull Docker images.
The application to deploy
In a companion article we present a simple Node.js application with an NGINX front-end. The application is in a pair of Docker containers, and is managed using Docker Compose.
See: A simple multi-tier Node.js and Nginx deployment using Docker
Come back here when you have put the app through its paces.

Uploading Docker containers to AWS ECR Repositories
Before we can deploy Docker containers to ECS they must be in a public Docker repository. AWS offers the Elastic Container Registry to supply you with a Docker suitable repository.
The application we're using as an example is on Github at
robogeek / aws-ecs-nodejs-sample
In a companion article (Deploying a simple multi-tier Node.js and Nginx deployment to AWS ECS ) we go over deploying this application to AWS ECS using a different method. That article shows building the container images and pushing them to an AWS ECR repository.
For this article what we need to know is that Docker images are being stored in an ECR repository.
In order to deploy Docker containers on AWS infrastructure, the images must be hosted in a Docker repository. That could be on Docker Hub, the AWS Elastic Container Registry (ECR), a self hosted Docker repository, or any other Docker repository. ECS will pull the images from whatever repository you specify. To do so, ECR must have access to the repository.

Configuring an AWS VPC for use by ECS
As said, we'll configure two VPC's and then two ECS clusters. One will have good configuration, and the other bad configuration.
It's the same instructions for both VPC's, except for one critical difference. What we'll do is present the instructions once, and explain a naming convention to make it clear which infrastructure items are for the good VPC or for the bad VPC.
Name the good VPC as vpc-good and then name every infrastructure item with the vpc-good prefix. Likewise the bad VPC will be named vpc-bad and we'll use the prefix vpc-bad. You should use the correct prefix depending on whether you're creating the good VPC or the bad VPC.
Start by logging-in to the AWS Management console, and then navigating to the VPC dashboard. Click on Your VPC's.
- Create a VPC - named
vpc-goodorvpc-bad.- Do not use the Launch VPC Wizard, but instead the Create VPC button on the Your VPC's page.
- Use the CIDR of
10.0.0.0/16
- Go to Subnets and we will create two subnet's
- Name the first
vpc-good-net-privateorvpc-bad-net-privateas appropriate- Attach it to
vpc-goodorvpc-badas appropriate - Leave the availability zone as whatever
- Use CIDR of
10.0.1.0/24
- Attach it to
- Name the second
vpc-good-net-publicorvpc-bad-net-publicas appropriate- Attach it to
vpc-goodorvpc-badas appropriate - Leave the availability zone as whatever
- Use CIDR of
10.0.2.0/24
- Attach it to
- Name the first
- Go to Internet Gateways and click on Create internet gateway
- Name it
vpc-good-igworvpc-bad-igw - Once it is created, select the newly created IGW, then in the Actions menu, select Attach to VPC. Then attach it to
vpc-goodorvpc-bad - An Internet Gateway, as the name implies, is what connects a VPC subnet to the public Internet
- Name it
- Go to NAT Gateways and click on Create NAT Gateway
- Name it
vpc-good-natorvpc-bad-nat - When creating
vpc-bad, attach the NAT to thevpc-bad-net-privatesubnet - When creating
vpc-good, attach the NAT to thevpc-good-net-publicsubnet - For proper configuration it is important that the NAT be attached to the public subnet. Notice that in
vpc-goodthat's where the NAT is connected. - For the Elastic IP allocation, click the Allocate button unless you already have one available. The NAT Gateway must have a Public IP address, and also be in the public network, in order for the NAT Gateway to do its job.
- Wait for the gateway to become Available
- Name it
- Go to Route Tables where we will create two tables
- Name the first
vpc-good-rt-privateorvpc-bad-rt-privateas appropriate- Attach it to either
vpc-goodorvpc-bad - You'll be back in the list of route tables, select the one just created
- In the Routes tab, click Edit Routes
- Add a route for
0.0.0.0/0to targetvpc-good-natorvpc-bad-natas appropriate - In the Subnet Associations tab, select the
vpc-bad-net-privateorvpc-good-net-privatesubnet - With the route table still selected, in the Actions menu select Set Main Route Table
- Attach it to either
- Name the first
vpc-good-rt-publicorvpc-bad-rt-publicas appropriate- Attach it to either
vpc-goodorvpc-bad - You'll be back in the list of route tables, select the one just created
- In the Routes tab, click Edit Routes
- Add a route for
0.0.0.0/0to targetvpc-good-igworvpc-bad-igw - In the Subnet Associations tab, select the
vpc-bad-net-publicorvpc-good-net-publicsubnet
- Attach it to either
- Name the first
These instructions are adapted from a
Stack Overflow question that is highly recommended reading. I have added a bit of additional commentary.
In the route tables, the 0.0.0.0/0 address will catch any requests trying to access resources outside the VPC. For the route table attached to the private subnet, any such traffic will be sent to the NAT Gateway. Likewise, with the route table attached to the public subnet, this traffic goes to the Internet Gateway. The difference is that for vpc-bad the NAT Gateway is homed on the private subnet, whereas for vpc-good it is homed to the public subnet.
The last item is to make sure to have a correctly configured security group for the containers we'll create in the next section. A default security group was created along with the VPC. Security groups are a kind of firewall that prevents or allows traffic on given TCP ports. Having a correct security group is essential to protecting our applications.
We'll discuss this in more detail in the next section. For now - first note the VPC code number for vpc-good and vpc-bad. Then for the security group associated with vpc-good give it a name of sg-vpc-good, and for the other give it the name sg-vpc-bad.
For best security we would create a number of security groups that are correctly configured for each container being used.
Creating the Good ECS and Bad ECS
Navigate to the ECS dashboard, and click on Create ECS. Select Networking Only to create an AWS Fargate cluster. Click on Next Step. Then, give it the name either ecs-good or ecs-bad. DO NOT CLICK ON Create VPC. Click on Create.
This sets up the ESC. Do this twice, once for ecs-good and once for ecs-bad.
Creating Task Definitions
We've created a pair of VPC's and a pair of ECS clusters. This step, to create the task definitions, we only have to do once.
A task definition is required in order to launch a Service or a Task within an ECS cluster. A Service is a container, or groups of containers, that are managed jointly.
In this case we have two containers - nginx and app, and need to create two task definitions to match.
We start by navigating to the ECS dashboard, and in the left hand column clicking on Task Definitions. This takes you to the list of task definitions you've already created. Click on the button marked Create Task Definition.
It asks you to select between a Fargate or EC2 task type. Since the ECS clusters are Fargate clusters, you must select the Fargate type.
For the nginx task definition, enter task-nginx as the name, and for app enter task-app.
Scroll down to Task memory (GB) and select 0.5GB, and for Task CPU (vCPU) select 0.25 vCPU.
Next click on Add Container. For the container name enter either nginx or app. In the Image box enter the selector for the ECR repository, for example USER-ID.dkr.ecr.REGION-NAME.amazonaws.com/app.
In Port Mappings, for nginx enter 80 and for app enter 3000.
There are a lot more container configuration settings we can enter here. For these two containers that is the extent of the configuration. The Add Container window matches the settings we can give via the docker run command.
That adds the container corresponding to the task definition being created. No other settings are required to define the task, so click Create.
Launching a service in the Bad ECS cluster to see the failure mode
If you paid attention during creating the task definitions, you will have noticed we could have created one task definition with two containers. However the app container needs to be on the private subnet, and the nginx container needs to be on the public subnet, which means they need to be launched as separate services, and therefore they need to be separate task definitions. This will become clear as we create the services.
We are working with ecs-bad just to see the failure mode. Therefore it is only necessary to set up one service, not both of the services.
Click on Clusters to get back to the list of ECS clusters, then click on ecs-bad. We'll first set up services in this cluster and see the failure mode.
Click on the Services tab, then the Create button.
For Launch Type select Fargate because that's the sort of cluster we set up.
In Task Definition select task-app, or if you've already created the app service select task-nginx.
The ecs-bad cluster should already be selected.
Under Service Name enter either app or nginx depending on the Task Definition chosen.
Under Number of Tasks enter 1.
Scroll down and click Next Step.
We need to select which VPC to use, and we may need to scroll the window upward. Since we're starting with the ecs-bad cluster, select the vpc-bad VPC.
Under Subnets, for app select vpc-bad-private and for nginx select both vpc-bad-public and vpc-bad-private.
Under Security Groups, click on Select existing security group. Here we want to select the default security group for the VPC. That's the security group we identified earlier.
Under Auto-assign public IP, for nginx select ENABLED, and for app select DISABLED.
We're done configuring the service, and can click Next Step until we get to the Review page. Give that a quick look, and then click on Create Service.
This takes us to a page for viewing info about the service. I don't find that page useful, and instead go to the top where there's a breadcrumb, and then click on the cluster. That brings one back to the dashboard for the ECS cluster.
You'll see in the Services tab the new service is there, marked in green as ACTIVE. The interesting action takes place in the Tasks tab where the running tasks are listed.
An entry will be there for the task corresponding to the service you just created. It will initially be listed as Desired State of RUNNING, and Last status of PENDING. What's happening is that ECS is attempting to instantiate the task, meaning it is setting up and initializing the container.
There are two buttons with which you can update the status. THe first is a button to the right with a pair of arrows, this is the Refresh button. The second is a pair of links marked Running and Stopped. Those links show the tasks which are currently running, or which have recently stopped. You can click either on the Refresh button or toggle between the Running and Stopped lists.
Since this is the ecs-bad cluster, the task will fail to launch because we've messed up the configuration. The task will eventually end up in the Stopped list.
In the Task column you see hex code strings that serve as a Task ID. Click on the ID and you'll see details about the status of the task.
Scroll to the bottom and you'll see a section labeled Containers. There is a triangle-button that you can use to open up the details about the container. In there you'll find the error message
CannotPullContainerError: Error response from daemon: Get https://USER-ID.dkr.ecr.REGION-NAME.amazonaws.com/v2/: net/http: request canceled while waiting for connection (Client.Timeout exceeded while awaiting headers)
We've gone through this with the ecs-bad cluster to demonstrate the failure mode.
Launching a service in the Good ECS cluster, to see success
Remember that the difference between ecs-bad and ecs-good is that in the latter the NAT Gateway was attached to the public subnet. The correct configuration is for private subnet(s) to connect to the NAT gateway, and for the NAT Gateway to be on the public subnet so that it can direct traffic to the Internet Gateway.
For the purpose of solving the CannotPullContainerError condition, ECS needs access to the public internet so it can retrieve images from docker repositories.
In the previous section we already went through creating a service, just to see it fail.
In this section, create the same service again but in the ecs-good cluster. While creating it, make sure to connect the service to the vpc-good VPC. Otherwise the instructions are the same.
Once the service is created - navigate to the Tasks list again, and wait. Shortly it should switch to a green RUNNING state.
Security group side effect
This created a small security problem because of what we did with the Security Group.
If you look carefully at the Security Group configuration, you'll see it has Inbound and Outbound rules. For the default SG created in the VPC, both rulesets allow all traffic to pass, meaning any traffic can reach into the container, and any traffic can leave the container.
Ideally each container will have a security group matching the needs of the container. It should allow only the required traffic to pass, and no more. For production deployments, our code must have as many layers of protection as possible.
Instead we used the default security group that allows all traffic.
The fix for this is to create one or more stricter security groups. Then edit each task definition to use the appropriate security group.
Resources / Links
Amazon gives an outline of the


Books by David Herron

(Sponsored)


