David Herron
Tags: Amazon Web Services »»»» AWS Lambda »»»» Serverless Framework »»»»
While Amazon's AWS platform is excellent, there are other similar platforms from Google, IBM, Microsoft and others. Why should our code be written solely to support the AWS infrastructure? The Serverless framework makes it easy to reuse the same application code on any of these functions-as-a-service platforms. Perhaps more importantly, it simplifies coding against these platforms. The AWS platform is incredibly complex, and using the Serverless framework is simplifies developing applications for the AWS platform.
The Serverless framework lets you target any of the popular Serverless platforms. Well, the platforms for which the team has implemented support, and which are listed on their website:
https://serverless.com/framework/docs/providers/
A service implemented with the Serverless Framework is described in a file named serverless.yml. This file can describe the configuration for any service provided by one of the supported platforms. When you deploy the service, this file is converted into commands specific to the designated platform and the described services are setup and configured.
For example, while deploying to Amazon Web Services the serverless framework converts the serverless.yml into a CloudFormation deployment, and uses the AWS API to setup and configure the services.
Elsewhere we show how to use the Amazon AWS GUI to configure the API Gateway and a Lambda function to implement a REST API. The AWS GUI is powerful, but there's a lot of click-click-click-click in GUI screens to configure all the details. This is not configuration files and code which you can check into a source repository. It is manual configuration in a user interface, clearly not any kind of software engineering best practice. The AWS GUI is best used to inspect and debug running services, but not for production use.
Production use of this kind of platform must involve source code checked into your own source repository, that is then deployed into the platform. Your organization needs to control your destiny as much as possible. While you're giving up some of that control by using a 3rd party service, the real jewels are your source code, which must be in your control and only handed to the platform provider for the purpose of deploying the desired services.
In this post we'll implement a simple Serverless Framework application and deploy it to Amazon AWS.
Setting up the Serverless Framework CLI tool
One uses the Serverless Framework via a command-line tool written in Node.js. You must first install Node.js on your laptop. The Node.js homepage (
https://nodejs.org/en/) offers downloadable packages, and it is available through various package managers for specific operating systems (https://nodejs.org/en/download/package-manager). Simply follow the instructions, it’s easy and straightforward.
Node.js 10.x is the current release as of this writing. It is a major advance because it brings in full support for async/await functions and ES6 modules.
Once Node.js is installed, your laptop will have a command, node, and you can get help using the node --help option. There’s a whole universe of things one can create using Node.js. Books like Node.js Web Development can get you started, if you like. For this article we’ll simply use it to run the Serverless framework CLI tool.
Install that tool using the command: npm install -g serverless
The npm command is installed as part of installing Node.js. It gives access to the hundreds of thousands of Node.js packages that can be browsed at
https://npmjs.com. This command installs the
serverless package globally so that it can be accessed anywhere in your laptop.
Once you have it installed, get the help message by running: serverless help
Setting up the AWS CLI tool, setting up AWS credentials
Before we can deploy the application to the AWS infrastructure we must have an AWS account, and some IAM credentials. This is very simple, and by the way everything in this article will fit within the “free tier” of the Amazon AWS service.
The Serverless Framework documentation has a guide:
serverless.com framework docs providers aws guide credentials
If you do not already have an AWS account, sign up for one:

After logging-in to the AWS account, go to the IAM service. You’ll need to create an IAM user and then create some IAM access tokens. Those tokens will be shown to you exactly once in the history of this or any other universe, so be sure to copy the tokens somewhere secure. You can easily revoke the tokens and generate new ones if you lose track of the tokens.
While creating the IAM user you’ll be asked for the permissions to grant that user. The simplest is to grant Administrator access but then anyone with those tokens can do anything to your account. It’s more correct to assign just the necessary permissions, to follow the principle of least privilege.
You will need to install the aws-cli tool, so you can use the aws command line. The online documentation shows what to do:

Once you have aws-cli installed, run aws configure to set up access to your AWS account. You’ll be asked for the IAM tokens generated earlier.
You can now run the serverless config credentials command for further setup.
Details for these steps are in the documents linked above.
Kicking some tires with a simple AWS Lambda Function based service
Now that we have the tools setup, we can start kicking some tires.
Make a directory - serverless-tire-kick - and populate it like so:
$ mkdir serverless-tire-kick
$ cd serverless-tire-kick/
$ npm init
… npm output
$ npm install --save express serverless-http aws-sdk cookie-parser multer
This gives us a directory with Node.js packages all setup for writing an Express application. The serverless-http package adapts a Node.js application so it can run in the AWS Lambda container. That means we can use all the Express framework goodness in an AWS Lambda function.
Create a file named app.js containing:
const os   = require('os');
const serverless = require('serverless-http');
const express = require('express');

const bodyParser = require('body-parser');
const multer = require('multer');
const upload = multer();
const cookieParser = require('cookie-parser');

const app = express()

app.use(cookieParser());
app.use(bodyParser.json());
app.use(bodyParser.urlencoded({ extended: true }));
app.post('/echo/:foo/:bar', (req, res) => {
  res.json({
      body: req.body,
      cookies: req.cookies,
      params: req.params,
      query: req.query
  });
});

app.get('/vm', (req, res) => {
    res.json({
        tmpdir: os.tmpdir(),
        hostname: os.hostname(),
        os: {
            type: os.type(),
            platform: os.platform(),
            arch: os.arch(),
            release: os.release()
        },
        uptime: os.uptime(),
        loadavg: os.loadavg(),
        memory: {
            total: os.totalmem(),
            free: os.freemem()
        },
        cpus: os.cpus(),
        network: os.networkInterfaces()
    });
});

module.exports.handler = serverless(app);
This is a normal Express application except that instead of wrapping the app object in an HTTPServer object, it is wrapped by the serverless-http package. This is excellent because it means we can reuse the excellent Express framework in our Lambda functions.
This defines two paths. With /echo/foo/bar, we see the data structures provided in the req object. With /vm we’re shown a bunch of system information. In both cases the data is returned as a JSON object.
In a normal Express application we would use the http package instead of the serverless-http package. The last line of this app.js would instead read as so:
const server = http.createServer(app);
server.listen(port);
In this case the app object is wrapped by the serverless package, and then assigned to the handler export from this module. This will become clearer as we look at the serverless.yml.
Create a file named serverless.yml containing:
service: "serverless-tire-kick"

provider:
  name: "aws"
  runtime: "nodejs8.10"
  stage: "dev"
  region: "us-east-1"

functions:
  app:
    handler: "app.handler"
    events:
      - http: ANY /
      - http: 'ANY {proxy+}'
The serverless.yml file describes a service. This particular service description only touches the surface of what one can do with the Serverless framework.
It says this service is to be deployed to the AWS platform, using Node.js 8.10 for Lambda functions, and deploying into the us-east-1 region.
The section marked functions is converted into a thing which can be used to configure the AWS API Gateway. It is best to configure every URL recognized by the application in this section. However, we’re using a little trick that avoids having to do so.
The line reading handler is what connects to the module we showed earlier. The first part, app, refers to the file name, while the second, handler, refers to the function to invoke.
The two events listed here describe the URL’s to be configured into the API Gateway. Each declaration has two parts, the first being the HTTP verb to respond to, the second the URL to respond to. In this case it is responding to ANY, which means that the two routes respond to any HTTP verb, such as GET or PUT or POST or DELETE. Also, by specifying / in one and {proxy+} in the other, the two events handle any URL. Thus, this technique responds to any request arriving on the service, which will then be sent to the function named handler in the app module.
This is a simple way to integrate an existing Express application as a Lambda function. You’d simply copy in the Express source code, make a few modifications, use these event declarations, and you’ll be up and running without having to declare every last URL as event items. While it is technically best to declare everything explicitly, this technique can save you some time.
Deploying to AWS
We have installed the Serverless CLI, and the AWS CLI tools. We have written the code for our Lambda function, in Node.js, using the Express framework. We have written a service description. Therefore we are ready to send this to the AWS platform.
$ serverless deploy
Serverless: Packaging service...
Serverless: Excluding development dependencies...
Serverless: Creating Stack...
Serverless: Checking Stack create progress...
.....
Serverless: Stack create finished...
Serverless: Uploading CloudFormation file to S3...
Serverless: Uploading artifacts...
Serverless: Uploading service .zip file to S3 (7.44 MB)...
Serverless: Validating template...
Serverless: Updating Stack...
Serverless: Checking Stack update progress...
.................................
Serverless: Stack update finished...
Service Information
service: serverless-tire-kick
stage: dev
region: REGION
stack: serverless-tire-kick-dev
api keys:
  None
endpoints:
  ANY - https://OBSCURED.execute-api.REGION.amazonaws.com/dev
  ANY - https://OBSCURED.execute-api.REGION.amazonaws.com/dev/{proxy+}
functions:
  app: serverless-tire-kick-dev-app
There we go, the service is deployed.
Visiting https://OBSCURED.execute-api.REGION.amazonaws.com/dev/vm we get the following:
{
    "tmpdir": "/tmp",
    "hostname": "ip-10-27-48-106",
    "os": {
        "type": "Linux",
        "platform": "linux",
        "arch": "x64",
        "release": "4.9.93-41.60.amzn1.x86_64"
    },
    "uptime": 761,
    "loadavg": [
        0.240234375,
        0.0498046875,
        0.01611328125
    ],
    "memory": {
        "total": 3948126208,
        "free": 3485478912
    },
    "cpus": [
        {
            "model": "Intel(R) Xeon(R) CPU E5-2680 v2 @ 2.80GHz",
            "speed": 2800,
            "times": {
                "user": 48700,
                "nice": 0,
                "sys": 34000,
                "idle": 7496000,
                "irq": 0
            }
        },
        {
            "model": "Intel(R) Xeon(R) CPU E5-2680 v2 @ 2.80GHz",
            "speed": 2800,
            "times": {
                "user": 64900,
                "nice": 0,
                "sys": 30800,
                "idle": 7487700,
                "irq": 0
            }
        }
    ],
    "network": {
        "lo": [
            {
                "address": "127.0.0.1",
                "netmask": "255.0.0.0",
                "family": "IPv4",
                "mac": "00:00:00:00:00:00",
                "internal": true,
                "cidr": "127.0.0.1/8"
            }
        ],
        "vinternal_11": [
            {
                "netmask": "255.255.254.0",
                "address": "169.254.76.21",
                "family": "IPv4",
                "mac": "12:f0:e6:21:b5:48",
                "internal": false,
                "cidr": "169.254.76.21/23"
            }
        ],
        "vtarget_6": [
            {
                "address": "169.254.79.1",
                "netmask": "255.255.255.255",
                "family": "IPv4",
                "mac": "c6:38:6b:bd:02:bc",
                "internal": false,
                "cidr": "169.254.79.1/32"
            }
        ]
    }
}
That's a lot of interesting information. The service is running on an x64 box running an Amazon build of Linux, on a dual core CPU with about 4GB of memory.
To test the echo service, we can use an application like Postman to send a POST request to the service:
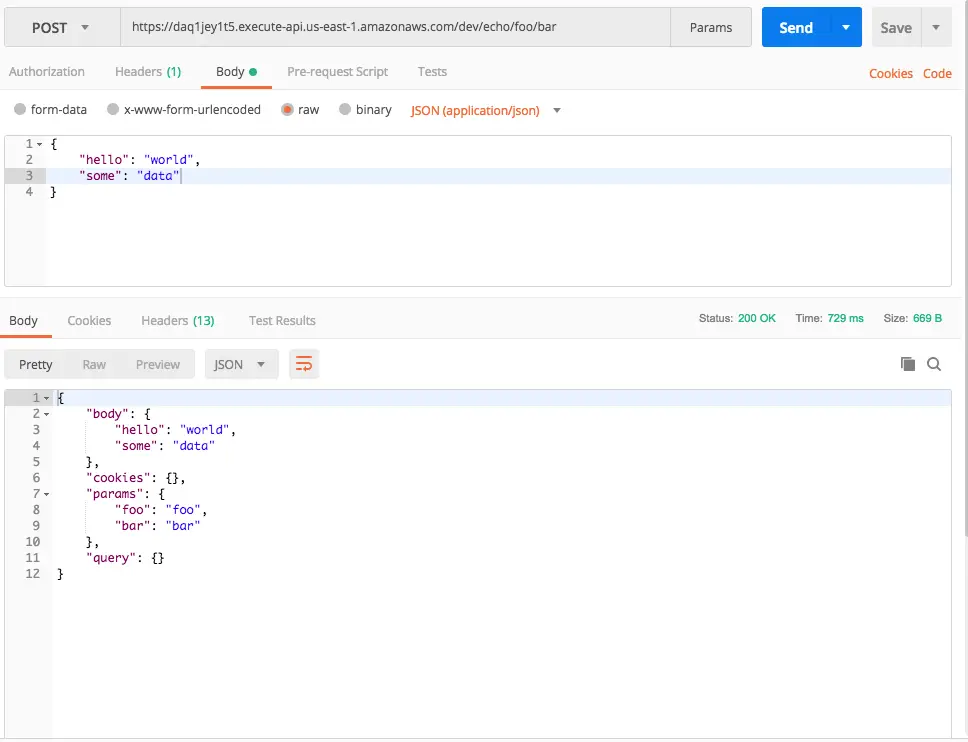
You'll see it echo's back the data provided in the request. The request did not include any Cookie values, nor query string parameters, or they would have shown up here.
That was simple enough. Obviously there is a ton more things one can do with this. But this post is already long enough, and has shown the basics of setting up a service on AWS using the Serverless Framework.
Inspecting the deployed service on AWS
To round this out it is useful to inspect what was setup for us on the AWS platform.

The CloudFormation console shows our application.
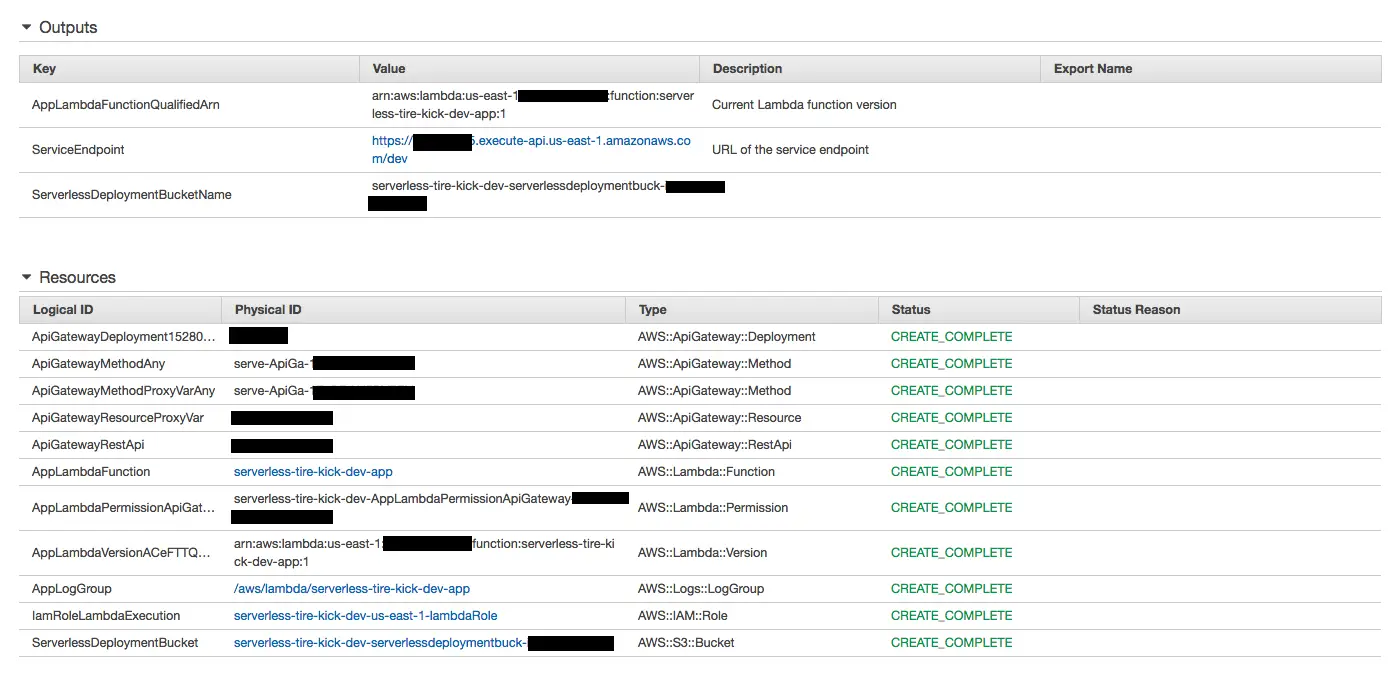
Click on the entry in the CloudFormation console, and you can see the details screen. This section shows the overall configuration which was created. This includes the API Gateway, a Lambda function, some permissions, logging support, an S3 bucket and more.
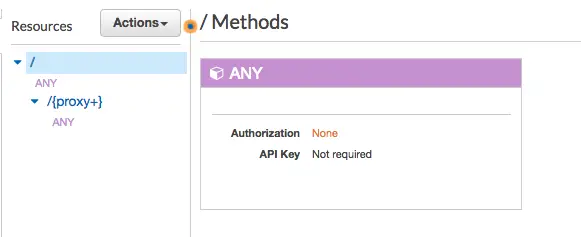
The API Gateway has only the catch-all routes shown in the serverless.yml
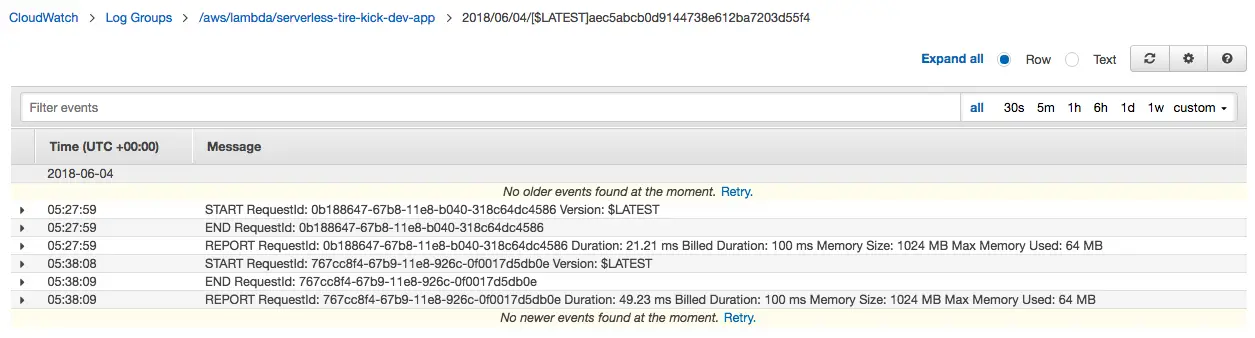
This Cloudwatch service was auto-configured, and is very useful to track what the service is doing.
Fixing the catch-all
The code we showed earlier misses an important best practice. It does not explicitly declare all the routes, and instead uses a catch-all setup. Let's fix that.
Change serverless.yml to this:
# serverless.yml

service: "serverless-tire-kick"

provider:
  name: "aws"
  runtime: "nodejs8.10"
  stage: "dev"
  region: "us-east-1"

functions:
  app:
    handler: "app.handler"
    events:
      - http: 'POST /echo/{proxy+}'
      - http: GET /vm
Then deploy as shown:
$ /opt/local/bin/serverless deploy
(node:11775) ExperimentalWarning: The fs.promises API is experimental
Serverless: Packaging service...
Serverless: Excluding development dependencies...
Serverless: Uploading CloudFormation file to S3...
Serverless: Uploading artifacts...
Serverless: Uploading service .zip file to S3 (7.44 MB)...
Serverless: Validating template...
Serverless: Updating Stack...
Serverless: Checking Stack update progress...
....................
Serverless: Stack update finished...
Service Information
service: serverless-tire-kick
stage: dev
region: REGION
stack: serverless-tire-kick-dev
api keys:
  None
endpoints:
  POST - https://OBSCURED.execute-api.REGION.amazonaws.com/dev/echo/{proxy+}
  GET - https://OBSCURED.execute-api.REGION.amazonaws.com/dev/vm
functions:
  app: serverless-tire-kick-dev-app
That's better - the endpoints shown here better reflect the actual endpoints supported by our Lambda function.
Because the echo method can theoretically support any path, it seemed best to use the {proxy+} technique there.
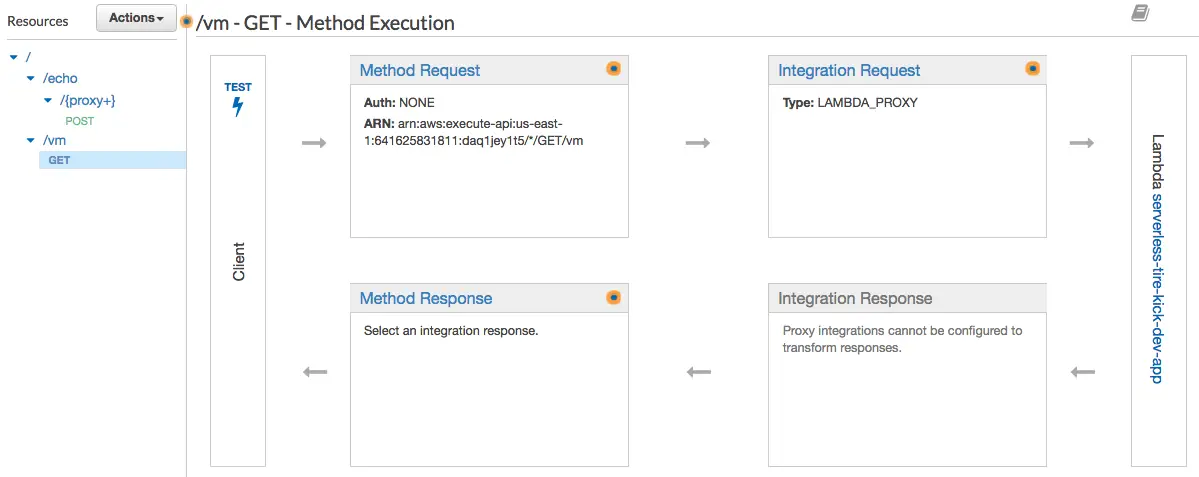
And, the API Gateway now displays a more correct rendition of the API.
Conclusion
With a little bit of configuration and coding we were able to deploy a nice service to Amazon's cloud platform. This little bit opens a door to a whole world of potential, given the scope and breadth of Amazon's service offering.
With a few changes we can also deploy this to other cloud services.


