David Herron
Tags: Node.JS »»»» Node.js Web Applications »»»» Bootstrap »»»» Socket.IO »»»»
The Bootstrap project has released the first Alpha for Bootstrap v5. It contains a number of major changes, such as dropping the requirement to use jQuery. Nothing is said about when the first official release will ship, but we can get a taste of what Bootstrap v5 will be like by using the Alpha to build a small application. This article goes over developing a Bootstrap v5 user interface for a TODO application.
This article is part 3 of a 4 part series going over implementing a web application using Node.js 14, ExpressJS, Bootstrap v5, and Socket.IO. In this section we will create a real time user interface using Bootstrap v5 and Socket.IO. For the other parts of this tutorial series, see Single page multi-user application with Express, Bootstrap v5, Socket.IO, Sequelize
"Mobile Responsive" design is very important nowadays, and Bootstrap has for years made that easy. This application uses it, and the Bootstrap Icons library, and it took very little effort to make it look well on mobile and desktop systems.
More important is that the Bootstrap team recently released the first alpha of the version 5 release train, a release which removes the requirement to use jQuery. While we can use jQuery, we decided to not use it in this application, to see what the post-jQuery world will be like.
In the project setup tutorial, we installed various packages, including bootstrap@next, popper.js@1.x, and bootstrap-icons. These give us a framework for developing a mobile-responsive user interface. At the time of this writing, the @next branch of the Bootstrap package is for Bootstrap v5. Also, the Bootstrap v5 project still requires Popper.js version 1.x, despite that branch being deprecated and the v2 branch being recommended.
As discussed above, we are not using jQuery, and therefore did not install it. After many years of relying on jQuery, the Bootstrap project has ditched it. But let's not focus on that, and instead move bravely into the future. Since jQuery has been the go-to-library for JavaScript UI's for a long time, moving beyond it means reacquainting ourselves with the normal DOM API in JavaScript.
Theoretically we can still use jQuery with Bootstrap v5, but learning about a post-jQuery life is worth our time. I believe that approach is called Vanilla JS, which just means plain every day JavaScript. Instead we'll be purists about using modern JavaScript/DOM.
Bootstrap is a mature framework for developing nice-looking mobile responsive web user interfaces. It was originally developed by engineers at Twitter, and is used on a very large number of websites. Bootstrap is focused solely on the presentation, unlike some other frameworks like Vue.js.
We also installed the Socket.IO package (socket.io and socket.io-redis). This framework enables pseudo-real-time communication between a Node.js server and a browser-based client. What we'll do is use Socket.IO for all communication with the server, rather than use a traditional AJAX approach. One effect is that we'll easily support multiple simultaneous users in the Todo application.
The last user interface package we installed is the Nunjucks template engine. It is a powerful templating system from the Mozilla project, and executes both on Node.js and in the browser. We'll use it in both places.
Router function for the TODO application home page
The TODO application will be a single page application. The user visits its main page, and simply stays there. That means the user interface must allow for creating/reading/editing/deleting Todo items without refreshing the page, or visiting other pages.
Instead of making AJAX calls to the server, we are using Socket.IO. It maintains an open communication channel with code running on the server, using an event-driven model similar to the Node.js EventEmitter. Events go back and forth between client and server, making for an efficient bi-directional exchange of data and commands.
In a file named routes/index.mjs add this code:
import * as util from 'util';
import { default as express } from 'express';

export const router = express.Router();
import { io } from '../app.mjs';
import DBG from 'debug';
const debug = DBG('todos:home');
const error = DBG('todos:error-home');

import { Todo } from '../models/Todo.mjs';

router.get('/', async (req, res, next) => {
    try {
        res.render('index', {
            title: 'Todos'
        });
    } catch (err) {
        next(err);
    }
});
At the top are the required imports.
We need the express object so we can create a Router object. There will be only one router function for this application, the one you see here.
Because Socket.IO is being used to communicate data, we import io from app.mjs. Any server-side module in a Socket.IO application must use the same io object.
In the router function we render the index view. Because we configured use of the Nunjucks template engine, that means the views directory must have a template file named index.njk.
This is literally the full extent of Express router functions we'll use for Todo. Where we might have normally set up routes for /todo/create, /todo/read, /todo/update or /todo/destroy for different operations on the TODO list, we're following the single page approach. We're using Socket.IO instead of those URL's.
A question to ponder is why do we even need this router function? We could skip the router function, since there's no dynamic server-side rendering of anything, and instead create a plain HTML file, public/index.html, to hold the user interface. That's a valid approach to consider.
The rest of index.mjs will include Socket.IO server-side code. But before we get to that let's create the HTML server-side templates.
Generating HTML using Nunjucks templates
Nunjucks has an interesting feature where one can extend a base template to have some code reuse. In this case we have two templates for presenting things to the user - error which is the error page, and index which is the home page. Let's create a third template, base that will be the base template of both, with error and index relying on code in the base template.
In the views directory of the project, create a named base.njk that will serve as the base template for the project.
<!doctype html>
<html lang="en">
  <head>
    {# Required meta tags #}
    <meta charset="utf-8">
    <meta name="viewport" content="width=device-width, initial-scale=1">

    {# Bootstrap CSS #}
    <link rel="stylesheet" href="/assets/vendor/bootstrap/css/bootstrap.min.css">

    {% block header %}
    <title>{{ title }}</title>
    {% endblock %}
  </head>
  <body>

    {% block content %}
    Default page content
    {% endblock %}

    {# Popper.js first, then Bootstrap JS #}
    <script src="/assets/vendor/popper.js/popper.min.js"></script>
    <script src="/assets/vendor/bootstrap/js/bootstrap.min.js"></script>
    <script src="/assets/vendor/nunjucks/nunjucks.js"></script>

    {% block jscode %}
    {% endblock %}
  </body>
</html>
This base template is derived from the recommendation shown in the Bootstrap project. The Bootstrap stylesheet is brought in via a <link> tag in the header, and the JavaScript code is brought in using <script> tags in the footer.
For example with /assets/vendor/bootstrap/css/bootstrap.min.css the /assets/vendor/bootstrap/css/ URL is handled by the app.use(... express.static ...) routes set up in app.mjs. In this case that URL translates to node_modules/bootstrap/dist/css/bootstrap.min.css.
In Nunjucks templates the {% block blockName %} ... {% endblock %} markup delineates a segment that can be substituted. Any template that extends this template can supply content for these blocks, which will replace what's shown here. For example there is a jscode block at the bottom that's meant to hold further JavaScript code.
Like many template systems we include the value of a variable in the template output with the {{ variable }} construct. Used that way, the value for the variable is simply substituted into the HTML. That's acceptable if the the value is safe for being displayed as-is on the screen. But in some cases it is not safe to do so, since the value may contain malicious HTML markup. In such a case you would use {{ variable | escape }}, which uses the escape filter which encodes any HTML characters for safe presentation.
This gives us a base template, with all the JavaScript and CSS files loaded to support the TODO application.
Extending a Nunjucks base template for the Error and Home pages
We have a base template, and the necessity of learning how to extend a template. Let's start with the error page since it's so simple.
Create a file named views/error.njk containing:
{% extends "base.njk" %}

{% block header %}
<title>ERROR</title>
{% endblock %}

{% block content %}
<h1>{{ message | escape }}</h1>
<h2>{{ error.status | escape }}</h2>
<pre>{{ error.stack | escape }}</pre>
{% endblock %}
It starts with {% extends "base.njk" %} which is how a Nunjucks template extends another. Then it has two {% block %} constructs to extend two of the blocks in the base template.
We extend the header block to make sure the <title> tag says the right thing.
For the content block we simply format some information from the error object. This is obviously a user-unfriendly error page, so put something on your backlog to improve this.
Because we do not know the safety of those three values, we have used the escape filter.
Next let's look at views/index.njk which is going to handle the main page. We'll be adding a whole lot of stuff to this template.
{% extends "base.njk" %}

{% block content %}
<button type="button"
        class="btn btn-light" id="add-todo"
        data-toggle="modal" data-target="#addTodoModal">
            <img src="/assets/vendor/bootstrap/icons/file-plus.svg" alt=""
                    width="32" height="32" title="Add TODO">
</button>
<ul id="TODOlistGroup" class="list-group">
<li class="list-group-item">.... please wait ....</li>
</ul>

{# Add Todo Modal #}
...
{# END Add Todo Modal #}

{% endblock %}

{% block jscode %}
<script src="/socket.io/socket.io.js"></script>
<script src="/main.js"></script>
{% endblock %}
In the content block we have a button that is configured to control a Bootstrap Modal. Modal's are popup things, and in this case we'll have one that will be used for adding or editing Todo items. We'll see the code for the Modal in a minute.
The other part of the user interface is a Bootstrap List Group component. These are useful for displaying a list of items, like we will have in the TODO application. At the moment the List Group has place-holder text, and there will be client-side code that uses Socket.IO calls to retrieve the TODO list and then render it in place of this place-holder text.
Another detail to discuss is the image in the Todo button. Instead of a textual label, this application uses a PLUS Icon from the Bootstrap Icons collection.
The Bootstrap Icons website (
https://icons.getbootstrap.com/) has a long list of images for each icon. Click on the image you like and you'll be shown the SVG code for the icon. I didn't find the SVG code to be terribly useful, and instead preferred to reference the SVG using an
<img> tag as shown here. The question is, how do you determine the file name to use? The Bootstrap Icons website cannot be bothered to tell us the file name.
What we have to do instead is look in this directory:
$ ls node_modules/bootstrap-icons/icons/file-plus*
You'll find on the Bootstrap Icons site that each icon is named something like "File Plus". There is a corresponding file name in the package directory, and we simply use that, supplying the appropriate prefix to access the directory.
As discussed earlier, /assets/vendor/bootstrap/icons/ translates to this directory.
Let's now look at the Modal:
{# Add Todo Modal #}
<div class="modal fade" id="addTodoModal" tabindex="-1"
role="dialog" aria-labelledby="addTodoModalLabel" aria-hidden="true">
<div class="modal-dialog">
<div class="modal-content">
<div class="modal-header">
<h5 class="modal-title" id="addTodoModalLabel">Add TODO</h5>
<button type="button" class="close" data-dismiss="modal" aria-label="Close">
<span aria-hidden="true">×</span>
</button>
</div>
<div class="modal-body">
<form>
<input type="hidden" id="inputTodoID" name="id" value="-1">
<div class="row g-3 align-items-center">
<div class="col-auto">
<label for="inputTodoTitle" class="form-label">Title</label>
</div>
<div class="col-auto">
<input type="email" class="form-control"
id="inputTodoTitle" aria-describedby="todoTitleHelp">
</div>
</div>
<div class="row g-3 align-items-center">
<label for="inputTodoBody" class="form-label">Body</label>
<textarea class="form-control" id="inputTodoBody"
aria-describedby="todoBodyHelp"
rows="3"></textarea>
</div>
<div class="row g-3 align-items-center">
<div class="col-auto">
<label for="inputTodoPrecedence" class="form-label">Precedence</label>
</div>
<div class="col-auto">
<select class="form-select" aria-label="Default select example"
id="todoPrecedenceSelect">
<option value="-1" selected>Select the precedence</option>
<option value="1">Low</option>
<option value="2">Medium</option>
<option value="3">High</option>
</select>
</div>
</div>
</form>
</div>
<div class="modal-footer">
<button type="button" class="btn btn-secondary"
data-dismiss="modal">Close</button>
<button type="button" class="btn btn-primary"
id="submitNewTodo">Save new TODO</button>
</div>
</div>
</div>
</div>
{# END Add Todo Modal #}
In a Bootstrap Modal, you have a one HTML element (the <button> in this case) to control the Modal, and the Modal itself is defined using a <div class="modal" id="addTodoModal" tabindex="-1" role="dialog" ...> element. Clicking on the Button causes the Modal to show or hide as appropriate. The markup used here is slightly modified from the example in the Bootstrap documentation.
Users of this TODO application add items by clicking the "+" icon. As we saw that is a Modal control button. What ties it to the Modal are these attributes: data-toggle="modal" data-target="#addTodoModal". The data-target refers to the Modal by its id attribute.
Bootstrap Modal's have a model-header for the top section of the dialog, a modal-body for the main content, and a modal-footer for the bottom row.
The modal-header in this example simply has an <h5> to show the title, and a close button to dismiss the Modal.
In the modal-body is a <form> that exists solely to contain FORM elements. It does not have any attributes that would normally declare it as a POST or GET form, or the destination URL. But by using a FORM, along with FORM elements like <input>, Bootstrap applies all kinds of goodness to make this look good.
I like inline forms, where the label appears on the same row as the <input>. To do this we declare a <div class="row"> to implement a Bootstrap row, then for both the <label> and <input> elements each are wrapped within a <div class="col-auto">.
With previous Bootstrap versions this would have been more complex, but for this release it was trivially easy to get a useful layout.
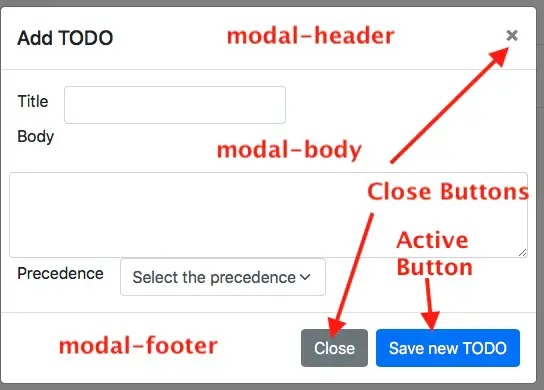
To the user, they fill in the fields, select the precedence value, then click the blue button. If they change their mind the close buttons are there to dismiss the Modal.
What we have covered so far is some HTML markup for a static page. To make it into a working application will require a bunch of JavaScript. For instance the List Group is a place-holder that is supposed to display TODO items. To get those items will require using JavaScript to send a Socket.IO message to the server, then rendering the returned data via a client-side template. Likewise the Modal we just discussed doesn't have a way to send new TODO items to the server, and instead we'll do it with a Socket.IO message.
Implementing a Socket.IO client/server to communicate application data
Normally we'd use AJAX calls to send data to the server, and receive responses. But for this demo let's instead use Socket.IO. That framework has both server-side and browser-side libraries implementing pseudo-real-time communication between a client application and server-side code running in Node.js. Our task is to implement code on both sides, in JavaScript, using Socket.IO for communication, containing the application "business logic".
We've already seen how the client code is loaded into an HTML page:
{% block jscode %}
<script src="/socket.io/socket.io.js"></script>
<script src="/main.js"></script>
{% endblock %}
The first <script> tag loads the browser-side of the Socket.IO framework. This URL is one that's handled by the server-side Socket.IO library.
The second JavaScript file is one we will write, and it will contain the client side of the Todo application. This means code in /main.js will use the client-side Socket.IO library to communicate with the server-side code that will sit in routes/index.mjs.
Let's start with main.js, the browser side code. A question to start with is ensuring the client-side code does not execute until the web page is ready enough for it to run. With jQuery we would make sure of that by wrapping client-side code with this:
$(document).ready(function () {
    // client side code
});
The purpose for this is, as the objects and functions say, to wait for the document to be ready before executing client side code. But for this application we are following Bootstrap's lead and eschewing jQuery. That means we need to learn the plain JavaScript equivalent to this and other jQuery functions.
With plain JavaScript/DOM code the closest equivalent to the jQuery document/ready construct is this:
document.addEventListener("DOMContentLoaded", function() {
    console.log('socket.io starting');
    let socket = io('/home');

    // client side code
});
This event listener waits for the DOM to be loaded, which is a suitable point in time for our client side code to be executed. Like with the jQuery equivalent, the client side code will be completely contained within this anonymous function.
In that function we call io, which was defined by loading the Socket.IO client library. Calling io('/home') creates a socket that is attached to the namespace named /home. In Socket.IO there can be any number of namespaces, and in each namespace any number of room's. Messages are targeted to a namespace, and sometimes to a namespace and room. Any client attached to the targeted combination will receive the message.
This creates a socket attached to /home. As we'll see, that socket object is the means by which the browser client code communicates with the server-side code.
The next thing is to create the server-side of this communication channel. In routes/index.mjs let's set up a container for the server-side code.
export function init(todostore) {
    io.of('/home').on('connect', socket => {
        debug('socketio connection on /home');

        // server-side code

    });
}
The init function is called from the end of app.mjs and as you recall the todostore variable is the TodoStore instance from models/sequlz.mjs. The io object in this case was initialized in app.mjs and imported into this module.
It serves a similar purpose to the browser-side io object. Similarly, io.of('/home') targets the /home namespace. The .on('connect'...) part of this sets up an event listener waiting for connections from browsers.
That gives us wrappers for both the browser-side and server-side code. Both are set up with objects to use as a Socket.IO communication channel. What's left is to set up the functions for each end to implement the logic required for the Todo application.
Sending and receiving Socket.IO events between browser and server
On the browser-side let's start with this:
socket.emit('get-todos', { },
newtodos => { renderTODOS(newtodos); });

socket.on('new-todos', todos => { renderTODOS(todos); });
The first thing we do on the browser is to emit the message get-todos. In Socket.IO there are two forms of the emit function from the browser side:
| Emit style | Discussion |
|---|---|
socket.emit('event-name', data) |
Sends the message, carrying along the data object, which is received by recipients of the message. |
socket.emit('event-name', data, callback) |
Sends the message, carrying along the data object, and also sends a function. The recipients can call that function, to send data as a reply. |
In this case there is no data to send. The recipient is supposed to reply with an array of Todo items, which is sent to the function named renderTODOS. We'll implement that in a minute.
The next line of code is an example of receiving a message on the browser side. The pattern for this is: socket.on('event-name', handler). The handler function comes in two variants, receiving a data object, and an optional callback function. This matches the two styles for socket.emit.
In this case we receive a message, new-todos, which carries an array of Todo items. That array is also passed to renderTODOS, which we'll implement in a minutes.
Before we get to renderTODOS, let's look at the matching server-side code.
Let's start with the event listener for the get-todos message.
socket.on('get-todos', async (data, fn) => {
    try {
        fn(await todostore.getAll());
    } catch (err) {
        error(`FAIL to get todo ${err.stack}`);
    }
} );
On the server side, the socket object comes from the io.of('/home').on('connect', ...) event handler mechanism.
We've already discussed how socket.on handler functions can receive either one or two arguments, the data object and an optional callback function. Because the get-todos event is defined to send a callback function, we are using it here.
Our first step is to call the todostore.getAll function to get the Todo list. Remember that todostore.getAll retrieves all Todo items into an array, and is sorted by precedence. Conceivably the data object could contain parameters to tailor the list of Todo items, so add that to your backlog.
Once the Todo array is retrieved, we call the callback function with that array. Socket.IO makes sure it gets back to the caller, as we've already seen in the browser-side code.
Any errors will in this case simply be logged. That's of course not the best practice, so add that to the backlog as well.
For the new-todos message, there will be multiple instances of server-side code emitting this message after calling the todostore.getAll function.
This gives us a sense of how we use Socket.IO to communicate. On one side we use emit('message-name', ...) to send a message, and on the other side we use on('message-name', ...) to set up an event handler function that receives these messages.
The message names can be anything, since there is no registry of message names, nor is there a convention to follow. Use the message names that make sense to you. led.
Browser-side rendering of Todo items into the DOM
We've seen that for both get-todos and new-todos a function named renderTODOS is called. The purpose for this function is to render an array of Todo items into the #TODOlistGroup List Group.
Back in public/main.js let's add renderTODOS:
function empty(id) {
    const parent = document.getElementById(id);
    while (parent.firstChild) {
        parent.firstChild.remove();
    }
}

function renderTODOS(todos) {
    empty("TODOlistGroup");
    let txt = '';
    for (let todo of todos) {
        console.log('render todo ', todo);
        txt += nunjucks.renderString(
        `
        <li class="list-group-item" id="todo{{ todo.id }}" data-id="{{ todo.id }}">
            <button type="button" class="btn todo-title"
                data-toggle="collapse" data-target="#collapse{{ todo.id }}"
                aria-expanded="false" aria-controls="collapse{{ todo.id }}"
            >{{ todo.title }}</button>
            <div class="float-right">

            {% if todo.precedence == 1 %}
            <span class="badge bg-success todo-precedence" data-precedence="1">Low</span>
            {% elseif todo.precedence == 2 %}
            <span class="badge bg-warning text-dark todo-precedence" data-precedence="2">Medium</span>
            {% elseif todo.precedence == 3 %}
            <span class="badge bg-danger todo-precedence" data-precedence="3">High</span>
            {% endif %}

            <button type="button" class="btn edit-button" data-id="{{ todo.id }}">
                <img src="/assets/vendor/bootstrap/icons/pencil.svg" alt=""
                    width="32" height="32" title="Edit"
                    class="edit-button-image">
            </button>

            <button type="button" class="btn delete-button" data-id="{{ todo.id }}">
                <img src="/assets/vendor/bootstrap/icons/trash.svg" alt=""
                    width="32" height="32" title="Delete"
                    class="delete-button-image">
            </button>
            </div>

            <div class="todo-body collapse row" id="collapse{{ todo.id }}">{{ todo.body }}</div>
            </div>
            </li>
        `,
        { todo: todo }
        );
    }
    document.getElementById("TODOlistGroup").innerHTML = txt;
}
The first thing it does is invoke a function named empty, which is the equivalent to the jQuery function $("selector").empty(). Implementing the jQuery empty function using vanilla JavaScript/DOM turns out to simply be a loop repeatedly calling parent.firstChild.remove().
Once we do that, the renderTODOS function must loop over the Todo items, rendering each one using a Nunjucks template. Once all items are rendered, it inserts that HTML into the #TODOlistGroup List Group.
For each item we use Nunjucks to render a template (specified inline) that is the HTML for each row in the List Group. Remember that the browser-side Nunjucks library was loaded in base.njk and is therefore available as the object named nunjucks. The renderString function takes the template as an inline string, as well as an object containing data that's provided to the template.
The next thing to remember is that the Todo items are to be elements of a Bootstrap List Group. Such items are wrapped with <li class="list-group-item">...</li>. For this list we have several user interface elements for each Todo item.
The first item is a <button> that displays the title of the Todo item. This button is also the controller of a Collapsible component implemented as so:
<div class="todo-body collapse row" id="collapse{{ todo.id }}">{{ todo.body }}</div>
</div>
When the user clicks (or taps) the button, the collapsible thing will open or close as appropriate.
There is also a <div class="float-right"> containing several items that will float at the right-hand side of the row. The first is a badge that displays the precedence value. The other two are edit and delete buttons.
When everything is rendered (into the txt variable), we need to insert it into the #TODOlistGroup List Group. In jQuery we would use a construct like $("#TODOlistGroup").append(txt), but we can't do that because we don't have jQuery. The equivalent to the jQuery append function is to simply set the innerHTML attribute.
The data-id and data-precedence attributes require some attention. In some code we'll write in a minute, we need to know the ID for the Todo item, and its other attributes. To do that, we'll retrieve the data for the Todo item from the DOM. For the title and body attributes, the data can simply be retrieved from the element. But for the ID and Precedence values, there was no natural place from which to retrieve that data, so we invented the data-id and data-precedence attributes to store the data values.
Creating (or Editing) a Todo item
The next thing we must do is look at how to create a Todo item. Remember that there is a button containing a "+" icon that controls the Modal. The user is supposed to click on that icon, launching the Modal, enter information into the Modal, then click the Submit button. But there is nothing listening to that button.
Add this in main.js:
document.getElementById('submitNewTodo').onclick = function() {
    if (document.getElementById('todoPrecedenceSelect').value === "-1") {
        console.error("Invalid precedence value");
        return;
    }
    const id = document.getElementById('inputTodoID').value;
    let action;
    let options;
    if (id > '0') {
        action = 'edit-todo';
        options = {
            id: id,
            title: document.getElementById('inputTodoTitle').value,
            body: document.getElementById('inputTodoBody').value,
            precedence: document.getElementById('todoPrecedenceSelect').value,
        };
    } else {
        action = 'create-todo';
        options = {
            title: document.getElementById('inputTodoTitle').value,
            body: document.getElementById('inputTodoBody').value,
            precedence: document.getElementById('todoPrecedenceSelect').value,
        };
    }
    socket.emit(action, options,
    newtodos => {
        var myModalEl = document.getElementById('addTodoModal');
        var modal = bootstrap.Modal.getInstance(myModalEl);
        modal.hide();
        document.getElementById('inputTodoTitle').value = '';
        document.getElementById('inputTodoBody').value = '';
        document.getElementById('todoPrecedenceSelect').value = '-1';
        document.getElementById('inputTodoID').value = '-1';
    });
}
The onclick handler shown here is equivalent to $("selector").on('click'...) in jQuery. It is a function called when the user clicks on the targeted thing. In this case we're targeting the Submit button in the Modal.
To retrieve values from the DOM we use this:
document.getElementById('todoPrecedenceSelect').value
The goal of this is to retrieve data from the DOM, so we can initialize the Modal from that data. Accessing the DOM value attribute of a FORM element is similar to the jQuery $("selector").val() function.
In this case we're looking at the SELECT element for the Precedence value. If no Precedence was selected, the event handler simply exits and nothing happens to the Modal. A better user experience will be had by displaying an error to the user, of course.
We use this technique to retrieve the title, body and precedence values. The FORM contains one more element, #inputTodoID, which is a hidden input element containing the ID for the Todo item. By default this is set to -1, a value which indicates that we are creating a Todo item. Setting this element to a positive integer means we are editing a Todo item that already existed in the server. In a minute we'll see how the Modal gets initialized for editing a Todo versus creating one.
Based on the ID value we will use the event name edit-todo or else create-todo. Further, the data object used with edit-todo will contain the id value, whereas for create-todo it is not supplied because there is not an id.
We then call socket.emit using the event name we selected, and the data item that was constructed. We are supplying a callback function so that the server can notify us it finished adding the Todo item. In that callback we first hide the Modal, then reset its DOM elements to default values. To hide a Bootstrap Modal means calling its JavaScript API, and therefore we retrieve the Modal instance using bootstrap.Modal.getInstance.
In routes/index.mjs we need the listener functions for these two messages:
socket.on('create-todo', async (newtodo, fn) => {
    try {
        await todostore.create(
            new Todo(-1, newtodo.title, newtodo.body, newtodo.precedence)
        );
        fn('ok');
        let newtodos = await todostore.getAll();
        io.of('/home').emit('new-todos', newtodos);
    } catch (err) {
        error(`FAIL to create todo ${err.stack}`);
    }
});

socket.on('edit-todo', async (newtodo, fn) => {
    try {
        await todostore.update(
            new Todo(newtodo.id, newtodo.title,
                    newtodo.body, newtodo.precedence)
        );
        fn('ok');
        let newtodos = await todostore.getAll();
        io.of('/home').emit('new-todos', newtodos);
    } catch (err) {
        error(`FAIL to create todo ${err.stack}`);
    }
});
What happens is we either call todostore.create or todostore.update as appropriate. The callback function is invoked from the server, which as we see causes the Modal to be hidden and reset to default values. Then we call todostore.getAll to retrieve the set of Todo items, and emit the new-todos message using that list.
From the server, this is how messages are emitted. By using io.of('/namespace') we ensure the message is emitted only to browsers connected to that namespace. In this application the only namespace is /home so every browser connected to this application will be on this namespace. But for larger-scale applications there could be dozens or hundreds of namespaces.
If we had instead sent the new Todo list as the response to this message, the only browser that would have been updated is the browser where the message was created or edited. But by broadcasting the new-todos message like this, every browser will be updated. This is how Socket.IO makes it easy to support multiple simultaneous users with pseudo-real-time updates.
We've shown the Edit and Delete buttons, and have even shown the code that will drive the Edit button. But we have not shown how to listen to events on those buttons.
Listening to events on dynamically created elements in Bootstrap v5
The issue with the Edit and Delete buttons is that they're dynamically generated, and regenerated every time the Todo list is updated. It wasn't conceivable to attach a simple event listener. Instead it seemed best to rely on a DOM feature in which events will "bubble up" the DOM tree until it finds an event listener.
What this means is that when the user clicks (or taps) on either button, the event is initially targeted at the <img> element inside each button. If there is no click event listener, the event will be sent to the parent <button> element. In turn, the click event will be sent to the parent element if no matching event handler exists.
At the moment there is no click event handler for the Edit or Delete buttons.
Let's add this in main.js:
document.querySelectorAll('#TODOlistGroup')[0]
    .addEventListener('click', function (event) {
        // click event handler code goes here
}, false);
Therefore the #TODOlistGroup element can handle any click in the DOM it contains. This is useful because the #TODOlistGroup is not destroyed and recreated all the time. Instead we can attach this event listener once, and leave it in place, knowing it will stay active for the life of the application.
Because of the bubble up effect we just discussed, this event listener can handle the click events for the Edit and Delete buttons. But how do we tell whether a given click event was for an Edit or Delete button? The key is to look at the event.target, and then perform some magic.
Let's start with detecting events on the Edit button.
if (event.target.classList.contains('edit-button-image')) {
    let parent = getClosest(event.target, '.edit-button');
    const id = parent.getAttribute('data-id');
    console.log(`emit edit-todo ${id}`);

    // Set up the modal with the required values
    // We set inputTodoID so that it will be set when saved
    // and therefore cause 'edit-todo' event to be sent to server.

    document.getElementById('inputTodoID').value = `${id}`;
    document.getElementById('inputTodoTitle').value =
        document.querySelectorAll(`#todo${id} .todo-title`)[0].innerHTML;
    document.getElementById('inputTodoBody').value =
        document.querySelectorAll(`#todo${id} .todo-body`)[0].innerHTML;
    document.getElementById('todoPrecedenceSelect').value =
        document.querySelectorAll(`#todo${id} .todo-precedence`)[0]
        .getAttribute('data-precedence');

    let myModalEl = document.getElementById('addTodoModal');
    let modal = bootstrap.Modal.getInstance(myModalEl);
    if (!modal) {
        // If this was null, it means a Modal hasn't been created yet,
        // and it's up to us to create it.
        // On the other hand, if the user clicks the "+" button, then
        // Bootstrap creates this object instance.
        modal = new bootstrap.Modal(myModalEl);
    }
    modal.show();
}
Refer back to the template and you'll see the Edit button has the class edit-button, and the <img> within that button has the class edit-button-image. Likewise, the Delete button and its image has similar class names. The event.target value is the DOM element to which the event was sent, and the classList attribute contains an array of the class names in the class attribute. In other words this is similar to the jQuery function $("selector").hasClass("class-name").
In order to get the ID of the Todo item, we need to access the <button> element. That means we need to find the parent of this <img>. For that purpose let's add this function:
function getClosest(elem, selector) {
    for ( ; elem && elem !== document; elem = elem.parentNode ) {
        if ( elem.matches( selector ) ) return elem;
    }
    return null;
};
This searches upward in the DOM tree for an element matching the provided selector, and is equivalent to the $("selector").parent("other-selector") function in jQuery. In this case the selector is .edit-button, which matches the <button> containing the <img>. Having found the button, we can use parent.getAttribute('data-id') to get the value for the ID attribute.
We then have some circuitous code that whose purpose is initializing the Modal fields with the values matching the Todo item. In order to edit that Todo item, the Modal must have the values to edit. Therefore we must initialize the FORM elements appropriately. Therefore, we use DOM calls to retrieve the data from the corresponding elements, with which to initialize the FORM.
Finally we call modal.show() to make the Modal appear on the screen. Because this might be the first time the Modal has been shown, there might not be an existing instance for the Modal. In that case we must instead create the instance, by calling new bootstrap.Modal.
For the Edit case, the user will see the same Modal as they saw when creating a new Todo item. The difference is that the Modal has the values for the Todo item, and the user can change those values. Once they click the Submit button, control passes to the handler function we looked at earlier. We've already seen how that handler detects whether the user was creating a new Todo, or editing an existing one, and how it acts appropriately for each case.
The Delete button is implemented similarly:
if (event.target.classList.contains('delete-button-image')) {
    let parent = getClosest(event.target, '.delete-button');
    const id = parent.getAttribute('data-id');
    socket.emit('delete-todo', { id: id });
}
In this case we simply get the ID for the Todo, then emit a delte-todo message.
That requires a server-side handler in routes/index.mjs:
socket.on('delete-todo', async (data) => {
    try {
        await todostore.destroy(data.id);
        let newtodos = await todostore.getAll();
        io.of('/home').emit('new-todos', newtodos);
    } catch (err) {
        error(`FAIL to delete todo ${err.stack}`);
    }
} );
This turns around to call todostore.destroy and then to emit new-todos with the new list of Todo items. That results in the display updated to show that the Todo has been deleted.
Summary
This completes the user interface for the Todo application. We've learned how to set up HTML for a Bootstrap application, and to manipulate the HTML using plain ordinary JavaScript DOM calls. We're using Socket.IO in both browser and client to communicate data back and forth.
To learn about the project setup: Project setup for Node.js 14, Express, Bootstrap v5, Socket.IO application
To learn about the database setup: Using Sequelize for the database layer in an Express Node.js 14 application
To learn about running the Todo application: Running the TODO application
To return to the project overview: Single page multi-user application with Express, Bootstrap v5, Socket.IO, Sequelize

Books by David Herron


(Sponsored)


