; Date: Fri Jul 29 2022
Tags: Raspberry Pi »»»»
The Raspberry Pi can power devices attached to the GPIO pins, or to the USB bus. But it's easy to accidently overload its power system.

Other articles in this series:
- Using multiple USB disks on a Raspberry Pi OS on RPI 4
- How to Boot a Raspberry Pi 4 or 400 from a USB drive
- A portable WiFI router/NAS/Docker using RaspAP on Raspberry Pi 4 with USB/SSD boot device
- Manually build a portable WiFI router/NAS/Docker on Raspberry Pi 4
- Installing OpenWRT on Raspberry Pi 4 using USB boot device
When using your Raspberry Pi, you might have seen a lightning bolt show up on the screen. That lightning bolt means that Raspberry Pi OS has determined the input power from the power adapter isn't enough to power everything connected to your Raspberry Pi. Drawing too much power through the Raspberry Pi is risky, since any electrical circuit can be damaged by going past power capacity limits.
The power limit for any electrical circuit is determined by the size of the electrical conductors and power limits for any semiconductors or other components. In the Raspberry Pi 4, that means the copper traces on the circuit board, and the power capacity of each chip. Those are hard physical limits that define the maximum power level these computers can directly handle.
I ran into this issue earlier when seeing how to attach multiple USB drives to a Raspberry Pi 4 USB3 port. My test involved booting the Pi from a 2.5" SSD drive in an external USB enclosure, then trying to connect a 2.5" HDD (hard drive) to the other USB3 port. Immediately error messages showed up in the Raspberry Pi OS kernel log, and the system started behaving strangely.
In /var/log/kern.log there were many messages discussing a new drive being recognized, and among them were these messages:
Jul 16 19:20:25 router kernel: [  107.897177] usb usb2-port2: over-current change #1
Jul 16 19:20:25 router kernel: [  107.929835] usb 1-1-port2: over-current change #1
Jul 16 19:20:26 router kernel: [  108.137216] usb usb2-port3: over-current change #1
Jul 16 19:20:26 router kernel: [  108.168015] usb 1-1-port3: over-current change #1
Jul 16 19:20:26 router kernel: [  108.377386] usb usb2-port4: over-current change #1
Jul 16 19:20:26 router kernel: [  108.408111] usb 1-1-port4: over-current change #1
That's a strange error message, but carefully notice the wording. The message is over-current on the named USB ports, and these messages are for the first change. It appears that sometimes this message can indicate damage to the board. However the more common case is what I did, which is to draw too much power through the USB ports.
The maximum power the Raspberry Pi 4B can supply over USB is 1.2A.
This instance demonstrates how easy it is to go beyond the limits. A 2.5" 160GB HDD I happen to have handy is rated for 5V 700mA. The 2.5" 480GB SSD I use as the boot devide is rated for 5V 1A. Together that means 1.7A of consumption on USB ports meant to handle 1.2A maximum.
How you get rid of the over-current change message depends on your project. In Using multiple USB disks on a Raspberry Pi OS on RPI 4, the project was to connect multiple disk drives. The solution to over-current on the USB bus is to use an externally powered USB hub. That way the Raspberry Pi is not responsible for delivering the power.

The
Raspberry Pi documentation has some basic facts about power limits, and recommended power supplies.
First, the actual issue is under voltage on the power supply. If it detects the input voltage is below 4.63V, then the warning icon shown here is displayed, and error messages show up in the kernel log.
Obviously this means the power supply itself could be bad. But, the normal behavior for a power supply is that as power demand increases the voltage falls. For example you might see the lights in your house dim when turning on an air conditioner or other device that draws a lot of power. That's due to the electrical load causing the voltage to drop. The same thing happens inside the Raspberry Pi if you're drawing too much power for the power supply.

Second, what is the power input limit to the Raspberry Pi? The documentation shows these facts:
- The input voltage is 5V, and the default input port is a USB-C power port.
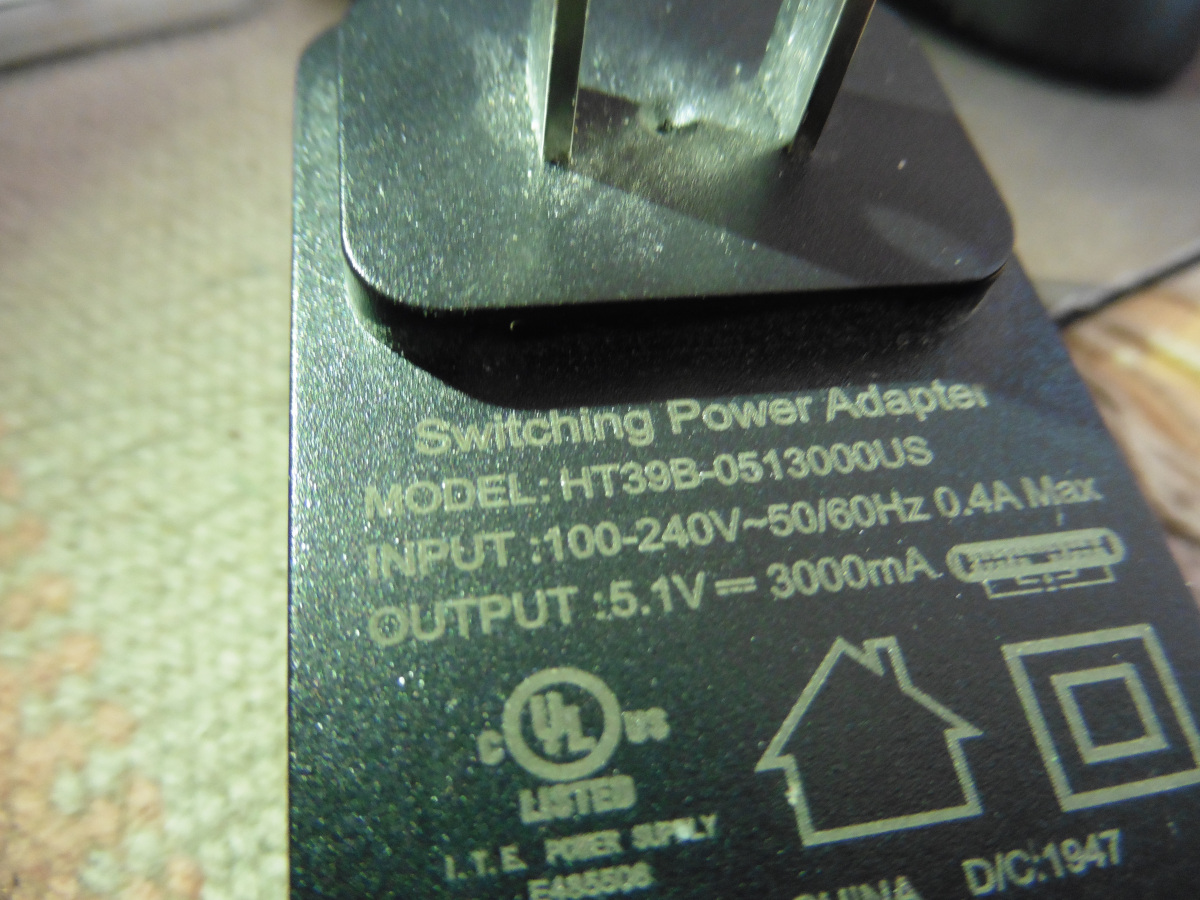
- For the Raspberry Pi 4 Model B it is recommended to have a 3A power brick. The brick shown here is rated for 5.1 volts, and 3000mA - note that equates to 3A.
- The maximum power that can be supplied through the USB ports is 1.2A.
- Typically the bare Pi 4B board (nothing else connected) will consume 600 mA (0.6A), and for the Pi 400 the consumption is 800 mA (0.8A).
The size of the power brick gives you a power budget, or a maximum power consumption. Each device connected to the Raspberry Pi will consume some power out of that budget.
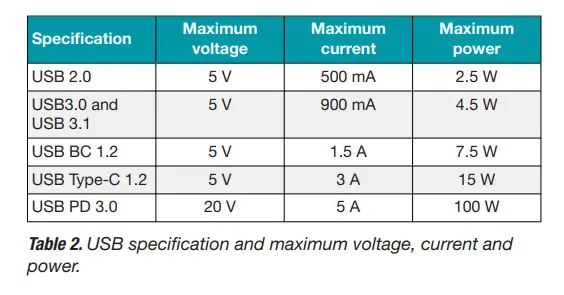
How much power can we supply to the Raspberry Pi 4 through the USB-C OTG connector? While the Raspberry Pi documentation doesn't make that clear,
the Texas Instruments primer on USB-C power has this chart:

It appears, therefore, that the 5V 3A recommended power supply is the maximum which can be supplied through the OTG port.
Another issue to be wary of is powering a Raspberry Pi using a USB charger. A USB3 charger, or a USB3 power bank, will supply either 1.5A or 900mA depending on whether it is a fast or slow charger. Neither power level is sufficient to power a Raspberry Pi 4B or 400. Therefore it is not recommended to power a Raspberry Pi using a USB phone charger or USB power bank. A USB-C charger should be able to supply 3A (check its specs) and should work okay.
All Raspberry Pi models can be powered by supplying 5V to GPIO pins 2 and 4, and connecting GPIO pin 6 to ground. The
HAT Design Guide documentation discusses the details. The power supply must be well regulated, and supply at least 2.5A. It does not document the maximum current level through the GPIO pins, however.
The main purpose for those pins is powering HATs attached to the Raspberry Pi. But, some HATs are designed with a power jack, and to be the source of power driving the Pi.
When interfacing with GPIO pins, be careful with all other GPIO pins since they all work at the 3.3V level. Do NOT connect 5V power to those pins.
Another thing to avoid is supplying power through the USB ports.
The USB specification requires that USB devices must not supply current to upstream devices. If a USB device does supply current to an upstream device then this is called back-powering. Often this happens when a badly-made powered USB hub is connected, and will result in the powered USB hub supplying power to the host Raspberry Pi. This is not recommended since the power being supplied to the Raspberry Pi via the hub will bypass the protection circuitry built into the Raspberry Pi, leaving it vulnerable to damage in the event of a power surge.
A USB device that sends power to the host to which it is connected would be acting contrary to the USB specification. You run the risk of damaging the board if trying to supply power this way.
Summary
The Raspberry Pi is designed to be powered either through the USB-C OTG connector, or through the three GPIO pins named earlier. It is designed to handle 5V 3A, or about 15 Watts of power, to provide power to HATs, and to deliver at most 1.2A through the USB ports.
It is not recommended to use a USB3 charger, or a USB3 power bank, to power a Raspberry Pi. Both are limited to at most 1.5A which can be easily exceeded. A USB-C power source, whether a USB-C charger or USB-C power bank, should power the Pi, but you must check the ratings of the device.
The 5V 3A maximum via the USB-C OTG port gives your project a power budget for handling the power capacity of the Raspberry Pi.
The on-board power budget cannot be extended. But, your project can provide separate power to devices connected to the Raspberry Pi. For example, in a NAS project the disk drives can be separately powered. The Pi can control a large number of drives, but cannot supply them with power.


