David Herron
Tags: Raspberry Pi »»»» RaspAP »»»»
RaspAP lets us build WiFi routers on Debian-based systems like the Raspberry Pi. It can easily build a complex WiFi router, while running other services at the same time.
What if you could build your own WiFi router that serves more functions than commercial routers? Commercial routers handle routing Internet traffic between a WiFi network, a local ethernet, and a wide area network. Usually that's the extent of their functionality, though some have a USB port supporting a disk drive or a printer. What if we could build one that has far more functionality?
A Raspberry Pi, along with suitable software, can make a very fine WiFi router that also runs other software. One choice is to install OpenWRT, which is professional-grade router software that's even used as the firmware of actual commercial WiFi routers. It can run on a Raspberry Pi, and I recently did so to try it out. But, I did not see a way to run other services alongside OpenWRT. What I'm interested in is the Raspberry Pi as a router that can also handle some other tasks like network attached storage (NAS).
RaspAP, on the other hand, does not take over the machine. Instead of installing an operating system image prebaked for RaspAP, you install the OS of your choice, then install RaspAP within that OS. Well, "OS of your choice" is limited to the operating systems supported by the RaspAP team. Their website currently lists Raspberry Pi OS, Armbian, Debian, and Ubuntu, each of which is a variant of Debian Linux. It also appears that RaspAP is available as a Docker image.
One opinion I've developed is that it's best for a Raspberry Pi-based router to boot from a regular disk drive rather than an SD card. I know that the Raspberry Pi genre is based on burning operating systems to SD cards. But, a WiFi router is the kind of device you set up, put on a shelf, and expect it to run for several years with no intervention. An SD card is simply the worst choice for the main drive of such an application. Therefore it is best for the host machine, a.k.a. Raspberry Pi, to run off a regular disk drive. For Raspberry Pi, that means booting using a regular disk drive (either SSD or HDD) connected via USB.
For a couple related articles, see:
- Using multiple USB disks on a Raspberry Pi OS on RPI 4
- How to Boot a Raspberry Pi 4 or 400 from a USB drive -- Guidance on booting a Raspberry Pi from USB drive
- Installing OpenWRT on Raspberry Pi 4 using USB boot device -- Maybe you prefer OpenWRT?
- Manually build a portable WiFI router/NAS/Docker on Raspberry Pi 4
- Power input and output limits on the Raspberry Pi 4B and 400
The high level process for installing RaspAP is:
- Burn an SD card (or USB drive) with Raspberry Pi OS (or other supported OS). You should probably use the Lite version - with no GUI support - because this device probably won't be used for a desktop user experience
- Use an ethernet cord to connect your Raspberry Pi to your Internet router
- Boot the Raspberry Pi from the SD card (or USB drive)
- Setup:
sudo apt-get update && sudo apt-get full-upgrade -y - REBOOT
- Config:
sudo raspi-config - REBOOT --
raspi-configwill probably demand a reboot - Install:
curl -sL https://install.raspap.com | bash - Visit RaspAP web GUI and start configuring things
Further documentation is at:
https://raspap.com/
What follows is my own journey, which was not as simple as the above overview. There are a couple tricks to running this combination.
My test system is a 2GB Raspberry Pi 4, mounted in a FLIRC case, with a Kingston 2.5" 480GB SSD drive in an external case. I have an EDIMAX brand USB WiFi module to test multiple WiFi scenarios. A picture of the system is at the bottom of the article.
My goal at the end is this combination:
- Allowing
eth0to connect to local LAN, or a direct connect to a laptop, but foreth0to be optional - Using
wlan0(built-in WiFi on Raspberry Pi) to connect WiFi to a host network, like my home WiFi system - Using a WiFi dongle to provide a hosted access point
- Using an SSD as the boot drive, and support additional drives to be hot-connected as desired
- One additional service is to export file systems using Samba
SNAFU on initial RaspAP setup - debugging PAM configuration on Raspberry Pi OS
On my first attempt I made what turns out to be unfortunate choices in the raspi-config step. That left RaspAP incorrectly setup, which led to some exploration of the PAM subsystem. I learned some things while debugging this which may be of use.
If you want to read about a working recommendation, skip this whole section. This section exists to provide useful advice to anyone running into similar issues.
The first clue is that the RaspAP install script "froze" without finishing. That is, it got to a message about setting up a NAT service, and the output stopped, and sometime later the SSH connection to the Raspberry Pi dropped. SSH'ing back into the router showed it was running fine, the RaspAP web GUI was running, and I could fiddle with some things.
But, when attempting to create a WiFi hotspot I kept getting an error - Unable to save Hotspot settings. This vague error message was dissatisfying. In the Hotspot area, there is a Logging tab, which you can turn on to see details about the hostapd service. But that was of no use with the initiall problem.
Instead, these messages in /var/log/auth.log were of far more importance.
Jul  5 18:28:48 router sudo: pam_unix(sudo:auth): conversation failed
Jul  5 18:28:48 router sudo: pam_unix(sudo:auth): auth could not identify password for [www-data]
Jul  5 18:28:48 router sudo: www-data : user NOT in sudoers ; PWD=/var/www/html ; USER=root ; COMMAND=/sbin/iw dev wlan0 set txpower auto
To interpret this, the RaspAP software is trying to use sudo to do something. The PAM system (sudo:auth) says it cannot identify a password for www-data, and that this user name is not in the sudoers file.
The first stage solution is to run this:
$ sudo usermod -aG sudo www-data
This adds the www-data user ID to the sudo group, allowing that user ID to use the sudo command.
After that the auth.log messages morphed to this:
Jul  5 19:02:31 router sudo: pam_unix(sudo:auth): conversation failed
Jul  5 19:02:31 router sudo: pam_unix(sudo:auth): auth could not identify password for [www-data]
After quite a bit of searching (and a
Stack Overflow post) I found that one can use
visudo to add an entry to the sudoers file:
www-data ALL=(ALL) NOPASSWD: ALL
Put this line at the bottom of the file, rather than somewhere in the middle. This allows www-data to use sudo without a password being registered in the system.
After this the auth.log messages changed to this:
Jul  5 19:58:28 router sudo: www-data : PWD=/var/www/html ; USER=root ; COMMAND=/bin/chmod o+r /tmp/hostapd.log
Jul  5 19:58:28 router sudo: pam_unix(sudo:session): session opened for user root(uid=0) by (uid=33)
Jul  5 19:58:28 router sudo: pam_unix(sudo:session): session closed for user root
This is indicating successful activity. Indeed, I was now able to make settings changes, but I was still unable to turn on the WiFi system.
In the Logging tab (hostapd) these messages showed up:
Configuration file: /etc/hostapd/hostapd.conf
Could not read interface uap0 flags: No such device
nl80211: Driver does not support authentication/association or connect commands
nl80211: deinit ifname=uap0 disabled_11b_rates=0
Could not read interface uap0 flags: No such device
nl80211 driver initialization failed.
uap0: interface state UNINITIALIZED->DISABLED
uap0: AP-DISABLED
uap0: CTRL-EVENT-TERMINATING
hostapd_free_hapd_data: Interface uap0 wasn't started
At that point I became stumped. Yes, the uap0 device did not exist, etc. I went to bed, slept on the problem, and in the morning decided to start over from scratch.
Incorrect use of raspi-config for installing RaspAP
The issues discussed in the previous section turned out to be because I'd made a bad choice while running raspi-config. Namely, turning on WiFi support using raspi-config. That choice seems to have caused RaspAP's installation script to go sideways, and for RaspAP to be incorrectly installed.
In raspi-config make these settings changes:
- Set the hostname to whatever you like - I used
router - Require that the console require login using user-name and password, rather than to support autologin
- Enable SSH login
The failure came when I made an additional setting change. If using raspi-config to enable WiFi to connect to my home LAN, then the RaspAP installation failed here:
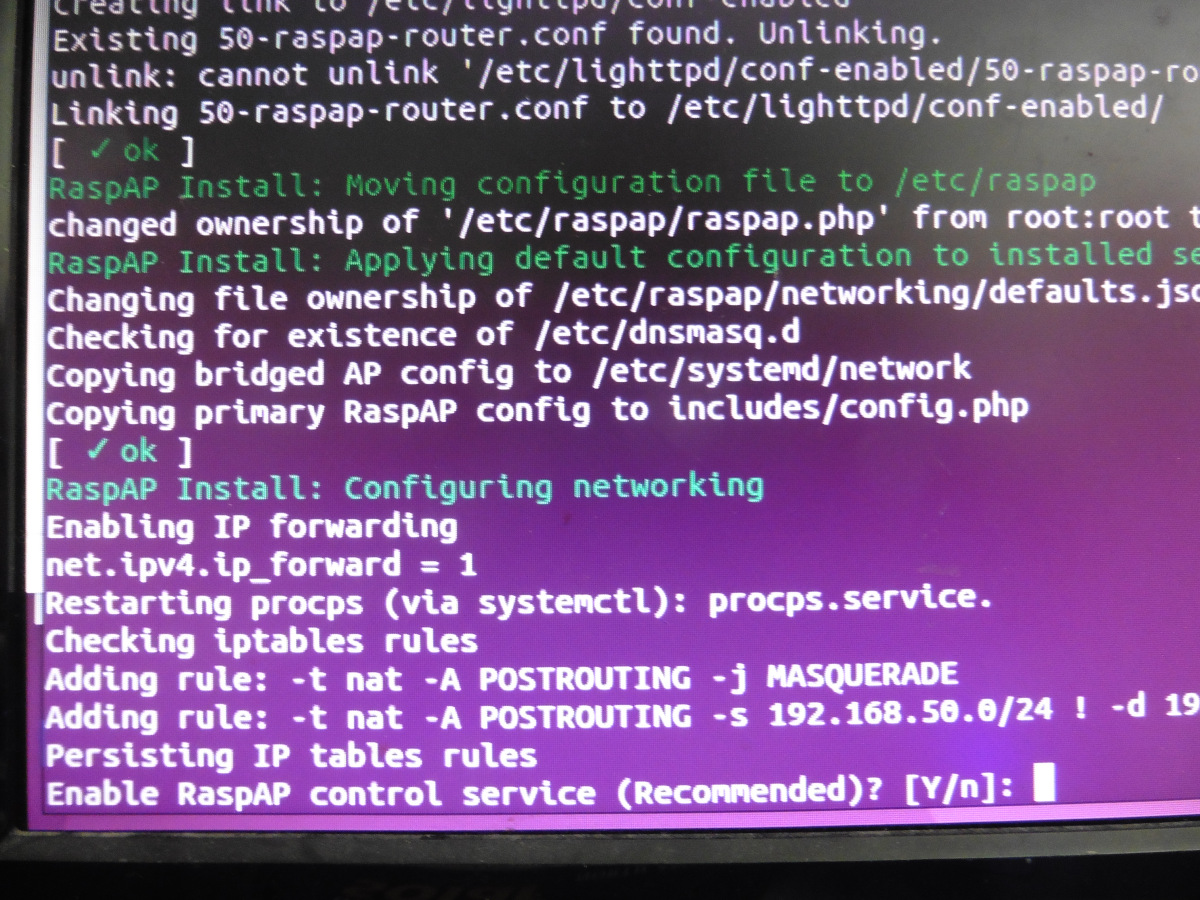
This screen capture shows what's supposed to happen. The two Adding rule lines get printed, it asks about enabling RaspAP and so on. Eventually the script gets to the end and reboots the system.
In the failure mode, where I enabled WiFi using raspi-config, after the first line reading Adding rule: -t nat ..., the process stopped printing anything out. After awhile I hit RETURN and the SSH session disconnected. I could reconnect to the Raspberry Pi, it seemed fine, and the RaspAP GUI was running, but with the failures discussed earlier.
I went through the process enough times and am certain that the error happens when enabling WiFi in the raspi-config step. As soon as I skipped enabling WiFi using raspi-config then the installation script correctly ran to completion. Further, the RaspAP GUI worked correctly meaning changes made in the Hotspot section registered correctly.
Enabling WiFi using RaspAP web GUI
In the previous section I made it clear - DO NOT ENABLE WiFi using raspi-config because that results in an incorrect installation.
In RaspAP, I could make settings changes in the Hotspot area, but could not start the Hotspot -- meaning that WiFi could not be turned on. In the upper left corner of the RaspAP GUI is some indicator lights, with a blinking red light saying Hotspot was inactive. All other indicators said it could not start the WiFi Hotspot I'd configured. In the hostapd log area, these messages showed up:
Configuration file: /etc/hostapd/hostapd.conf
rfkill: WLAN soft blocked
wlan0: interface state UNINITIALIZED->COUNTRY_UPDATE
Using interface wlan0 with hwaddr dc:a6:32:3d:f4:7c and ssid "HotSpot"
Failed to set beacon parameters
wlan0: Could not connect to kernel driver
Interface initialization failed
wlan0: interface state COUNTRY_UPDATE->DISABLED
wlan0: AP-DISABLED
wlan0: Unable to setup interface.
wlan0: interface state DISABLED->DISABLED
wlan0: AP-DISABLED
wlan0: CTRL-EVENT-TERMINATING
hostapd_free_hapd_data: Interface wlan0 wasn't started
nl80211: deinit ifname=wlan0 disabled_11b_rates=0
Notice the second line discusses rfkill. In the RaspAP documentation, the manual configuration instructions contains a section discussing rfkill blocking the WiFi system.
The solution given is to:
- Use
raspi-configto set WiFi locale -- but did not use it to turn on the WiFi -- It might be possible to use the RaspAP GUI to set the WiFi locale - reboot required after that (by raspi-config)
- After reboot:
sudo rfkill unblock wlan
Immediately, in RaspAP the indicator "Hotspot active" is now green, when it had been blinking red.
After running rfkill unblock, I was able to make several RaspAP changes, and have them reflected in a normal way.
Configuring RaspAP to advertise a WiFi network
A first experiment is to use your Raspberry Pi to create a WiFi router. This means connecting the Raspberry Pi using an ethernet cord to your regular Internet router, and then using the built-in WiFi of the Raspberry Pi to create a new WiFi network. Technically speaking, it will be configured as a WiFi Access Point.
By default RaspAP configures eth0, the device name for the built-in ethernet port, to receive network configuration and IP addresses from a DHCP server on the network. That DHCP server is built-in to your internet router. You'll need to investigate to find the IP address it was assigned, for example by looking at the router administrative page. Another method is that, while you have a monitor/keyboard attached, to login to the command line, and to run ifconfig -a.
The RaspAP web GUI can be reached at http://IP-ADDRESS for the IP address assigned to the eth0 interface. Alternatively, when running raspi-config you gave the Raspberry Pi a host name. You may be able to connect using http://HOST-NAME.local.
The next step to head to the Hotspot section of the RaspAP web GUI. There are three tabs of interest. Make settings changes in the tabs like this:
- Basic settings
- Interface -- Leave as
wlan0 - SSID -- Choose a network name
- Wireless mode -- Leave this alone?
- Channel -- Pick a channel number if desired
- Interface -- Leave as
- Security
- Security type -- WPA2
- Encryption type -- CCMP
- PSK -- Choose a password
- Advanced settings
- Set Transmit Power to
auto - Set Country Code to your country
- Set Transmit Power to
Click the Save Settings button to write the settings out to configuration files. Then click Restart Hotspot to implement the settings change.
In the DHCP Server section, select the wlan0 interface, making sure it is configured as so:
- Choose Static IP address
- Static IP Options
- IP Address -- choose an address, like
10.71.71.1 - Subnet mask -- Define a corresponding mask, like
255.255.255.0 - Default Gateway -- Same as for IP Address
- IP Address -- choose an address, like
- DHCP Options
- Set Enable DHCP for this interface
- Starting IP address -- Choose an IP address within the network -- For example
10.71.71.20 - Ending IP address -- Choose an IP address within the network -- For example
10.71.71.120 - DNS Server 1 and DNS Server 2 -- Choose a DNS server if desired like
1.1.1.1or8.8.8.8
Again, click Save Settings to enable these changes. This ensures a sensible setup for DHCP address assignment on the WiFi network. Creating the WiFi network probably made sensible defaults.
In the networking area you might see a status like this:
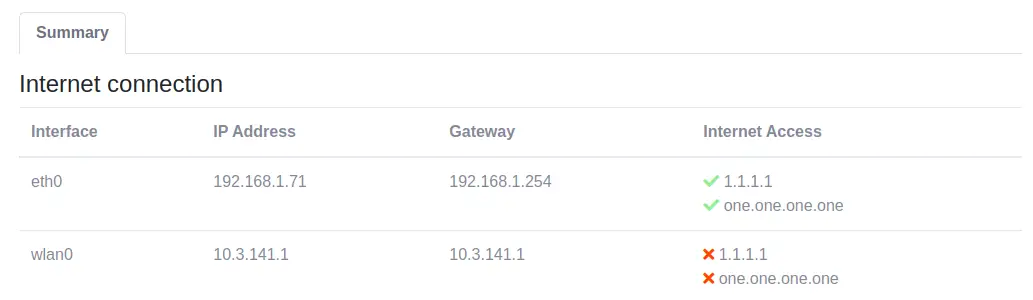
The eth0 device is the wired ethernet, with its IP address and that of the Internet router. The wlan0 is the built-in WiFi, with the IP address of the network it has assigned for the WiFi network you just created.
If you have another device, like a smart phone, you can scan for WiFi networks. The newly created network should show up, and you should be able to join the network using your chosen password. After joining the network your device should show an IP address assigned by the router.
You should be able to use this hotspot to browse the Internet and do anything else.
The result so far is two network interfaces your local LAN and the new WiFi hotspot, and the Raspberry Pi routes traffic between the two.
Using a second WiFi adapter as a WiFi client
RaspAP is able to configure a WiFi interface to be a client to an existing WiFi network. We're using the built-in WiFi interface to create our own WiFi network. We can easily add a USB WiFi dongle using it to connect with an existing network, that way the router can route between our new WiFi network and the existing network.
For example, you might be at a coffee shop. The second WiFi interface can connect to the WiFi supplied by the coffee shop, and your laptop or tablet can connect to the WiFi network created by RaspAP.
For this test, I have an EDIMAX EW-7811UN WiFi dongle. The box specifically says Ideal for Raspberry Pi on the front.
I simply slid it into one of the USB ports on the Raspberry Pi. Looking at /var/log/kern.log and /var/log/syslog, messages immediately show up verifying that the operating system recognizes the device:
# /var/log/kern.log

Jul  7 20:46:09 router kernel: [86914.640754] usb 1-1.3: new high-speed USB device number 3 using xhci_hcd
Jul  7 20:46:10 router kernel: [86914.772283] usb 1-1.3: New USB device found, idVendor=7392, idProduct=7811, bcdDevice= 2.00
Jul  7 20:46:10 router kernel: [86914.772313] usb 1-1.3: New USB device strings: Mfr=1, Product=2, SerialNumber=3
Jul  7 20:46:10 router kernel: [86914.772335] usb 1-1.3: Product: 802.11n WLAN Adapter
Jul  7 20:46:10 router kernel: [86914.772353] usb 1-1.3: Manufacturer: Realtek
Jul  7 20:46:10 router kernel: [86914.772370] usb 1-1.3: SerialNumber: 00e04c000001
Jul  7 20:46:10 router kernel: [86914.905863] rtl8192cu: Chip version 0x10
Jul  7 20:46:10 router kernel: [86914.974023] rtl8192cu: Board Type 0
Jul  7 20:46:10 router kernel: [86914.974159] rtl_usb: rx_max_size 15360, rx_urb_num 8, in_ep 1
Jul  7 20:46:10 router kernel: [86914.974216] rtl8192cu: Loading firmware rtlwifi/rtl8192cufw_TMSC.bin

# /var/log/syslog

Jul  7 20:46:10 router dhcpcd[1488]: wlan1: adding address fe80::fd26:84c3:b23f:d43c
Jul  7 20:46:10 router avahi-daemon[361]: Joining mDNS multicast group on interface wlan1.IPv6 with address fe80::fd26:84c3:b23f:d43c.
Jul  7 20:46:10 router dhcpcd[1488]: wlan1: carrier lost
Jul  7 20:46:10 router avahi-daemon[361]: New relevant interface wlan1.IPv6 for mDNS.
Jul  7 20:46:10 router avahi-daemon[361]: Registering new address record for fe80::fd26:84c3:b23f:d43c on wlan1.*.
Jul  7 20:46:11 router dhcpcd[1488]: wlan1: deleting address fe80::fd26:84c3:b23f:d43c
Jul  7 20:46:11 router avahi-daemon[361]: Withdrawing address record for fe80::fd26:84c3:b23f:d43c on wlan1.
Jul  7 20:46:11 router avahi-daemon[361]: Leaving mDNS multicast group on interface wlan1.IPv6 with address fe80::fd26:84c3:b23f:d43c.
Jul  7 20:46:11 router avahi-daemon[361]: Interface wlan1.IPv6 no longer relevant for mDNS.
In the Hotspot area, a new device wlan1 showed up. According to the RaspAP documentation, it's possible to configure two multiple WiFi network hotspots with manual intervention. But, that's not what we're doing in this section. It's useful to notice that RaspAP recognizes wlan1.
In the WiFi Client section, it will show WiFi networks it can see. There is also a Rescan button to scan for networks.
I simply entered the WiFi password for my WiFi network, and clicked the Add button
In the Networking section you'll now have three entries:
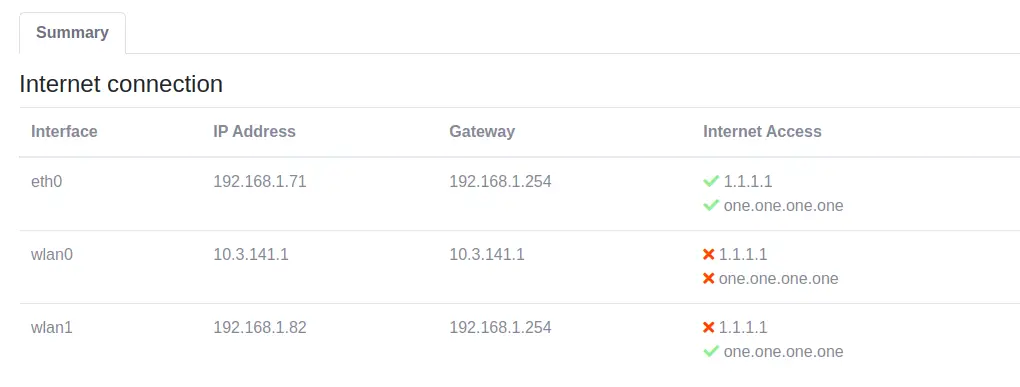
The wlan1 interface has connected over WiFi to the Internet router, and received an IP address assignment. You can now use this IP address to connect your browser to the RaspAP. For that matter, you can use ROUTER-NAME.local to connect to the RaspAP Web GUI. The GUI will act the same either way.
Now, disconnect the ethernet cord from the Raspberry Pi. You should still be able to browse the RaspAP Web GUI, and now the Network section will look like this:
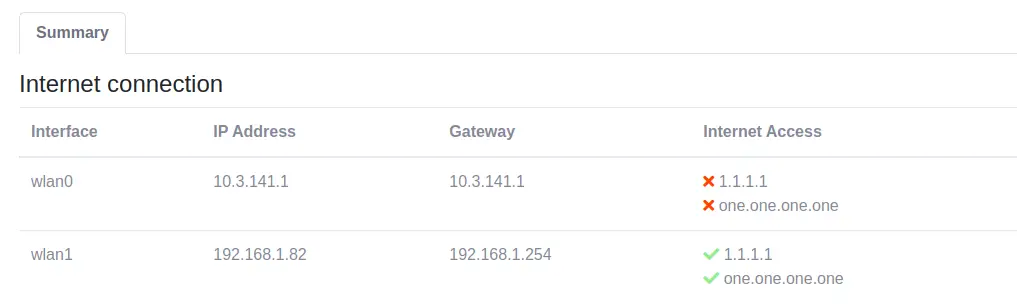
The only interfaces now are wlan0 and wlan1.
The status is:
wlan0is the new WiFi network generated by the Raspberry Piwlan1is used as a WiFi client to connect to your existing WiFi network
Ideally you should now be able to connect a device - like your smart phone or another computer - to the WiFi network, and the router lets you browse the Internet. It will do this by routing your queries over the WiFi to your Internet router, and everything will be fine.
I had some trouble with this. In the RaspAP FAQ, it is suggested to uncheck the Install a default route for this interface option.
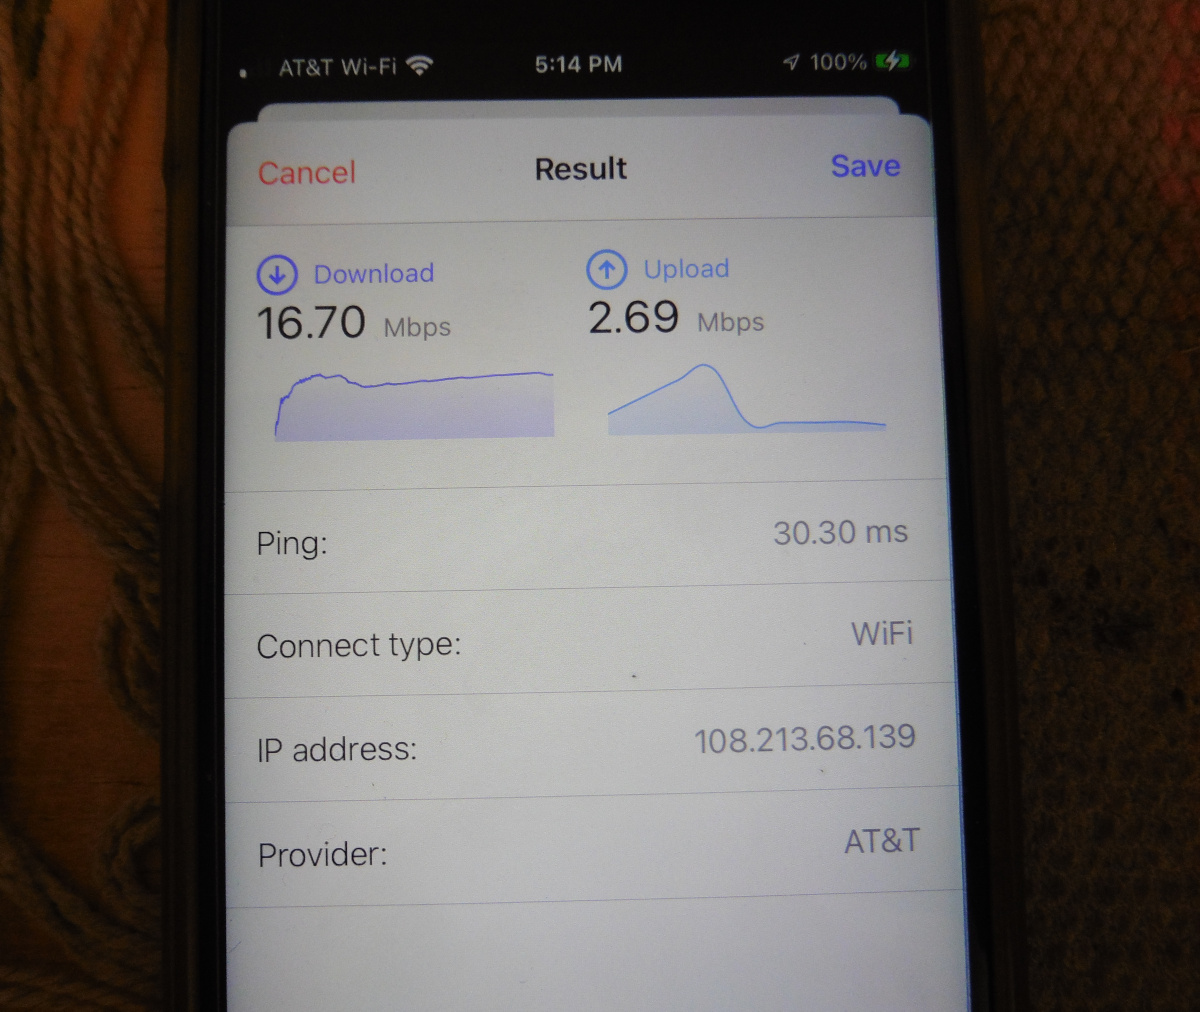
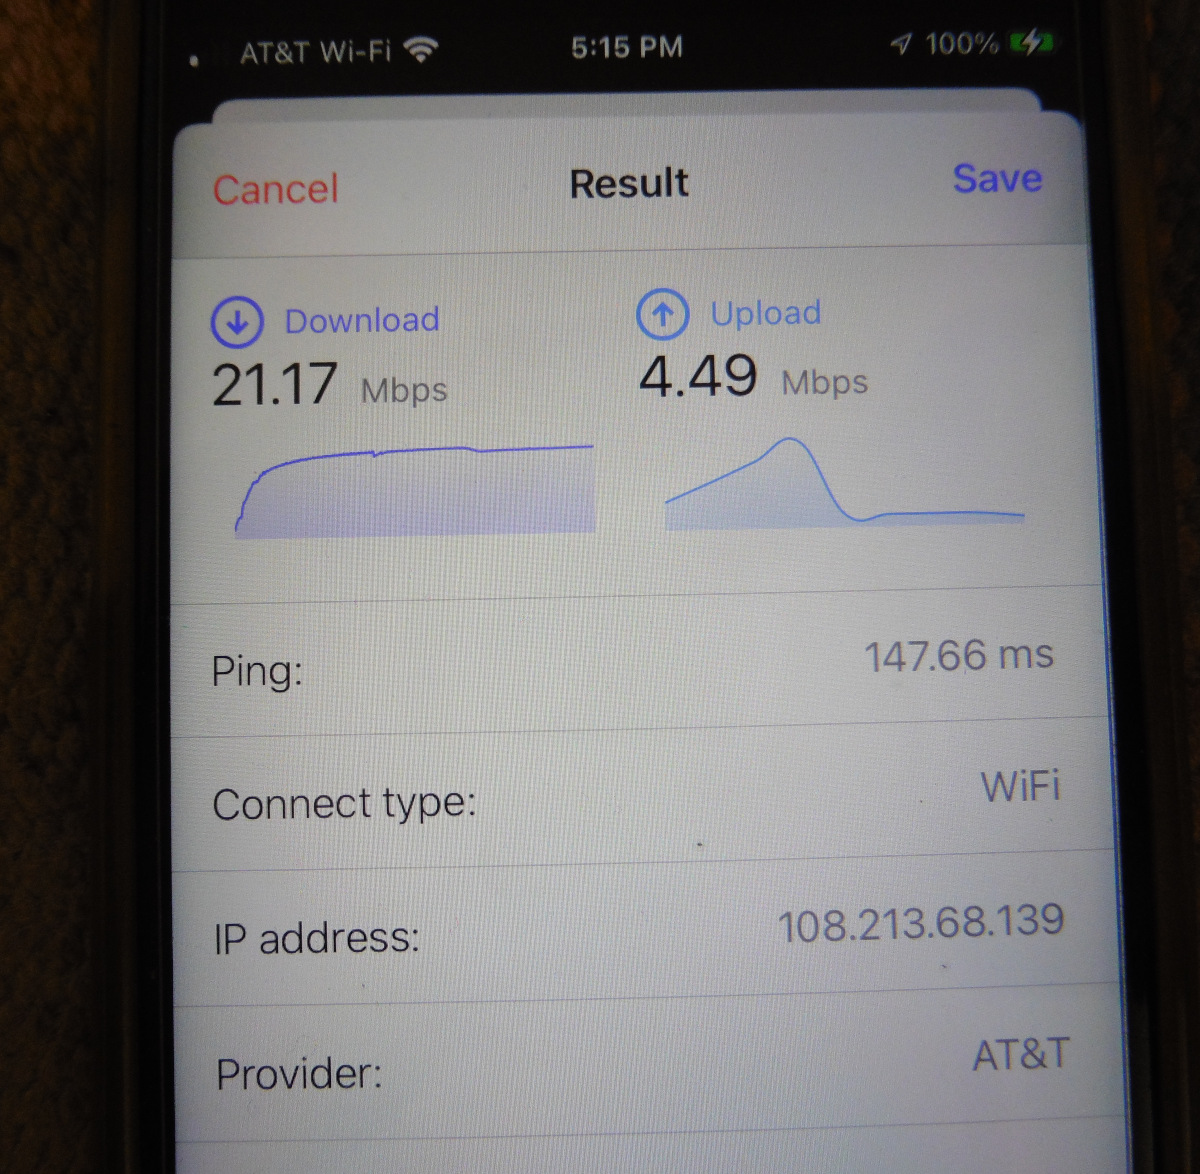
Speed test comparison of WiFi using RaspAP
There are three scenarios available for comparing internet speed. For the tests I used an iPhone speed test app - Speed Test & WiFi Analyzer - which was freshly installed from the App Store. I made sure it was testing through the WiFi, and for each phase of the performance test I made sure the WiFi was connected as each scenario indicated.
My home Internet connect is via a DSL line provisioned by Sonic DSL that is by no means top of the line, but is adequately fast for my needs.
- WiFi connected through the RaspAP configured for WiFi-WiFi to Internet Router
- WiFi connected through the RaspAP configured for WiFI-Ethernet to Internet Router
- WiFi connected directly to the WiFi of the Internet Router
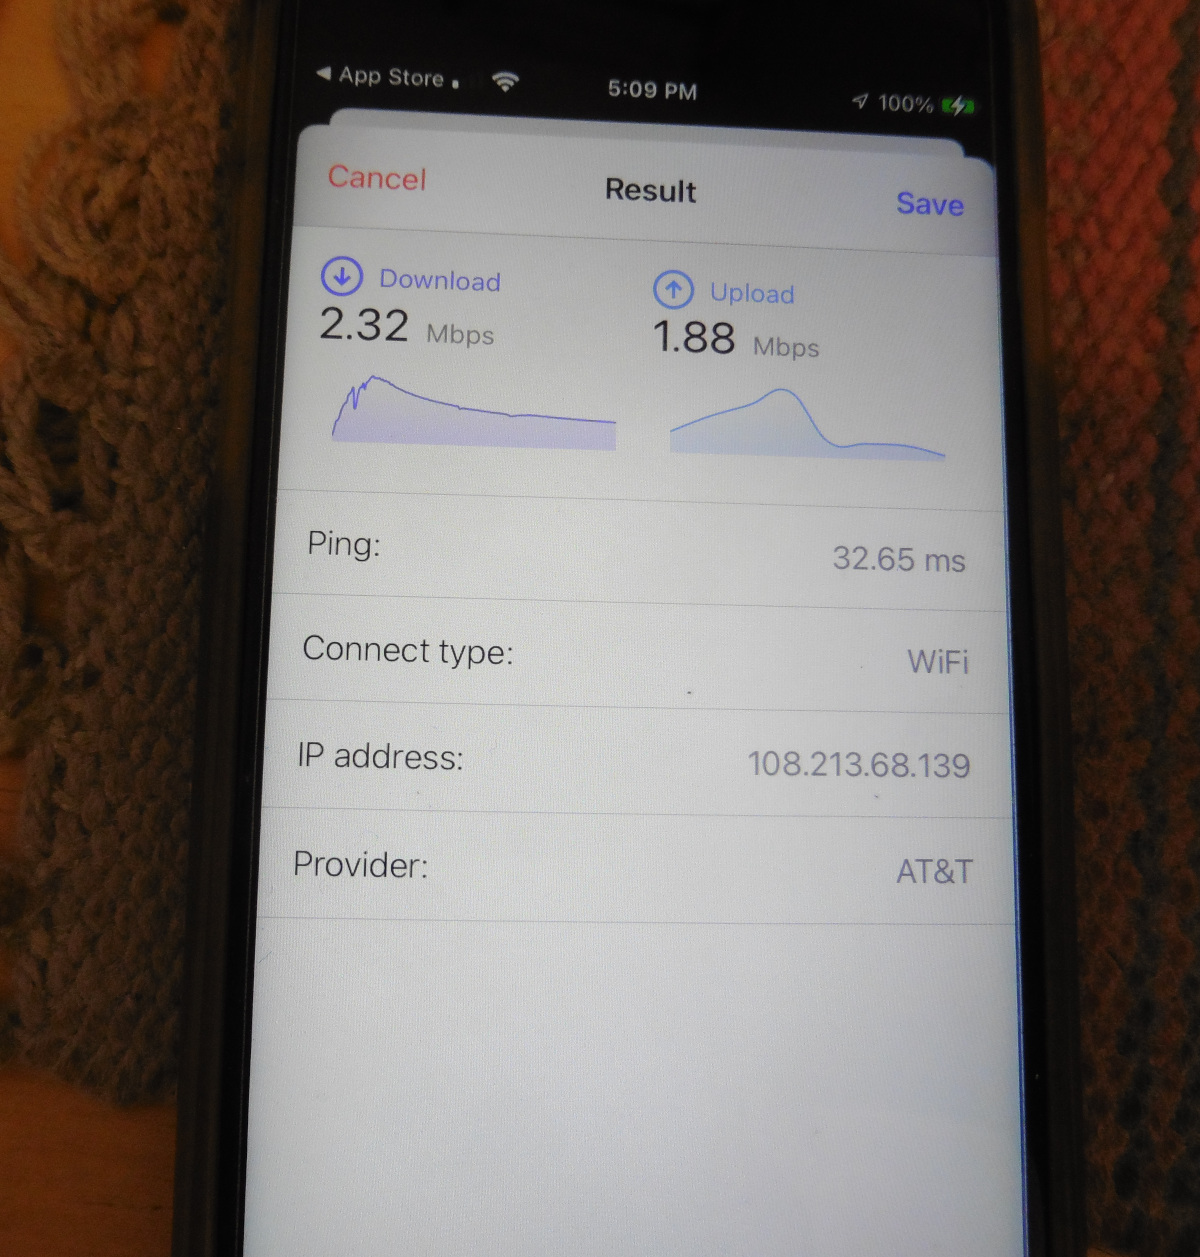
As you can see, the WiFi-WiFi performance is a lot slower. It may be because the WiFi dongle only supports USB2. There may be a USB3 WiFi dongle supported by Raspberry Pi OS. When installing the app the phone was connected to the Internet via the router. While the App Store application ran fine over the RaspAP router, the application download seemed glacially slow.
Implementing file sharing using Raspberry Pi running RaspAP
Because RaspAP runs alongside anything else we install on the Raspberry Pi, it should be easy to run other applications.
For file sharing, lets start by setting up Samba in the default mode.
$ sudo apt-get install samba samba-common-bin
$ ls /opt
$ mkdir /opt/share
$ sudo mkdir /opt/share
$ sudo chown david /opt/share
$ sudo chown david.david /opt/share
$ sudo vi /etc/samba/smb.conf
$ sudo smbpasswd -a david
$ sudo service smbd restart
This installs the Samba packages, creates a directory (/opt/share) that I'll set up as a file sharing area, changes its ownership to my login. I then edit smb.conf with the configuration I'll show in a minute. I make sure the Samba password for my account is set. And I then restart the Samba service.
For smb.conf the only changes made were in the Misc section of the default configuration file. There is of course close to a zillion changes that could be made elsewhere depending on your goals. This is about the simplest setup possible. In the Misc section I commented out everything which was there, and added these entries:
[david]
    comment = David
    path = /home/david
    browsable = yes
    guest ok = no
    read only = no
    create mask = 0755
    valid users = david

[share]
    comment = Share
    path = /opt/share
    browsable = yes
    guest ok = no
    read only = no
    create mask = 0755
    valid users = david
This sets up a pair of shares that are browsable, and support connecting using the password I just created.
My laptop is running Ubuntu Linux, and the two shares immediately showed up in Nautilis and I could easily attach to the file shares and add files.
Thus, a possible scenario is - at the coffee shop - connect to the coffee shop WiFi through this router - and at the same time bring along some files on the SSD drive.
Installing Docker on the Raspberry Pi alongside RaspAP
One thing I'm interested in is to run Docker based services. I have some instructions for Docker installation on various operating systems: Installing Docker Engine or Desktop on Ubuntu, macOS or Windows
For installing on Raspberry Pi OS, the official instructions are:
$ sudo apt-get remove docker docker-engine docker.io containerd runc
$ sudo apt-get install     ca-certificates     curl     gnupg     lsb-release
$ sudo mkdir -p /etc/apt/keyrings
$ curl -fsSL https://download.docker.com/linux/debian/gpg | sudo gpg --dearmor -o /etc/apt/keyrings/docker.gpg
$ echo   "deb [arch=$(dpkg --print-architecture) signed-by=/etc/apt/keyrings/docker.gpg] https://download.docker.com/linux/debian \
   $(lsb_release -cs) stable" | sudo tee /etc/apt/sources.list.d/docker.list > /dev/null
$ sudo apt-get update
$ sudo apt-get install docker-ce docker-ce-cli containerd.io docker-compose-plugin
$ sudo groupadd docker
$ sudo usermod -aG docker $USER
That deinstalls any preexisting Docker, because the Docker packages have changed around and it's important to be using the new ones. It then adds a package source based on docker.com, and installs the current version of Docker Engine. By default that starts the Docker Engine running as a system service. The last step is to ensure the docker group exists, and to add your user ID to that group.
After that last step, logout from the Raspberry Pi, then login again, so that your new login shell has the docker group. You should then be able to run this:
$ docker run hello-world
Unable to find image 'hello-world:latest' locally
latest: Pulling from library/hello-world
9b157615502d: Pull complete
Digest: sha256:13e367d31ae85359f42d637adf6da428f76d75dc9afeb3c21faea0d976f5c651
Status: Downloaded newer image for hello-world:latest

Hello from Docker!
This message shows that your installation appears to be working correctly.

...
The hello-world image is a quick easy way to verify that Docker is installed, and that you can execute Docker commands on your own.
Summary
We've set up a pretty interesting device on a Raspberry Pi. With RaspAP we can setup complex internet router configurations. It's easy to install the software, and additionally to install other software alongside RaspAP.
The RaspAP GUI is not fully featured. There are limits to what you can do directly in the GUI. For example, the RaspAP FAQ says it is possible to setup two Access Point networks -- meaning, to host two WiFi networks off the same device -- but that the GUI does not support doing so. Instead, you go to the command-line and do some of the configuration there.
In other words, RaspAP lets you go to command-line tools to do any complex configuration you desire. But, the purpose of a GUI is to take care of as many use cases as possible.
In this article I did not discuss setup of OpenVPN or Wireguard. This was in the interest of space.
OpenVPN appears to be able to tunnel your outgoing traffic through a 3rd party VPN service. Hence, if you're at a Starbucks or a hotel using a public WiFi, tunneling your traffic through the external VPN means nobody on that public WiFi network can snoop your traffic. Wireguard is an alternate VPN service that requires specific software.
The combination I've shown above - RaspAP plus Samba plus Docker - is useful for a software engineer like me. For example, I could add a Gitea server to the Raspberry Pi for a local Git server, or run a database on the Raspberry Pi, or any of a zillion other possibilities.
Another idea which that looks enticing is a 4G LTE or 5G WWAN modem. There are devices that connect to Raspberry Pi GPIO headers, and there are other devices that connect to USB ports. It should be possible to configure RaspAP to setup routine with such a modem, enabling you to create a portable hotspot connected via WAN networks.
My hardware configuration looks like this:
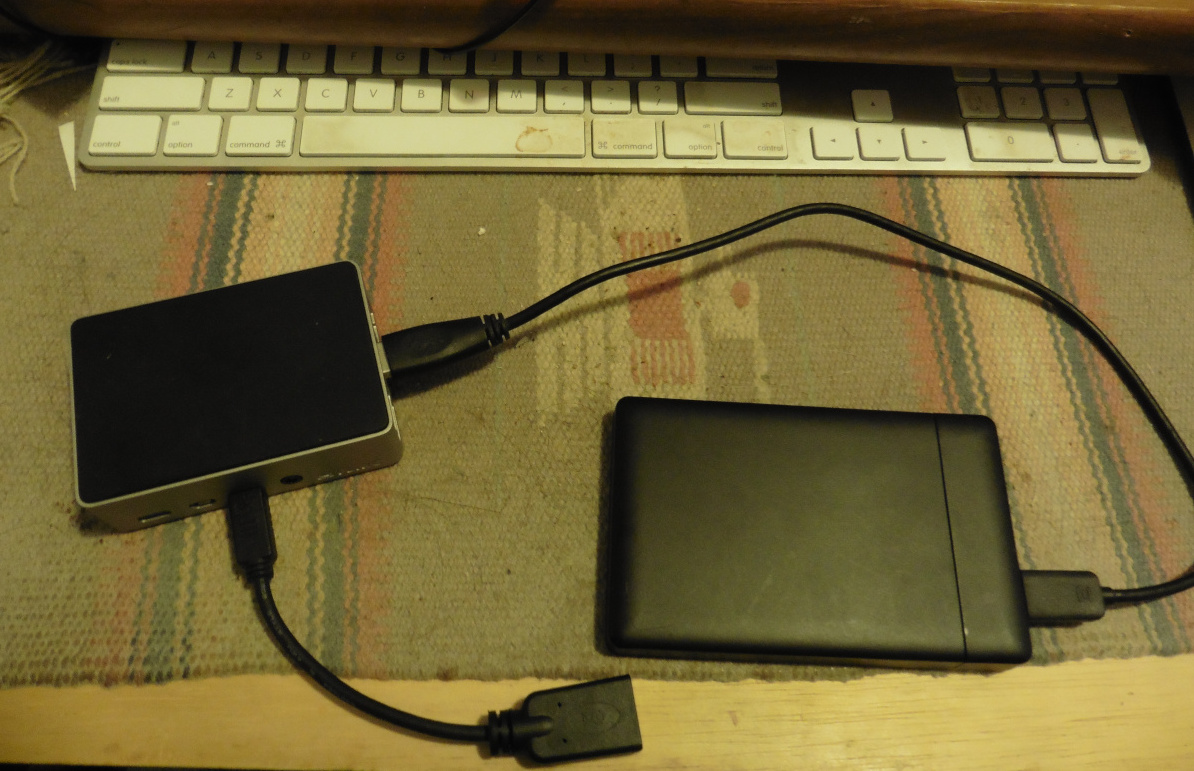
The Raspberry Pi 4 is mounted in a FLIRC case. These provide excellent passive heat dissipation, in a very sleek/small case. The USB drive is a simple 2.5" external case and is a bus-powered SSD, allowing for potentially 2TB of portable storage depending on your budget. Shown here is a micro-HDMI to HDMI adapter cable allowing display on regular HDMI displays. It's easy to add a keyboard/mouse via the USB ports. The power requirements are easily handled via a portable USB power bank, a USB charger, or other 5v power supply (not shown). This system is easy to throw in a bag to take with you.
Taking this setup to the next level requires a powered USB3 hub and several USB disks attached to the hub.
The bottom line is this demonstrates building a flexible micro-server you can bring with you to use in the field.


