David Herron
Tags: Raspberry Pi »»»»
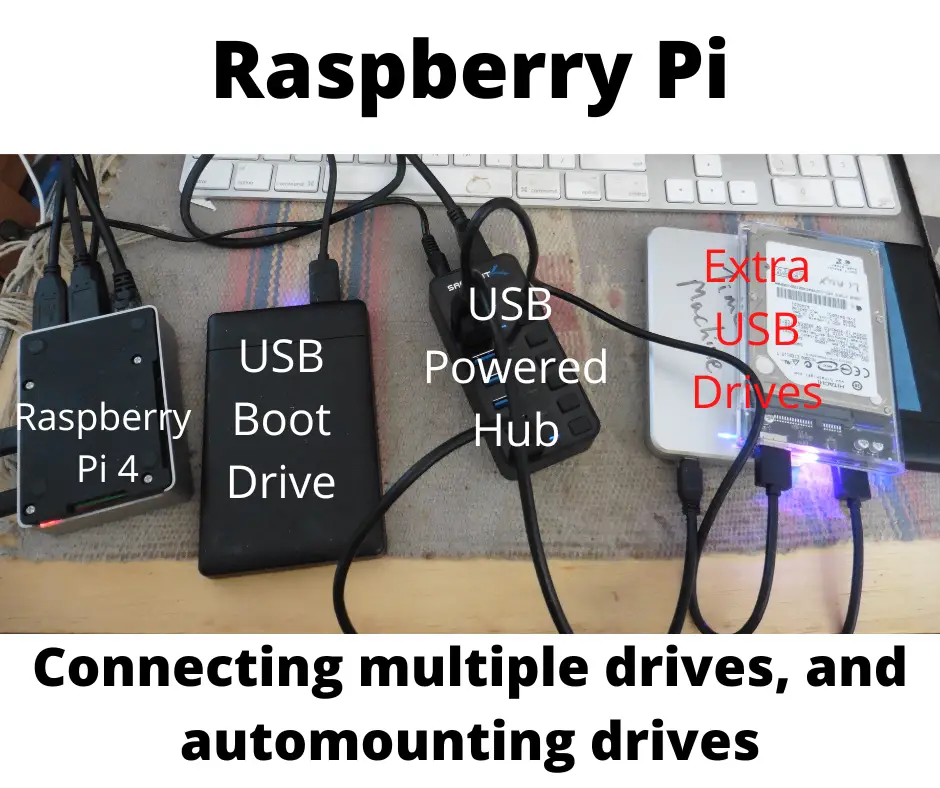
With a USB powered hub and a little bit of configuration, we can attach as many USB drives to a Raspbere Pi as we like, and automatically mount them like on macOS.
I recently build a Raspberry Pi which works both as a WiFi hotspot router, as a Docker host, and as a cheap network attached storage (NAS) device. There were two goals remaining to be filled, however. The first is the ability to attach many drives to the Raspberry Pi. Why not use a Raspberry Pi for a big pile of 10TB disk drives? The second goal is to automatically mount drives when they're attached.
Other articles in this series:
- How to Boot a Raspberry Pi 4 or 400 from a USB drive
- Installing OpenWRT on Raspberry Pi 4 using USB boot device
- A portable WiFI router/NAS/Docker using RaspAP on Raspberry Pi 4 with USB/SSD boot device
- Manually build a portable WiFI router/NAS/Docker on Raspberry Pi 4
- Power input and output limits on the Raspberry Pi 4B and 400
On my daily driver machine, a laptop running Ubuntu 22.04, attaching a USB drive there is an attempt to automatically mount it under the /media mount point. Likewise, on a macOS machine, there is an attempt to automatically mount the drive on /Volumes. This is a very convenient user experience.
For the purpose of using a Raspberry Pi as a NAS, it will be very convenient to be able to use some drives intermittently. For example, you might have a drive with financial records, that stays disconnected most of the time, but is attached on Fridays when you do the books.
Another necessity is to potentially attach lots of drives to the Raspberry Pi. How many drives depends on your needs. In my office I have multiple 8 terabyte drives storing my files. Some of these drives are duplicates serving as backups of content on other drives. It would be useful to attach the backup drives only when running backups, for example.
Using a Raspberry Pi as a NAS is an example where you expect the computer to keep running for months or years at a time. It is best for a NAS to boot from a regular drive, rather than boot from an SD card. SD cards wear out over time which is an inconvenience because you'll need to rebuild the configuration when the card dies. While regular hard drives also wear out, their lifespan is much longer. For instructions see How to Boot a Raspberry Pi 4 or 400 from a USB drive
It's possible to use the Raspberry Pi as your WiFi router. One choice is to use OpenWRT, which is professional grade software that is actually used by several router manufacturers. It, unfortunately, takes over the system and it's hard to install additional software. I found it useful to use RaspAP to drive the WiFi hotspot feature because it easily works alongside other applications. My Raspberry Pi has RaspAP, Samba, and Docker installed.
In this article we'll be exploring the above terrain. We will attach multiple drives to a Raspberry Pi 4, and implement hotswapping of drives -- meaning the ability to automatically mount a drive when attached, and easily unmount a drive when not needed.
Power capacity of the Raspberry Pi
Raspberry Pi's have limited ability to provide power to USB drives. A USB drive that is bus powered can easily go over the capacity of your Raspberry Pi.
In my initial test, I have a Raspberry Pi 4 configured to boot from a 2.5" SSD drive as documented in How to Boot a Raspberry Pi 4 or 400 from a USB drive . That means the RPI has one USB drive which must always stay attached, and which is powered by the RPI over USB.
To that machine, I attached a second 2.5" drive, this time a regular spinning disk drive originally pulled from a Mac laptop. HDD's require more power than SSD's. The boot drive is an SSD, the new drive is an HDD.
Upon attaching the drive to the Raspberry Pi I looked in in /var/log/kern.log and saw a bunch of messages discussing a new drive being recognized. Among those messages were these:
Jul 16 19:20:25 router kernel: [  107.897177] usb usb2-port2: over-current change #1
Jul 16 19:20:25 router kernel: [  107.929835] usb 1-1-port2: over-current change #1
Jul 16 19:20:26 router kernel: [  108.137216] usb usb2-port3: over-current change #1
Jul 16 19:20:26 router kernel: [  108.168015] usb 1-1-port3: over-current change #1
Jul 16 19:20:26 router kernel: [  108.377386] usb usb2-port4: over-current change #1
Jul 16 19:20:26 router kernel: [  108.408111] usb 1-1-port4: over-current change #1
Okay, that was too much power consumption. Fortunately the solution is relatively simple.
To learn more about powering Raspberry Pi's and the power limits see: Power input and output limits on the Raspberry Pi 4B and 400
Using a powered USB hub with a Raspberry Pi
It's easy with a Raspberry Pi to go past the available power capacity if using bus-powered USB devices. This means having separate power so that these devices are not powered from the USB bus. The simple USB hubs do not have their own power supply, but are bus powered from the host computer. If that USB hub is powering a keyboard and mouse, the minimal power consumption is find for a non-powered USB hub. But powering multiple disk drives won't work.
The solution is to use a powered USB hub is a USB hub with its own power supply.
To learn more about powering Raspberry Pi's and the power limits see: Power input and output limits on the Raspberry Pi 4B and 400
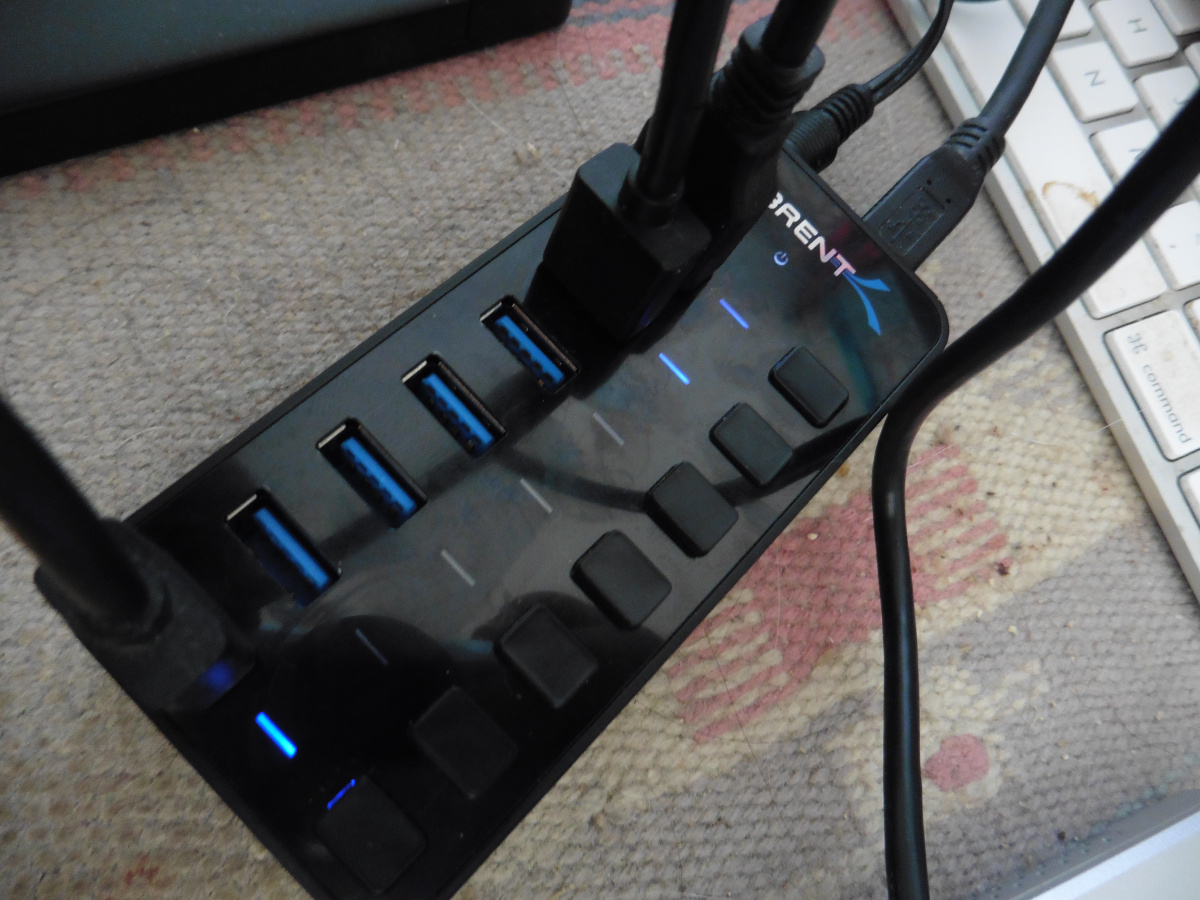
Powered USB hubs come with their own power brick that attaches to the USB hub. I have a Sabrent HB-BUP7, shown above, which is a 7-port USB hub with an individual switch for each port. It's very compact and would be easy to carry in a bag alongside the Raspberry Pi if you're traveling.
You start by connecting the powered USB hub to a port on the Raspberry Pi.
Jul 16 19:25:00 router kernel: [  200.870356] usb 2-2.4: Manufacturer: Generic
Jul 16 19:25:00 router kernel: [  200.879816] hub 2-2.4:1.0: USB hub found
Jul 16 19:25:00 router kernel: [  200.882383] hub 2-2.4:1.0: 4 ports detected
Jul 16 19:25:00 router kernel: [  201.045209] usb 1-1.2.4: new high-speed USB device number 4 using xhci_hcd
Jul 16 19:25:00 router kernel: [  201.188991] usb 1-1.2.4: New USB device found, idVendor=0bda, idProduct=5411, bcdDevice= 1.36
Jul 16 19:25:00 router kernel: [  201.189023] usb 1-1.2.4: New USB device strings: Mfr=1, Product=2, SerialNumber=0
Jul 16 19:25:00 router kernel: [  201.189044] usb 1-1.2.4: Product: 4-Port USB 2.0 Hub
Jul 16 19:25:00 router kernel: [  201.189061] usb 1-1.2.4: Manufacturer: Generic
Jul 16 19:25:00 router kernel: [  201.191419] hub 1-1.2.4:1.0: USB hub found
Jul 16 19:25:00 router kernel: [  201.192465] hub 1-1.2.4:1.0: 4 ports detected
Messages like this will appear in /var/log/kern.log. This is a USB3 hub, and it has 7 ports, so it's unclear why it is identified as a 4 port USB2 hub. Maybe that's a simple mistake?
Attaching a USB drive to Raspberry Pi
Using a powered USB hub will solve USB power capacity issues on a Raspberry Pi. There's a maximum power capacity for the USB hub, but it'll be enough to run a few drives.
We can now attach a disk drive and see if it is automounted.
Jul 16 19:25:49 router kernel: [  249.326159] usb 2-2.1: new SuperSpeed USB device number 5 using xhci_hcd
Jul 16 19:25:49 router kernel: [  249.357741] usb 2-2.1: New USB device found, idVendor=152d, idProduct=0578, bcdDevice= 2.04
Jul 16 19:25:49 router kernel: [  249.357770] usb 2-2.1: New USB device strings: Mfr=1, Product=2, SerialNumber=3
Jul 16 19:25:49 router kernel: [  249.357791] usb 2-2.1: Product: External USB 3.0
Jul 16 19:25:49 router kernel: [  249.357809] usb 2-2.1: Manufacturer: JMicron
Jul 16 19:25:49 router kernel: [  249.357826] usb 2-2.1: SerialNumber: 201703310007F
Jul 16 19:25:49 router kernel: [  249.403680] scsi host1: uas
Jul 16 19:25:49 router kernel: [  249.405255] scsi 1:0:0:0: Direct-Access     External USB3.0           0204 PQ: 0 ANSI: 6
Jul 16 19:25:49 router kernel: [  249.407416] sd 1:0:0:0: Attached scsi generic sg1 type 0
Jul 16 19:25:49 router kernel: [  249.408803] sd 1:0:0:0: [sdb] 312581808 512-byte logical blocks: (160 GB/149 GiB)
Jul 16 19:25:49 router kernel: [  249.408830] sd 1:0:0:0: [sdb] 4096-byte physical blocks
Jul 16 19:25:49 router kernel: [  249.409096] sd 1:0:0:0: [sdb] Write Protect is off
Jul 16 19:25:49 router kernel: [  249.409118] sd 1:0:0:0: [sdb] Mode Sense: 53 00 00 08
Jul 16 19:25:49 router kernel: [  249.409697] sd 1:0:0:0: [sdb] Disabling FUA
Jul 16 19:25:49 router kernel: [  249.409720] sd 1:0:0:0: [sdb] Write cache: enabled, read cache: enabled, doesn't support DPO or FUA
Jul 16 19:25:49 router kernel: [  249.410600] sd 1:0:0:0: [sdb] Optimal transfer size 33553920 bytes not a multiple of physical block size (4096 bytes)
Jul 16 19:25:49 router kernel: [  249.438062] sd 1:0:0:0: [sdb] Attached SCSI disk
These messages appeared in /var/log/kern.log. Read them carefully and you see it is recognized as USB3, and has a 160GB capacity, just as it says on the label on the disk. Because the disk is recognized as USB3 probably means the powered hub is recognized as USB3, so the message earlier saying otherwise may have been a mistake.
Unfortunately the device is not automounted. You see here no messages about being mounted nor a mount point.
david@router:~ $ df -h
Filesystem      Size  Used Avail Use% Mounted on
/dev/root       440G  2.7G  420G   1% /
devtmpfs        775M     0  775M   0% /dev
tmpfs           936M     0  936M   0% /dev/shm
tmpfs           375M  1.8M  373M   1% /run
tmpfs           5.0M  4.0K  5.0M   1% /run/lock
/dev/sda1       253M   50M  203M  20% /boot
tmpfs           188M     0  188M   0% /run/user/1000
Nor does it show up as a mounted device.
david@router:~ $ lsblk
NAME   MAJ:MIN RM   SIZE RO TYPE MOUNTPOINT
sda      8:0    0 447.1G  0 disk
├─sda1   8:1    0   256M  0 part /boot
└─sda2   8:2    0 446.9G  0 part /
sdb      8:16   0 149.1G  0 disk
└─sdb1   8:17   0   149G  0 part
It does show up as a block device, but it is not mounted
david@router:~ $ blkid
/dev/sda1: LABEL_FATBOOT="boot" LABEL="boot" UUID="F021-066F" BLOCK_SIZE="512" TYPE="vfat" PARTUUID="b94a7ddd-01"
/dev/sda2: LABEL="rootfs" UUID="99f9cf68-e6fa-4b90-aeee-7fa3e9ed5c2d" BLOCK_SIZE="4096" TYPE="ext4" PARTUUID="b94a7ddd-02"
/dev/sdb1: LABEL="empty" UUID="cc546d66-332e-47d9-8c4e-ef30ea5ca323" BLOCK_SIZE="4096" TYPE="ext4" PARTLABEL="emptier" PARTUUID="12184e7a-22db-4bf0-9575-559853b5c7aa"
There is an ID string for the block device as we see with blkid.
With this information we can head to /etc/fstab and add an entry like this:
PARTUUID=12184e7a-22db-4bf0-9575-559853b5c7aa /mnt/empty ext4 defaults,noatime 0 3
The PARTUUID is a unique identifier that you see listed by blkid. We can also use PARTLABEL if you prefer. These act as a unique identifier for the disk so it can be recognized. Otherwise in the first field of /etc/fstab we might put /dev/sdb1, which is the device name assigned when the drive is attached. But, we are not guaranteed to have the same device name, the PARTUUID is more reliable.
With this entry we can then run the following:
david@router:~ $ sudo mount -a
david@router:~ $ df -h
Filesystem      Size  Used Avail Use% Mounted on
/dev/root       440G  2.7G  420G   1% /
devtmpfs        775M     0  775M   0% /dev
tmpfs           936M     0  936M   0% /dev/shm
tmpfs           375M  1.9M  373M   1% /run
tmpfs           5.0M  4.0K  5.0M   1% /run/lock
/dev/sda1       253M   50M  203M  20% /boot
tmpfs           188M     0  188M   0% /run/user/1000
/dev/sdb1       146G   28K  139G   1% /mnt/empty
The first command (mount -a) mounts everything listed in /etc/fstab. As we see it successfully mounted at /mnt/empty.
Clearly for a multi-drive setup, we'd format each drive such that it has a unique PARTUUID, attaching them all to the USB hub.
Set up this way, the USB devices are automatically mounted when the system is booted. For example:
david@router:~ $ sudo reboot
Connection to router.local closed by remote host.
Connection to router.local closed.

...
david@router:~ $ df -h
Filesystem      Size  Used Avail Use% Mounted on
/dev/root       440G  2.7G  420G   1% /
devtmpfs        775M     0  775M   0% /dev
tmpfs           936M     0  936M   0% /dev/shm
tmpfs           375M  1.9M  373M   1% /run
tmpfs           5.0M  4.0K  5.0M   1% /run/lock
/dev/sdb1       253M   50M  203M  20% /boot
/dev/sda1       146G   28K  139G   1% /mnt/empty
tmpfs           188M     0  188M   0% /run/user/1000
After reboot, /mnt/empty is there. This is again suitable for scenarios where you have multiple drives you want to always have available. Format and attach them all, add them to /etc/fstab, and they'll be available every time.
Automounting USB drives to Raspberry Pi at plug-in time
What if you want to intermittently use the drive? We just showed how to mount drives when the system starts up, but there are many use cases where drives are attached or disconnected as needed.
Start by undoing the setup from the previous section
$ sudo umount /mnt/empty
$ sudo vi /etc/fstab
And, in /etc/fstab comment-out the line which was added.
Make sure your system is up-to-date:
$ sudo apt-get update
$ sudo apt-get upgrade -y
It's a good practice to regularly do this. The Raspberry Pi OS team is routinely updating packages, and this way you'll get the latest version that presumably will have the fewest security issues.
Now, run this:
$ sudo apt-get install usbmount
The usbmount tool automatically mounts USB devices when they're inserted, and dismounts them when removed. That will exactly serve the other goal named at the top. Once installed it does the trick, drives automatically mount themselves as easy as pie. But we have some low-level work to do first.
In my case, with USBMount installed as above, I kept getting the following message in /var/log/syslog:
Jul 16 23:26:32 router usbmount[1648]: /dev/sdc3 does not contain a filesystem or disklabel
Jul 16 23:26:32 router systemd-udevd[1623]: sdc3: Process '/usr/share/usbmount/usbmount add' failed with exit code 1.
The devide very well does have a file system. But it would not mount, and the error message was printed into the logs.
After a lot of searching, I found a clear answer thanks to
a post on linuxuprising. There is also some info in the usbmount issue queue, but I ultimately ignored the stuff in the issue queue and did what Linux Uprising said.
That post says that USBMount was removed from Debian a while back due to bugs. It is still available in other variants, but there are bugs which are fixed in the repository which are not reflected in the package which is installed.
To make a long story short, we cannot use the usbmount installed by apt-get. Therefore, we start by removing USBMount if you've installed it:
$ sudo apt-get remove usbmount
You then run the following commands.
$ sudo apt install git
$ git clone https://github.com/rbrito/usbmount
This makes sure that Git is installed, and then clones the USBMount repository.
We'll be building the DEB package from the repository since it has some fixes which are needed.
$ sudo apt install debhelper build-essential
These tools help with building DEB packages.
$ cd usbmount
$ dpkg-buildpackage -us -uc -b
This builds the package, with the package file landing in the directory above.
To install the package, run the following:
$ cd ..
$ sudo dpkg -i usbmount_0.0.24.deb
That's it... If you want to hack on the package, it's just a shell script. In the .service file you see that the shell script is triggered by inserting or removing devices. You now have within your hands the ability to edit the usbmount script, make changes, and install a custom version.
In /var/log/kern.log we now get the following messages:
Jul 17 00:26:09 router kernel: [ 2488.894832] usb 2-2.2: New USB device found, idVendor=152d, idProduct=0578, bcdDevice= 2.04
Jul 17 00:26:09 router kernel: [ 2488.894862] usb 2-2.2: New USB device strings: Mfr=1, Product=2, SerialNumber=3
Jul 17 00:26:09 router kernel: [ 2488.894913] usb 2-2.2: Product: External USB 3.0
Jul 17 00:26:09 router kernel: [ 2488.894932] usb 2-2.2: Manufacturer: JMicron
Jul 17 00:26:09 router kernel: [ 2488.894950] usb 2-2.2: SerialNumber: 201703310007F
Jul 17 00:26:09 router kernel: [ 2488.910543] scsi host1: uas
Jul 17 00:26:09 router kernel: [ 2488.912450] scsi 1:0:0:0: Direct-Access     External USB3.0           0204 PQ: 0 ANSI: 6
Jul 17 00:26:09 router kernel: [ 2488.922524] sd 1:0:0:0: Attached scsi generic sg1 type 0
Jul 17 00:26:09 router kernel: [ 2488.923661] sd 1:0:0:0: [sdb] 312581808 512-byte logical blocks: (160 GB/149 GiB)
Jul 17 00:26:09 router kernel: [ 2488.923689] sd 1:0:0:0: [sdb] 4096-byte physical blocks
Jul 17 00:26:09 router kernel: [ 2488.923964] sd 1:0:0:0: [sdb] Write Protect is off
Jul 17 00:26:09 router kernel: [ 2488.923988] sd 1:0:0:0: [sdb] Mode Sense: 53 00 00 08
Jul 17 00:26:09 router kernel: [ 2488.924506] sd 1:0:0:0: [sdb] Disabling FUA
Jul 17 00:26:09 router kernel: [ 2488.924529] sd 1:0:0:0: [sdb] Write cache: enabled, read cache: enabled, doesn't support DPO or FUA
Jul 17 00:26:09 router kernel: [ 2488.925417] sd 1:0:0:0: [sdb] Optimal transfer size 33553920 bytes not a multiple of physical block size (4096 bytes)
Jul 17 00:26:09 router kernel: [ 2488.984710]  sdb: sdb1
Jul 17 00:26:09 router kernel: [ 2488.986555] sd 1:0:0:0: [sdb] Attached SCSI disk
Jul 17 00:26:15 router kernel: [ 2494.893373] EXT4-fs (sdb1): mounted filesystem with ordered data mode. Opts: (null). Quota mode: none.
These look good, and the last line says it mounted an EXT4 filesystem.
david@router:~ $ lsblk
NAME   MAJ:MIN RM   SIZE RO TYPE MOUNTPOINT
sda      8:0    0 447.1G  0 disk
├─sda1   8:1    0   256M  0 part /boot
└─sda2   8:2    0 446.9G  0 part /
sdb      8:16   0 149.1G  0 disk
└─sdb1   8:17   0   149G  0 part /media/usb0
Indeed, the disk mounts perfectly.
One test is to run this:
david@router:~ $ touch /media/usb0/foo
This creates a file on the device.
To safely unmount the device run this program:
david@router:~ $ pumount /media/usb0
This, pumount, is a wrapper around the normal umount command that normally requires sudo permissions. If you prefer, you can always use sudo umount instead. In either case, it is necessary to unmount the drive before disconnecting the USB cord. That way you're certain that the drive is safely disconnected.
david@router:~ $ ls /media/usb0/
This should show no files in the directory. Further, running lsblk should show that the device has been dismounted - meaning that no mountpoint will show up.
Next, mount the drive again by unplugging the USB cord then plugging it back in. In my case, the powered USB hub has switches for each USB port. The switches turn off or turn on power to the port. This power cycles the drive, and when power comes back on the Raspberry Pi will see it as a newly attached drive.
After the drive reconnects, you'll see this:
david@router:~ $ lsblk
NAME   MAJ:MIN RM   SIZE RO TYPE MOUNTPOINT
sda      8:0    0 447.1G  0 disk
├─sda1   8:1    0   256M  0 part /boot
└─sda2   8:2    0 446.9G  0 part /
sdb      8:16   0 149.1G  0 disk
└─sdb1   8:17   0   149G  0 part /media/usb0
david@router:~ $ ls /media/usb0/
foo  lost+found
Using lsblk we see the drive is mounted on the named mountpoint, and that ls shows files in the directory now.
The best way to manually and unmount drives on Raspberry Pi OS
Say you don't want to install USBMount, but you still want to dynamically mount and unmount drives. There is another choice that's fairly decent.
The thing we want to avoid is having to run something like this:
$ lsblk -- or blkid -- to explore which drives are availabl
$ mkdir /mnt/mount-point-directory
$ mount /dev/sdb1 /mnt/mount-point-directory
That's too much fiddling for what should be a simple operation. If macOS can automatically mount a drive, so can Linux.
However, this particular idea is not automated mounting and unmounting of drives. You'll have to run a couple commands, but once you've set up an /etc/fstab entry the work is reduced to one command.
First, with the device attached to your Raspberry Pi, run blkid to get its UUID's. I found it necessary to run sudo blkid sometimes in order for the device to be found.
With the UUID in hand, add an entry like this to /etc/fstab:
PARTUUID=...UUID-STRING... /mnt/empty ext4 defaults,noauto,nofail,noatime 0 3
This means, you'll have a drive you wish to use intermittently. It will be formatted a certain way, and have a known UUID, and you know where you want it mounted in the filesystem. Make sure the filesystem type (in this case ext4) is correct for the drive.
The key for this is the noauto and nofail options. With noauto the drive will not be automatically mounted on system boot, or when mount -a is run. With nofail the system will not fail to boot if the drive is not available. With both, we are certain the system will boot automatically, and not get hung up if there's a problem with external USB drives.
With this set up, your effort to mount a drive reduces to this:
$ sudo mount /mnt/empty
If you prefer, use pmount /mnt/empty instead. It means you must remember somehow the mountpoint for the drive. One idea is attaching a label to the drive enclosure with the mountpoint.
Mounting the drive won't be automatic, but it will be relatively painless. Unmounting the drive is simply sudo umount /mnt/empty.
Summary
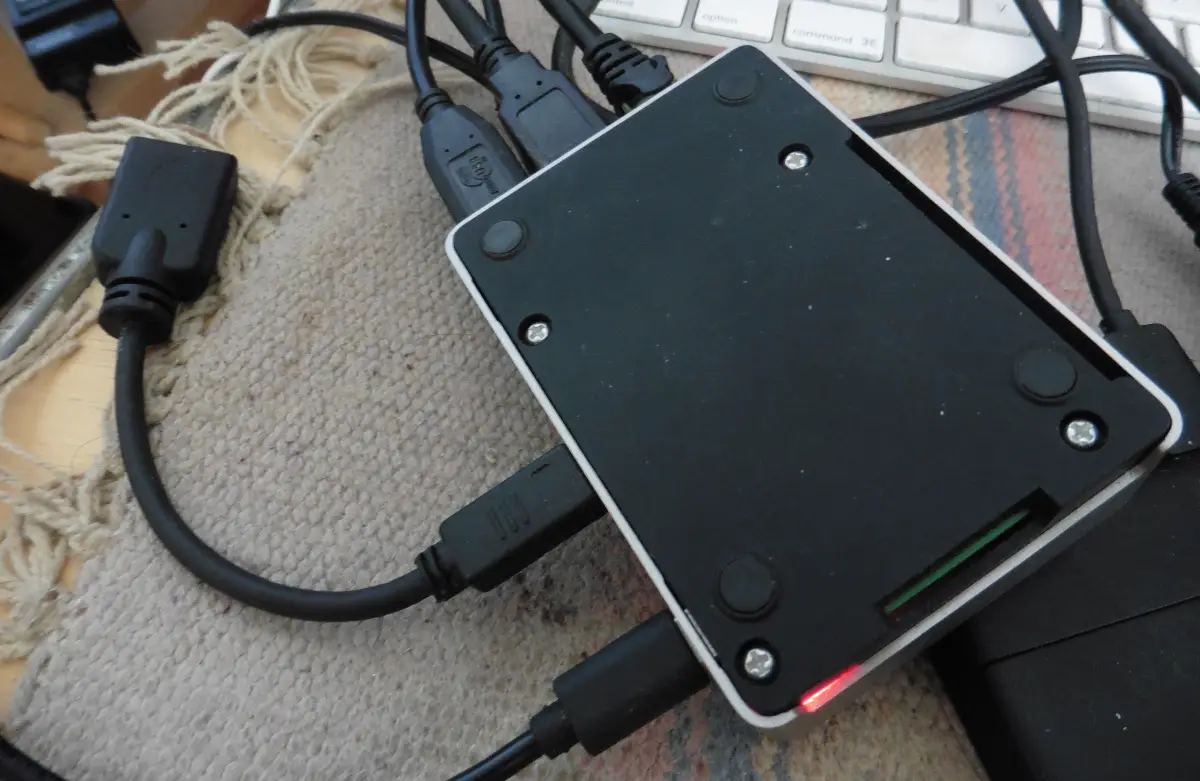
The Raspberry Pi 4 shown here is mounted in a FLIRC case. Attached are a micro-HDMI to HDMI cable, an ethernet cable, a USB2 cable for keyboard/mouse, a USB3 cable to the boot drive, and another USB3 cable going to the USB3 hub. The full setup is shown in the picture at the top.
The result is a compact device which acts both as a WiFi router/hotspot, and network attached storage. If desired we can run Docker containers, but since this RPI only has 2GB of memory we're limited in what we can do.
Because it's so compact we could take it along while traveling. What if we're at a picnic table in a remote park, no Internet or WiFi signal? The Raspberry Pi can serve as a WiFi hotspot and file storage for a group of people processing landscape photography and video.
Minimal software is required to get everything going. RaspAP drives the WiFi routing, Samba makes sure we can share drives over the local network, and USBMount makes it easy to mount and unmount drives as needed.


")


