David Herron
Tags: Terraform »»»» AWS »»»» AWS EC2 »»»»
Terraform is a powerful tool for configuring infrastructure on a long list of cloud-based systems. Since AWS is such a complex system we look for simpler ways to do anything on AWS. Terraform promises to make AWS deployments much simpler. To test that let's learn how to deploy some EC2 instances on AWS using Terraform.
With Terraform we declare the infrastructure elements you want. The text files are fairly straightforward - and are certainly easier to read than any of the files AWS wants us to use.
In this example we will build a VPC (Virtual Private Cluster), with a couple subnets. One of the subnets will be public meaning it attaches to an Internet Gateway. We will attach to this VPC some EC2 instances with different characteristics and see how to configure them.
An AWS Virtual Private Cluster (VPC) is an AWS service that looks like a cluster of computers and routers and software. It is virtual in that we are not directly renting whole computers. Instead we are renting services that run using the AWS software stack on the AWS cloud platform. Each VPC is distinct from every other VPC and, unless there are peering relationships set up between VPC's, each VPC is completely isolated from other VPC's. AWS provides many useful services and capabilities which can be attached to a VPC.
To start let's create a directory - terraform - and in that directory create another directory named vpc-simple. This directory will contain what Terraform calls a module that will contain code describing a simple VPC. As the name implies, Terraform Modules are meant to be reusable between applications. In fact on the Terraform website there is a registry of 3rd party modules available for use.
A Terraform module is simply a directory containing Terraform scripts. When one uses a module, one passes in values that appear as variables inside the module. Then the module produces outputs that are available to the script which used the module.
If you prefer, the source code for this is available at:
https://github.com/robogeek/terraform-aws-modules
The module we're about to create is at
https://github.com/robogeek/terraform-aws-modules/tree/master/modules/vpc-simple
The example shown later is at:
https://github.com/robogeek/terraform-aws-modules/tree/master/examples/ec2-simple
In a related tutorial, we go over setting up an EC2 cluster on AWS: Terraform deployment of a simple multi-tier Node.js and Nginx deployment to AWS ECS
Required setup
Before going through this we need two things set up.
The first is that you must have an AWS account, and have set up the AWS CLI on your laptop. You will need an AWS profile configured with the AWS CLi. The last thing required is to generate a key pair.
The second is to install Terraform. For that go to the
Terraform website and find the installer. Or, if you have a package manager like MacPorts or Homebrew, the Terraform CLI program is available there.
A Terraform module to create an AWS VPC
There are lots of Terraform modules with which one can configure a VPC. We could have used any of those modules, but it is useful to examine how to set up the AWS infrastructure to support EC2 instances, and how to implement a Terraform module.
In terraform/vpc-simple create a file named main.tf containing
resource "aws_vpc" "main" {
  cidr_block       = var.vpc_cidr
  instance_tenancy = var.tenancy
  enable_dns_support = var.enable_dns_support
  enable_dns_hostnames = var.enable_dns_hostnames

  tags = {
    Name = var.vpc_name
  }
}
This is the basic VPC declaration.
The declarations like var.vpc_cidr are variable references. In Terraform, a variable reference starts with var. and then the variable name.
The cidr_block attribute holds the IP address space to be used within the VPC. The notation for this is an Internet standard and is a string like 10.0.0.0/16 which refers to a range of addresses starting with 10.0 and spanning the range of 10.0.0.0 to 10.0.255.0.
The instance_tenancy controls an aspect of spinning up instances in the VPC.
With enable_dns_support and enable_dns_hostnames we control whether domain names are constructed for things attached to the VPC.
In tags the Name provides a user-friendly name that will appear in AWS management console listings. Using a Name makes it much easier to know which thing is what.
resource "aws_internet_gateway" "igw" {
  vpc_id = aws_vpc.main.id

  tags = {
    Name =  "${var.vpc_name}-IGW"
  }
}

resource "aws_route" "route-public" {
  route_table_id         = aws_vpc.main.main_route_table_id
  destination_cidr_block = "0.0.0.0/0"
  gateway_id             = aws_internet_gateway.igw.id
}
This sets up the Internet Gateway, and attaches it to the main routing table.
The Internet Gateway is a two-way router allowing Internet traffic to enter the VPC, and for things inside the VPC to access things on the public Internet.
For an IGW to be used, routing table(s) must send traffic to the Internet Gateway. The route shown here says that for any IP address - other than addresses assigned to the VPC - send that traffic to the Internet Gateway. This route is then attached to the main routing table that is created along with the VPC.
This section demonstrates accessing other kinds of object values. To access variables we used var.variable_name. Accessing objects related to other resources or data sources we have a similar syntax.
With aws_vpc.main.id, for example, we access the aws_vpc service, find the instance of that service named main, and then access its attribute named id. Hence in this case we declare that the Internet Gateway is attached to this VPC.
In the aws_route declaration, the route_table_id attribute says to attach this route to the main route table. The gateway_id attribute says to use the named Internet Gateway.
resource "aws_subnet" "public" {
  vpc_id     = aws_vpc.main.id
  cidr_block = var.public_cidr

  tags = {
    Name = "${var.vpc_name}-net-public"
  }
}

resource "aws_subnet" "private" {
  vpc_id     = aws_vpc.main.id
  cidr_block = var.private_cidr

  tags = {
    Name = "${var.vpc_name}-net-private"
  }
}

resource "aws_eip" "gw" {
  vpc        = true
  depends_on = [aws_internet_gateway.igw]

  tags = {
    Name =  "${var.vpc_name}-EIP"
  }
}

resource "aws_nat_gateway" "gw" {
  subnet_id     = aws_subnet.public.id
  allocation_id = aws_eip.gw.id

  tags = {
    Name =  "${var.vpc_name}-NAT"
  }
}

resource "aws_route_table" "private" {
  vpc_id = aws_vpc.main.id

  route {
    cidr_block     = "0.0.0.0/0"
    nat_gateway_id = aws_nat_gateway.gw.id
  }

  tags = {
    Name =  "${var.vpc_name}-rt-private"
  }
}

resource "aws_route_table_association" "public" {
  subnet_id      = aws_subnet.public.id
  route_table_id = aws_vpc.main.main_route_table_id
}

resource "aws_route_table_association" "private" {
  subnet_id      = aws_subnet.private.id
  route_table_id = aws_route_table.private.id
}
Here we are declaring a private subnet, a public subnet, an elastic IP address, a NAT gateway, a routing table, and a route.
The aws_subnet declarations are attached to the VPC, and then are given a CIDR describing the address scope of this subnet.
The private aws_route_table has a route declared to send public Internet traffic to the NAT gateway.
NAT gateways are a one-way router. They do not allow traffic from the public Internet through the gateway, but they allow traffic from the private subnet to go out to the public Internet. It is similar to your home WiFi router (that also has a NAT gateway). Just like the private IP address range managed by the WiFi router, a NAT gateway handles a private IP address range within an AWS VPC.
To function, the NAT gateway is attached to a public network so it can send traffic to the Internet Gateway, and it receives traffic from the private network. It also must have a public IP address, hence the EIP declaration (Elastic IP address).
The two aws_route_table_association makes sure that the subnets are correctly attached to the route tables.
Now create a file named variables.tf containing:
variable "vpc_cidr" {
  type        = string
  default     = "10.0.0.0/16"
  description = "CIDR for VPC"
}

variable "tenancy" {
  type        = string
  default     = "default"
  description = ""
}

variable "enable_dns_support" {
    default = true
}

variable "enable_dns_hostnames" {
    default = true
}

variable "vpc_name" {
  type        = string
  default     = "main"
  description = ""
}

variable "public_cidr" {}
variable "private_cidr" {}
For the above code to work we must declare the variables that are being used.
Terraform lets us declare the variables in many ways. We'll see in a moment how to declare values for the variables when invoking the module.
Now create a file named outputs.tf containing:
output "vpc_id" {
    value = aws_vpc.main.id
}

output "vpc_arn" {
    value = aws_vpc.main.arn
}

output "igw_id" {
    value = aws_internet_gateway.igw.id
}

output "subnet_public_id" {
    value = aws_subnet.public.id
}

output "subnet_private_id" {
    value = aws_subnet.private.id
}
The last thing needed is to declare the outputs from the module. These values will be available to any code using the module.
Using a Terraform module to set up the VPC
In the terraform directory create a new directory, deploy. In that directory create a file named main.tf containing:
provider "aws" {
    shared_credentials_file = "$HOME/.aws/credentials"
    profile                 = "PROFILE-NAME"
    region                  = var.aws_region
}

module "vpc" {
    source = "../vpc-simple"
    vpc_name = "fred"
    vpc_cidr = "192.168.0.0/16"
    public_cidr = "192.168.1.0/24"
    private_cidr = "192.168.2.0/24"
}
We will be adding more code to this module. With this part we declare that we're using the AWS provider, and then invoke the module we just created.
A Terraform Provider is a plugin that interfaces Terraform with the service associated with the plugin. All the resources named aws_xyzzy we saw earlier were made available by the AWS Provider Plugin.
The AWS provider is configured with our AWS profile using the credentials file created when you configure the AWS CLI.
We also declare the AWS region being used.
The module statement is where we invoke the module. Our name for the module is simply vpc. The attributes of this statement become the values for the corresponding variables inside the module.
If you don't want to set up the module sources yourself, it is possible to change the source= attribute to:
module "vpc" {
    source = "github.com/robogeek/terraform-aws-modules//modules/vpc-simple"
    ...
}
Terraform supports a long list of formats for specifying the source path.
Look at the CIDR's declared here. In vpc_cidr we have the address space for the VPC. Both public_cidr and private_cidr are within that address space.
Then create a file named variables.tf containing:
variable "aws_region" {
    default = "us-west-2"
}


variable "ec2_count" {
  default = "1"
}

variable "ami_id" {
    // Ubuntu Server 18.04 LTS (HVM), SSD Volume Type in us-west-2
    default = "ami-0d1cd67c26f5fca19"
}

variable "instance_type" {
  default = "t2.micro"
}

// variable "subnet_id" {}
This declares the variables used in the deployment module. It declares the region being used, the AMI ID for the EC2 instance, and so forth.
Initializing the Terraform workspace
At this point we can initialize our workspace with Terraform.
$ terraform init
Initializing modules...
- vpc in ../vpc-simple

Initializing the backend...

Initializing provider plugins...
- Checking for available provider plugins...
- Downloading plugin for provider "aws" (hashicorp/aws) 2.56.0...

The following providers do not have any version constraints in configuration,
so the latest version was installed.

To prevent automatic upgrades to new major versions that may contain breaking
changes, it is recommended to add version = "..." constraints to the
corresponding provider blocks in configuration, with the constraint strings
suggested below.

* provider.aws: version = "~> 2.56"

Terraform has been successfully initialized!

You may now begin working with Terraform. Try running "terraform plan" to see
any changes that are required for your infrastructure. All Terraform commands
should now work.

If you ever set or change modules or backend configuration for Terraform,
rerun this command to reinitialize your working directory. If you forget, other
commands will detect it and remind you to do so if necessary.
This downloaded the Terraform AWS provider, and if you look in the directory you'll find a couple new files.
It also suggests we can run terraform plan. That command scans the Terraform files, and determines the objects they declare.
Run that right now and you'll see a map of the infrastructure declared by the VPC module. It will show you the VPC, the subnets, internet gateway, and so forth, and the values for different attributes.
It will also tell you any errors in the scripts. If there are errors, Terraform will tell you the line number and do a fairly good job of explaining the problem.
Initializing an EC2 instance in the VPC
Now we can declare an EC2 instance. An EC2 instance is a virtual computer where we install an operating system and we can configure for whatever purpose we like.
In terraform/deploy/main.tf add this declaration:
resource "aws_instance" "public-ec2" {
    ami           = var.ami_id
    instance_type = var.instance_type
    subnet_id     = module.vpc.subnet_public_id
    key_name      = "notes-app-key-pair"
    vpc_security_group_ids = [ aws_security_group.ec2-sg.id ]
    associate_public_ip_address = true

    tags = {
        Name = "ec2-main"
    }

    depends_on = [ module.vpc.vpc_id, module.vpc.igw_id ]
}

resource "aws_security_group" "ec2-sg" {
  name        = "security-group"
  description = "allow inbound access to the Application task from NGINX"
  vpc_id      = module.vpc.vpc_id

  ingress {
    protocol    = "-1"
    from_port   = 0
    to_port     = 0
    cidr_blocks = [ "0.0.0.0/0" ]
  }

  egress {
    protocol    = "-1"
    from_port   = 0
    to_port     = 0
    cidr_blocks = ["0.0.0.0/0"]
  }
}
The value for ami_id declares which operating system environment to use. An AMI is an Amazon Machine Image, which is a template from which an EC2 instance is built. The AMI contains the operating system plus other configuration required to have an EC2 instance running on AWS.
To find the AMI code, log in to the AWS Management Console. Then you navigate to the EC2 area. Once in the EC2 area, click on the Create Instance button. The first page of that wizard includes a list of AMI's, each of which has an AMI code. The AMI code in variables.tf is for Ubuntu 18.04.
The instance_type option declares how "big" of an EC2 instance will be instantiated. The size is a matter of CPU, memory and disk space allocation. The t2.micro type is, as the name implies, very small. This instance type is important since it fits into the free tier.
The notation module.vpc.subnet_public_id is how we reference a value exported from a module. In this case we are referring to the ID for the public subnet created within the VPC module.
For key_name there is a bit of required setup to perform. Namely, the IAM service lets us create a key pair that can be used by the AWS CLI to access AWS services. When in the IAM dashboard creating your user ID, it is necessary to create a key pair. The key pair name will be remembered by AWS, and it is sufficient to refer to the key pair by name.
For vpc_security_group_ids we declare the Security Group that will control access to this EC2 instance. The security group used in this case is declared below.
Generally speaking, a Security Group is how we declare which traffic is allowed to enter or exit an AWS object. In production deployments it is an important security measure to declare the strictest possible limits on the traffic which can enter (ingress) or exit (egress) every AWS thing you deploy.
But in this case we're throwing all caution to the wind. This security group says any traffic at all is allowed to enter or exit this EC2 instance. For our purpose at this moment that's fine, since all we're doing is experimenting.
The last line, depends_on, says that creation of the EC2 instance will wait for the named objects to finish being created.
Then create a file named outputs.tf containing:
output "ec2-public-dns" {
    value = aws_instance.public-ec2.public_dns
}

output "ec2-public-ip" {
    value = aws_instance.public-ec2.public_ip
}

output "ec2-public-private-dns" {
    value = aws_instance.public-ec2.private_dns
}

output "ec2-public-private-ip" {
    value = aws_instance.public-ec2.private_ip
}
The other purpose of outputs is to print values when we run a Terraform script. We'll see these values output later. It tells us useful things like the domain name for the EC2 instance that we'll create.
Deploying our first EC2 instance to AWS
When we ran terraform plan this message was printed:
Plan: 12 to add, 0 to change, 0 to destroy.

Note: You didn't specify an "-out" parameter to save this plan, so Terraform
can't guarantee that exactly these actions will be performed if
"terraform apply" is subsequently run.
As suggested, our next step is to run terraform apply.
That command applies or instantiates the AWS infrastructure declared in the files we've created.
$ terraform apply
...
Plan: 12 to add, 0 to change, 0 to destroy.

Do you want to perform these actions?
  Terraform will perform the actions described above.
  Only 'yes' will be accepted to approve.

  Enter a value: yes

...
Apply complete! Resources: 12 added, 0 changed, 0 destroyed.

Outputs:

ec2-public-dns = ec2-52-38-87-245.us-west-2.compute.amazonaws.com
ec2-public-ip = 52.38.87.245
ec2-public-private-dns = ip-192-168-1-212.us-west-2.compute.internal
ec2-public-private-ip = 192.168.1.212
The last four lines were created by the outputs we put in outputs.tf. It tells us the public DNS name, public IP address, etc.
$ ssh -i ~/Downloads/notes-app-key-pair.pem ubuntu@ec2-52-38-87-245.us-west-2.compute.amazonaws.com
The authenticity of host 'ec2-52-38-87-245.us-west-2.compute.amazonaws.com (52.38.87.245)' can't be established.
ECDSA key fingerprint is SHA256:phJCbRnladtvmy9GuxF90YEqGFq6LxmyZKWJ8NDNXBQ.
Are you sure you want to continue connecting (yes/no)? yes
Warning: Permanently added 'ec2-52-38-87-245.us-west-2.compute.amazonaws.com,52.38.87.245' (ECDSA) to the list of known hosts.
Welcome to Ubuntu 18.04.3 LTS (GNU/Linux 4.15.0-1057-aws x86_64)

 * Documentation:  https://help.ubuntu.com
 * Management:     https://landscape.canonical.com
 * Support:        https://ubuntu.com/advantage

  System information as of Sun Apr  5 01:31:52 UTC 2020

  System load:  0.04              Processes:           91
  Usage of /:   19.6% of 7.69GB   Users logged in:     0
  Memory usage: 32%               IP address for eth0: 192.168.1.212
  Swap usage:   0%

76 packages can be updated.
50 updates are security updates.

The programs included with the Ubuntu system are free software;
the exact distribution terms for each program are described in the
individual files in /usr/share/doc/*/copyright.

Ubuntu comes with ABSOLUTELY NO WARRANTY, to the extent permitted by
applicable law.

To run a command as administrator (user "root"), use "sudo <command>".
See "man sudo_root" for details.

ubuntu@ip-192-168-1-212:~$
And, we can log-in to the newly created EC2 instance.
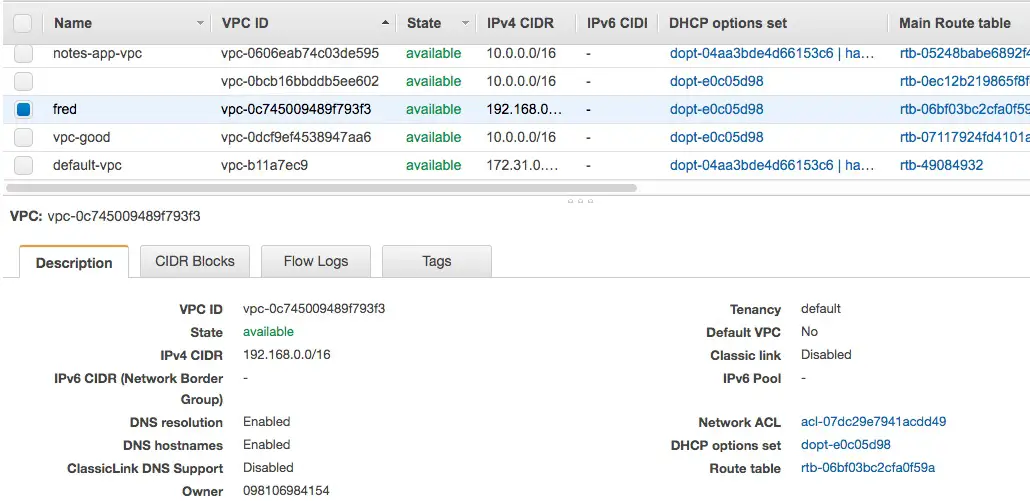
It's also useful to browse the AWS Management Console to inspect the various things which were created. In this case we navigated to the VPC console and clicked on Your VPCs to view this list. We named this VPC fred and we can look at its attributes.
Similarly in the VPC area there are other dashboards for route tables, subnets, and the like, that will have configured objects.
Similarly, in the EC2 area we will be able to inspect the EC2 instance and other things.
Once we're logged-in to the EC2 instance we can take a look around, run a few commands, and so forth.
Once we're done we can tear down the infrastructure with this command:
$ terraform destroy
...
Plan: 0 to add, 0 to change, 12 to destroy.

Do you really want to destroy all resources?
  Terraform will destroy all your managed infrastructure, as shown above.
  There is no undo. Only 'yes' will be accepted to confirm.

  Enter a value: yes
...

Destroy complete! Resources: 12 destroyed.
Once this is finished, you'll find all traces of the VPC and the EC2 instance have vaporized.
Launching a customized EC2 instance using Terraform
Sometimes you want to customize an EC2 instance, for example by installing some software. In theory you should be creating an AMI from a customized EC2 instance, and then instantiating that AMI instead. But we can also tell the Terraform script to run some commands once the EC2 instance is launched.
In main.tf change the aws_instance declaration to this:
resource "aws_instance" "public-ec2" {
    ami           = var.ami_id
    instance_type = var.instance_type
    subnet_id     = module.vpc.subnet_public_id
    key_name      = "notes-app-key-pair"
    vpc_security_group_ids = [ aws_security_group.ec2-sg.id ]
    associate_public_ip_address = true

    tags = {
        Name = "ec2-main"
    }

    depends_on = [ module.vpc.vpc_id, module.vpc.igw_id ]

    user_data = <<EOF
#!/bin/sh
sudo apt-get update
sudo apt-get install -y mysql-server
EOF
}
The user_data value is a shell script that gets executed when an EC2 instance is launched. For documentation see

The script shown here simply installs the MySQL server. This package is not installed by default with this particular AMI. If you want a MySQL server installed, this is one way to go.
With this change, re-run terraform apply then log-in and see if MySQL is indeed installed.
$ ssh -i ~/Downloads/notes-app-key-pair.pem ubuntu@ec2-35-164-140-83.us-west-2.compute.amazonaws.com
The authenticity of host 'ec2-35-164-140-83.us-west-2.compute.amazonaws.com (35.164.140.83)' can't be established.
ECDSA key fingerprint is SHA256:7oqdf0SEUt1dUyNtlj/Zb64IuMuaZrqFcQxnQA0YtFg.
Are you sure you want to continue connecting (yes/no)? yes
Warning: Permanently added 'ec2-35-164-140-83.us-west-2.compute.amazonaws.com,35.164.140.83' (ECDSA) to the list of known hosts.
Welcome to Ubuntu 18.04.3 LTS (GNU/Linux 4.15.0-1057-aws x86_64)
...

ubuntu@ip-192-168-1-77:~$ mysql
ERROR 1045 (28000): Access denied for user 'ubuntu'@'localhost' (using password: NO)
ubuntu@ip-192-168-1-77:~$  ps axf
...
 2353 ?        Sl     0:00 /usr/sbin/mysqld --daemonize --pid-file=/run/mysqld/mysqld.pid
Never mind the error. The error indicates that the MySQL package is installed, and that we simply haven't set it up yet. We also see that the MySQL daemon is running in the background.
Launching both a private and public EC2 instance using Terraform
In some application architectures we need both private resources, that aren't visible to the public Internet, and public resources. The private resources might hold critical data or services that require more in-depth protection.
Since the VPC we've created has both public and private subnets, let's see how to launch an EC2 instance on both.
resource "aws_instance" "public-ec2" {
    ami           = var.ami_id
    instance_type = var.instance_type
    subnet_id     = module.vpc.subnet_public_id
    key_name      = "notes-app-key-pair"
    vpc_security_group_ids = [ aws_security_group.ec2-sg.id ]
    associate_public_ip_address = true

    tags = {
        Name = "ec2-main"
    }

    depends_on = [ module.vpc.vpc_id, module.vpc.igw_id ]
}

resource "aws_instance" "private-ec2" {
    ami           = var.ami_id
    instance_type = var.instance_type
    subnet_id     = module.vpc.subnet_private_id
    key_name      = "notes-app-key-pair"
    vpc_security_group_ids = [ aws_security_group.ec2-sg.id ]
    associate_public_ip_address = false

    tags = {
        Name = "ec2-main-private"
    }

    depends_on = [ module.vpc.vpc_id, module.vpc.igw_id ]

    user_data = <<EOF
#!/bin/sh
sudo apt-get update
sudo apt-get install -y mysql-server
EOF
}
In main.tf change the EC2 declaration to these two. Notice that in the EC2 instance labeled private that we do not allocate a public IP address, and the instance is connected to the private subnet. In the EC2 instance labeled public it is the same as before, except we do not have the initialization script.
We moved the initialization script to the private EC2 instance because clearly the database is a resource requiring more protection.
Running terraform apply we see this output:
Apply complete! Resources: 13 added, 0 changed, 0 destroyed.

Outputs:

ec2-private-dns =
ec2-private-ip =
ec2-private-private-dns = ip-192-168-2-109.us-west-2.compute.internal
ec2-private-private-ip = 192.168.2.109
ec2-public-dns = ec2-34-208-41-192.us-west-2.compute.amazonaws.com
ec2-public-ip = 34.208.41.192
ec2-public-private-dns = ip-192-168-1-113.us-west-2.compute.internal
ec2-public-private-ip = 192.168.1.113
That gives us domain names and IP addresses for two systems. Let's log in and see what happens.
$ scp -i ~/Downloads/notes-app-key-pair.pem ~/Downloads/notes-app-key-pair.pem ubuntu@ec2-34-208-41-192.us-west-2.compute.amazonaws.com:
First we need the key pair file on the public server.
 ssh -i ~/Downloads/notes-app-key-pair.pem ubuntu@ec2-34-208-41-192.us-west-2.compute.amazonaws.com
The authenticity of host 'ec2-34-208-41-192.us-west-2.compute.amazonaws.com (34.208.41.192)' can't be established.
ECDSA key fingerprint is SHA256:qONK1oOeCzR21IbzUSGYMaqCZ9BMjalI8RNt5+hd8ls.
Are you sure you want to continue connecting (yes/no)? yes
Warning: Permanently added 'ec2-34-208-41-192.us-west-2.compute.amazonaws.com,34.208.41.192' (ECDSA) to the list of known hosts.
Welcome to Ubuntu 18.04.3 LTS (GNU/Linux 4.15.0-1057-aws x86_64)

...


ubuntu@ip-192-168-1-113:~$ mysql

Command 'mysql' not found, but can be installed with:

sudo apt install mysql-client-core-5.7
sudo apt install mariadb-client-core-10.1
This is the public EC2 instance. It does not have MySQL installed, as was declared in the Terraform script.
ubuntu@ip-192-168-1-113:~$ ssh ubuntu@ip-192-168-2-109.us-west-2.compute.internal
The authenticity of host 'ip-192-168-2-109.us-west-2.compute.internal (192.168.2.109)' can't be established.
ECDSA key fingerprint is SHA256:I5U8jMzKq/QEe+YMKVH8PALNQABgf8Ofiz8EwJtgQGY.
Are you sure you want to continue connecting (yes/no)? yes
Warning: Permanently added 'ip-192-168-2-109.us-west-2.compute.internal,192.168.2.109' (ECDSA) to the list of known hosts.
ubuntu@ip-192-168-2-109.us-west-2.compute.internal: Permission denied (publickey).
From the public server we can try to reach the private server. This shows we can get TCP/IP traffic to that EC2 instance, but we haven't used the key pair.
ubuntu@ip-192-168-1-113:~$ ssh -i ~/notes-app-key-pair.pem ubuntu@ip-192-168-2-109.us-west-2.compute.internal
Welcome to Ubuntu 18.04.3 LTS (GNU/Linux 4.15.0-1057-aws x86_64)

...

ubuntu@ip-192-168-2-109:~$
ubuntu@ip-192-168-2-109:~$ mysql
ERROR 1045 (28000): Access denied for user 'ubuntu'@'localhost' (using password: NO)
ubuntu@ip-192-168-2-109:~$
This is on the private server, and indeed MySQL is installed.
Ergo, with a little bit of change we were able to set up two EC2 instances with different configurations.
Summary
We've learned a lot in this blog post about setting up EC2 instances on AWS using Terraform.
This demonstrated how it is possible to build a simple VPC infrastructure and then attach EC2 instances. Once you have the EC2 instances running we can install additional software and have them performing the task needed for our business.


