David Herron
Tags: Terraform »»»» AWS »»»» AWS EC2 »»»» AWS RDS »»»»
We commonly must deploy on AWS both running code and a database service. AWS offers a cloud based database system, RDS, and in this tutorial we will look at launching an AWS EC2 instance along with an RDS database inside a custom-built AWS Virtual Private Cluster (VPC). The RDS database will not be reachable from the public Internet, and only from within the VPC we will create. Our tool for this will be Terraform, a powerful tool for configuring infrastructure on a long list of cloud-based systems
An AWS Virtual Private Cluster carves out an area hosted by AWS into which you deploy AWS infrastructure items. A VPC can contain EC2 instances, deployments of containerized application using Docker (ECS) or Kubernetes (EKS) ECS service and a long list of other possible services. There are so many services offered by AWS that it's like stumbling through a maze of twisty passages all alike.
It is complex building AWS infrastructure using the tools provided by AWS. In this example we will use Terraform, since it offers a much simpler way to implement cloud based systems on AWS or many other services. We still have to learn how the AWS infrastructure pieces work, but using Terraform simplifies everything.
This example builds on a previous example - Easily launch EC2 instance, with SSH access, using Terraform
In that example we used Terraform to set up a VPC with EC2 instances, and in one case one of the EC2 instances had a self-hosted MySQL database.
The AWS RDS service offers many advantages over self-hosted MySQL. It is easy to implement a massively scaled database, with replication, fail-over in case a database crashes, automatic backups, automatic upgrades, since all of that is available by clicking some buttons in the AWS management console.
The code for the example shown here is on Github at
robogeek / terraform-aws-modules
Specifically, the VPC cluster is built using a Terraform module
robogeek /terraform-aws-modules / modules / vpc-double
And the example is at
robogeek / terraform-aws-modules / examples / rds
To understand configuration of the VPC cluster, I suggest reading Easily launch EC2 instance, with SSH access, using Terraform. That tutorial focused on a VPC cluster with one private subnet, which was built using the vpc-simple module. This tutorial uses the vpc-double module, which is the same as the vpc-simple module but contains two subnets.
Initializing a Terraform project, and an AWS VPC, for deploying RDS instances
In the rds example you will find several Terraform scripts comprising the tutorial. Let's start with main.tf, where we initialize the Virtual Private Cluster (VPC) using the vpc-double module:
provider "aws" {
    shared_credentials_file = "$HOME/.aws/credentials"
    profile                 = "notes-app"
    region                  = var.aws_region
}

module "vpc" {
    source = "../../modules/vpc-double"
    vpc_name = "db-sample"
    vpc_cidr = "192.168.0.0/16"
    public_cidr = "192.168.1.0/24"
    private1_cidr = "192.168.2.0/24"
    private2_cidr = "192.168.3.0/24"
    private1_az = data.aws_availability_zones.available.names[0]
    private2_az = data.aws_availability_zones.available.names[1]
    public_az = data.aws_availability_zones.available.names[0]
}

data "aws_availability_zones" "available" {
  state = "available"
}
This sets up the AWS Provider, configuring it with our access credentials, and our preferred AWS region.
At the bottom we use aws_availability_zones to load a list of AWS Availability Zones for the selected region.
In the middle we invoke the vpc-double module. As we said, this module is a simple VPC, containing one public subnet, and two private subnets. Using the arguments we declare the CIDR's and availability zones for those subnets.
To support this project we need a file, variables.tf, to hold the project variables. For the var.aws_region variable add this declaration.
variable "aws_region" {
    default = "us-west-2"
}
Initializing the EC2 instance for the cluster
We'll shortly set up a MySQL instance using AWS RDS. That MySQL instance won't be visible from the public Internet. To have a chance of interacting with the database we will add an EC2 instance so we can log in and run the MySQL CLI client.
In practice you might want to deploy an application service on the EC2 instance.
resource "aws_instance" "public-ec2" {
    ami           = var.ami_id
    instance_type = var.instance_type
    subnet_id     = module.vpc.subnet_public_id
    key_name      = "notes-app-key-pair"
    vpc_security_group_ids = [ aws_security_group.ec2-sg.id ]
    associate_public_ip_address = true

    tags = {
        Name = "ec2-main"
    }

    depends_on = [ module.vpc.vpc_id, module.vpc.igw_id ]

    user_data = <<EOF
#!/bin/sh
sudo apt-get update
sudo apt-get install -y mysql-client
EOF
}

resource "aws_security_group" "ec2-sg" {
  name        = "security-group"
  description = "allow inbound access to the EC2 instance"
  vpc_id      = module.vpc.vpc_id

  ingress {
    protocol    = "-1"
    from_port   = 0
    to_port     = 0
    cidr_blocks = [ "0.0.0.0/0" ]
  }

  egress {
    protocol    = "-1"
    from_port   = 0
    to_port     = 0
    cidr_blocks = ["0.0.0.0/0"]
  }
}
This EC2 deployment is extremely similar to what we did in Easily launch EC2 instance, with SSH access, using Terraform.
We have created a Security Group that allows any traffic to enter (ingress) or leave (egress) the EC2 instance. Obviously for a production deployment the security instance must be tightly specified. But this is just a demonstration, so it's okay to leave the barn doors wide open.
We are attaching the EC2 instance to the public subnet, and have required that it allocate a public IP address. It is configured with our AWS "key pair" so we can use SSH to log in.
We are adding the mysql-client package to the EC2 instance so that we can access the database using the MySQL CLI. The user_data attribute lets us attach a shell script that will execute when the EC2 instance launches. As you see, that shell script runs Ubuntu commands to install the mysql-client package. In the previous tutorial we had a script that instead installed the mysql package so that the EC2 instance had a pre-installed database.
To support this we need two additional variables in variables.tf
variable "ami_id" {
    // Ubuntu Server 18.04 LTS (HVM), SSD Volume Type in us-west-2
    default = "ami-0d1cd67c26f5fca19"
}

variable "instance_type" {
  default = "t2.micro"
}
Initializing the RDS database instance
The scripts so far have created a VPC, with a set of public and private subnets, and then attached an EC2 instance. Our goal is to attach an RDS instance to the VPC, and then access the database from the EC2 instance. We now have enough ready to go about attaching an RDS instance to the VPC.
While RDS offers huge flexibility, such as scaling, replication, automated backups, and more, we'll use the simplest possible configuration. A single instance, attached to a single availability zone.
In the workspace you'll find a file, rds.tf, containing the RDS configuration.
resource "aws_db_parameter_group" "default" {
  name   = "rds-pg"
  family = "mysql8.0"

  parameter {
    name  = "character_set_server"
    value = "utf8"
  }

  parameter {
    name  = "character_set_client"
    value = "utf8"
  }
}

resource "aws_db_subnet_group" "default" {
  name       = "main"
  subnet_ids = [ module.vpc.subnet_private1_id , module.vpc.subnet_private2_id ]

  tags = {
    Name = "My DB subnet group"
  }
}

resource "aws_security_group" "rds-sg" {
  name        = "rds-security-group"
  description = "allow inbound access to the database"
  vpc_id      = module.vpc.vpc_id

  ingress {
    // protocol    = "tcp"
    // from_port   = 0
    // to_port     = 3306
    protocol    = "-1"
    from_port   = 0
    to_port     = 0
    cidr_blocks = [ module.vpc.vpc_cidr ]
  }

  egress {
    protocol    = "-1"
    from_port   = 0
    to_port     = 0
    cidr_blocks = [ module.vpc.vpc_cidr ]
  }
}
To create an RDS instance we first start with creating:
- A database subnet group - containing the subnets to be used by the RDS instance.
- A parameter group - containing the the configuration parameters for the database.
- A security group - containing the security firewall around the RDS instance.
Using the parameter group, AWS creates a MySQL configuration file. It is also possible to specify an option group for even more options. For documentation see
aws_db_parameter_group and aws_db_option_group on the Terraform website.
The aws_db_subnet_group declaration controls which subnets the database will be used in. More importantly this associates the RDS instance with the VPC configured for the project. Notice that we're using the two private subnets created in the vpc-double module.
For the security group notice that we're leaving the barn doors wide open again. There is an obvious ingress rule to use, limiting traffic to the 3306 port number that is standard for MySQL.
resource "aws_db_instance" "default" {
  allocated_storage    = 100
  storage_type         = "gp2"
  engine               = "mysql"
  engine_version       = "8.0"
  instance_class       = "db.t2.micro"
  identifier           = "mydb"
  name                 = "mydb"
  username             = "root"
  password             = "foobarbaz"
  parameter_group_name = aws_db_parameter_group.default.id
  db_subnet_group_name = aws_db_subnet_group.default.id
  vpc_security_group_ids = [ aws_security_group.rds-sg.id ]
  publicly_accessible  = false
  skip_final_snapshot  = true
  multi_az             = false
}
Then we finally set up the RDS instance. For documentation see
aws_rds_instance.
In this case we are configuring a db.t2.micro instance to stay in the free tier, containing 100GB of data storage, and running MySQL 8.0.
The name parameter is the name for the initial database, and the username and password parameters create a login identity to use.
The parameter_group_name, db_subnet_group_name and vpc_security_group_ids connect to the options declared above.
The publicly_accessible setting makes sure this database is not publicly accessible. The skip_final_snapshot setting means that when deleting the database instance no database snapshot will be made. The multi_az setting means the database will appear in only one availability zone.
Clearly some of these settings are not what we'd use on a production server. The security group should me limited to port 3306 for instance. And there should be settings for backups, updating the software, multiple availability zones, taking a final database snapshot, and more.
Output variables
The final thing to handle is outputting useful bits of data. The outputs.tf file contains these declarations:
output "ec2-public-dns" {
    value = aws_instance.public-ec2.public_dns
}

output "ec2-public-ip" {
    value = aws_instance.public-ec2.public_ip
}

output "ec2-public-private-dns" {
    value = aws_instance.public-ec2.private_dns
}

output "ec2-public-private-ip" {
    value = aws_instance.public-ec2.private_ip
}

output "db-address" {
    value = aws_db_instance.default.address
}

output "db-arn" {
    value = aws_db_instance.default.arn
}

output "db-domain" {
    value = aws_db_instance.default.domain
}

output "db-id" {
    value = aws_db_instance.default.id
}

output "db-name" {
    value = aws_db_instance.default.name
}

output "db-port" {
    value = aws_db_instance.default.port
}
This gives us quite a bit of output when we launch the service.
Launching the RDS and EC2 services on AWS using Terraform
We're now ready to launch this thing. As always the first step is to run terraform init to initialize the Terraform plugins and state file. We follow that by running terraform plan to give this a once-over and ensure that it does what we want.
Once ready we run terraform apply:
$ terraform apply

An execution plan has been generated and is shown below.
Resource actions are indicated with the following symbols:
  + create

Terraform will perform the following actions:

...

Plan: 18 to add, 0 to change, 0 to destroy.

Do you want to perform these actions?
  Terraform will perform the actions described above.
  Only 'yes' will be accepted to approve.

  Enter a value: yes

...

Apply complete! Resources: 18 added, 0 changed, 0 destroyed.

Outputs:

db-address = mydb.chuhqysisf6f.us-west-2.rds.amazonaws.com
db-arn = arn:aws:rds:us-west-2:098106984154:db:mydb
db-domain =
db-id = mydb
db-name = mydb
db-port = 3306
ec2-public-dns = ec2-34-215-225-103.us-west-2.compute.amazonaws.com
ec2-public-ip = 34.215.225.103
ec2-public-private-dns = ip-192-168-1-72.us-west-2.compute.internal
ec2-public-private-ip = 192.168.1.72
If all goes well the output will look like this. The ec2-public-dns item tells us where the EC2 instance is located, while the db-address item tells us where the database is located.
From our laptop, the database is not accessible, but the EC2 instance can be accessed:
$ ping mydb.chuhqysisf6f.us-west-2.rds.amazonaws.com
PING mydb.chuhqysisf6f.us-west-2.rds.amazonaws.com (192.168.2.199): 56 data bytes
Request timeout for icmp_seq 0
Request timeout for icmp_seq 1
^C
--- mydb.chuhqysisf6f.us-west-2.rds.amazonaws.com ping statistics ---
3 packets transmitted, 0 packets received, 100.0% packet loss
$ ping ec2-34-215-225-103.us-west-2.compute.amazonaws.com
PING ec2-34-215-225-103.us-west-2.compute.amazonaws.com (34.215.225.103): 56 data bytes
64 bytes from 34.215.225.103: icmp_seq=0 ttl=40 time=44.286 ms
64 bytes from 34.215.225.103: icmp_seq=1 ttl=40 time=44.586 ms
^C
--- ec2-34-215-225-103.us-west-2.compute.amazonaws.com ping statistics ---
2 packets transmitted, 2 packets received, 0.0% packet loss
round-trip min/avg/max/stddev = 44.286/44.436/44.586/0.150 ms
This is what we wanted - the EC2 instance can be accessed, but the database is not accessible.
Let's log in to the EC2 instance and see what's what.
$ ssh -i ~/Downloads/notes-app-key-pair.pem ubuntu@ec2-34-215-225-103.us-west-2.compute.amazonaws.com
The authenticity of host 'ec2-34-215-225-103.us-west-2.compute.amazonaws.com (34.215.225.103)' can't be established.
ECDSA key fingerprint is SHA256:nSJSNfFHeV4UtFRgqQ6Nyyd5WxokxxxI15JjzVJjtU0.
Are you sure you want to continue connecting (yes/no)? yes
Warning: Permanently added 'ec2-34-215-225-103.us-west-2.compute.amazonaws.com,34.215.225.103' (ECDSA) to the list of known hosts.
Welcome to Ubuntu 18.04.3 LTS (GNU/Linux 4.15.0-1057-aws x86_64)

...
ubuntu@ip-192-168-1-72:~$ mysql -u root -h mydb.chuhqysisf6f.us-west-2.rds.amazonaws.com -p
Enter password:
Welcome to the MySQL monitor.  Commands end with ; or \g.
Your MySQL connection id is 11
Server version: 8.0.11 Source distribution

Copyright (c) 2000, 2020, Oracle and/or its affiliates. All rights reserved.

Oracle is a registered trademark of Oracle Corporation and/or its
affiliates. Other names may be trademarks of their respective
owners.

Type 'help;' or '\h' for help. Type '\c' to clear the current input statement.

mysql> show databases;
+--------------------+
| Database           |
+--------------------+
| information_schema |
| innodb             |
| mydb               |
| mysql              |
| performance_schema |
| sys                |
+--------------------+
6 rows in set (0.00 sec)

mysql>
We can log in and access the database server.
The security group attached to the RDS instance allows traffic from anywhere inside the VPC. This means we can install any software we like on the EC2 instance to use the database - for example set up a web server with Wordpress - and use a MySQL API client to access the database. Or we can install other facilities in the VPC like an ECS cluster to use the database.
Examining the AWS Management Console
Let's look at what was created.
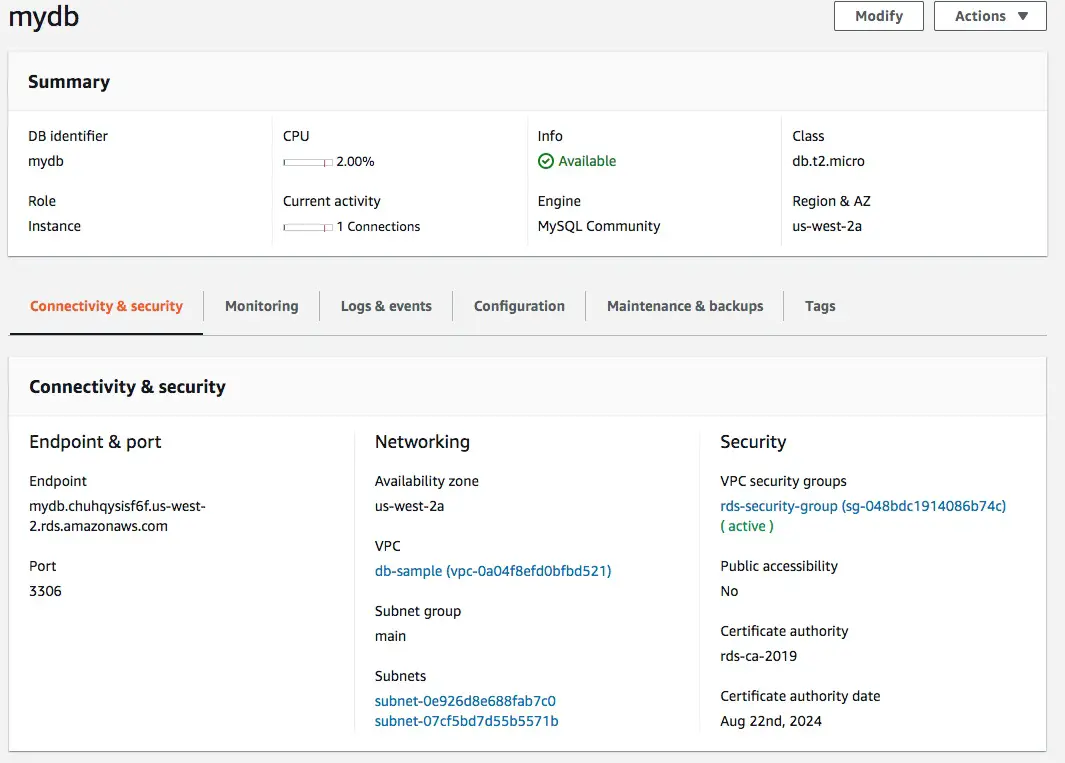
We see here all the same settings and parameters being shown in the RDS dashboard for this instance. The security group, VPC, and subnets matches what we declared earlier.
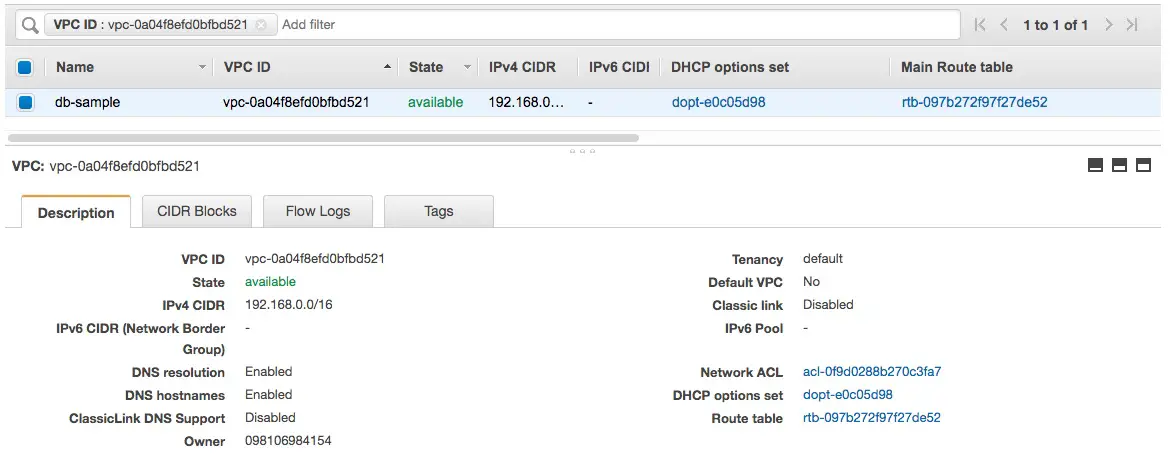
Likewise in the VPC dashboard area we can inspect the VPC, and the configuration of various things attached to it like the subnets and route tables.
Simplifying finding the RDS instance
You may have noticed that the domain name assigned by AWS is not exactly user-friendly.
db-address = mydb.chuhqysisf6f.us-west-2.rds.amazonaws.com
According to the AWS documentation there is no way to change this domain name into one that is more usable. For example it would be excellent if the RDS instance domain name were db.mydomain.com or maybe db.local. The best offered by AWS is to assign a CNAME to the AWS-provided domain name.
But let's think of another method. If we change the declaration for the EC2 instance a little, the creation of the EC2 instance can occur after the creation of the RDS instance, and then the script for installing mysql-server can also save the RDS instance domain name.
resource "aws_instance" "public-ec2" {
    ami           = var.ami_id
    instance_type = var.instance_type
    subnet_id     = module.vpc.subnet_public_id
    key_name      = "notes-app-key-pair"
    vpc_security_group_ids = [ aws_security_group.ec2-sg.id ]
    associate_public_ip_address = true

    tags = {
        Name = "ec2-main"
    }

    depends_on = [ module.vpc.vpc_id, module.vpc.igw_id, aws_db_instance.default ]

    user_data = <<EOF
#!/bin/sh
sudo apt-get update
sudo apt-get install -y mysql-client
echo ${aws_db_instance.default.address} >/tmp/dbdomain.txt
sudo mv /tmp/dbdomain.txt /dbdomain.txt
EOF
}
This is the modified EC2 instance declaration. There are two changes here that are significant.
First, the depends_on clause adds aws_db_instance.default. The depends_on clause tells Terraform that creating a given resource must occur after some other resource exists. Therefore we tell Terraform in this case that creating the EC2 instance must wait until the DB instance is created.
Secondly, the user_data script now saves the value of aws_db_instance.default.address into a file inside the EC2 instance file-system.
Indeed, if we launch the system after this change, we get the following result:
ubuntu@ip-192-168-1-171:~$ cat /dbdomain.txt
mydb.chuhqysisf6f.us-west-2.rds.amazonaws.com
This implementation may or may not be usable for your application. But it demonstrates we can capture this domain name, and place it somewhere that it will be useful for the application.
In other words the goal is to automate configuring the database connection in whatever application we have created. For example if our EC2 instance is housing a Wordpress installation, then the user_data script could ensure the database domain name gets into a Wordpress configuration file.
But it's really silly to have to use this kind of subterfuge.
For example in the AWS ECS service (for deploying Docker containers) it is possible to connect ECS Service instances to Route53 such that AWS automatically assigns a useful domain to the ECS container. That means ECS containers can automatically find each other by a simple domain name like my-service.local. For an example see Terraform deployment on AWS ECS a multi-tier Node.js and Nginx system using Service Discovery
.
Deleting the AWS RDS infrastructure
Since we don't have any immediate need for this system, we can destroy it.
$ terraform destroy

...

Plan: 0 to add, 0 to change, 18 to destroy.

Do you really want to destroy all resources?
  Terraform will destroy all your managed infrastructure, as shown above.
  There is no undo. Only 'yes' will be accepted to confirm.

  Enter a value: yes

...

Destroy complete! Resources: 18 destroyed.
Summary
We've seen in this tutorial how to set up a simple deployment of an RDS instance, and other AWS facilities, into an AWS VPC environment.
RDS offers not just MySQL but other database engines, and offers the capability to scale across AWS infrastructure.


 Starter Kit (32 GB EVO+ Edition, Premium Black Case)")


