David Herron
Tags: Docker »»»» Self Hosting »»»»
Managing Docker infrastructure solely with command-line tools is powerful but full of geeky details which can be simplified with a GUI. Dockge is a web GUI offering a point-and-click approach to managing application stacks deployed with Docker Compose.
Like many software systems, there is a trade-off between command-line tools, and clicking around a GUI to visually fiddle with settings. CLI tools can be driven from scripts, or programs accessing an API, with execution managed in an automated job system. That's a powerful best practice for scalable DevOps. But, sometimes we just want to click around in a GUI.
For managing Docker stack deployments, there are several GUIs we can use. Portainer is a popular choice, and it has a lot of power especially for managing Kubernetes clusters. But, there are many circumstances with different needs. In a home-based self-hosting Docker environment, Portainer may be too much, especially if you're doing everything with Compose files.
Dockge is a new tool billing itself as: A fancy, easy-to-use and reactive self-hosted docker compose.yaml stack-oriented manager.
What this means is:
- Dockge focuses on a
docker-compose.ymlfile in a directory. - You can create or edit this file in the GUI.
- Interactive management of Docker stacks.
- Connecting to a shell session inside a container.
- Conversion of
docker run ...commands to a Compose file. - Using agent containers, manage multiple stacks on multiple Docker instances on multiple hosts.
- Your Compose files are always on disk rather than being kidnapped by the tool.
These points are the basic elements of managing Docker stacks. The feature-set is nowhere as comprehensive as a system like Portainer. But, that last point is a direct dig at Portainer, since it manages the existence of your Compose file without keeping it on disk.
The natural way to use or manage a Compose file is to have it, docker-compose.yml, sitting in a directory next to any associated resources. Portainer's default behavior is different from that, while Dockge uses precisely that model. Further, it is possible to use Dockge alongside with other Docker management tools.
What if you want to switch from one management tool to another? If your Compose files are trapped inside the tool, you have to do some rigamarole with exporting the Compose files and other assets, just to recreate the Docker environment.
With Dockge, your files stay on disk where they belong. You can easily shut down Dockge to use a different tool any time you like, or use two tools in parallel.
System requirements for Dockge
Dockge can run under Docker or Podman. But, since Podman doesn't support Compose files won't that be problematic? In any case, it requires Docker v20 and later.
It runs on most Linux systems, and is available for both ARM and x86 platforms. For Debian and Raspbian, Bullseye is the minimum release. It does not run on Windows (yet). Not mentioned is macOS.
Installing Dockge
As you might expect, Dockge is executed from a Docker Compose file. But before we get to that, there's a small bit of setup to handle.
First is to make sure your computer has Docker installed. See Installing Docker Engine or Desktop on Ubuntu, macOS or Windows
Next, Dockge enforces what should be considered a best practice, which is to have a directory within which to store directories for all Docker stacks. Namely, Dockge encourages using the directory /opt/stacks within which you create one directory for each deployed stack.
In case you're not familiar with the word Stack, it refers to the group of Docker containers launched from one Compose file. Where the docker run .. command launches one container at a time, Compose files allow one to launch several containers together. For example you might deploy a database and a REDIS cache alongside a web application. Each of those are their own container, described together in the same Compose file.
It is best to store everything related to a given stack in the same directory. It is best for the stack directories to be next to each other on the file system. Dockge is built around those two best practices.
Create a directory - it can be any directory path, not just /opt/stacks. For example, on my Ubuntu laptop I already had /home/david/Projects/docker/ for this purpose.
The Dockge instructions say to create two directories:
/path/to/stacks-- The directory within which to store stack directories./path/to/dockge-- The directory within which to store Dockge's stack.
These two directories should be siblings of each other. This means I would create /home/david/Projects/docker/stacks/ and /home/david/Projects/docker/dockge/.
Next, in the Dockge directory we create a compose.yaml file (or docker-compose.yaml if you prefer). The Github project has a sample file you can use, or
https://dockge.kuma.pet/ contains an interactive tool to build the Compose file. With the latter, you set the Stacks directory, and the port on which Dockge runs.
The default docker-compose.yml is this:
version: "3.8"
services:
  dockge:
    image: louislam/dockge:1
    restart: unless-stopped
    ports:
      - 5001:5001
    volumes:
      - /var/run/docker.sock:/var/run/docker.sock
      - ./data:/app/data
      # Stacks Directory
      # ⚠️ READ IT CAREFULLY. If you did it wrong, your data could end up writing into a WRONG PATH.
      # ⚠️ 1. FULL path only. No relative path (MUST)
      # ⚠️ 2. Left Stacks Path === Right Stacks Path (MUST)
      - /opt/stacks:/opt/stacks
    environment:
      # Tell Dockge where to find the stacks
      - DOCKGE_STACKS_DIR=/opt/stacks
By default it runs on port 5001, but of course that can be remapped. It imports /var/run/docker.sock so that Dockge can directly interface with Docker so it can manage containers.
The data directory is mounted inside the container. That directory contains a database and configuration file.
The /opt/stacks directory is your stacks directory. As it says, the left-hand side is the host directory. That, the left-hand directory, is the one to change for your desired location in the filesystem. For example, I use /home/david/Projects/docker:/opt/stacks.
To deploy Dockge, first remember that the old docker-compose command has been deprecated for several years. The functionality is now incorporated in docker as docker compose.
That means:
$ cd /path/to/dockge
$ docker compose up -d
With the configuration shown above, the next step is to visit http://localhost:5001 in your browser.
On your first visit, Dockge will ask you to create an administrator account. It doesn't seem to support multiple users, FWIW.
Creating a new Docker stack in Dockge
Let's kick the tires by launching a couple simple containers. The first is the default NGINX container. Obviously it's a powerful web server application, but the default configuration gives us a simple way to verify the ability to launch a container.
In the Dockge home page, in the upper-left corner, click on the button labeled + Compose. That opens the Compose file editor in the main area of the page:
Enter the string nginx-demo as the Stack Name, and nginx as the container name. Click on the Add Container button.
If you want to further customize the container, click the Edit button.
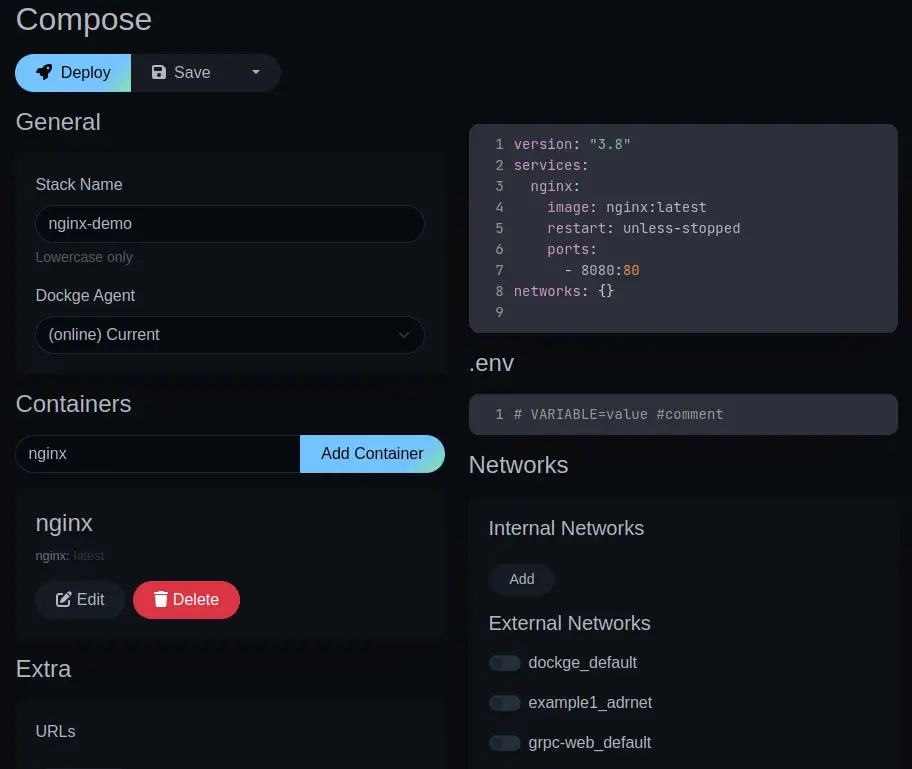
Click the Save button and then the Deploy button.
After a moment, during which the screen goes through several changes, you end up with this:
Very easy. Notice that it generates a Compose file for you, which you can edit if desired.
version: "3.8"
services:
  nginx:
    image: nginx:latest
    restart: unless-stopped
    ports:
      - 8080:80
networks: {}
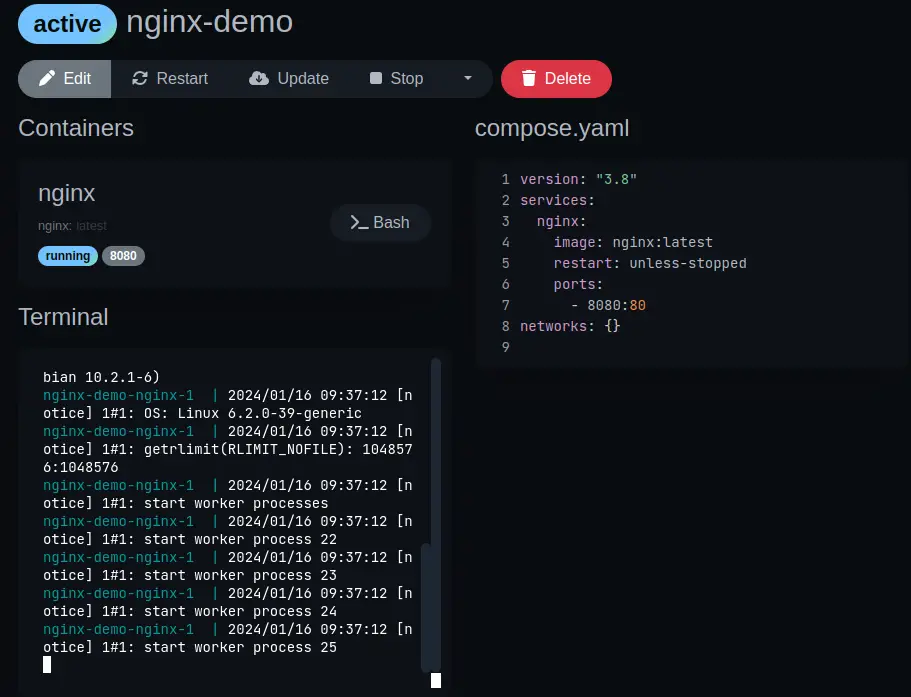
You can now visit http://localhost:8080 in your browser. Also notice in the Dockge window, next to the label reading running is another reading 8080. That is a link which opens the browser window on the corresponding port number.
In the browser you should see this:
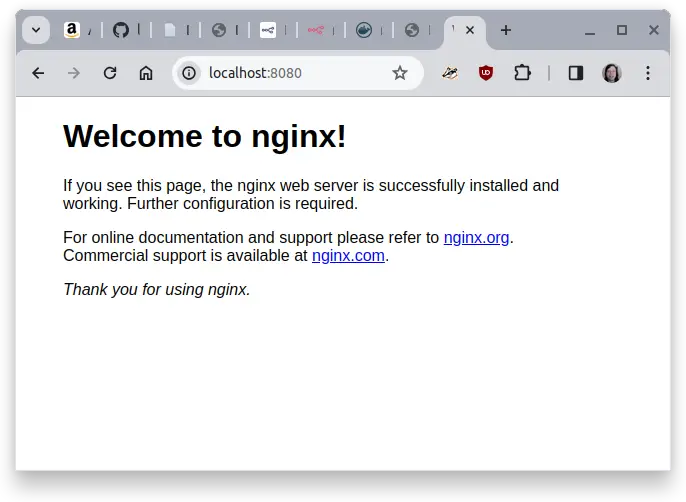
That's cool. It gave us a quick "it worked" experience. But there's nothing to interact with.
Let's do another container containing an interactive application. This comes from an earlier article,
Directly deploying a Docker service to AWS ECS using Docker Compose, where I show the deployment of an example TODO application. In that case the deployment is with Docker on AWS ECS. But, we can modify that Compose file a bit for use in Dockge on our laptop.
It starts the same way, clicking the + Compose button. You then enter todo-app-demo as the stack name. Enter todo as the container name, and click Add Container.
To set up the Compose file correctly, click the Edit button. Enter robogeek/todo-app as the image name. Then, under Ports click Add Port and enter 9080:80.
You should end up with this Compose file:
version: "3.8"
services:
  todo:
    restart: unless-stopped
    image: robogeek/todo-app
    ports:
      - 9080:80
networks: {}
Then, click the Save and Deploy buttons. After a moment the screen will show details for the container, and you can visit http://localhost:9080 to see the application.
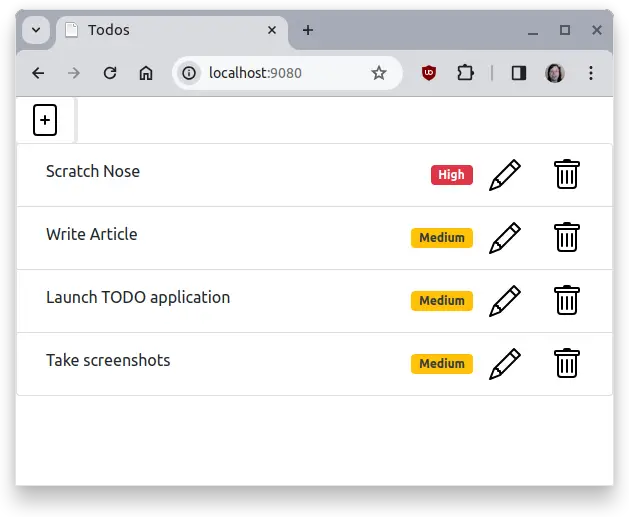
You'll see this, except the screen will be empty with none of the tasks shown here. Instead the only visible element is the + button. Click on that, and a popup window lets you enter TODO items.
Exploring a running container in Dockge
A cool feature is the Bash button when viewing a container. This button lets you launch an interactive shell inside the container. Yes, we can do this with the command docker exec -it _container name_ bash but sometimes it's tedious/tricky to determine the actual container name. Dockge gives us a simple button.
Deleting a container stack in Dockge
We now have two containers launched for demo purposes. They're not needed any longer. Let's learn how to delete a stack in Dockge.

These are the buttons available for every stack deployed by Dockge.
The Restart button lets you restart the container. The Update button pulls a new copy of the images. The Stop button stops the container, the buttons change around to contain a Start button that launches the container again.
We came here to learn about the Delete button.
Clicking that button, we get a popup asking if we're certain.
Yes, we are certain. The screen changes itself around for a moment, then the TODO app is erased from the screen.
Converting docker run to a Compose file
We've seen how to use Dockge to construct a Compose file by entering a container name and other parameters. We can also directly edit the Compose file. But, often we'll see instructions to launch a Docker container using a docker run command. Dockge has a built-in feature to convert such a command into a Compose file.
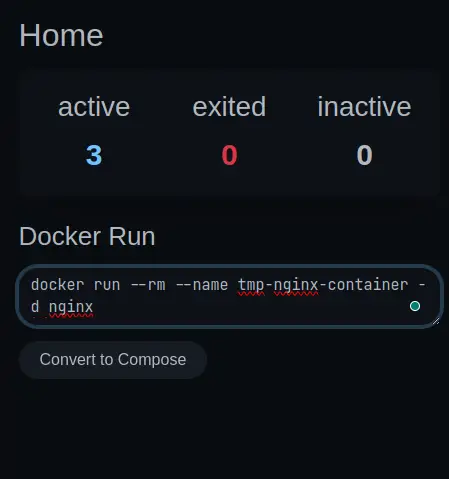
On the Dockge home screen there is a box named Docker Run. The docker run command shown here is from the README for the NGINX container. It launches NGINX with default and the name tmp-nginx-container.
Click on Convert to Compose, and you're taken to the container view with this generated Compose file:
version: "3.3"
services:
  nginx:
    container_name: tmp-nginx-container
    image: nginx
networks: {}
You can start this right away, except that we left off the --port option. Edit the Compose file to add this:
# ...
    ports:
      - 8080:80
# ...
In order to click the Save button, you must enter a Stack name. This can be tmp-nginx-container.
After clicking on Save and Deploy, you can visit http://localhost:8080 to see the NGINX welcome content.
Dockge automatically creates stack directories
We just quickly created a Docker stack from a command line, then clicked Save and Deploy to have a running container. Where did it save the Compose file?
Start a new container from the command:
docker run --rm -p 8080:80 -d nginx
That creates the Compose file:
version: "3.3"
services:
  nginx:
    ports:
      - 8080:80
    image: nginx
networks: {}
After entering a stack name, like test-nginx, click Save.
In your terminal, use the ls command to inspect the stacks directory:
$ ls /path/to/stacks
dockge  esx  mongodb  n8n  test-nginx
$ ls /path/to/stacks/test-nginx/
compose.yaml
And, that Compose file will contain the generated Compose file.
Delete this test stack, and you'll find the directory has disappeared.
Importing existing stacks into Dockge
When installing Dockge, I already had an existing MongoDB container in the stacks directory. Dockge saw this container, but it gave a message along the lines of it had no management capabilities over that stack.
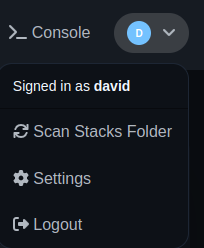
In the upper-right corner of the Dockge screen is this menu.
The Scan Stacks Folder choice looks for stacks in the stacks directory. It will bring in any stack it does not already know about.
Summary
Dockge is a very cool tool for managing Docker Compose stacks. While it's not as feature-filled as Portainer, it is very useful. Further, using Portainer sometimes feels very heavy-weight because of all its capabilities, while Dockge feels like we can quickly spin things up, take them down, and experiment.
I use Portainer on my production server, and see little reason to install Dockge there. But, on my laptop, where I'm always experimenting, Dockge feels like the perfect tool.


