David Herron
Tags: Docker »»»» Docker MAMP »»»»
Docker is a wonderful advancement for software engineers and system administrators. It simplifies launching and maintaining background processes, while adding a layer of much-needed encapsulation and security. But the default command-line administrative tools are less than pleasant to use, and we instead want a good GUI with which to manage our Docker hosts. That's where Portainer comes in. It manages the Docker containers we have running on our local host, or on remote hosts.
Surely if you're reading this you already know that Docker is a platform for running containerized software environments. Typically it is used for running a packaged background service like a web server or database. If you need a database, you spin up a MySQL or PostgreSQL instance using Docker, and voila a database.
Docker promises us better management of services we run our business or home office with. But it is hampered by a poor user interface. Portainer promises to fix that with a nice open source Docker management tool.
Selfhosting is the practice of hosting your own services rather than relying on 3rd party services. That might mean running a Nextcloud instance rather than using Dropbox. While Docker makes it easy to do selfhosting, Docker's user experience problems are significant. For a self-hoster, Portainer offers a way to hugely simplify managing the Docker services we're running at home.
For my purposes, I manage several self-hosted services on a small computer here at home. (Gogs and Gitea for Git hosting, Jenkins for builds, Plex for movies, and NextCloud to store files - see Cloning the MAMP concept with Docker -- DAMP stack: Docker, Apache, MySQL, PHP, etc) I'm using Docker Compose to describe each application, making it easier to start and stop the application, and to update it. However there are at least two issues with this setup:
- The command-line tools that Docker ships with have a bad user experience
- It is unwieldy to manage the containers using command-line tools (see the previous point)
For an example of what I mean about the bad user experience, consider the docker ps -a command that we frequently run to see the currently running containers and their status.
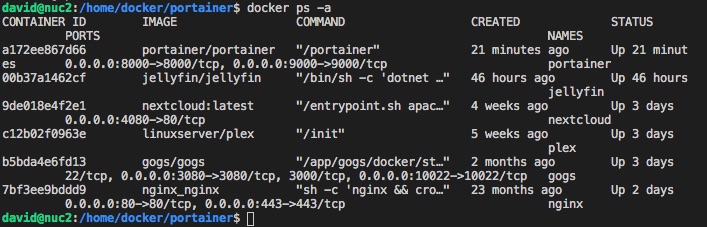
This is informative and tells us a lot. But the output is very wide, so wide that the data for each container is split over two lines. It is therefore very difficult to read this, and to get it to look halfway decent requires widening the terminal window to a ridiculous width. To make it worse, if you want to drill down or otherwise find more information, you must run other commands and you probably won't remember the syntax and the output is often a huge block of verbose JSON.
Using Portainer the same display is:
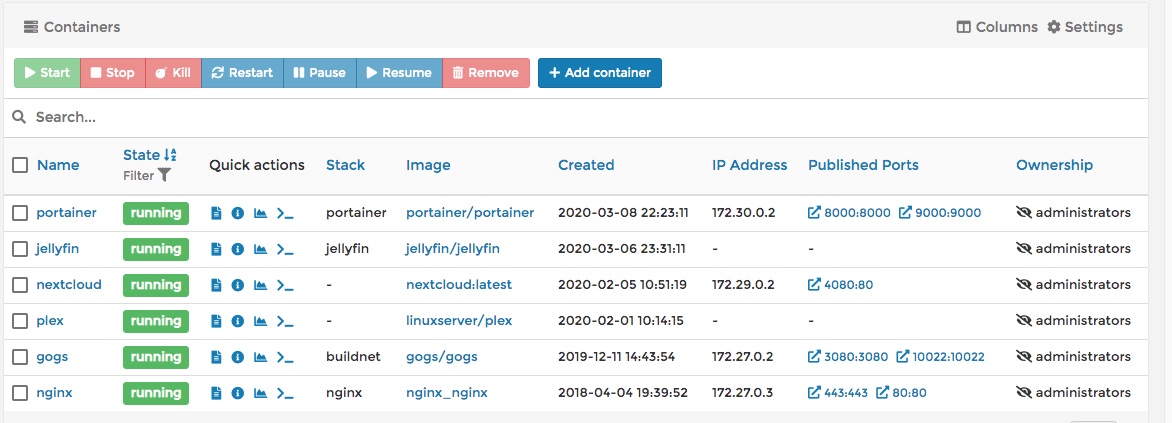
This display nicely fits the browser window. There are several useful actions on this screen - those buttons along the top, plus the Quick Action buttons on each row. Further, drilling down to get more details is very easy, just click on things.
Portainer is a very nicely designed system for managing Docker instances. It can connect with the local Docker machine, or a remote Docker host. It has screens for managing every aspect of your Docker environment. It can easily launch new containers without even doing something like creating a Docker Compose file. It has a library of service templates so you can easily launch the predefined services using their template. There is a set of extensions available to add new features. It can be used by multiple people to manage the systems. And much more.
Installing Portainer
Portainer is available through the project website:
https://www.portainer.io/
Portainer is of course distributed as a Docker container. The installation instructions give a docker run command to launch Portainer. But since I like Docker Compose, I converted that to a docker-compose.yml file.
As an example of how I manage things currently - I have a directory on my computer, /home/docker, containing the work directory for each Docker container I'm running. For each service I make one directory. Inside that directory I create a docker-compose.yml file, plus create any directories or configuration files that will be mounted into the container. For example a MySQL container will have its data directory mounted from a directory in this work area.
The docker-compose.yml for Portainer (in /home/docker/portainer) is simple:
version: '3'

services:
    portainer:
        container_name: portainer
        image: portainer/portainer
        ports:
            - "8000:8000"
            - "9000:9000"
        restart: always
        volumes:
            - /var/run/docker.sock:/var/run/docker.sock
            - ./data:/data
This is a simple transliteration of the docker run command line they gave.
In the volumes section the first is to mount /var/run/docker.sock inside the container. That socket is for communicating with the Docker API, and therefore this mount makes that socket available to the Portainer code.
The other volume is for the Portainer data directory. In the suggested docker run command it was suggested to first use docker volume create portainer_data to create a named volume, then to mount that named volume to the container. I thought - screw that - the location of the named volume is in some far away hard to find location. This is more straight-forward since the data directory is directly available.
Initial setup for Portainer
Setting up the service was very simple. Just go to http://IP-ADDRESS:9000 (port 9000 on your Docker host), provide a user name for the admin user, along with a password, and log in.
On the next screen you're given the opportunity to set up the initial Docker host to manage. You can click on Local to manage the current host, or Remote to manage a remote Docker host. The remote Docker host requires more complexity which I've not done yet.
Once you've done that, Portainer is set up and ready to go.
Kick the tires - Spin up a MySQL container
My system doesn't have a MySQL database currently. But what if I wanted one? Let's use that as an example to put Portainer through its paces. Let's start a MySQL container!
This process took about 3 minutes - I had no previous experience with starting a container on Portainer, but I have done a lot with Docker already. Three minutes or so, and a running MySQL container.
Notice in the container list above there is a button marked + Container. That's how we launch a container. But let's not do that right away because there is another task to take care of first.
A database container, like MySQL, needs its data directory to be kept outside the container. Databases are supposed to be immortal while containers are ephemeral. So... I first went into the Create Container area thinking I could do everything from there, but it was not possible to create the volume to hold the data directory from the Create Container screen. So...
First click on Volumes in the navigation sidebar. That takes you to a dashboard for maintaining the Volumes in your Docker installation. Click on + Add Volume. It simply asks you for a volume name - for this enter mysql - and that's it.
I found it clumsy to have to first create the volumes to hold data before creating the container. Shouldn't we be able to do both from the Create Container screen? Actually, as we'll see, I could have created a bind mount rather than a volume mount, and specified a host system directory rather than a volume.
Now we go back to the Containers dashboard and click on + Container.
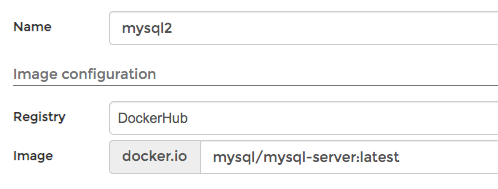
We specify the repository from whence to get the container image, plus the image name to use.
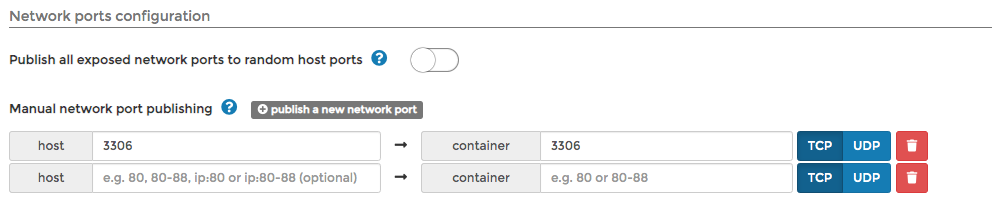
We can expose ports like so.
We can set every single option for a container from these simple-to-use screens.
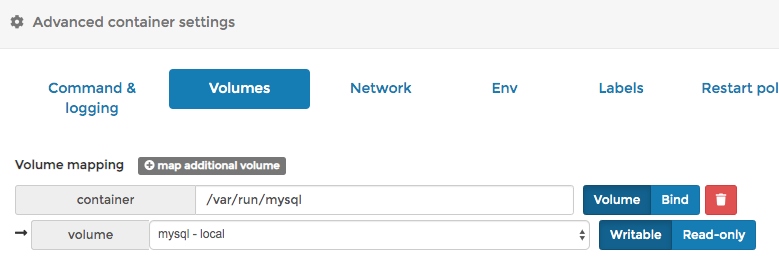
Here we can specify the mounted volumes. This is what I mentioned earlier - that it was inconvenient to have to separately create the volume.
But I just noticed, this has two modes. You can mount a volume, as is shown here, or you can bind a directory. I could have selected bind then created a directory and specified that path.
The MySQL container like many is configured using environment variables. The environment variable tab lets you create as many as you like.
The Restart tab handles the --restart option.
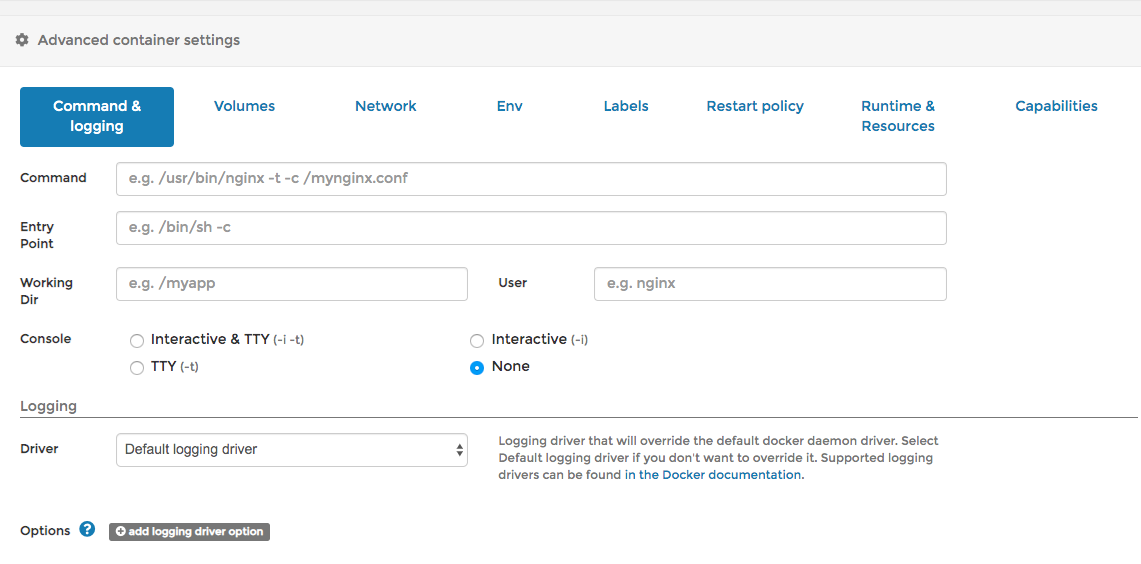
The Runtime & Resources and Capabilities tab let you set every single last advanced option. I'd glanced over a lot of these before, then skipped past them because I didn't need any of them. But if you do need them, the options are there.
In short - the Create Container feature is a comprehensive yet easy-to-use way to launch Docker containers.
Once everything is configured, there's a Launch Instance button, and away it goes.
Container monitoring with Portainer
Portainer offers extensive capabilities to monitor containers. For example you can view the logs online in real time.
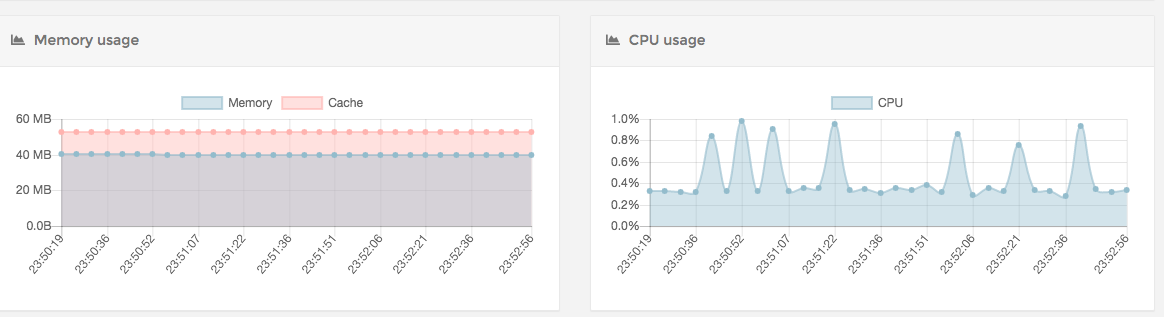
This is a very cool real-time graph of memory and CPU utilization.
My plans with Portainer
I have just installed it about an hour ago - and it's already my plan to use this to manage my Docker containers. That's how good it is.
I'm thinking to install it on my laptop, and then set up remote Docker connections for every host I want to manage.
My main Docker host is the Intel NUC on my desk. These are inexpensive small low-power-required machines that can be stuffed into a corner. It is running the containers shown above, and could be running much more. To test Portainer, I installed it there.
But I might instead install it on my laptop, then manage the NUC's Docker system remotely. Which means learning how to do that.
Another task on my mind is to convert the current Docker containers away from the Docker Compose files, into something natively administered on Portainer.
Bottom line is that I'm giving Portainer a strong recommendation. It should be useful for an independent software consultant like myself, or for a corporate team looking for a way to manage their infrastructure.
The company backing Portainer offer commercial support and additional features. I haven't tried any of that.


