David Herron
Tags: OpenAPI »»»» Swagger »»»»
OpenAPI documents are written in either YAML or JSON and are editable with any programmer's editor. Tools like the Swagger Editor interactively assist with writing OpenAPI specifications by immediately showing errors and interactive API documentation. Since OpenAPI is an open specification, the door is open for any company to develop OpenAPI tools. In this post, we'll go over using the Swagger Editor on the swagger.io website and try some alternatives that will run on your laptop.

Recall that OpenAPI is a method for documenting application programming interfaces (APIs). It began life as the Swagger Specification, but when Smart Bear contributed it to the OpenAPI Initiative, the name changed to OpenAPI. OpenAPI specification documents are written in either YAML or JSON format. They describe object schemas, API methods, and more. OpenAPI tools can generate interactive documentation, determine a configuration of platforms like the AWS API Gateway, or generate client or server source code.
Throughout this tutorial we're referring to todo.yml. You can use any OpenAPI specification you like. But, if you want to view the specification used while writing this tutorial, the GitHub repository is at:
https://github.com/robogeek/typescript-todo-service
The Online Swagger Editor
The online Swagger Editor is the simplest OpenAPI editor to start using. One navigates to the website (
https://swagger.io/tools/swagger-editor/) and clicks on the Live Demo button, which takes you to http://editor.swagger.io/. At that site, you can start editing either JSON- or YAML-formatted OpenAPI documents. You will initially be editing the Pet Store demo API, but it is easy to clear the editor buffer and edit your API.
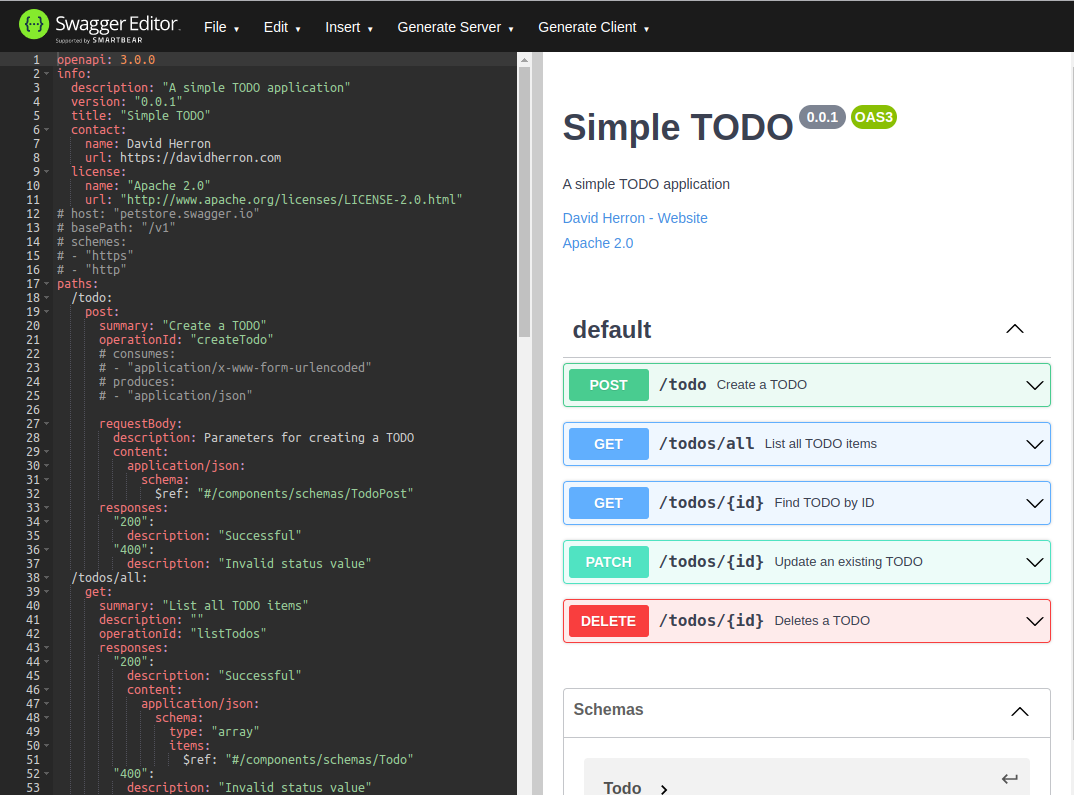
The editing pane is a regular programmer's editor attuned for editing either the JSON or YAML form of OpenAPI specifications. As you edit an OpenAPI specification, it interactively verifies the code and gives you errors and warnings, helping with code completion. While editing, the preview pane interactively shows a constantly updated, and interactive, summary of the API you're creating. This means you can easily explore your API, and directly determine if your intent is matched by the code. The editor relies on a backend service that does the heavy lifting of detecting errors and generating interactive documentation.
While the editing experience is very good, it is not integrated with your local file system. This means opening a file to edit, or saving edits back to the file you opened, is clumsy, which we'll talk about later. Using the online editor puts you at the mercy of Smart Bear, relying on their willingness to continue hosting this editor for free.
Smart Bear does provide a paid online service, Swagger Hub. In other words, the online editor is a freemium demo of the paid service.
Installing the Swagger Editor locally
It is possibly a best practice to run the editor on your machine so that you are in control of your destiny. Smart Bear makes the editor available either as a Docker container or a Node.js package you install using npm. It is the same editor which is installed on their website, but you can run it on your computer.
Unfortunately, the Node.js package, swagger-editor, does not offer a clearly described way to run the editor. The package README is written as if you're using the Git repository from GitHub (
https://github.com/swagger-api/swagger-editor). This is the place to go if you're interested in the source code, but it does not seem geared for everyday use.
Instead let's focus on using Docker to run Swagger Editor.
If you haven't installed Docker on your laptop, head to Installing Docker Engine or Desktop on Ubuntu, macOS or Windows for a tutorial.
In the README of the GitHub repository you'll find documentation on running the Docker container using this command:
$ docker run -d -p 80:8080 swaggerapi/swagger-editor
After running this command, you can go to http://localhost in your browser and have the exact Swagger Editor available on the Swagger website. The difference is that the editor is running on your computer, and you have a margin of additional control.
An alternate to the command line is to create a file named docker-compose.yml containing this:
version: '3'

services:
  editor:
    image: swaggerapi/swagger-editor
    ports:
      - 80:8080
You then run this using the command:
$ docker compose up
Notice this is "docker compose" and not "docker-compose". The latest version of Docker tools contains a "docker compose" command seemingly with the functionality of the venerable "docker-compose" command. It is recommended to switch to the new command, and forget about the old command. Docker-compose is dead, long live Docker Compose?
Once the editor is running the user experience is the same as on the Swagger website. The difference is you have more control since the editor is executing on your computer.
Using the Swagger Editor to edit local OpenAPI specification files
Whether you use the Swagger Editor on the website, or under Docker on your computer, it is the same Swagger Editor. Let's talk about using it to edit a local file. We said earlier that editing a local file is clumsy. Because it is a web application, it cannot directly open files on your computer, leading to clumsiness.
To edit an OpenAPI specification, you click on the File menu and choose Import File. This opens a file selector with which you select a local file. Notice the phrase "Import File" rather than "Open File" as is used in a native application. The phrase serves to remind you that as a web application it does not directly open the file in the filesystem. Once imported, the editor contains the specification you selected.
After you have edited the specification, you'll arrive at a conclusion where you want to save the file back to your disk. To do this, return to the File menu, and choose Save as YAML. Instead of letting you choose the file name, it simply saves the specification as "openapi.yaml" in your Downloads folder. To save this back to your workspace you must manually copy the file from Downloads.
This process is somewhat clumsy. On the one hand saving a file requires two steps, saving to openapi.yaml then moving that file to your original file. On the other hand is a habit I believe all IDE users should develop, and that is to regularly type CTRL-S or COMMAND-S to regularly save the file you're editing. Doing so saves the file to disk, which can be important if the editor crashes. Because the Swagger Editor is in a browser pane, that habit cannot be used.
Automating editing a local file using Swagger Editor
The Docker command can easily list the file to edit. That will save you the step of using Import File to edit the file.
$ docker run -p 80:8080 -v $(pwd):/tmp \
             -e SWAGGER_FILE=/tmp/todo.yml swaggerapi/swagger-editor
This mounts the current directory as /tmp inside the container, and then tells Swagger Editor to edit /tmp/todo.yml. When you open the browser window on http://localhsot you'll see the file is already there.
Using this as a Compose file is fairly simple. Create a file named docker-compose-edit-spec.yml containing:
version: '3'

services:
  editor:
    image: swaggerapi/swagger-editor
    ports:
      - 80:8080
    volumes:
      - ./todo.yml:/tmp/todo.yml
    environment:
      - SWAGGER_FILE=/tmp/todo.yml
This is the same setup as with the command line tool, but everything is neatly recorded in a configuration file.
To run this Compose file:
$ docker compose --file docker-compose-edit-spec.yml up
By giving the Compose file such a long name, we're able to use multiple Compose files for multiple purposes.
Installing the OpenAPI extension for Visual Studio Code
This extension by 42Crunch is essentially the Swagger Editor integrated into Visual Studio Code. In VSC, open the Extensions pane, and search for "OpenAPI". As of this writing, this extension is the top result and is by far the most widely installed OpenAPI tool for VSC.
Once installed, upon opening a JSON or YAML file this extension automatically detects whether it is an OpenAPI specification. If so, it adds behavior that's useful for OpenAPI. This includes code completion and code hints in the editor pane, as well as a preview pane. The preview pane is triggered by clicking the preview button in the VSC toolbar. The interactive API view is identical to what is provided by the Swagger Editor.
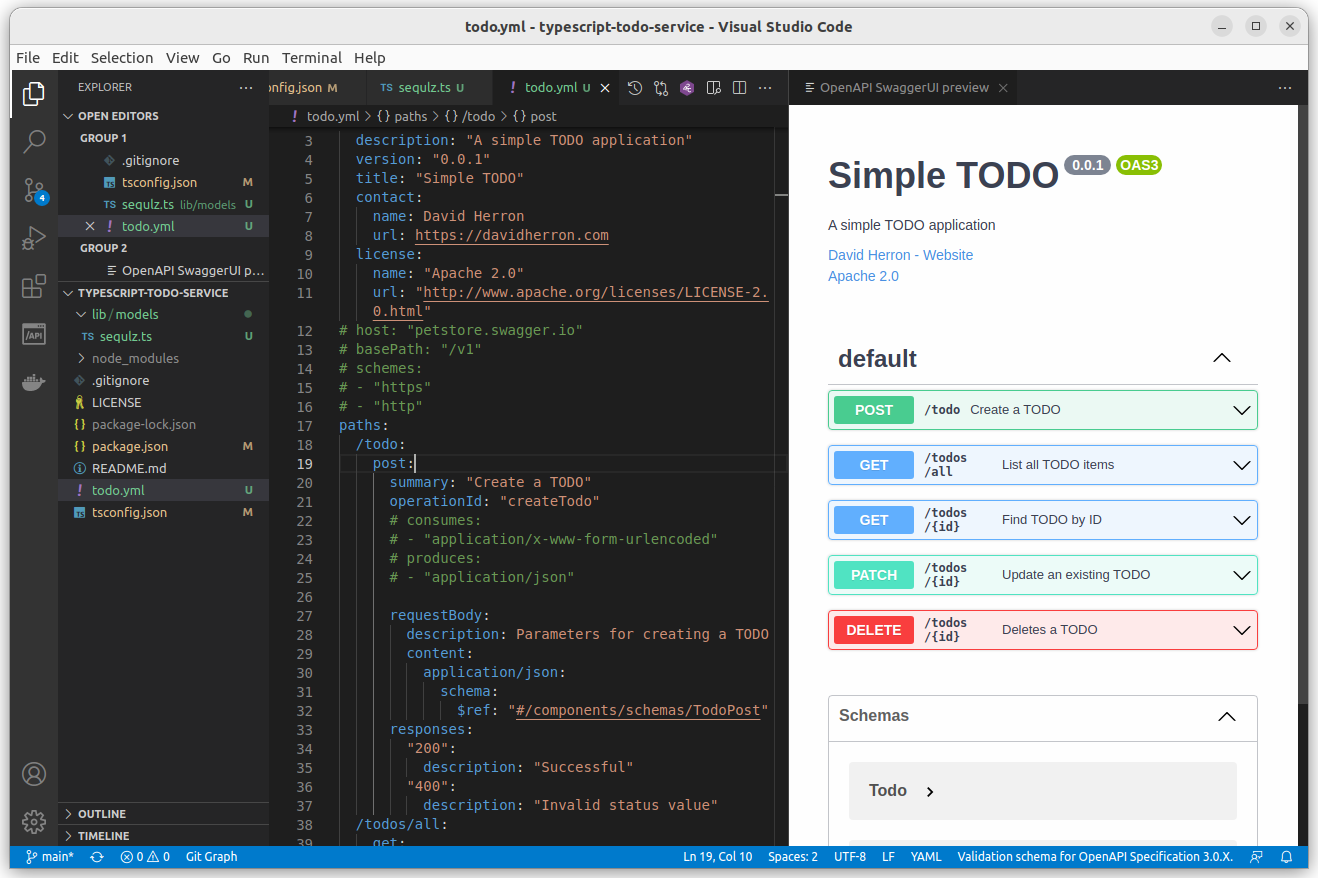
Because you are editing the specification in the VSC editor, you have direct access to the file system. You can type CTRL-S or COMMAND-S all you like, for example. More importantly, you aren't required to manually rename the saved file because VSC natively saves directly to the file which was opened.
This solves the clumsiness described earlier. You're directly editing a local file, and directly saving to a local file. The downside is adding some bloat to Visual Studio Code.
Publishing API documentation using Swagger UI
The model is that documentation for OpenAPI specifications is interactive. The Swagger UI project (
https://github.com/swagger-api/swagger-ui) is a browser-side viewer for OpenAPI specifications. It is essentially the preview pane of the Swagger Editor. The purpose is for deployment on a public website, so the public can view interactive API documentation.
The Swagger UI README discusses two installation methods:
- Embedding some code in an HTML page, with Swagger UI running fully in the browser.
- Deploying a Docker container.
For the HTML deployment, consult the template shown by the Swagger UI team. For more information about this see: Displaying Swagger UI in an HTML page without using server-side services
Instead, let's explore using the Docker container.
$ docker run -p 80:8080 \
        -e BASE_URL=/swagger \
        -e SWAGGER_JSON=/foo/swagger.json \
        -v /bar:/foo \
        swaggerapi/swagger-ui
This uses a local file, which would be /bar/swagger.json which appears as /foo/swagger.json inside the container. While this environment variable is SWAGGER_JSON we can also supply a YAML file. The BASE_URL variable makes the API viewer appear on a different URL, meaning that instead of viewing http://localhost/ for the API, you view http://localhost/swagger.
This is useful for displaying the API on your laptop, but is not so useful for a production deployment.
Here's a Docker Compose deployment that attempts to display an API spec available from an HTTP URL.
version: '3'

services:

  nginx:
    image: nginx
    networks:
      - openapi
    volumes:
      - .:/usr/share/nginx/html:ro

  editor:
    image: swaggerapi/swagger-ui
    networks:
      - openapi
    ports:
      - 80:8080
    # volumes:
    #   - ./todo.yml:/tmp/todo.yml
    environment:
      - SWAGGER_JSON_URL=http://nginx/todo.yml
      # - SWAGGER_JSON=/tmp/todo.yml

networks:
  openapi:
This deploys two containers, an NGINX which is used solely to serve the OpenAPI spec, and the Swagger UI. If we use SWAGGER_JSON_URL and comment-out SWAGGER_JSON, this tries to retrieve the todo.yml from the NGINX server. Alternatively, we can use SWAGGER_JSON instead of SWAGGER_JSON_URL to retrieve it from a local file.
When using the NGINX server an error popped up:
Failed to load API definition.

Fetch error
Failed to fetch http://nginx/todo.yml
Fetch error
Possible cross-origin (CORS) issue? The URL origin (http://nginx)
  does not match the page (http://localhost).
  Check the server returns the correct 'Access-Control-Allow-*' headers.
With this Compose file, the Swagger UI container can reach the NGINX container at the http://nginx URL. It then retrieves the specification from http://nginx/todo.yml. This means the JavaScript loaded by Swagger UI loads from a different URL than the source of the OpenAPI spec, which looks like a CORS error. There is a recommendation to add Access Control headers, which is something to research.
The simplest working example for using Swagger UI with a Docker Compose file is:
version: '3'

services:

  editor:
    image: swaggerapi/swagger-ui
    ports:
      - 80:8080
    volumes:
      - ./todo.yml:/tmp/todo.yml
    environment:
      - BASE_URL=/todoapi
      - SWAGGER_JSON=/tmp/todo.yml
This mounts a local OpenAPI spec into the container, tells Swagger UI to use it, and places it at the /todoapi URL.
For a working example of deploying Swagger UI on a web page, see: Displaying Swagger UI in an HTML page without using server-side services
Summary
The Swagger Editor and Swagger UI are useful tools for editing and viewing OpenAPI specifications. They can be fairly easily used either on your laptop, or as a hosted service on your website.
For editing OpenAPI files, the OpenAPI extension for Visual Studio Code is recommended.
OpenAPI is an open specification, making it possible for any organization to use it, and for any company to develop and provide OpenAPI tools. There is a long and growing list of OpenAPI tools listed at:
https://openapi.tools/


")


