David Herron
Tags: Docker »»»» Docker Compose »»»» AWS ECS »»»»
Thanks to a new Docker CLI feature we can directly deploy to AWS Elastic Container Service (ECS) using a Docker Compose file. It's very cool, and greatly simplifies deploying applications to AWS, but it lacks an important feature which is implementing HTTPS support. The solution offered by the Docker team involves rewriting the Cloud Formation template they generate for us, so let's learn how it works.
We have a powerful new way to deploy Docker services to the AWS cloud. The Docker team a few months ago released a new feature, a special purpose Context that supports deployment directly to the AWS Elastic Container Service (ECS) using a Docker Compose file. This tantalizes us with deployment onto a highly scalable system, ECS, from the comfort of the easy-to-write-and-understand Compose file.
For an introduction see Directly deploying a Docker service to AWS ECS using Docker Compose
The following is abstracted from a book I've nearly finished which will be called Deploying Docker Containers to AWS using Terraform. As the title suggests it's primarily about using Docker containers on AWS, and using Terraform to simplify everything. Since the Docker ECS Context is a new feature, the book contains a long chapter with several examples.
A key takeaway after having created several ECS deployments using Compose files is that the technology is very early stage, and incomplete. One key example is the difficulty with provisioning HTTPS support. Compose files simply don't have the ability to express the configuration required for HTTPS.
Currently implementing HTTPS with the Docker ECS Context requires an extensive Cloud Formation overlay. With this overlay we reconfigure the default AWS Load Balancer configuration to terminate the SSL connection in the ALB, as well as implement a redirect to hide a www-prefix domain.
| You may be asking: What's a Cloud Formation overlay? The Docker ECS Context works by translating the Compose file into a Cloud Formation template. It then seamlessly deploys that template to the AWS platform, using not only ECS but Cloud Map, Route 53, Load Balancer, and more. The Cloud Formation overlay is a nifty feature for modifying the generated Cloud Formation template. The modifications are recorded as YAML constructs in the Compose file, and are automatically applied every time we deploy the Compose file to AWS ECS. |
Obviously HTTPS is a critical need for any website since it provides important security guarantees. That makes it highly important to configure HTTPS support on ECS when using Compose files. The AWS Load Balancer can easily support HTTPS, but why do we say Compose files cannot support HTTPS?
An HTTPS implementation requires:
- An SSL certificate validating the domain associated with the website
- Associating the domain name to the deployed application
- Load Balancer
- Docker Container
- Implementing a redirect to hide the
www-prefix domain name - Implementing a redirect from the HTTP URL to the HTTPS URL
Compose files cannot describe any of those things.
Within the Docker team there seems to be a tension between our needs, as application developers, and the reasonable scope of the Compose file. This file has always been about deploying containers, and configuring runtime characteristics like memory or CPU allotments, storage volumes, network connections, and related settings. It doesn't handle domain name assignments, configure load balancers, etc.
To explore this problem let's deploy a simple container to AWS ECS and see how to implement HTTPS.
Getting started with the Docker ECS Context
To proceed you must have an up-to-date version of Docker installed on your laptop. To have the modules required for ECS integration means having version 20.10 or later. That corresponds to Docker Desktop version 3.1 or later.
One test is whether this command does not give you an error:
$ docker compose
It should print out a usage summary of that command. Notice that we did not type docker-compose, but docker compose. The docker compose command, with a <space> in its name, is about integrating docker-compose functionality directly into the docker command. The Docker version numbers mentioned above are sufficient.
To use this with AWS there are two steps required:
- Set up the AWS CLI on your laptop, and configure an AWS Profile, which you've probably already done.
- For some advice see Setting up the AWS Command-Line-Interface (CLI) tool on your laptop. It is required that the AWS CLI be configured with at least one AWS profile, and that you have already verified success with it.
- If you do not have an account, go to
https://aws.amazon.com/ and sign up.
- Have a Docker ECS Context configured for use with your AWS Profile
- To learn how to setup the Docker ECS Context, read: Directly deploying a Docker service to AWS ECS using Docker Compose
The short version is to run this command:
$ docker context create ecs ecs-env
? Create a Docker context using:  [Use arrows to move, type to filter]
> An existing AWS profile
  AWS secret and token credentials
  AWS environment variables
Then select the third option, AWS environment variables. The article linked above has more information as well as a brief exercise to familiarize yourself with the ECS Context.
| What's a Docker Context? Contexts manage connections to remote Docker hosts. For example you can create an SSH Context to use SSH to remotely control a normal Docker host (see Using SSH to remotely control a Docker Engine or Docker Swarm in two easy steps). |
In mid-2020 the Docker team made available Contexts for interfacing Docker with both AWS ECS and Azure ACI, allowing us to directly deploy to either platform using Compose files. Our goal in this article is exploring the Context for AWS ECS.
Once you've created the context, you can run this:
$ docker context list
NAME       TYPE   DESCRIPTION                              DOCKER ENDPOINT              KUBERNETES ENDPOINT   ORCHESTRATOR
default    moby   Current DOCKER_HOST based configuration  unix:///var/run/docker.sock                        swarm
ecs        ecs    us-west-2
ecs-env *  ecs    credentials read from environment
The default context is your local machine, the ecs context is configured from an AWS Profile, and the ecs-env context is configured from environment variables. The * indicates which is the currently selected context.
Deploying a simple Compose file for experimenting with HTTPS
In order to get our feet wet let's create a trivial Compose file. That'll let us explore HTTPS implementation without complicating the tutorial with setting up other things like a database.
A very popular application for this purpose, containous/whoami, is a trivial application that prints out some useful information about the container and it's network infrastructure.
Create a file named docker-compose.yml containing:
services:
    whoami:
        image: containous/whoami
        ports:
            - "80:80"
        deploy:
            replicas: 1
Run this command:
$ docker compose up
containous/whoami resolved to docker.io/containous/whoami:latest@sha256:7d6a3c8f9147...
[+] Running 14/14
 ⠿ docker-ecs                   CreateComplete      209.6s
 ⠿ WhoamiTCP80TargetGroup       CreateComplete        1.0s
 ⠿ WhoamiTaskExecutionRole      CreateComplete       17.0s
 ⠿ Cluster                      CreateComplete        7.0s
 ⠿ DefaultNetwork               CreateComplete        6.0s
 ⠿ LogGroup                     CreateComplete        2.0s
 ⠿ CloudMap                     CreateComplete       47.0s
 ⠿ Default80Ingress             CreateComplete        2.0s
 ⠿ DefaultNetworkIngress        CreateComplete        0.0s
 ⠿ LoadBalancer                 CreateComplete      122.0s
 ⠿ WhoamiTaskDefinition         CreateComplete        3.4s
 ⠿ WhoamiServiceDiscoveryEntry  CreateComplete        2.0s
 ⠿ WhoamiTCP80Listener          CreateComplete        3.0s
 ⠿ WhoamiService                CreateComplete       66.0s
Note - this is not docker-compose up, because the - is replaced with a <space>.
Look carefully at this output, especially the service names in the first column. These correspond to the different AWS platform services that Docker configures for us. It does this by converting the Compose file to a Cloud Formation template, and each of these service names refer to an entry in that template. We'll be studying this later so keep these in mind.
For the moment we want to open this service in a web browser. To discover the load balancer URL, run this command:
$ docker compose ps
In the output there will be a URL like docke-LoadB-1KZ8X2C46HB4E-111590033.us-west-2.elb.amazonaws.com. Paste that into a web browser, and you'll see the service output.
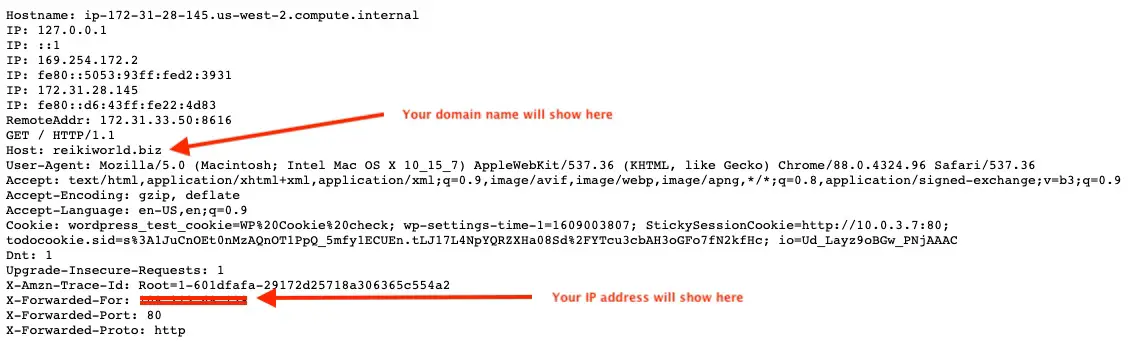
This container is useful for our purpose because it gives a bunch of information about the container, the network configuration, and the web browser.
Horizontal scaling is simple to implement, by changing the replicas value in the Compose file. Then rerun docker compose up, and after the services are provisioned go back to your web browser. Click reload several times and you'll see the numbers change. That's not what we're here for, so don't lets not get distracted by this.
When you're done looking at this, run:
$ docker compose down
Doing so destroys the deployment just created.
Assigning a domain name, provisioning a load balancer and SSL certificate
Obviously if we want users for our whizzy wonderful web application, it needs to be available at a regular domain name. On AWS that means using Route 53 to manage the domain, setting up an AWS Load Balancer, and assigning Alias records in Route 53 referring to the Load Balancer.
The easiest way of implementing HTTPS on AWS infrastructure is by creating an AWS Load Balancer. It is a feature-filled load balancer, with the Application Load Balancer supporting the HTTP/HTTPS protocols, and the Network Load Balancer supporting other protocols. To provision the SSL certificate, it is simplest to turn to the AWS Certificate Manager. SSL certificates from ACM are free so long as they're used with AWS infrastructure.
We need to create an application load balancer that has no listeners, rules or target groups. Those three items are used by the AWS load balancer to process HTTP/HTTPS requests. We will be configuring listeners, rules and target groups shortly, but we cannot supply a preconfigured load balancer to the Docker ECS Context.
Instead we must create the load balancer using this command:
$ aws elbv2 create-load-balancer --name whoami-alb \
    --scheme internet-facing --type application \
    --security-groups sg-08ede23deaa1efbfb \
    --subnets subnet-5d96ee76 subnet-34e32369 subnet-8a4dbbf2 subnet-6afbe821
This uses the AWS CLI tool, which you will have already installed. As the command name suggests, this is used for creating load balancers.
In the output from this command is the ARN for the load balancer. Record the ARN.
This creates an internet-facing application load balancer with the name whoami-alb. To get the list of subnets, in the AWS Management Console navigate to the VPC dashboard, and inspect the Default VPC. Use its subnets for this list.
It's important for us that this load balancer not contain any listeners, rules or target groups. The Docker ECS Context will throw this error if we try:
Resource of type 'AWS::ElasticLoadBalancingV2::Listener' with identifier 'A listener already exists on this port for this load balancer 'arn:aws:elasticloadbalancing:us-west-2:09E1X6A8MPLE:loadbalancer/app/wp-ecs-load-balancer/031fb204d4ee0d00' (Service: ElasticLoadBalancingV2, Status Code: 400, Request ID: ea5b2a3e-268c-4f2d-9db5-42985039bf25, Extended Request ID: null)' already exists.
This error says that the Docker ECS Context insists that it must be in charge of configuring the load balancer. So, we give the ECS Context an empty load balancer, and it will create a default configuration. But later in this article we will see how to modify that default configuration to suit our needs.
For the security group we can either use the default security group for the default VPC. Or, we can create a security group. To create a security group, navigate to the EC2 dashboard and click on Security Groups. On that dashboard, click on Create Security Group. Enter something in the Security group name and Description fields. Then under Inbound rules, click on Add Rule to add an HTTP rule accepting traffic from Anywhere, then click on Add Rule again to add an HTTPS rule accepting traffic from anywhere.
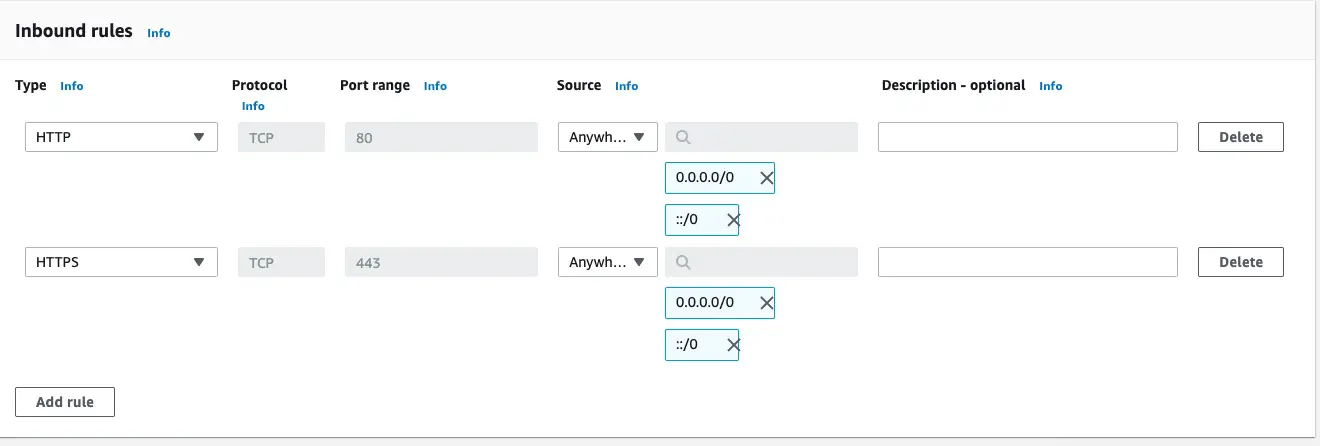
The ingress rules should look like this. Once you save this security group, you'll be given an ID string that you can use on the command above.
Running that command shows you a blob of JSON describing the load balancer. You'll also find it listed on the Load Balancers dashboard, which you find in the EC2 dashboard area.
The next setup task is to set up the domain name. Navigate to the Route 53 dashboard. What's required is to create a Public Hosted Zone, so click on the Create hosted zone button. Public hosted zones are domain names for the public Internet. Route 53 also supports private hosted zones, which are domain names usable only within AWS infrastructure.
If you don't have a domain name to use, go to a regular domain name registrar and register a domain name. Enter the domain name, make sure to select Public hosted zone, then at the bottom click the Create hosted zone button. To finalize setting up the domain with Route 53, you will be given some nameserver domain names. You need to go back to your domain name registrar and configure the domain to use these nameserver names.
Once you have the public hosted zone setup, navigate to the Hosted zones dashboard and your domain name should be listed. Click on the domain name to enter its dashboard area. This lists the DNS records for your domain, and there is a button marked Create record.
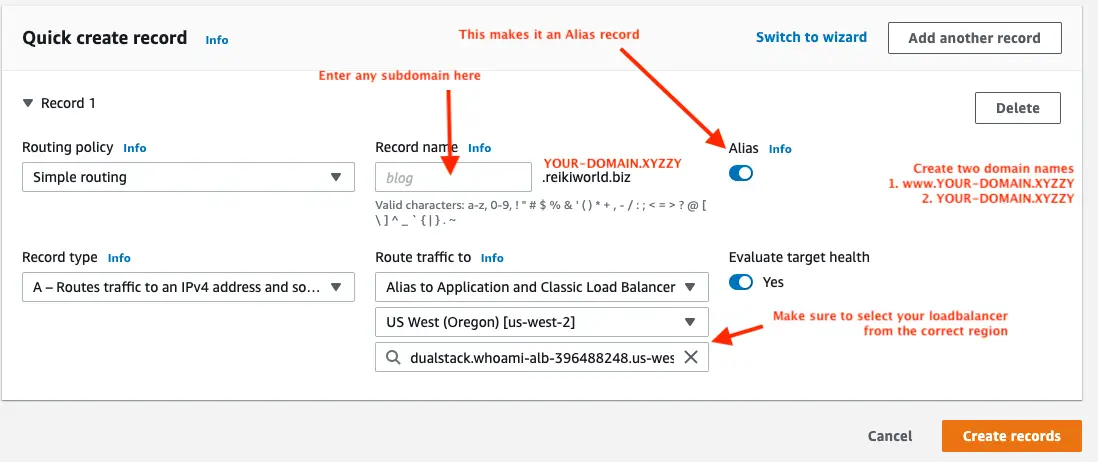
Create the DNS record using these settings. Clicking the Alias button makes it an Alias record. Alias records are associated with another AWS resource such as a load balancer. As soon as you click the Alias button, the Route traffic to section shows up. Configure it as shown here.
Make sure to create both a domain name that will serve as the main domain for the service, as well as the www-prefix domain name. Hence, create example.xyz and www.example.xyz. The reason is that when we get to the load balancer configuration we'll handle both domain names.
The next thing is to set up an SSL certificate. To do so, in the AWS Management Console, navigate to the Certificate Manager. Then click on the Request a Certificate button.
In the subsequent wizard, make sure you are requesting a public certificate. For domain names, enter both your main domain name and the www-prefix domain name.
Make sure to record the ARN for the Load Balancer and the SSL certificate. You will need to record the ARN's for both the Load Balancer ARN and SSL Certificate.
Deploying Docker to ECS using a domain name
We've set up several things, so lets put them to use, starting with the domain names. The DNS records are already set up to point to the load balancer. That means you can use the ping command to check the IP address for both.
$ ping whoami-alb-396488248.us-west-2.elb.amazonaws.com
PING whoami-alb-396488248.us-west-2.elb.amazonaws.com (52.34.253.46): 56 data bytes
...
$ ping example.xyz
PING example.xyz (52.34.253.46): 56 data bytes
...
$ ping www.example.xyz
PING www.example.xyz (52.34.253.46): 56 data bytes
...
There will be no response from the ping (you'll be told Request timeout for icmp_seq 0) because nothing is connected to the load balancer. But as long as the same IP address is given for each, you know the DNS entries are configured right.
Change docker-compose.yml as so:
version: '3.8'

x-aws-loadbalancer: arn:aws:elasticloadbalancing:us-west-2:09E1X6A8MPLE:loadbalancer/app/whoami-alb/967a9da334b76cd3

services:
    whoami:
        image: containous/whoami
        ports:
            - "80:80"
        deploy:
            replicas: 1
What we've done is added a x-aws-loadbalancer item to declare the load balancer.
The practice for the ECS Context, as well as the Azure ACI Context, is to use declarations like this for context-specific settings. Items starting with x-aws are specific to the ECS Context. In this case x-aws-loadbalancer is how we tell the ECS Context to use our load balancer, rather than it provisioning one for us.
The purpose for all this was to be able to assign a domain name to the IP address of our service.
Re-launch the WHOAMI application using the new configuration:
$ docker compose up
Notice that the service names are almost the same as before. There is not a LoadBalancer service this time, because we instead supplied our own load balancer.
When the service is fully launched you can run docker compose ps.
$ docker compose ps
NAME                                               SERVICE  STATE    PORTS
task/docker-ecs/f76c6fd69c13478c817deb681d0de3bc   whoami   Running  whoami-alb-396488248.us-west-2.elb.amazonaws.com:80->80/http
Notice that it now shows the domain name of our load balancer, and not the load balancer domain shown before. This is another sign that our load balancer is being used.
If this was successful, you'll get this result for these domain names:
- Your load balancer URL
YOUR-DOMAIN.XYZwww.YOUR-DOMAIN.xyz
Our goal with the load balancer configuration is for your service to be visible on only one of the domain names. If the request specifies the www-prefix domain, we want to redirect to the base domain. If the request specifies the base domain name, then we want to show the service. If the request is on the HTTP port, we want to redirect to the HTTPS port. And if the request is for any other domain, then an error should be shown.
Examining the Cloud Formation template
We can now start with the goal of this blog post, which is to modify the Cloud Formation template with the load balancer configuration.
In docker-compose.yml edit the ports declaration to this:
ports:
    - "80:80"
    - "443:443"
We'll be implementing port 443 now, so let's inform the ECS Context that we want this port. We will be reconfiguring the load balancer configuration, but by doing this the ECS Context will go ahead and create listeners for both ports.
Run this:
$ docker compose convert >cf-base.yml
So far we've used docker compose up to deploy the WHOAMI application to ECS. Behind the scenes it generated a Cloud Formation template. Running docker compose convert lets us see what that template contains.
Open cf-base.yml in a programmers text editor. There is some extraneous text at the top from where the docker command told us about resolving the container name. Delete that text, and you'll be left with pristine YAML.
We are looking for these resource items:
WhoamiTCP80ListenerWhoamiTCP80TargetGroupWhoamiTCP443ListenerWhoamiTCP443TargetGroup
Study those and you'll see that they send traffic straight through to the backend service.
Also, under WhoamiService you'll find this:
LoadBalancers:
- ContainerName: whoami
  ContainerPort: 80
  TargetGroupArn:
    Ref: WhoamiTCP80TargetGroup
- ContainerName: whoami
  ContainerPort: 443
  TargetGroupArn:
    Ref: WhoamiTCP443TargetGroup
This means the WHOAMI service registers itself with both the port 80 target group, and the port 443 target group. This is part of the theme that the inbound traffic on port 80 and port 443 simply goes through to the service.
Your service can implement HTTPS on its own. That would require that your service be configured to answer to specific domain names, and to use an SSL certificate to terminate the HTTPS connection. If that's the case, then there's no need to reconfigure the Cloud Formation stack. Your application will take care of HTTPS and all will be fine.
But what if your application cannot handle HTTPS on its own? What if you prefer HTTPS be handled by the load balancer? That's what we'll handle in the next section.
Creating a Cloud Formation overlay for HTTPS
We've got a simple Compose file and have proved we can deploy it to AWS ECS and use our chosen domain name to access the resulting service. In this section our goal is to reconfigure the load balancer to serve our needs.
My preference is that a website be used with its base domain (example.xyz) and therefore requests to the www-prefix domain name must be redirected to the base domain name. Other people prefer that instead users should use the www-prefix domain name. The load balancer configuration here will force my preference. If your preference is different, the two rules must be reversed.
When going through this it's helpful to go to the AWS online documentation, and find the Cloud Formation documentation. Within the documentation is an area labeled Template Reference within which is Resource and property reference. This contains detailed documentation of each possible resource that can be declared.
A Cloud Formation overlay is YAML that we put into the YAML of a Compose file. The contents of the overlay is fields that will either add to, or modify, the YAML of the Cloud Formation template. In other words, we can use the overlay to either add information to the template, or modify information in the template.
Start with this:
x-aws-cloudformation:
  Resources:
Refer back to the template and you'll see there is a Resources object containing a number of items. What we'll be doing is modifying some of the items, removing one item, and adding two items.
For the first, let's change the port 80 Listener:
x-aws-cloudformation:
  Resources:
    ...
    WhoamiTCP80Listener:
      Properties:
        # Implement the redirect to HTTPS
        # Note that this will eliminate the natural reference to WhoamiTCP80TargetGroup
        DefaultActions:
        - Type: redirect
          RedirectConfig:
            Port: 443
            Protocol: HTTPS
            StatusCode: HTTP_301
    ...
This had forwarded port 80 traffic to the port 80 target group. We instead want port 80 traffic to redirect to port 443 using the HTTPS protocol. That's what this does.
Next let's modify the port 443 listener:
x-aws-cloudformation:
  Resources:
    ...
    WhoamiTCP443Listener:
      Properties:
        # Set protocol and associate with the SSL certificate
        Protocol: "HTTPS"
        Certificates:
          - arn:aws:acm:us-west-2:09E1X6A8MPLE:certificate/27170bee-30c6-4532-992b-c3E3X7AM2PLE
        # Replace reference to WhoamiTCP443TargetGroup with this Fixed Response
        DefaultActions:
          - Type: "fixed-response"
            FixedResponseConfig:
              ContentType: "text/plain"
              MessageBody: "BAD DOMAIN NAME"
              StatusCode: "200"
    ...
This listener implements the HTTPS protocol. We supply the SSL certificate we provisioned earlier in the AWS Certificate Manager. We do this by listing the ARN here.
Under DefaultActions we replace the reference to WhoamiTCP443TargetGroup with this fixed response. Any request to port 443 will, by default, be shown this text BAD DOMAIN NAME.
If this seems strange, hang on a minute so we can add two rules for processing HTTPS requests.
Before we add the rules, we need to delete the port 443 target group:
x-aws-cloudformation:
  Resources:
    ...
    # Delete port 443 target group
    WhoamiTCP443TargetGroup:
    ...
The port 443 target group is no longer needed. That's because the backend service will only listen on port 80 (HTTP) and the backend service does not handle HTTPS traffic at all.
The question is, if we can only add or modify items in the Cloud Formation template, how can we delete an item? Turns out to be simple. We just modify the item to be empty, like here. The ECS Context will then see the empty item, and simply not generate it in the template.
x-aws-cloudformation:
  Resources:
    ...
    # Match www.DOMAIN and redirect to DOMAIN
    WhoamiTCP443WWWRule:
      Type: AWS::ElasticLoadBalancingV2::ListenerRule
      Properties:
        ListenerArn:
          Ref: WhoamiTCP443Listener
        Priority: 50000
        Conditions:
          - Field: host-header
            HostHeaderConfig:
              Values:
                - www.example.xyz
        Actions:
          - Type: redirect
            RedirectConfig:
              Host: example.xyz
              Port: 443
              Protocol: HTTPS
              StatusCode: HTTP_301
    ...
This is our first rule. Because there are no Listener Rule's in the generated template, we are not modifying a rule but instead creating one out of whole cloth. That means we have to carefully read the documentation and ensure we create every required field.
Under ListenerArn notice it references WhoamiTCP443Listener. This is how we attach the rule to the listener, so that the listener knows to apply the rule.
The Priority determines the order of applying rules. This is an integer value from 1 to 50,000, with 50,000 being the highest priority.
The Conditions say to match the Host field against the www-prefix domain name.
The Actions say to cause a redirect to the base domain name.
x-aws-cloudformation:
  Resources:
    ...
    # Match DOMAIN and forward to the port 80 Target Group
    WhoamiTCP443BaseRule:
      Type: AWS::ElasticLoadBalancingV2::ListenerRule
      Properties:
        ListenerArn:
          Ref: WhoamiTCP443Listener
        Priority: 40000
        Conditions:
          - Field: host-header
            HostHeaderConfig:
              Values:
                - example.xyz
        Actions:
          - Type: forward
            ForwardConfig:
              TargetGroups:
                - TargetGroupArn:
                    Ref: WhoamiTCP80TargetGroup
    ...
This is our second rule, and the purpose here is to match the base domain name, sending traffic to the port 80 target group.
It again attaches to the port 443 listener, and the priority of 40,000 means it is checked after the WWW rule. The Conditions means it matches against the base domain name.
Under Actions we have a forward rule, which means to send incoming requests to the port 80 target group.
What does target group mean? A service, like a Docker container, registers itself with the target group in order to receive traffic from the load balancer. In other words, a load balancer target group is a communications channel to the backend services.
The last task is to modify the Service Definition to only refer to the port 80 target group:
x-aws-cloudformation:
  Resources:
    ...
    WhoamiService:
      Properties:
        # Eliminate the reference to whoamiTCP443TargetGroup
        LoadBalancers:
        - ContainerName: whoami
          ContainerPort: 80
          TargetGroupArn:
            Ref: WhoamiTCP80TargetGroup
    ...
Because the port 443 target group no longer exists, we cannot reference it. The LoadBalancers field contained a reference to the port 443 target group. What we've done here is replace the LoadBalancers field with an array that only references the port 80 target group.
That completes the changes required to implement HTTPS. The next step is to deploy the service, and make sure everything works right.
Deploying with HTTPS support
We have reconfigured the WHOAMI service to use HTTPS. The load balancer has been reconfigured, in the previous section, this way.
- Port 80 traffic redirects to port 443
- The default behavior for port 443 is to return BAD DOMAIN NAME
- If traffic on port 443 matches the
www-prefix domain, redirect to the base domain - If traffic on port 443 matches the base domain name, forward the traffic to the container
- In the service definition, only register with the port 80 target group
- Remove the port 443 target group
Run this:
$ docker compose up
containous/whoami resolved to docker.io/containous/whoami:latest@sha256:7d6a3c8f91470a23ef380320609ee6e69ac68d20bc804f3a1c6065fb56cfa34e
[+] Running 17/17
 ⠿ docker-ecs                   CreateComplete    126.0s
 ⠿ LogGroup                     CreateComplete      3.0s
 ⠿ WhoamiTCP80TargetGroup       CreateComplete      1.0s
 ⠿ WhoamiTCP443Listener         CreateComplete      3.0s
 ⠿ DefaultNetwork               CreateComplete      6.0s
 ⠿ WhoamiTaskExecutionRole      CreateComplete     18.0s
 ⠿ CloudMap                     CreateComplete     47.0s
 ⠿ Cluster                      CreateComplete      5.0s
 ⠿ WhoamiTCP80Listener          CreateComplete      2.0s
 ⠿ WhoamiTCP443WWWRule          CreateComplete      3.0s
 ⠿ WhoamiTCP443BaseRule         CreateComplete      2.0s
 ⠿ DefaultNetworkIngress        CreateComplete      1.0s
 ⠿ Default80Ingress             CreateComplete      1.0s
 ⠿ Default443Ingress            CreateComplete      1.0s
 ⠿ WhoamiTaskDefinition         CreateComplete      3.0s
 ⠿ WhoamiServiceDiscoveryEntry  CreateComplete      1.0s
 ⠿ WhoamiService                CreateComplete     69.0s
There's several more services listed here, including the two we created.
Once everything finishes deploying, run docker compose ps to check the status and to ensure the it still shows our load balancer URL.
To test the service visit load balancer URL to ensure we get the expected error message, then visit the http:// URL's to ensure we are redirected to https://, and ensure that visiting the www-prefix URL causes a redirect to the base domain name.
When you're done, run docker compose down.
Discuss an idea of a way to implement this in Compose
Hooray, we have HTTPS support. Should we uncork a bottle of champagne and celebrate and declare victory? Perhaps, but we should also step back a little and ask, is this the best way to implement this result?
Shouldn't we be able to implement some of this in the Compose file without having to dive into Cloud Formation? Speaking for myself, I want to limit my exposure to Cloud Formation, and do as much as possible using the Compose file.
It is excellent, however, that we have this escape hatch into Cloud Formation. That avenue gives us complete freedom to customize the AWS deployment in any desired way. But, why tantalize me with Compose file syntax if I'm forced to implement a standard feature using Cloud Formation?
In other words, there is a competition among possible deployment tools. We could use Cloud Formation, or Terraform, or Compose, to describe the deployment. Since Compose isn't up to the task of describing the HTTPS configuration, we're left coming up with another way to implement this required feature.
So, Docker Team, enticing us to use Compose with ECS means developing a Cloud Formation alternative that is better than Terraform.
Let's ponder how we could possibly implement some of this in the Compose file. The policy the Docker team is following is before extending the official Compose file specification, that we first test the idea using a Cloud Formation overlay, then we develop an x-aws extension.
The first thing we notice is that there are two syntaxes for the ports definition. We used the short form earlier, but there is a long form available. The long form gives us room for more options.
ports:
    - published: 80
      protocol: "http"
      x-aws-alb-default-actions:
        - type: redirect
          host: 'example.xyz'
          port: 443
          protocol: HTTPS
          status-code: HTTP_301
    - published: 443
      protocol: "https"
      x-aws-acm-certificate: ARN-for-SSL-Certificate
      x-aws-alb-default-actions:
        - type: fixed-response
          content-type: "text/plain"
          message-body: "BAD DOMAIN NAME"
          status-code: "200"
      x-aws-alb-rules:
        - conditions:
            - type: 'host-header'
              hosts:
                - 'www.example.xyz'
          actions:
            - type: 'redirect'
              host: 'example.xyz'
              port: 443
              protocol: HTTPS
              status-code: HTTP_301
        - conditions:
            - type: 'host-header'
              hosts:
                - 'example.xyz'
          actions:
            - type: forward
              target: 80
              protocol: 'http'
I'm not beholden to this being the final method, but am instead offering this as an item of discussion. The primary concept is to reinvision how the ports field is interpreted by the ECS Context.
The current ECS Context documentation tells us "Only symmetrical port mapping is supported in ECS." Additionally we're told that "The source and target ports defined in the Compose file MUST be the same."
In other words, it (currently) only supports straight-through connections.
In each ports entry, I'm envisioning using just the published field to declare the publicly exposed port. The target field would not be required, and the protocol field would be used to inform the ECS Context that we're using HTTP or HTTPS. If HTTPS is used, then we'd be required to supply an SSL certificate.
Most of the rest is meant to map fairly directly to ALB constructs. For example the x-aws-alb-default-actions field maps to DefaultActions. Then x-aws-alb-rules is meant to generate ListenerRule items.


