David Herron
Tags: Docker »»»» Docker MAMP »»»»
There are several ways to launch a PHP service, backed by a MySQL database, on Docker. That combination is literally the LAMP Stack (Linux, Apache, MySQL, PHP/Python/etc), and we can use Docker to easily set up this combination on our laptop or deploy it to a production server. Elsewhere we went over setting up MySQL on Docker, so lets now demonstrate the LAMP Stack, on Docker, by deploying PHPMyAdmin and Wordpress on our laptop.
We have learned how to install Docker, and to use Docker to launch a MySQL instance. Our goal is exploring the ability of Docker to implement the LAMP Stack model, and using Docker on our laptop for developing LAMP applications that are then deployed to a production server. Launching MySQL gave us two of the letters of LAMP, namely Linux and MySQL. The other two letters, Apache and PHP, are what we'll discuss in this tutorial.
The LAMP stack is still an extremely important model for developing web applications. A big example is the continued popularity of Wordpress, a blogging platform implemented in PHP. But the traditional way to host PHP websites is with a full server running Linux, with an Apache instance, and installing PHP either using CGI or FastCGI. Apache can be configured to support multiple hosts, and for example low end shared web hosting uses exactly that model. But how do we instead use Docker to host a LAMP application like Wordpress?
With Docker we can easily bring up a MySQL instance in one container, and host Apache/PHP in one or more other containers. On Docker Hub there is a container for Apache, another for NGINX, another for PHP, and another for Wordpress. There are several paths to follow using one or more of those containers.
To learn about implementing LAMP applications on Docker, let's set up both Wordpress and PHPMyAdmin building on the MySQL setup we just created. We'll use docker run to launch a new MySQL instance tailored for Wordpress. We'll then use docker run again to launch both PHPMyAdmin and Wordpress instances that use that MySQL database.
It's possible to configure Apache-or-NGINX coupled with PHP/FastCGI in Docker by launching two containers. One contains either Apache or NGINX configured to connect to a FastCGI backend. The other runs PHP-FPM (FastCGI for PHP) to serve the PHP application. But that configuration edges towards being complex, so in this tutorial we'll use containers with prebaked support for PHPMyAdmin or Wordpress.
But lets first discuss the general concept of deploying applications on Docker.
With Docker we deploy Containerized applications onto virtualized Linux systems. Often we combine multiple containers to deliver a full service. For example we might use a reverse proxy (Nginx) to implement HTTPS, in front of a service, that uses a database, and even a key-value store (like REDIS).
That's several application containers but are all of them exposed to the public Internet? A security best practice is minimizing the attack surface where miscreants might find holes through which to intrude into your system. A key way to limit the attack surface is to expose only selected ports to the world, and keep everything else closed off.

That picture roughly shows the model. The outer cloud is the Docker host system, inside which are several containers. Each container provides a portion of the service we wish to offer. One might be a database, another the Apache/PHP runtime required to run Wordpress, and another a REDIS instance used to cache Wordpress data. These services can communicate with each other using an internal bridge network. The Wordpress container must publish itself on TCP port 80 (HTTP) and perhaps port 443 (HTTPS), as does the PHPMyAdmin service. All other services must not expose a published port.
Launching a MySQL instance for Wordpress
To start, let's create a directory to hold the project:
$ mkdir lamp-wp
$ cd lamp-wp
We discussed elsewhere launching a MySQL instance. So, let's just launch the database:
$ docker network create --driver bridge wpnet
6bebfa7c69e935f6502fc7aa3dfa98ff7d1d5dc6e4e12d5da5c06ea319b18eef
$ docker run --name mysql \
    --env MYSQL_RANDOM_ROOT_PASSWORD=true \
    --env MYSQL_USER=wpuser \
    --env MYSQL_PASSWORD=w0rdw0rd \
    --env MYSQL_DATABASE=wpdb \
    --volume `pwd`/mysql-data:/var/lib/mysql \
    --network wpnet \
    mysql/mysql-server:5.7
...
[Entrypoint] GENERATED ROOT PASSWORD: VOk8UqSYgEjEMloR4L4MM@pYkIM
...
This creates a database, wpdb, for the use of Wordpress. A network, wpnet, will be the private communications channel between the services. There is a user, wpuser, that we must tell Wordpress to use. The root user is, by default, limited to be used from inside the container itself, and it is a best practice to instead configure a user this way. This user has limited access to the database server, which will help with security.
To test access run this:
$ docker exec -it mysql mysql -u wpuser -p
...

mysql> show databases;
+--------------------+
| Database           |
+--------------------+
| information_schema |
| wpdb               |
+--------------------+
2 rows in set (0.04 sec)

mysql>
$ docker exec -it mysql mysql -u root -p
...

mysql> show databases;
+--------------------+
| Database           |
+--------------------+
| information_schema |
| mysql              |
| performance_schema |
| sys                |
| wpdb               |
+--------------------+
5 rows in set (0.02 sec)

mysql>
As is expected, the wpuser has access to fewer databases than does the root user.
Now that we have that out of the way, let's proceed to the real purpose of this tutorial.
Launching PHPMyAdmin to administer a Wordpress database
It is an excellent idea to install a database administration tool alongside a database server. For MySQL the most popular such tool is PHPMyAdmin. It is implemented using PHP, and it has a long history.
We'll use the
official PHPMyAdmin Docker Image, and attach it to
dbnet. There are several modes we can use based on environment variables, or a configuration file, we use when launching the PHPMyAdmin container.
A few are these:
PMA_HOSTtells it to only support connecting to a specific MySQL host. You can also use this withPMA_PORTin case the MySQL server is on a non-standard port.PMA_USERandPMA_PASSWORDsupply user name and password to use when connecting to the databasePMA_ARBITRARYinstead says we can use PHPMyAdmin to connect to any MySQL server anywhere
It seems like the security best practice is the last choice to give as little help as possible to any miscreants that access our PHPMyAdmin service.
$ docker run --network wpnet --env PMA_ARBITRARY=1 \
            -p 9080:80 --name phpmyadmin \
            phpmyadmin/phpmyadmin
This runs the phpmyadmin/phpmyadmin container image, giving it the name phpmyadmin, and attaching it to wpnet. We've specified PMA_ARBITRARY=1 to, as we just reasoned, give any wandering miscreants as little help as possible.
This is our first time publishing a port from a Docker container. The -p option is short for --publish and is how we make a port inside the container available to the public. In this case the PHPMyAdmin container operates on port 80, but we want to leave that open for the Wordpress container. The specifier 9080:80 says to remap container port 80 so the public accesses port 9080. The container still see's traffic arriving on port 80, and the mapping is handled by Docker's internal magic.
We turn our browser to http://localhost:9080 and log in with the user credentials for this server.

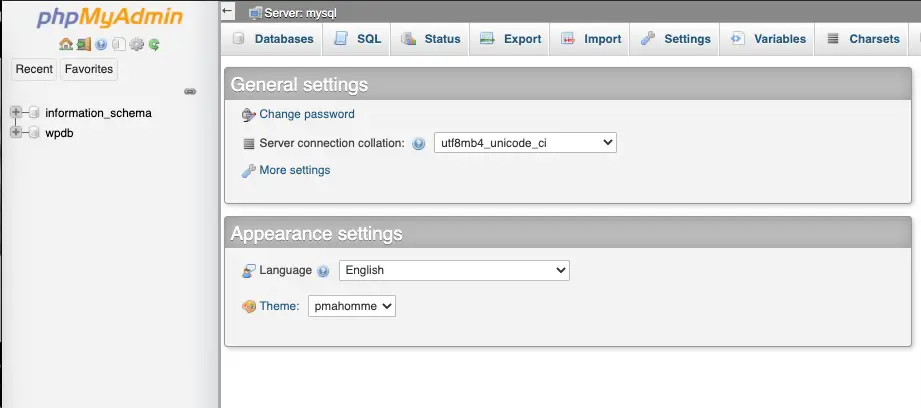
Notice that we're logging in using wpuser. This user ID is limited to accessing the wpdb database, as is correct for the user ID that is to be used by the Wordpress instance. This means we cannot perform full database administration with this user ID.
We did not configure the root user ID for access from outside of the container. Therefore we cannot use PHPMyAdmin to login as root for full control over the server. If you desire to do so, it's not difficult to configure another user ID that can be accessed from outside the database container, and has more control over the server. But for our purpose this is sufficient. With this access we can view and manipulate any Wordpress table, and perform backups.
Installing Wordpress in Docker
While there are a several ways to run a PHP-based service on Docker, lets do the simple thing for right now. There is a Wordpress container that is preconfigured to deploy Wordpress. It is easy to set up and get going, while giving us plenty of flexibility to customize the Wordpress installation anyway we want.
With the MySQL server setup as discussed earlier, run this:
$ docker run --name wordpress \
        --env WORDPRESS_DB_HOST=mysql \
        --env WORDPRESS_DB_NAME=wpdb \
        --env WORDPRESS_DB_USER=wpuser \
        --env WORDPRESS_DB_PASSWORD=w0rdw0rd \
        -p 80:80 \
        --volume `pwd`/wwwroot:/var/www/html \
        --network wpnet \
        wordpress:latest
...
Unable to find image 'wordpress:latest' locally
latest: Pulling from library/wordpress
45b42c59be33: Pull complete
366d949cba16: Pull complete
4c65628244f3: Pull complete
79a8e4ec25c6: Pull complete
3512b0c25baf: Pull complete
a983b5b9a384: Pull complete
0def93a72fb4: Pull complete
b463e75d679a: Pull complete
86780b697834: Pull complete
7df64f4812c2: Pull complete
59f175c32a30: Pull complete
5363b603851d: Pull complete
93fcdb189245: Pull complete
c0025acb1755: Pull complete
bcdfe24e9c2c: Pull complete
ee894f64a1fa: Pull complete
47ebdf2b72a5: Pull complete
53fab7d97aa4: Pull complete
90b3aed105ef: Pull complete
d39e54d371f3: Pull complete
Digest: sha256:73cfcbf1e511d760d9fc6c4864aeba1f8c856ba2be333a7d342fd76935055e9d
Status: Downloaded newer image for wordpress:latest
WordPress not found in /var/www/html - copying now...
Complete! WordPress has been successfully copied to /var/www/html
This uses the latest release of the official Wordpress container. As of this writing that means Wordpress 5.6.2 is the starting point for any newly launched container, which is exactly the release available at Wordpress.org. Several environment variables are used to set up database access particulars. The container exposes port 80, to give us access to the website, and it is connected to wpnet, so the Wordpress container can access the MySQL database.
The --volume flag ensures that the Wordpress files are persisted outside the container.
When the Wordpress container starts it checks the /var/www/html directory, and if no Wordpress files are found it downloads a default Wordpress release and then performs initial configuration. You see this in the output where it says Wordpress not found and later Wordpress has been successfully copied. The initial configuration includes a wp-config.php and anything else required to get Wordpress running.
Because we mount a host directory onto /var/www/html container directory, we can kill the container, delete it, create a new one, and the files will all still be there. It means we can install any file into that directory, such as a theme or plugin, and those files will be persisted outside the container. The same is true for any uploaded files, such as images we use in blog posts, because the wp-content/uploads directory is persisted along with all the other files.
We can use other tag names besides latest to select a specific PHP version, or whether to use Apache or FastCGI. For example wordpress:php7.2-apache says to use the Apache web server, along with PHP version 7.2. Or, wordpress:php8.0-fpm says to use PHP version 8.0 under PHP-FPM, which is a FastCGI implementation for PHP. To use the later requires separately configuring NGINX or Apache with FastCGI support.
After running the above docker run command, we can visit localhost in our web browser. There we will be greeted by the following:
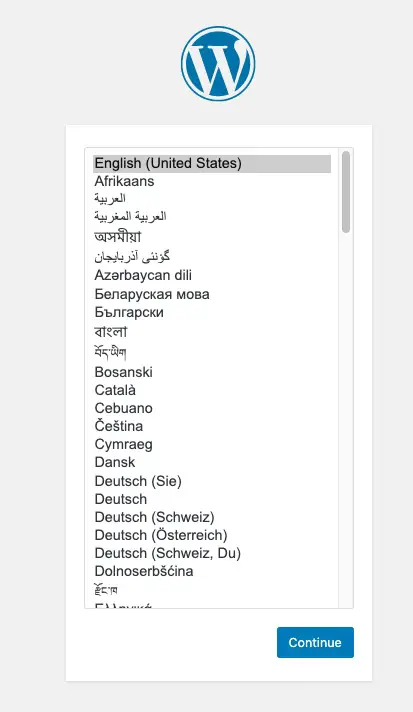
This is the first screen of the Wordpress installer. After selecting the language, you'll go through one or more other setup screens. The Wordpress team has famously made the setup extremely simple, and you'll quickly be in the Wordpress administrative dashboard.
Feel free to install any plugin you like, or make any customization. If you browse the wwwroot directory while doing so, you'll see that files are updated in that directory as expected. Again, what the Wordpress container sees as /var/www/html is actually stored in the host file system as the wwwroot directory. Files you change or upload are stored there.
To test this, run the following:
^C[Sun Mar 07 01:39:45.114693 2021] [mpm_prefork:notice] [pid 1] AH00169: caught SIGTERM, shutting down
$
$ docker rm wordpress
wordpress
$ docker run --name wordpress ...
That is, type CONTROL-C on the terminal where Docker is running the container, to kill the container. Then use docker rm to remove the container. Then rerun the docker run command to recreate and launch the container. You'll be able to start right where you left off, and you won't even have to log in again.
Summary
In this tutorial we've demonstrated we can easily launch PHP-based services in Docker, that store data in a MySQL database. In other words, this demonstrates the ease of setting up a LAMP-stack application using Docker. This demonstration happened on our laptop, and the result can be fairly easily transferred to a production server.
Links
MySQL containers:
-
https://hub.docker.com/u/mysql/
-
-
-


