David Herron
Tags: Node.JS »»»» Docker »»»»
Getting HTTPS support in all websites is extremely important for a variety of security purposes. HTTPS both encrypts the traffic as it goes over the Internet, and it validates the website is correctly owned. Let's Encrypt is a fabulous service providing free SSL certificates, which are required to implement HTTPS. For this posting we'll be implementing a simple Express app, deploying it using Docker and Docker Compose, using Let's Encrypt to acquire the SSL certificates, and hosting the app on a cloud hosting service.
As a pre-requisite you must have Docker installed on your laptop. For instructions see:
-
https://docs.docker.com/docker-for-mac/install/
-
-
-
-
-
I'm doing this on an Ubuntu desktop computer. The examples should run as-is on a Mac OS X computer. On Windows, you will have to interpolate the commands for PowerShell, or else install Docker on the Windows Subsystem for Linux. That requires having an up-to-date Windows 10.
Generating a simple Express application
For this demo we don't need anything special in the way of an application. Let's just use the Express Generator to set up a simple app.
$ mkdir https-demo
$ cd https-demo
$ mkdir app
$ cd app
$ npm install express-generator
$ ./node_modules/.bin/express --hbs .

  warning: option `--hbs' has been renamed to `--view=hbs'

destination is not empty, continue? [y/N] y

   create : .
   create : ./package.json
   create : ./app.js
   create : ./public
   create : ./routes
   create : ./routes/index.js
   create : ./routes/users.js
   create : ./views
   create : ./views/index.hbs
   create : ./views/layout.hbs
   create : ./views/error.hbs
   create : ./bin
   create : ./bin/www
   create : ./public/javascripts
   create : ./public/images
   create : ./public/stylesheets
   create : ./public/stylesheets/style.css

   install dependencies:
     $ cd . && npm install

   run the app:
     $ DEBUG=app:* npm start
$ nvm use 9
Now using node v9.5.0 (npm v5.6.0)
$ npm install
added 83 packages and removed 5 packages in 10.054s
$ npm remove express-generator
up to date in 0.393s
We set up this app to use Handlebars templates and otherwise it's just a dead-simple blah application.
I am running this experiment on an Ubuntu desktop and will be deploying to a Docker-Machine instance on a Digital Ocean droplet.
You'll notice I'm using nvm (
https://github.com/creationix/nvm) to manage Node.js versions. This is an excellent tool making it extremely easy to stay up-to-date with the latest Node.js releases. I'm using Node.js 9.x because we might want to use ES6 modules and otherwise it's got the most features.
Dockerizing the Simple Express app with Docker Compose
If you follow the commands above the app is in a directory: https-demo/app
In https-demo let's make a file named docker-compose.yml in which we'll implement the Docker deployment. Docker Compose (
https://docs.docker.com/compose/overview/) lets you describe a group of Docker containers in a high-level fashion. The containers can be brought up and down together, and it's very convenient.
version: '3'
services:

  app:
    build: ./app
    container_name: app
    ports:
      - "3000:3000"
      # - "443:443"
    restart: always
This is just the starting point - we'll be adding to this bit-by-bit as we go.
This does a Docker build in the app directory, and therefore we must create a Dockerfile in that directory containing:
FROM node:9.5-slim

ENV PORT="3000"
ENV DEBUG="app:*"

RUN apt-get update -y \
    && apt-get -y install curl python build-essential git ca-certificates

RUN mkdir -p /app /app/bin /app/routes /app/views /app/public

COPY bin/ /app/bin/
COPY public/ /app/public/
COPY routes/ /app/routes/
COPY views/ /app/views/
COPY app.js package.json /app/

WORKDIR /app
RUN npm install --unsafe-perm

EXPOSE 3000
CMD /app/bin/www
The file /app/bin/www is generated by the Express Generator. It is a Node.js script set up to execute as a regular command. The www script takes care of putting together the HTTP Server object and the Express application object.
app    | Error [ERR_UNKNOWN_FILE_EXTENSION]: Unknown file extension: /app/bin/www
app    |     at Loader.exports.resolve [as resolver] (internal/loader/ModuleRequest.js:135:13)
app    |     at Loader.resolve (internal/loader/Loader.js:71:40)
app    |     at Loader.getModuleJob (internal/loader/Loader.js:101:40)
app    |     at Loader.import (internal/loader/Loader.js:128:28)
app    |     at module.js:472:29
app    |     at Function.Module._load (module.js:473:7)
app    |     at Function.Module.runMain (module.js:701:10)
app    |     at startup (bootstrap_node.js:190:16)
app    |     at bootstrap_node.js:662:3
The apt-get commands are what's required to support installing Node.js modules. That is, installing a native-code module requires the build-essential package that pulls in all the compilers and stuff, plus Python since the Node.js build tools are written in Python. Then we simply copy the application source code into the container, and finally run an npm install. The last step is to expose port 3000, and in the Docker Compose file that port is exposed to the world, followed by starting the Node.js server process.
The Docker Compose file is built as so:
$ docker-compose build
Then launched as so:
$ docker-compose up
Creating network "https_default" with the default driver
Creating app ... done
Attaching to app
app    | (node:6) ExperimentalWarning: The ESM module loader is experimental.
And then you visit the app at http://localhost:3000
What we have so far is a simple Docker Compose setup to launch a simple Express application. Next step is to create a Container to manage SSL certificates generated by Let's Encrypt, then later to use those certificates to setup HTTPS support.
Simple container to manage Let's Encrypt transactions
Traditionally getting an HTTPS certificate was a manual process - you go to a service provider website, order a certificate through an online store, download the certificate, and then integrate the certificate with your application. Every step is manual, and it easily costs $100 or more for the certificate. If the Internet was to ever switch to HTTPS in a big way, getting SSL certificates would have to become trivially easy and incredibly cheap.
That's the combination offered by the Let's Encrypt project. This is a non-profit organization offering free SSL certificates and a very simple highly automated system for generating and renewing SSL certificates. See:
https://letsencrypt.org/
Instead of going to a website and ordering certificates through an online store, you run a command-line program. It automatically registers you with the Let's Encrypt service, and downloads the certificate. It's up to you to integrate the certificate with your application. Another command-line tool handles certificate renewal in a way that's completely automated.
What we'll do in this section is create a simple container containing the certbot tool, and set up a cron job in that container to handle renewals. The directories containing certificate files and the .well-known directory for the webroot challenge will be cross-mounted into the app container.
The certbot tool is the most popular client to the Let's Encrypt service. For documentation:
https://certbot.eff.org/
Start by creating a directory named https-demo/certbot.
Then create a Dockerfile containing:
FROM debian:jessie

# Inspiration:
# https://hub.docker.com/r/gaafar/cron/

# Install cron, certbot, bash, plus any other dependencies
RUN apt-get update \
   && apt-get install -y cron bash wget
RUN mkdir -p /webroots/evsoul.com/.well-known /scripts

WORKDIR /scripts
RUN wget https://dl.eff.org/certbot-auto
RUN chmod a+x ./certbot-auto
# Run certbot-auto so that it installs itself
RUN /scripts/certbot-auto -n certificates

# /webroots/DOMAIN.TLD/.well-known/... files go here
VOLUME /webroots
VOLUME /etc/letsencrypt

# This installs a Crontab entry which
# runs "certbot renew" on several days of each week at 03:22 AM
#
# RUN echo "22 03 * * 2,4,6,7 root /scripts/certbot-auto renew" >/etc/cron.d/certbot

CMD [ "cron", "-f" ]
What we've done is install certbot in the container by using the certbot-auto script. Running the certificates command is done solely for the side effect of installing all the dependencies into the container.
There are two directories of importance:
/etc/letsencryptis where the certificates and other administrative files are stored. This directory is exported as a VOLUME so it's available outside the container, and so the data persists when the container is recreated./webroots/is where we keep the.well-knowndirectories for each domain under management.
The primary purpose of this container is to house a cron service, that's configured to run a cron job every couple days. The cron job will check for domains whose certificates are to be renewed, and handle the renewal process automatically. There is also some configuration required (below) to make the SSL certificates available to the app container.
To register a domain with Let's Encrypt we can use this shell script - create a file named https-demo/certbot/register containing:
#!/bin/sh
/scripts/certbot-auto certonly --webroot -w /webroots/$1 -d $1
The certonly command generates the SSL certificate. The webroot authentication algorithm is used.
A key part of Let's Encrypt is the algorithms used to verify that you own the domain for which you're generating an SSL certificate. For example one can add a DNS record to the DNS configuration for the domain, and then Let's Encrypt knows you own the domain. But that requires a DNS provider who supports an API known to the certbot command.
The webroot authentication algorithm instead works by installing a well-known file in the website, so that Let's Encrypt can retrieve that well-known file. That is - if Let's Encrypt can retrieve something like http://example.com/.well-known/acme-challenge/HGr8U1IeTW4kY_Z6UIyaakzOkyQgPr_7ArlLgtZE8SX (using a code string defined by Let's Encrypt) it is pretty darned confident you own the domain in question.
Running certbot-auto certonly with the above options will use /webroots/DOMAIN/.well-known as the root directory for such a challenge. What's necessary is to get that directory served by the Express application such that Let's Encrypt can retrieve the file.
Edit the https-demo/docker-compose.yml file so it reads:
version: '3'
services:

  app:
    build: ./app
    container_name: app
    ports:
      - "3000:3000"
      # - "443:443"
    restart: always
    volumes:
      - certbot-webroot-evsoul:/app/public/.well-known
      - certbot-letsencrypt:/etc/letsencrypt

  certbot:
    build: ./certbot
    container_name: certbot
    restart: always
    volumes:
      - certbot-webroot-evsoul:/webroots/evsoul.com/.well-known
      - certbot-letsencrypt:/etc/letsencrypt

volumes:
  certbot-webroot-evsoul:
  certbot-letsencrypt:
BY THE WAY: In this example I'm using a spare-unused domain named evsoul.com. I happen to own a Kia Soul EV, and in a burst of enthusiasm noticed that evsoul.com was available and registered it. Then I realized I didn't have an idea what to do with the domain - so it's sitting there unused. Everywhere you see evsoul.com in these instructions, substitute your preferred domain.
What we've done here is set up two volumes that are mounted in both the app and certbot containers.
The certbot container is the Dockerfile we just went over.
The certificates are stored inside /etc/letsencrypt and therefore we'll have to integrate those certificates into the Express app in the app container. We'll do that later.
The .well-known directory is where the webroot authentication algorithm is performed.
For both those directories we've defined a Docker volume. Then, each volume is mounted into each container in the appropriate location.
To verify this let's bring up the containers, then start a command shell inside each container and write files in each directory to see that the files are visible in the other container.
$ docker-compose build
$ docker-compose up
Creating volume "https_certbot-letsencrypt" with default driver
Creating volume "https_certbot-webroot-evsoul" with default driver
Creating certbot ... done
Recreating app ... done
Attaching to certbot, app
app        | (node:10) ExperimentalWarning: The ESM module loader is experimental.
app        | Launching app server
app        | Wed, 21 Feb 2018 07:26:04 GMT app:server Listening on port 3000
Then in another terminal window:
$ docker exec -it certbot bash
root@eebdb0ec4812:/scripts#
root@eebdb0ec4812:/scripts#
root@eebdb0ec4812:/scripts# ls /webroots/evsoul.com/.well-known/
root@eebdb0ec4812:/scripts# touch /webroots/evsoul.com/.well-known/aaa
root@eebdb0ec4812:/scripts#
root@eebdb0ec4812:/scripts# ls /etc/letsencrypt/
renewal-hooks
root@eebdb0ec4812:/scripts# touch /etc/letsencrypt/bbb
root@eebdb0ec4812:/scripts# ls /etc/letsencrypt/
bbb  renewal-hooks
root@eebdb0ec4812:/scripts#
And in yet another terminal window
$ docker exec -it app bash
root@ff965d8f49df:/app# ls public/.well-known/
aaa
root@ff965d8f49df:/app# ls /etc/letsencrypt/
bbb  renewal-hooks
That proves the directories in question are shared between the two containers.
The next thing is inspecting the actual location of these directories. When Docker creates a volume it sets aside a directory in the host file-system, mounting that directory inside the container. You can determine the file-system location two ways.
$ docker inspect app
$ docker inspect certbot
This inspects all the data about the containers we've created. The important item of interest is in the Mounts object since that lists the file-system location of the directories.
$ docker volume ls
DRIVER              VOLUME NAME
...
local               https_certbot-letsencrypt
local               https_certbot-webroot-evsoul
...
This lists the Volumes currently known to Docker. These are the generated volume names for the Docker Compose file shown above. It's easy to inspect both to learn about their details:
$ docker inspect https_certbot-letsencrypt
[
    {
        "CreatedAt": "2018-02-20T23:54:31-08:00",
        "Driver": "local",
        "Labels": {
            "com.docker.compose.project": "https-demo",
            "com.docker.compose.volume": "certbot-letsencrypt"
        },
        "Mountpoint": "/var/lib/docker/volumes/https_certbot-letsencrypt/_data",
        "Name": "https_certbot-letsencrypt",
        "Options": {},
        "Scope": "local"
    }
]
$ docker inspect https_certbot-webroot-evsoul
[
    {
        "CreatedAt": "2018-02-20T23:26:41-08:00",
        "Driver": "local",
        "Labels": {
            "com.docker.compose.project": "https-demo",
            "com.docker.compose.volume": "certbot-webroot-evsoul"
        },
        "Mountpoint": "/var/lib/docker/volumes/https_certbot-webroot-evsoul/_data",
        "Name": "https_certbot-webroot-evsoul",
        "Options": {},
        "Scope": "local"
    }
]
Deploying everything to a cloud hosting service
All we've done so far is to lay the ground-work. We have a pair of Docker containers, one containing a web service, the other containing the Certbot tool with which we intend to get SSL certificates from Let's Encrypt. To to that the web service must be hosted where we can assign a real domain name. The easiest way to do this is by uploading the Docker containers to a virtual server on a cloud service.
What we'll do is use Digital Ocean, because they make this so simple. We'll use Docker Machine to set up a so-called Droplet on Digital Ocean, one that's pre-configured to host Docker containers. We'll be able to sit on our laptop, running the same docker-compose commands we used earlier, but the target will be the Docker Machine Droplet on Digital Ocean.
Docker Machine is a tool for provisioning Docker hosting instances on a cloud service system. From your laptop you run the docker-machine command, set a few environment variables, and voila docker and docker-compose commands start operating on the remote server. See
https://docs.docker.com/machine/overview/
Digital Ocean offers virtual servers and a very easy-to-use control panel. By following this link you'll get a $10 credit with which you try out the procedures I'm writing about here.
First step is to log-in to your Digital Ocean account. The instructions will work with several other cloud hosting providers if you prefer. In the Digital Ocean account you'll see a navigation link for API. Click on that, and make sure you're on the Tokens/Keys tab. Click on Generate New Token, and then carefully record the code string you'll be given. Digital Ocean won't show this string to you again.
Type this command:
$ docker-machine create --driver digitalocean \
    --digitalocean-size 2gb \
    --digitalocean-access-token TOKEN \
    https-demo
After a couple minutes it will automatically set up the Docker instance. The voluminoous output ends with this message:
Docker is up and running!
To see how to connect your Docker Client to the Docker Engine running on this virtual machine, run: docker-machine env https-demo
Running that command gives you this output:
$ docker-machine env https-demo
export DOCKER_TLS_VERIFY="1"
export DOCKER_HOST="tcp://159.65.179.28:2376"
export DOCKER_CERT_PATH="/home/david/.docker/machine/machines/https-demo"
export DOCKER_MACHINE_NAME="https-demo"
# Run this command to configure your shell:
# eval $(docker-machine env https-demo)
This shows you the environment variables to be set to access your Docker Machine instance. Looking in your Digital Ocean dashboard you'll also see that a Droplet has been created, and that it has the same IP address.
Run that command
$ eval $(docker-machine env https-demo)
No output is printed, but the environment variables will be set as shown. From that point on, Docker commands will act on that remote host.
$ docker-machine ls
NAME          ACTIVE   DRIVER         STATE     URL                        SWARM   DOCKER        ERRORS
https-demo    *        digitalocean   Running   tcp://159.65.179.28:2376           v18.02.0-ce
This shows characteristics of the Docker Machine. Another thing to try is to run a Docker container, like $ docker run hello-world, then run docker ps -a to inspect the available containers. Run that command in this window, that has these environment variables, and in another window that does not, and see that the hello-world container does not show up locally.
Deploying the test application and certbot to cloud service
Now you can type:
$ docker-compose build
$ docker-compose up
This time the build will occur on the server rather than your laptop. One side effect is that the code in your source tree is uploaded to the server before the containers are built on the server. For the small amount of code we have here, that's not a problem, but for a large project the time to upload code prior to building containers on the server can be significant.
Visit the Express application using IP address for server
$ docker-machine ip https-demo
159.65.179.28
Since the Docker Compose file still reads port 3000, use http://IP-ADDRESS:3000 in your browser.
To change to port 80, change the docker-compose.yml file as so:
app:
  build: ./app
  container_name: app
  ports:
    - "80:3000"
    # - "443:443"
Then run these commands:
$ docker-compose stop
$ docker-compose build
$ docker-compose up
To stop, rebuild and restart the service. After doing that the service can be viewed at http://IP-ADDRESS without using a port number.
Associating a domain name with the server
The next stage of this is to associate a real domain name with the server. That way you can visit the Express service using http://DOMAIN-NAME instead of the IP address. More importantly, Let's Encrypt must be able to do the same, access a special file using that same URL, and therefore a real domain name is required.
So... register a domain somewhere. I have a personally owned spare domain - evsoul.com - that I'm using for this tutorial. I bought it because of a brain fart 3 years ago, and instead of using the domain for something productive it's only used for experiments like this.
In any case - in your domain registrar account, you must change the domain configuration to "point to" the server. In the case of Digital Ocean, you assign the NS records to Digital Ocean so that the Digital Ocean dashboard can take over control of the domain.
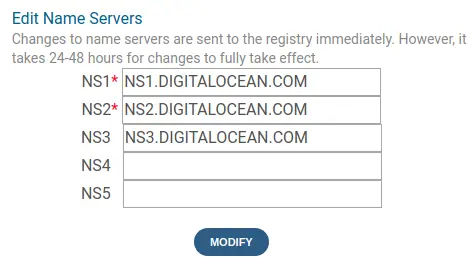
Other hosting providers may have a different mechanism.
Once Digital Ocean knows about the domain, you then associate the domain with your server as so:
The specifics of what you do will of course depend on your domain registrar, and the cloud hosting provider.
The end result must be, at the minimum, an A record in the domain listing the IP address of the server. Once accomplished you can visit the Express service as http://DOMAIN-NAME
The domain configuration would be something like so:
$ dig -t any evsoul.com

; <<>> DiG 9.10.3-P4-Ubuntu <<>> -t any evsoul.com
;; global options: +cmd
;; Got answer:
;; ->>HEADER<<- opcode: QUERY, status: NOERROR, id: 40621
;; flags: qr rd ra; QUERY: 1, ANSWER: 5, AUTHORITY: 0, ADDITIONAL: 1

;; OPT PSEUDOSECTION:
; EDNS: version: 0, flags:; udp: 65494
;; QUESTION SECTION:
;evsoul.com.                    IN      ANY

;; ANSWER SECTION:
evsoul.com.             1800    IN      SOA     ns1.digitalocean.com. hostmaster.evsoul.com. 1519092120 10800 3600 604800 1800
evsoul.com.             3502    IN      A       159.65.179.28
evsoul.com.             1800    IN      NS      ns1.digitalocean.com.
evsoul.com.             1800    IN      NS      ns2.digitalocean.com.
evsoul.com.             1800    IN      NS      ns3.digitalocean.com.

;; Query time: 335 msec
;; SERVER: 127.0.0.53#53(127.0.0.53)
;; WHEN: Wed Feb 21 13:28:09 PST 2018
;; MSG SIZE  rcvd: 169
Implementing HTTPS in the Express application
Getting to this point required several steps. But what we have is an Express app, with source on our laptop, that we can easily run on our laptop or deploy to a cloud server. The app is associated with a real domain name. The next step is registering the domain with Let's Encrypt to get an SSL certificate.
For that purpose we set up the certbot container. It has a pre-installed copy of the certbot-auto script. What we'll use is the webroot method, see:
https://certbot.eff.org/docs/using.html#webroot
The method used to install certbot left a script, certbot-auto, in the /scripts directory. According to the documentation certbot and certbot-auto are interchangeable names for the same application, the difference being the installation method.
What Let's Encrypt needs is to see that you validly own the domain for which you're requesting an SSL certificate. It supports several authentication algorithms. With the webroot algorithm, the certbot tool writes a special file using a special file-name into a given location within the webroot of the application. The application is then supposed to make that file available.
A typical URL that Let's Encrypt tries to retrieve is: http://example.com/.well-known/acme-challenge/HGr8U1IeTW4kY_Z6UIyaakzOkyQgPr_7ArlLgtZE8SX
In a typical Express application there is a configuration setting:
app.use(express.static(path.join(__dirname, 'public')));
What this says is that any file in the public directory is served at the root of the URL structure. For example Express Generator gave us a file, public/stylesheets/style.css where we can control the look of the application. That file is available as http://example.com/stylesheets/style.css.
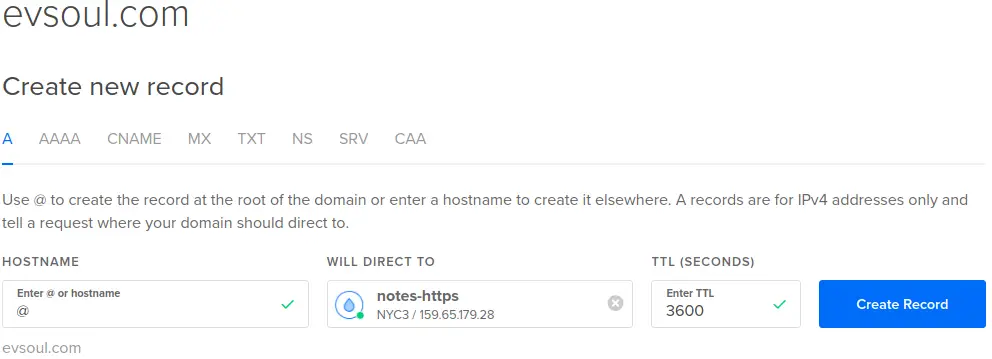
For the Let's Encrypt authentication file shown above - if the certbot container can write files into the public directory, then it can add the authentication file which Let's Encrypt will use to authenticate our ownership of the domain.
In docker-compose.yml we implement this connection with the volume mounts.
In certbot:
volumes:
  - certbot-webroot-evsoul:/webroots/evsoul.com/.well-known
  - certbot-letsencrypt:/etc/letsencrypt
And in app:
volumes:
  - certbot-webroot-evsoul:/app/public/.well-known
  - certbot-letsencrypt:/etc/letsencrypt
Both are using to the same Docker volume. The webroot volume is mounted in two different locations, but as we saw earlier writing a file in the directory in one container has that same file show up in the other container.
$ docker exec -it certbot bash
root@05b095690414:/scripts# /scripts/certbot-auto certonly --webroot -w /webroots/evsoul.com -d evsoul.com
Saving debug log to /var/log/letsencrypt/letsencrypt.log
Plugins selected: Authenticator webroot, Installer None
Enter email address (used for urgent renewal and security notices) (Enter 'c' to
cancel): david@davidherron.com

-------------------------------------------------------------------------------
Please read the Terms of Service at
https://letsencrypt.org/documents/LE-SA-v1.2-November-15-2017.pdf. You must
agree in order to register with the ACME server at
https://acme-v01.api.letsencrypt.org/directory
-------------------------------------------------------------------------------
(A)gree/(C)ancel: a

-------------------------------------------------------------------------------
Would you be willing to share your email address with the Electronic Frontier
Foundation, a founding partner of the Let's Encrypt project and the non-profit
organization that develops Certbot? We'd like to send you email about EFF and
our work to encrypt the web, protect its users and defend digital rights.
-------------------------------------------------------------------------------
(Y)es/(N)o: n
Obtaining a new certificate
Performing the following challenges:
http-01 challenge for evsoul.com
Using the webroot path /webroots/evsoul.com for all unmatched domains.
Waiting for verification...
Cleaning up challenges

IMPORTANT NOTES:
 - Congratulations! Your certificate and chain have been saved at:
   /etc/letsencrypt/live/evsoul.com/fullchain.pem
   Your key file has been saved at:
   /etc/letsencrypt/live/evsoul.com/privkey.pem
   Your cert will expire on 2018-05-22. To obtain a new or tweaked
   version of this certificate in the future, simply run certbot-auto
   again. To non-interactively renew *all* of your certificates, run
   "certbot-auto renew"
 - Your account credentials have been saved in your Certbot
   configuration directory at /etc/letsencrypt. You should make a
   secure backup of this folder now. This configuration directory will
   also contain certificates and private keys obtained by Certbot so
   making regular backups of this folder is ideal.
 - If you like Certbot, please consider supporting our work by:

   Donating to ISRG / Let's Encrypt:   https://letsencrypt.org/donate
   Donating to EFF:                    https://eff.org/donate-le

root@05b095690414:/scripts#
This is what it looks like to register a domain with Let's Encrypt. Read this carefully and you'll see it tried the http-01 challenge, it wrote the challenge file into /webroots/evsoul.com. As we determined earlier, the /webroots/evsoul.com/.well-known directory shows up in the app container as /app/public/.well-known, and therefore the Express application will serve that file on the correct URL.
The key is this:
root@05b095690414:/scripts# ls /etc/letsencrypt/live/evsoul.com/
README  cert.pem  chain.pem  fullchain.pem  privkey.pem
root@05b095690414:/scripts# exit
david@nuc2:~/nodewebdev/https$ docker exec -it app bash
root@5838a96091ae:/app# ls /etc/letsencrypt/live/evsoul.com/
README  cert.pem  chain.pem  fullchain.pem  privkey.pem
This demonstrates that the certificates are available in BOTH the certbot and app containers.
Another important piece to the puzzle is this line in certbot/Dockerfile:
# RUN echo "22 03 * * 2,7 root /scripts/certbot-auto renew" >/etc/cron.d/certbot
This line is currently commented out. If this line runs while the certbot container is built, it generates a cron job that will run at 03:22 AM on the 2nd and 7th days of the week, which runs the certbot-auto renew command. This command automatically reaches out to the Let's Encrypt server to renew the certificates.
In other words, we now have SSL certificates that are trivially easy to procure, and trivially easy to renew.
Enabling HTTPS in the Express application
We have SSL certificates that will be automatically renewed. That's a huge step forward for the Internet, because it removes the obstacles to adopting HTTPS everywhere.
Our next step is to implement HTTPS in the Express application. This is done in the Express start-up process, to set up an HTTPS Server object next to the existing HTTP Server object.
In bin/www make these changes:
const app = require('../app');
const debug = require('debug')('app:server');
const http = require('http');
const https = require('https');
const fs    = require('fs');
...

/**
 * Create HTTP server.
 */

const options = {
  key: fs.readFileSync("/etc/letsencrypt/archive/evsoul.com/privkey1.pem"),
  cert: fs.readFileSync("/etc/letsencrypt/archive/evsoul.com/fullchain1.pem"),
  ca: fs.readFileSync("/etc/letsencrypt/archive/evsoul.com/chain1.pem")
};

const server = http.createServer(app);
const serverSSL = https.createServer(options, app);

/**
 * Listen on provided port, on all network interfaces.
 */

server.listen(port);
server.on('error', onError);
server.on('listening', onListening);

serverSSL.listen(443);
serverSSL.on('error', onError);
serverSSL.on('listening', onListening);
What's going on is -
- We import the
httpsmodule alongside thehttpmodule - We read the certificates into an anonymous object, and pass that object to creation of the HTTPS Server object.
- We cause the application to listen on both port 443 (the standard HTTPS port) as well as the port specified in the PORT environment variable
Obviously the pathnames for the certificate files must be configurable. But this will work for our purposes right now. The Let's Encrypt team has been known to change the file names of the certificates, so adjust this for whatever you're given.
Then in the docker-compose.yml make one more change:
app:
  build: ./app
  container_name: app
  ports:
    - "80:3000"
    - "443:443"
  restart: always
  volumes:
    - certbot-webroot-evsoul:/app/public/.well-known
    - certbot-letsencrypt:/etc/letsencrypt
This enables port 443, the standard port for HTTPS.
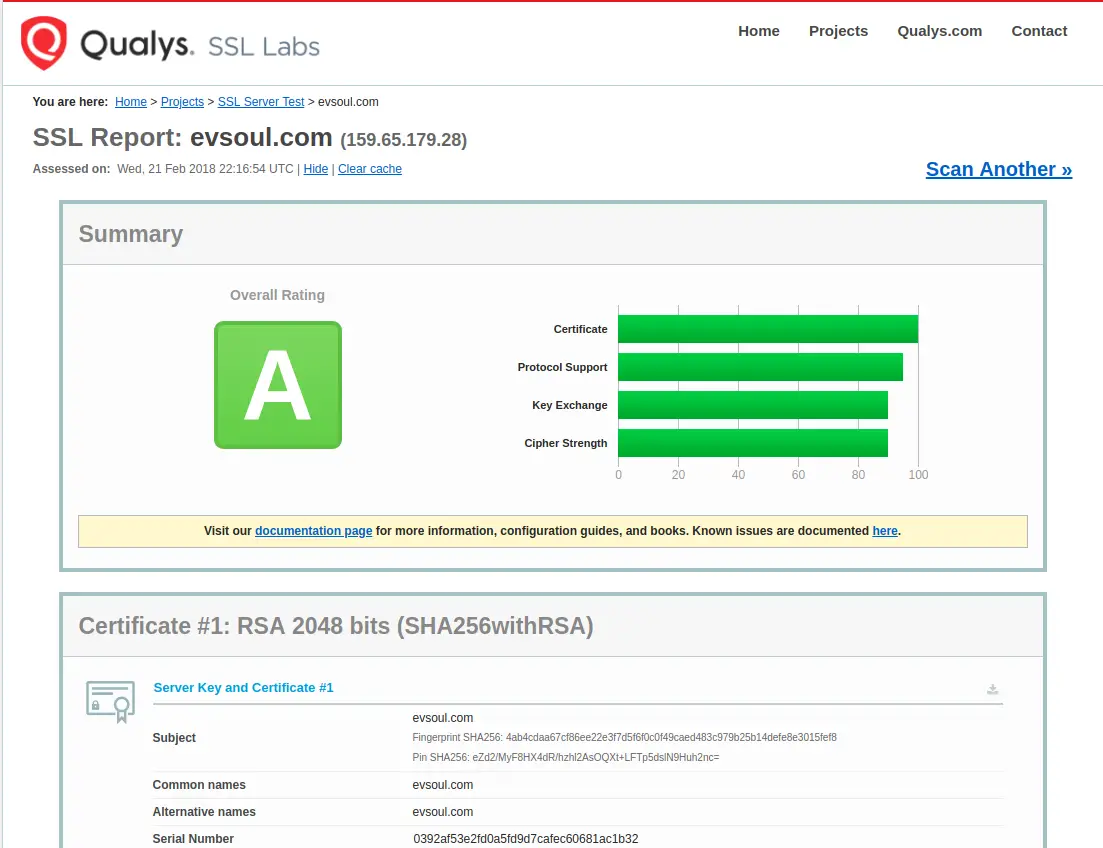
Once accomplished you can now visit https://DOMAIN
Another thing to do is visit this SSL tester tool:
https://www.ssllabs.com/ssltest/
Redirecting HTTP to HTTPS - for full-time HTTPS
For SEO purposes and for the purpose of HTTPS-everywhere, it's best if your application automatically redirects to HTTPS. As it stands you can visit both the HTTP and HTTPS version of the application.
This is easily accomplished with another module:
https://www.npmjs.com/package/express-force-ssl
Add that package to the package.json dependencies. Then in app/app.js make these changes:
const express = require('express');
const forceSSL = require('express-force-ssl');
...
app.use(logger('dev'));
app.use(bodyParser.json());
app.use(bodyParser.urlencoded({ extended: false }));
app.use(cookieParser());
app.use(forceSSL);
app.use(express.static(path.join(__dirname, 'public')));
That is, we import the express-force-ssl package, then use it as Express Middleware.
Having done this, visiting http://DOMAIN automatically redirects to https://DOMAIN
Another method is to install helmet (
https://www.npmjs.com/package/helmet) and use its HSTS module. Helmet is a package for adding many security measures to an Express application, and should be installed anyway.
Implementing HTTPS using nginx instead
Suppose your vision for your application is to install nginx in front of the application? For example you can offload delivering static files from the Express service to be performed by nginx instead. Of course that's a minor example of what you might do with nginx since it is a very powerful server.
Unfortunately a simple-seeming task has become a nightmare, and I have other work that needs to be accomplished, so I'll have to leave the remainder of this tutorial as some rough notes that someone can start with.
The idea is to add an nginx container, have it use the same SSL certificates, and give it a configuration file that sets up HTTPS support while proxying to the app container. The app container would no longer be visible to the publc, and instead it's the nginx container that would take that job.
In app/bin/www make these changes to disable HTTPS support:
/**
 * Create HTTP server.
 */

/* const options = {
  key: fs.readFileSync("/etc/letsencrypt/archive/evsoul.com/privkey1.pem"),
  cert: fs.readFileSync("/etc/letsencrypt/archive/evsoul.com/fullchain1.pem"),
  ca: fs.readFileSync("/etc/letsencrypt/archive/evsoul.com/chain1.pem")
}; */

const server = http.createServer(app);
// const serverSSL = https.createServer(options, app);

/**
 * Listen on provided port, on all network interfaces.
 */

server.listen(port);
server.on('error', onError);
server.on('listening', onListening);

// serverSSL.listen(443);
// serverSSL.on('error', onError);
// serverSSL.on('listening', onListening);
And some changes in app/app.js to disable HTTPS
// const forceSSL = require('express-force-ssl');
...
// app.use(forceSSL);
And in docker-compose.yml make this change:
app:
  build: ./app
  container_name: app
  # ports:
  #   - "80:3000"
  #   - "443:443"
  restart: always
  volumes:
    - certbot-webroot-evsoul:/app/public/.well-known
    - certbot-letsencrypt:/etc/letsencrypt
These changes turn off SSL/HTTPS and make the app container not have ports exposed to the Internet. In app/Dockerfile it should still use EXPOSE 3000.
In docker-compose.yml we then need to add this container to support nginx:
nginx:
  build: ./nginx
  container_name: nginx
  ports:
    - "80:80"
    - "443:443"
  restart: always
  volumes:
    - certbot-webroot-evsoul:/webroots/evsoul.com/.well-known
    - certbot-letsencrypt:/etc/letsencrypt
This sets up the container with the two volumes carrying Lets Encrypt data files and certificates, and exposes ports 80 and 443 to the public Internet.
In nginx/Dockerfile use this:
FROM nginx

COPY nginx.conf /etc/nginx/nginx.conf

EXPOSE "80"
EXPOSE "443"
This is the standard nginx container - with ports 80 and 443 exposed - and with a configuration file.
The configuration file I'm using is derived from one in this excellent blog post:
https://code.lengstorf.com/deploy-nodejs-ssl-digitalocean/
user  root;
worker_processes  1;

error_log  /var/log/nginx-error.log debug;
pid        /var/run/nginx.pid;


events {
    worker_connections  1024;
}


http {
    include       /etc/nginx/mime.types;
    default_type  application/octet-stream;

    log_format  main  '$remote_addr - $remote_user [$time_local] "$request" '
                      '$status $body_bytes_sent "$http_referer" '
                      '"$http_user_agent" "$http_x_forwarded_for"';

    access_log  /var/log/nginx-access.log  main;

    sendfile        on;
    #tcp_nopush     on;

    keepalive_timeout  65;
    #gzip  on;

    # HTTP — redirect all traffic to HTTPS
    server {
        listen 80;
        listen [::]:80 default_server ipv6only=on;
        return 301 https://$host$request_uri;
    }

    # HTTPS — proxy all requests to the Node app
    server {
        # Enable HTTP/2
        listen 443 ssl http2;
        listen [::]:443 ssl http2;
        server_name evsoul.com;

        # Use the Let’s Encrypt certificates
        ssl_certificate /etc/letsencrypt/live/evsoul.com/fullchain1.pem;
        ssl_certificate_key /etc/letsencrypt/live/evsoul.com/privkey1.pem;

        location / {
            proxy_set_header X-Real-IP $remote_addr;
            proxy_set_header X-Forwarded-For $proxy_add_x_forwarded_for;
            proxy_set_header X-NginX-Proxy true;
            proxy_pass http://app:3000/;
            proxy_ssl_session_reuse off;
            proxy_set_header Host $http_host;
            proxy_cache_bypass $http_upgrade;
            proxy_redirect off;
        }

        location /.well-known {
            root /webroots/evsoul.com/.well-known;
        }
    }
}
What this does is set up two server objects. The first listens to port# 80, and forces a redirect to port#443. That port is the other server object, and it's configured for HTTPS. The SSL certificates come from the directory we've mounted into the container.
The second server contains one location section that proxies over to the app container. This is a straightforward setup of proxying, and I'm trusting Mr. Lengstorf implemented it correctly.
The second location section tries to mount the .well-known directory tree so that webroot challenges can work. This is straight-forward and should work fine. BUT ... when running the server, I get this error:
nginx | 2018/02/22 02:08:56 [emerg] 1#1: BIO_new_file("/etc/letsencrypt/live/evsoul.com/fullchain1.pem") failed (SSL: error:02001002:system library:fopen:No such file or directory:fopen('/etc/letsencrypt/live/evsoul.com/fullchain1.pem','r') error:2006D080:BIO routines:BIO_new_file:no such file)
The issue is that /etc/letsencrypt has some unfortunate file protections:
root@4e2c900ec9bd:/# ls -l /etc/letsencrypt/
total 28
drwx------ 3 root root 4096 Feb 21 21:44 accounts
drwx------ 3 root root 4096 Feb 21 21:45 archive
drwxr-xr-x 2 root root 4096 Feb 21 21:45 csr
drwx------ 2 root root 4096 Feb 21 21:45 keys
drwx------ 3 root root 4096 Feb 21 21:45 live
drwxr-xr-x 2 root root 4096 Feb 21 21:45 renewal
drwxr-xr-x 5 root root 4096 Feb 21 20:22 renewal-hooks
The nginx process changes its user ID to nginx - and therefore, while there is a file at the pathname given above, you can see here that /etc/letsencrypt/live is protected such that root is the only user ID which can read these files. But, the nginx process is running as the nginx user ID. That user ID obviously cannot read the file at the above named path.
There is a clear valid reason for this protection setting. The files in that directory tree contains private keys. If those private keys were to leak, to become available to miscreants, those miscreants could do some miscreant action. Therefore it's important to protect the private keys to limit the likelihood these files would leak to the public.
How did the Express app read these private keys? The Express app ran as root, and therefore had the rights to access the private keys.

Books by David Herron

(Sponsored)


