David Herron
Tags: Node.JS »»»»
ForerunnerDB is a JavaScript library for storing data using a MongoDB-like API. It runs in both the browser and server-side in Node.js, and requires no setup of any server making it convenient for inline database functionality. It supports persisting data either to browser local storage, or the Node.js supports persisting data to a directory containing JSON objects.

Normally to use the MongoDB API in a Node.js application requires setting up a MongoDB instance. It isn't always feasible to install a database server. We may have an application to implement where a document oriented database is useful, but be in such a situation, making ForerunnerDB a viable alternative. Further, given that it runs in browsers (and therefore, in Electron), that makes it possible to bring MongoDB-like functionality into client-side code.
To use ForerunnerDB as a Mongo-like storage engine in Node.js, you start by installing the forerunnerdb package, then using require or import to access the package. Once the code is loaded, you initialize a database instance, initialize one or more collections, and then immediately start using the Mongo-like API to manipulate data. Persisting data to long-term storage requires using either the browser-side persistence plugin, or the server-side plugin, both of which are built-in.
It's very easy to use ForerunnerDB, so let's get started with a trivial example. Later we'll modify an existing application, which uses Sequelize (a popular ORM for SQL databases), to instead use ForerunnerDB.
Initialize a project directory:
$ mkdir t
$ cd t
$ npm init
...
$ npm install forerunnerdb --save
We just need to have the package installed so we can write a couple simple scripts.
Start by creating a file named mk.js containing:
const ForerunnerDB = require("forerunnerdb");

const fdb = new ForerunnerDB();
const db = fdb.db("test");

db.persist.dataDir("./configData");

const itemCollection = db.collection("item");

itemCollection.insert({
	// _id: 3,
	price: 400,
	name: "Fish Bones"
});

itemCollection.insert([{
	// _id: 4,
	price: 267,
	name:"Scooby Snacks"
}, {
	// _id: 5,
	price: 234,
	name: "Chicken Yum Yum"
}]);

console.log(itemCollection.find());

itemCollection.save(function (err) {
	if (!err) {
		console.log('Save was successful');
	} else {
        console.error(err);
    }
});
The first few lines initialize ForerunnerDB. We create a database instance, and then configure the storage plugin to store data in the named directory. After that we use db.collection to create a Collection.
Just as in MongoDB, a Collection is similar to a Table in an SQL database. Being a no-SQL database, Collections simply store JSON documents.
Just as in MongoDB, we use itemCollection.insert to store items into the collection.
Just as in MongoDB, we use itemCollection.find() to query the collection, and print the results.
Departing a little from MongoDB, we use the save method to save the database to disk.
$ node t.js
[
  { price: 400, name: 'Fish Bones', _id: '3f600976f750820' },
  { price: 267, name: 'Scooby Snacks', _id: '1bf52801bebd7a0' },
  { price: 234, name: 'Chicken Yum Yum', _id: '2da4e2527015300' },
  __fdbOp: Operation {
    pathSolver: Path {},
    counter: 0,
    _data: {
      operation: 'find',
      index: [Object],
      steps: [Array],
      time: [Object],
      flag: [Object],
      log: [],
      analysis: [Object],
      results: 3
    }
  },
  '$cursor': {}
]
The _id values are autogenerated. Just as in MongoDB, the _id field is the primary key for each document in a collection. If you like to assign the value for _id yourself, the code contains commented-out values that you can use. The return value is an array of items we stored in the database, but there's this other object that seems to show the operation which was performed, and another that has something to do with the query cursor. We'll have to see how to use the data without confusing those other values as data.
But, let's make sure the data is being persisted:
$ ls configData/
test-item-metaData.fdb test-item.fdb
$ cat configData/test-item.fdb
json::fdb::[
    {"price":400,"name":"Fish Bones","_id":"3f600976f750820"},
    {"price":267,"name":"Scooby Snacks","_id":"1bf52801bebd7a0"},
    {"price":234,"name":"Chicken Yum Yum","_id":"2da4e2527015300"}
]
As we see, the persisted database is simply a JSON object. We've cleaned up the output for presentation here.
Having seen how to add items to a ForerunnerDB database, let's see how to retrieve them. Create a new file named show.js containing:
const ForerunnerDB = require("forerunnerdb");

const fdb = new ForerunnerDB();
const db = fdb.db("test");

db.persist.dataDir("./configData");

const itemCollection = db.collection("item");

itemCollection.load(function (err) {
	if (err) {
		console.error(err);
        process.exit(1);
	}

    // console.log(itemCollection.find());

    for (let item of itemCollection.find()) {
        console.log(item);
    }
});
The initialization is the same. Then, we use itemCollection.load to load the data for the collection. Once the data is loaded we can use itemCollection.find to run a query.
From the previous script we know that this operation returns an array, so we are able to use a for ... of loop on that array. Fortuitously this loop skips over those extra values we saw in the earlier output.
$ node show.js
{ price: 400, name: 'Fish Bones', _id: '3f600976f750820' }
{ price: 267, name: 'Scooby Snacks', _id: '1bf52801bebd7a0' }
{ price: 234, name: 'Chicken Yum Yum', _id: '2da4e2527015300' }
Using the for..of loop we only accessed the data retrieved from the database. Therefore those extra data values are automatically skipped when accessing the data in the result set.
What we've learned is that we can easily reuse our MongoDB knowledge when using ForerunnerDB. We can use the insert method to store data in a collection, and we can use the find method to retrieve data. While the scripts briefly touched the surface, we've shown we can read and write data from a data collection using a Mongo-like API. Reading through the ForerunnerDB documentation shows a long list of additional API methods and options.
Modifying a real Node.js application to use ForerunnerDB
In an earlier tutorial we created a simple TODO application using Node.js, Bootstrap v5, and Socket.IO. For data persistence, that application uses Sequelize, with which it can store data in any of several SQL databases. What we'll do is modify the application to use ForerunnerDB, which will be easier to do than it sounds.
The source repository is:
https://github.com/robogeek/nodejs-express-todo-demo
In that repository you'll find a branch, forerunnerdb, that is already modified to use ForerunnerDB. It is suggested that you go ahead and check out the code, or else browse it on Github.
The first task was to install the forerunnerdb package as before:
$ npm install forerunnerdb --save
The application is structured so that data persistence is handled in the models directory. There is a file, Todo.mjs, containing a class definition for TODO instances. For the existing application, the file sequlz.mjs contains the TodoStore class which uses Sequelize to persist data to/from the database.
What we need to do is create a file, forerunner.mjs, containing a TodoStore implementation for ForerunnerDB. So long as it implements the same API, the rest of the application will be none the wiser.
Create forerunner.mjs, and let's start with this code:
import ForerunnerDB from 'forerunnerdb';

import { default as DBG } from 'debug';
const debug = DBG('todos:fore');
const error = DBG('todos:error-fore');
import util from 'util';

import { Todo } from './Todo.mjs';

const _todo_fore  = Symbol('forerunnerdb');
const _todo_db    = Symbol('db');
const _todo_todos = Symbol('todos');

export class TodoStore {
    constructor() {
        this[_todo_fore] = undefined;
    }
    ...
}
Notice that the application is using ES6 modules, so that's the syntax being used for everything. This imports the Forerunner package, sets up a couple other things, the primary being Symbol instances for safely storing data in the object.
This technique of using a Symbol instance to define the field name is the closest we can come in JavaScript to hiding and encapsulating data.
Start by adding a method to connect to the database:
async connect() {
    if (this[_todo_fore]) return;

    this[_todo_fore] = new ForerunnerDB();
    this[_todo_db]   = this[_todo_fore].db('todo');
    this[_todo_db].persist.dataDir('./TODOs');

    this[_todo_todos] = this[_todo_db].collection('todos');
    await new Promise((resolve, reject) => {
        this[_todo_todos].load(function (err) {
            if (!err) {
                console.log('TODO successfully loaded TODOS collection');
                resolve();
            } else {
                reject(err);
            }
        })
    });
}
What this does is to initialize Forerunner, create the database instance, set up persistence, and initialize the Collection. It then uses load to read in the data for the Collection.
Other than using this[SYMBOL_REFERENCE], it is largely the same code as before. We've set this up within an async function for convenience. It seems from the ForerunnerDB documentation that most of the methods operate in memory, and are therefore not asynchronous. The load and save methods, on the other hand, read and write data to/from disk, and are therefore asynchronous. Since those methods do not support returning a Promise, we have to wrap the invocation with new Promise as here.
async close() {
    if (this[_todo_fore]) {
        await this.save();
        this[_todo_fore] = undefined;
        this[_todo_db] = undefined;
        this[_todo_todos] = undefined;
    }
}
To close the database, we first save it, then release all references to the database.
async save() {
    await new Promise((resolve, reject) => {
        this[_todo_todos].save(function (err) {
            if (!err) {
                console.log('TODO successfully saved TODOS collection');
                resolve();
            } else {
                reject(err);
            }
        })
    });
}
This is a convenience function to help with saving data. We'll call this several times so that data is persisted in the due course of using the application.
async getAll() {
    await this.connect();
    let todos = this[_todo_todos].find({}, {
        $orderBy: {
            precedence: 1
        }
    });
    let ret = todos.map(todo => {
        return (Todo.fromFORE(todo)).sanitized();
    });
    console.log(ret);
    return ret;
}
In the TODO application, this function is called to get the TODO items that need to be displayed for the user. We simply use the find operation, and then use $orderBy to sort the items.
The todos.map converts the array we get from the database into a sanitized array of simple objects. This will work better for sending data using Socket.IO to the client program.
async create(todo) {
    await this.connect();
    this[_todo_todos].insert({
        title: todo.title, body: todo.body, precedence: todo.precedence
    });
    await this.save();
}
In the TODO application, this function is called when the user requests to add a new TODO item. The function will receive an object with these fields, and all we need to do is to store that in the database.
async update(todo) {
    await this.connect();
    this[_todo_todos].update({
        _id: todo.id
    }, {
        title: todo.title, body: todo.body, precedence: todo.precedence
    });
    await this.save();
}
In the TODO application, this function is called when the user edits a TODO item. It receives an object containing those fields, including the id field. The update function first takes a where clause to search for the item to update, and the second object is the data to update.
async destroy(id) {
    await this.connect();
    this[_todo_todos].remove({
        _id: id
    });
    await this.save();
}
In the TODO application, this function is called when the user wants to destroy a TODO item. It simply calls the remove method, which uses a where clause to select the affected item.
You may have noticed that the Todo class has a new method, fromFORE, which is:
static fromFORE(sqtodo) {
    return new Todo(sqtodo._id, sqtodo.title, sqtodo.body, sqtodo.precedence);
}
This is a factory function to construct Todo instances from an object.
The last change required was to change app.mjs to use this new TodoStore instance.
import { TodoStore } from './models/forerunner.mjs';
Because of how the application is structured, that's all which needed to be changed to switch from an SQL database to a Mongo-like database.
To run the application, type this command:
$ npm install
$ npm start
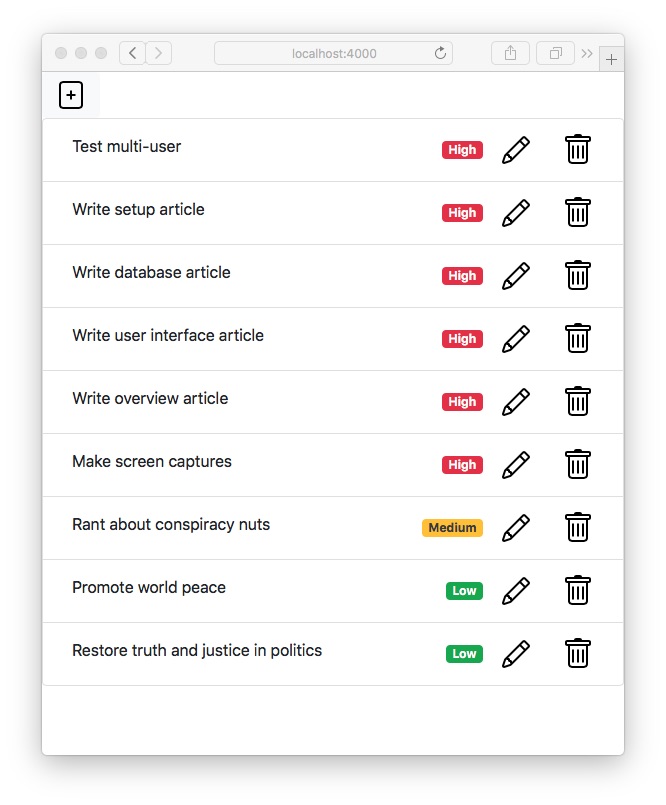
By default the PORT variable is set to 4000, so in your browser visit http://localhost:4000. To enter a new TODO, click on the + icon in the upper left corner. After adding one or more, check the data directory:
$ ls TODOs/
todo-todos-metaData.fdb todo-todos.fdb
Yes, it does work.
Summary
What we've learned in this tutorial is the beginning steps of using ForerunnerDB in an Node.js application. It has a powerful API that's very similar to MongoDB. It should be practical to build certain kinds of powerful applications.
For example, I'm planning to make a major rewrite of
AkashaCMS using ForerunnerDB. With it, I expect to be able to build a complete index of all content in a website being rendered with AkashaCMS. With that index, I expect to be able to not only simplify AkashaCMS's internals, but to hugely increase the flexibility of selecting and processing content and other data.

Books by David Herron

(Sponsored)


