David Herron
Tags: Ubuntu »»»»
Need to use a distant Ubuntu computer from your Mac laptop or desktop? I have an Intel NUC in my office providing some lightweight services - a Gogs-based Git server, and a Jenkins instance - and, while I hardly ever use its desktop environment it is useful to occasionally do so. Using Apple's Screen Sharing feature is excellent, when used between Mac's. But with Ubuntu two issues crop up, one being the relative difficulty getting it set up on Ubuntu and the other being the inscrutable error message macOS gives when you attempt to access the Ubuntu desktop.
Apple promises that remote desktop access is this easy. That the existence of a computer with desktop sharing turned on is advertised using the Bonjour service, such computers then automatically show up in Finder, and you simply click on this button and voila the remote desktop appears on your screen.
Getting to this goal requires two major tasks:
- Enabling remote desktop support on Ubuntu
- Configuring things such that the Mac is able to display a remote Ubuntu desktop
Let's get started.
Enabling remote desktop support on Ubuntu
The Ubuntu project has integrated the Vino VNC server, and made it easy to configure Vino from the system Settings screens.
VNC - which stands for Virtual Network Computing - is a communications protocol letting you access desktop environments on remote computers. For a computer to share its desktop environment it must have VNC Server software. For a computer to access a remote desktop using VNC it must have VNC Client software.
VNC is not the only system of this sort. But it is the system we'll use for this task, if only because VNC's software licensing (it is open source) is friendly to Linux systems like Ubuntu.
In any case this means the remote Ubuntu machine must have a VNC server. That's what Vino is, a VNC server which the Ubuntu project is putting to use.
In Ubuntu you access the system settings a.k.a. control panel via this menu. The icon to click on is in the lower left and looks like a wrench and screwdriver.
This is the main settings window. Click on the Sharing choice - because we'll be enabling Screen Sharing. If we were doing the same for macOS, we'd go to System Preferences and also click on the Sharing section then enable Screen Sharing. The Ubuntu Team must have had this in mind when designing this for Ubuntu.
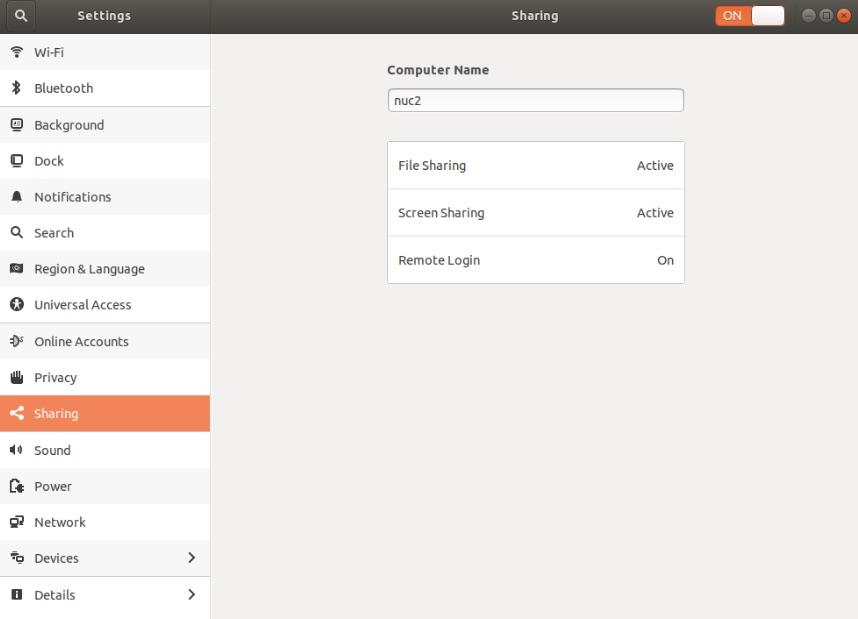
In this pane you see three sorts of sharing - File Sharing, Screen Sharing and Remote Login. Each does what is implied, for example File Sharing sets up a SAMBA server and allows folks to access directories on the machine over the network.
In this case we're interested in Screen Sharing and you can see I have already enabled this. The default is for this to be Off, so let's see what's involved with enabling the feature. Click on Screen Sharing.

Obviously for folks to access the screen the Allow connections choice must be selected. There's also a button in the top of this dialog window, shown here as On that must be selected. That button controls whether this feature is on or off.
Down at the bottom is a choice labeled Networks. This Intel NUC has its WiFi turned off, and it is instead hardwired to an ethernet switch that includes the WiFi router. Obviously for remote access to the Ubuntu desktop at least one network connection must be enabled.
In the middle is something requiring a couple choices. It's good form to limit access - since this is the desktop of a logged-in user on one of your computers. What if someone nefarious had access to your local network? You want to have some degree of control, don't you?
The New connections must ask for access requires that someone using the shared computer must click approval on a dialog that pops up on the desktop. In this case I have not selected that choice because I simply want to connect to the Ubuntu desktop without requiring any input on that desktop.
The Require a password means that the VNC Client will ask for a password, and that a password is required to access the VNC server.
Once you've done this, close the dialog.
Enabling auto-login on Ubuntu
A related task is the option of having the Ubuntu system automatically log-in as a given user. In my case I want to not have to directly use the Ubuntu machine ever. Think of the Ubuntu machine being stuffed in a closet where there's no display or keyboard. If the Ubuntu machine were rebooted you don't want to go to the closet and log-in, you just want the machine to be logged in.
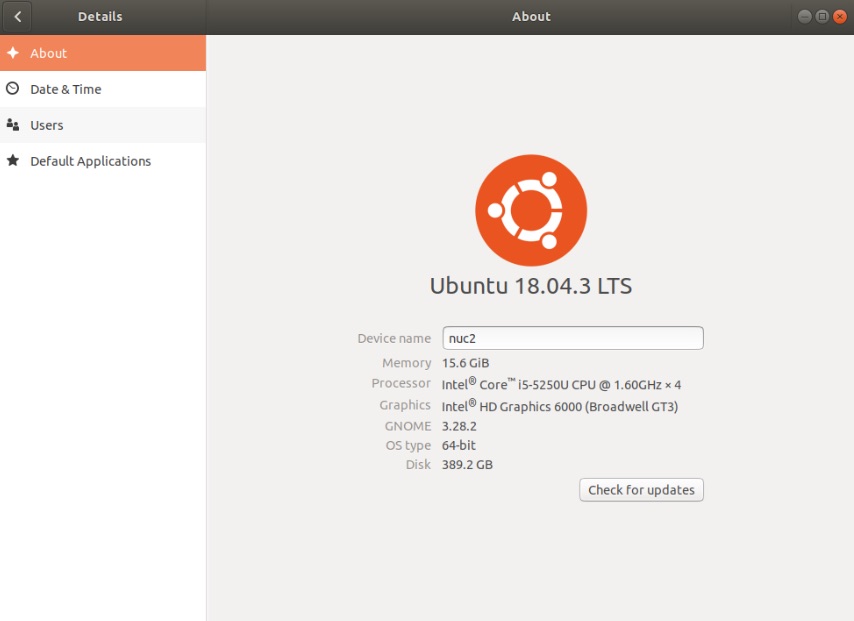
First - click on Details
Then click on Users
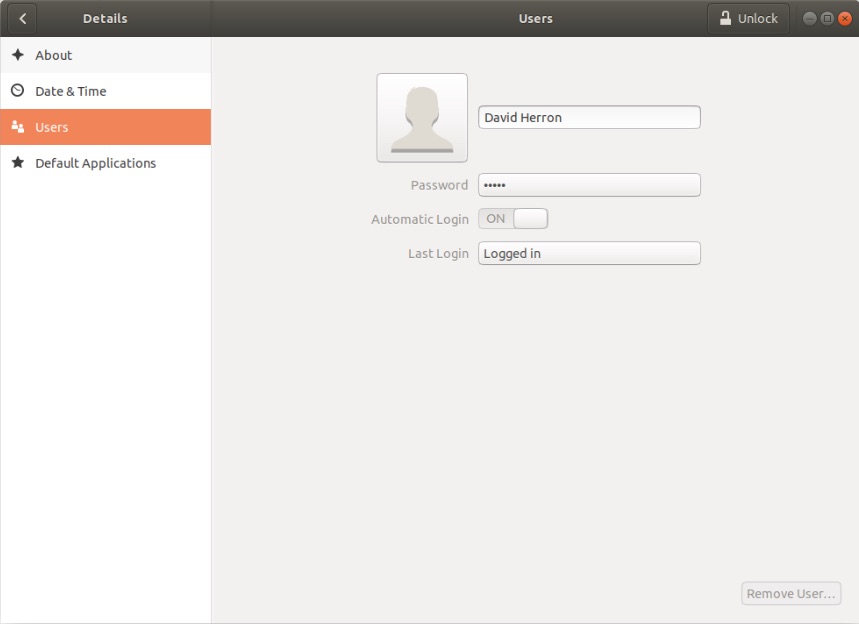
On this screen first click on the Unlock button in the title bar. You'll be asked for your password. Then click on Automatic Login. This choice means that when the Ubuntu machine reboots it will automatically log in to this user ID.
At this point you should reboot the computer to make sure Automatic Login works.
Enabling access to Ubuntu remote desktop from macOS
So far we've set up a VNC server on the Ubuntu machine. Recall that we now need a VNC Client to access any VNC server.
Take a look in the macOS Application Store and you'll find several VNC client applications. Ignore all those.
Or if you want - take a look at Using VNC to access remote desktop on Raspberry Pi or other computer behind a NAT firewall
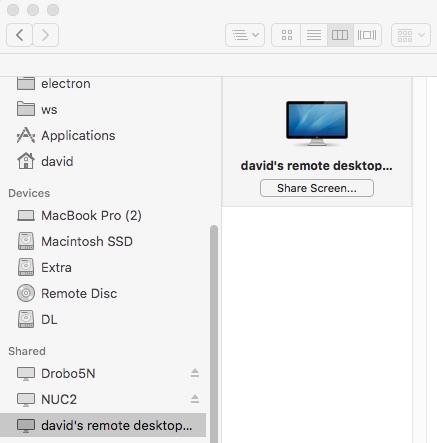
Instead look in Finder and you should find something like this:
Simply click on the Share Screen button.
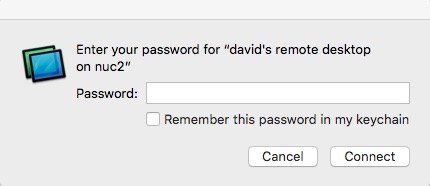
If everything is correctly configured you'll get this, and upon entering the correct password you'll get a screen showing the remote desktop.
In my case there was a problem - an inscrutable error message.
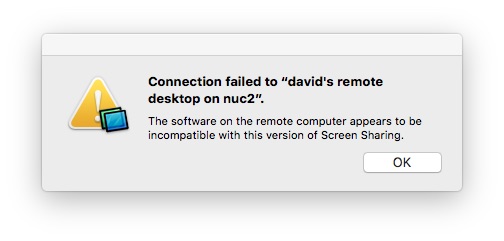
Hurm. I even got some of the macOS VNC clients in the App Store to see if they would work when Screen Sharing did not. The message doesn't make much sense - it's talking about incompatibility, but surely Apple would make things compatible? Surely one of the other VNC clients would make things compatible?
After some searching I found this command has to be run on the Ubuntu computer:
$ gsettings set org.gnome.Vino require-encryption false
This setting has to do with whether the VNC transmission is encrypted. Getting back to security issues - what if your remote desktop session went over a network connection where others could watch what you were doing? In theory all your data could be exposed if someone else could snoop on your VNC remote desktop session. Therefore it is best to have VNC connections encrypted.
But the macOS Screen Sharing thing does not support encrypted VNC sessions. So... run the above command, and then you'll be prompted for a password, and the remote desktop will pop up.
Windows?
Windows does not have such a feature built in. Instead you use a 3rd party VNC client of which there are many. A commonly recommended client is Real VNC.
Mobile devices
In the respective app stores for Android and iOS (or iPadOS) there are VNC client programs. Get one. I don't have any recommendations to share.
In both the case of Windows and mobile VNC clients, the applications have a paradigm of managing a set of known VNC Connections. So you would add a New Connection for the Ubuntu machine, configure the settings for this connection, and then click the Connect button.


