David Herron
Tags: Raspberry Pi »»»» Raspberry Pi Zero »»»» Security »»»» Security Cameras »»»»
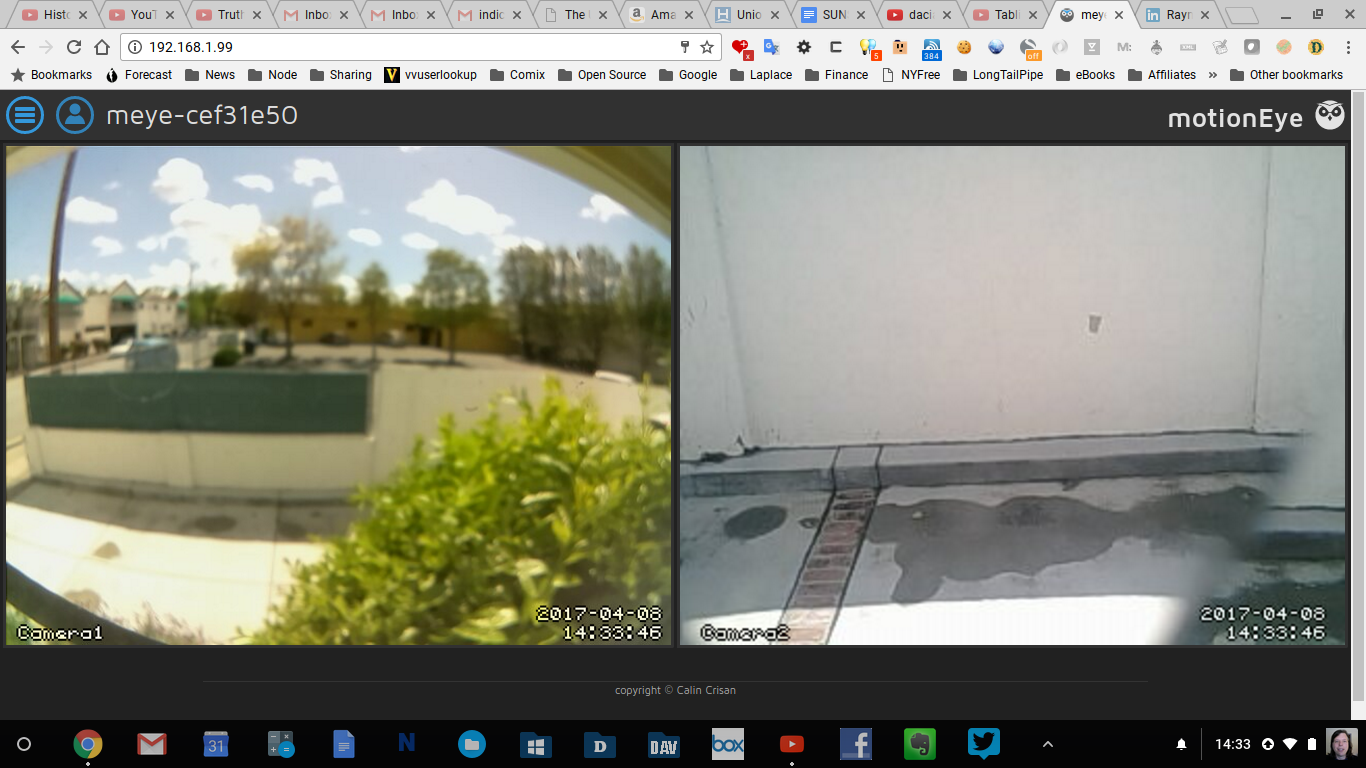
You can build a powerful and flexible motion sensing security camera system using open source software on a Raspberry Pi and similar single board computers. The key is the MotionEyeOS that neatly bundles everything you need into a Raspberry Pi image. Simply burn it to an SD card, attach cameras, boot the Raspberry Pi, and start configuring. It easily supports monitoring multiple cameras, which can be USB webcams, WiFi cameras, the Raspberry Pi camera, or other MotionEyeOS instances. I have an original-version Raspberry Pi (low CPU power) driving two cameras and it handles things just fine.


For this project I'm updating an existing MotionEyeOS setup. I'd originally built this system last summer, and decided to update to the latest OS release and at the same time document the setup.
Our goal is to see who's in the driveway in front of the house. There's a window at the top of the front door, and another window nearby, both of which view parts of the driveway. For the front door, I've mounted a cheap webcam in the window using velcro tape, then draped a USB extension cord so the door can still open/close naturally with no impediment. For the other window, I'm using a CSI extension cord to reach the CSI camera in that window.
There is a bookcase halfway between the two, and the Raspberry Pi is installed on the bookcase top shelf. The extension cords are so the camera's can be installed in their respective windows.
For a newer report using a Zero W and the NO-IR camera, see Build a security camera system with Raspberry Pi Zero and cheap webcams
Hardware
With MotionEyeOS you have a wide choice of available linux single-board-computers (SBC's), as well as cameras. Each release is compiled for three ODROID configurations and three Raspberry Pi configurations, and they claim support on other boards like the BananaPi and Cubietruck.
In my case, I have
- Original model Raspberry Pi B+ w/ 5 volt power supply
- A cheap no-name WiFi dongle
- A cheap no-name webcam -- I spent many hours searching for this, because I needed the right shape camera to velcro to the inside of the window on the front door -- any webcam will do, it's just that my specific need required searching out the correctly shaped camera
- A USB extension cable
- A Raspberry Pi CSI camera -- I currently have the Wide Angle camera --
http://amzn.to/2pesVkU
- A CSI extension cable purchased from Adafruit --
Even this old/slow Raspberry Pi is able to keep up with the two cameras.
If I were to expand this setup, to cover more windows, I'd want to use the Raspberry Pi Zero W. That plus a NoIR CSI camera could be built as a nicely compact camera module at a very low cost. I see in the MotionEyeOS issue queue, plenty of reports of difficulty with the Zero W so that idea is a little premature.
Software
Go here:
github.com ccrisan motioneyeos releases And download the latest version.
That gives you a file named something like motioneyeos-raspberrypi-20170329.img.gz. The first step is run gunzip:
$ gunzip motioneyeos-MACHINE-TIMESTAMP.img.gz
The next step is to copy the image to your SD or microSD card. It appears from what's written on the installation page, that Etcher would work:
https://etcher.io/ However, they have some specific instructions on the installation page. The advantage of using their
writeimage.sh script is you can pre-load the IP address into the Raspberry Pi.
Refer to the Installation wiki page:
github.com/ccrisan/motioneyeos Installation
For Windows they provide these instructions:
raspberrypi.org installation installing-images windows
On Linux or MacOSX they provide a shell script:
githubusercontent.com/ccrisan/motioneyeos writeimage.sh
The advantage of this shell script is being able to preconfigure some settings like a static IP address, and the address of the router. The options aren't documented on the installation page. But if you run it with no options a help message is printed:
sh ./writeimage.sh
Usage: ./writeimage.sh [options...]

Available options:
    <-i image_file> - indicates the path to the image file (e.g. -i /home/user/Download/file.img.gz)
    <-d sdcard_dev> - indicates the path to the sdcard block device (e.g. -d /dev/mmcblk0)
    [-m modem:apn:user:pwd:pin] - configures the mobile network modem (e.g. -m ttyUSB0:internet)
    [-n ssid:psk] - sets the wireless network name and key (e.g. -n mynet:mykey1234)
    [-s ip/cidr:gw:dns] - sets a static IP configuration instead of DHCP (e.g. -s 192.168.1.101/24:192.168.1.1:8.8.8.8)
In my case I ran:
$ sudo sh ./writeimage.sh -d /dev/disk4 -i motioneyeos-raspberrypi-20170329.img -s "192.168.1.99/24:192.168.1.254:192.168.1.254" -n WiFiNetworkName:passwordRequred
To determine the sdcard_dev value, use either df -k or mount to list the drives attached to your computer. In my case (on a MacOSX machine):
$ df -k
Filesystem             1024-blocks       Used   Available Capacity    iused       ifree %iused  Mounted on
/dev/disk2               467649408  411720696    55672712    89%  102994172    13918178   88%   /
devfs                          345        345           0   100%       1197           0  100%   /dev
/dev/disk1s2             731734976  669633716    62101260    92%  167408427    15525315   92%   /Volumes/Extra
map -hosts                       0          0           0   100%          0           0  100%   /net
map auto_home                    0          0           0   100%          0           0  100%   /home
/dev/disk4s1                 20422       8846       11576    44%        512           0  100%   /Volumes/NO NAME
The drive of interest is the last. The device name used, /dev/disk4, is the raw device corresponding to the mounted device.
The next argument is the image_file which is what I downloaded off the github releases page.
The next argument lists the static IP configuration I want to use. There are three sections to this argument:
- IP address of the Raspberry Pi plus the specifier for the netmask
- IP address of the router
- IP address of the DNS service
To decode this a bit --- each ethernet segment has a TCP/IP network number. In my case the WiFi router assigns IP addresses in the 192.168.1.NNN range with the network address being 192.168.1.0 and the corresponding netmask being 255.255.255.0. The netmask has a width of 24 bits, hence the address is specified as 192.168.1.99/24 so that the MotionEyeOS software can configure both IP address and netmask. The router itself is at 192.168.1.254 and it also provides DNS service on its own. Therefore it's not necessary to rely on Google's DNS (8.8.8.8). That DNS address is important to remember if your government ever goes rogue with Internet access, so keep it in the back of your mind. For our purposes today it's sufficient to configure the MotionEyeOS to use the DNS provided by the WiFi router.
The final argument lists the SSID (network name) of your WiFi network, and the password required to use that network. I'm obviously not going to show you these values for my home network.
The script will take awhile to run. Mine went like so:
$ sudo sh ./writeimage.sh -d /dev/disk4 -i motioneyeos-raspberrypi-20170329.img -s "192.168.1.99/24:192.168.1.254:192.168.1.254" -n WiFiNetworkName:passwordRequred
Password:
:: writing disk image to sdcard
220+0 records in
220+0 records out
230686720 bytes transferred in 835.149004 secs (276222 bytes/sec)
:: mounting sdcard
Unmount of all volumes on disk4 was successful
:: creating wireless configuration
:: setting static IP configuration
:: unmounting sdcard
:: you can now remove the sdcard
First boot
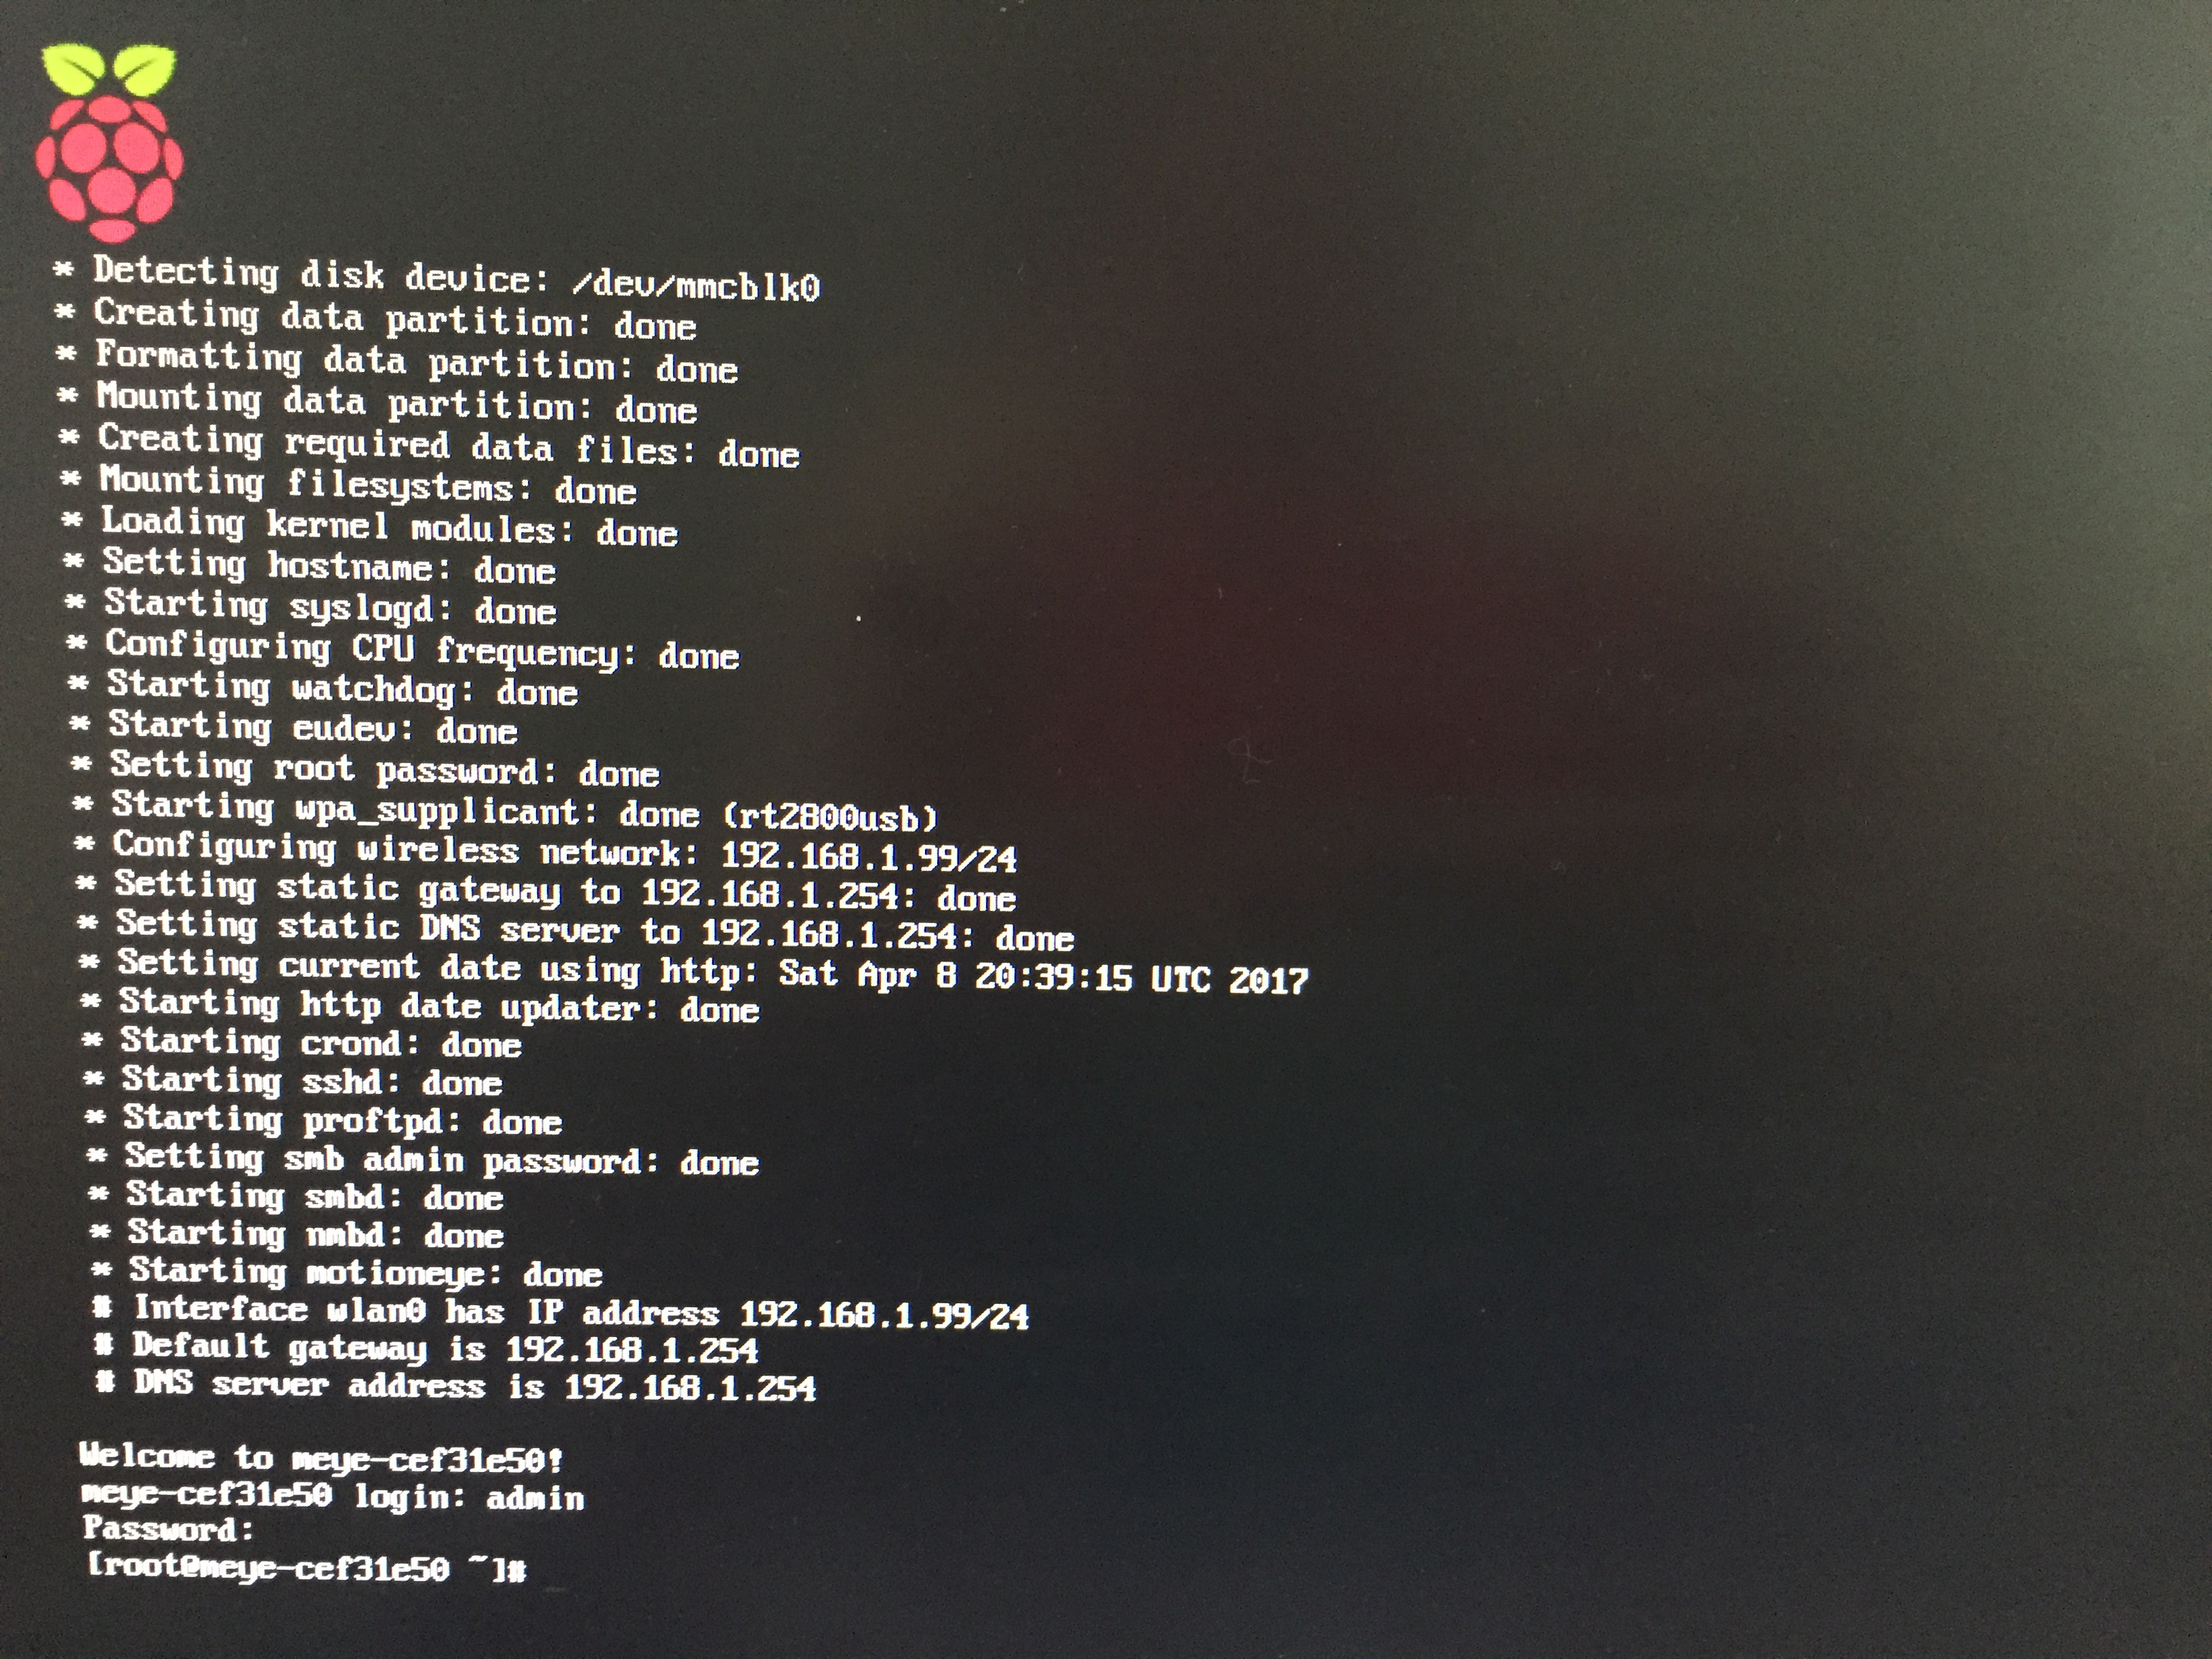
According to the MotionEyeOS instructions, you just put the SD card into the Raspberry Pi, connect the cameras, turn it on, and after a few minutes all will be good. The "first boot" does initial setup and it's necessary to let it run without interruption.
On my first boot, I waited awhile, then tried to log into the web service, and no go. I connected the Raspberry Pi to an HDMI monitor and learned the configuration was failing while looking for a wired ethernet. Instead of booting properly, it was cycling through this failed configuration attempt.
LESSON You can connect a monitor and USB keyboard/mouse to the computer to observe the first boot and determine if there are problems.
By default the root password is blank. Once the machine gets to offering a login prompt, you can do so by entering root then hitting return when it asks for a password. You can also ssh in as so: ssh -l root 123.456.789.123
I ran into another problem getting it to recognize the WiFi. This WiFi dongle had already been used by the earlier version of MotionEyeOS I'd used, so it should have worked with no problem. But, during the boot sequence a message was printed about WiFi not working and it would have to reboot. In order to avoid the reboot, I had to connect an ethernet cable from the WiFi router to the ethernet port on the board. Once connected it could boot, and I logged in to inspect the system.
LESSON Connecting an ethernet cord can circumvent problems initializing WiFi.
In the log files in /data/var/log I found a message about a syntax error in this file:
# cat /data/etc/wpa_supplicant.conf
update_config=1
ctrl_interface=/var/run/wpa_supplicant
network={
    scan_ssid=1
    ssid="ReikiHome2"
    psk="PASSSSSSWORDDDDDDDD"
-e }
And sure enough, that last line is a syntax error. That line is generated by the writeimage.sh script with this block of code:
# wifi
if [ -n "$SSID" ]; then
    msg "creating wireless configuration"
    conf=$BOOT/wpa_supplicant.conf
    echo "update_config=1" > $conf
    echo "ctrl_interface=/var/run/wpa_supplicant" >> $conf
    echo "network={" >> $conf
    echo "    scan_ssid=1" >> $conf
    echo "    ssid=\"$SSID\"" >> $conf
    if [ -n "$PSK" ]; then
        echo "    psk=\"$PSK\"" >> $conf
    fi
    echo -e "}\n" >> $conf
fi
And, wait, there's a -e in the script. I verified that removing the -e and reformatting the SD card results in the computer being able to boot with no problem, and connect to WiFi correctly.
The issue is that the Mac OSX version of echo does not support the -e flag, while the Linux echo does. I've filed an issue with the project suggesting a fix:
github.com ccrisan motioneyeos issues/879 UPDATE: The fix was accepted.
Final result