David Herron
Terraform is a powerful tool for configuring infrastructure on a long list of cloud-based systems. Since AWS is such a complex system we look for simpler ways to do anything on AWS. Get started means installing and configuring the AWS CLI before using Terraform to simplify AWS deployment.
You probably already know this, but AWS (Amazon Web Services) is the most mature of the cloud hosting systems. It comprises data centers around the world, and was originally created by Amazon for their e-commerce websites like Amazon.com. Along the way Amazon figured out how to productize the infrastructure, in effect renting out their own infrastructure to 3rd party people like you and me. They did such a good job with AWS that it is the big kahuna in cloud hosting providers, but they also made an extremely complex behemoth that is hard to figure out.
Terraform's promise is simplifying cloud service deployments. It is a language (not a programming language) for describing deployment of cloud based systems. It is not a programming language because it does not contain programming logic. Instead, it is declarative meaning that the programmer describes to Terraform the desired cloud infrastructure, and then Terraform works out how to implement the desired system.
Terraform is much easier to use than the equivalent AWS tools.
Getting started with Terraform means first installing the AWS CLI, and then installing Terraform. Terraform uses the credentials you configure into the AWS CLI to provide the credentials required to access the AWS API. That's because both the AWS CLI and Terraform are AWS API clients, and every action they take is performed using the AWS API.
Prior to everything discussed below, you must install the AWS CLI and configure one or more AWS Profiles. That link is a guide on doing exactly that.
For the rest of this guide we will assume you have already installed and configured the AWS CLI.
Installing the Terraform CLI tool
Terraform (see
https://www.terraform.io/) is a family of tools. What we're looking for is the Terraform CLI, the command line tool.
One method to install the Terraform CLI is to
download the Terraform CLI installer for your operating system from their website. You may also find Terraform in the package manager systems.
For macOS and Linux, the download bundle is a ZIP file. You simply unzip that file, and the Terraform CLI binary pops out. You then simply place it in a directory that's in your PATH. For example:
$ ls -l ~/Downloads/terraform*
-rwxr-xr-x@ 1 david  staff  85876096 Aug 10 10:50 /Users/david/Downloads/terraform
-rw-r--r--@ 1 david  staff  35631250 Aug 12 17:03 /Users/david/Downloads/terraform_0.13.0_darwin_amd64.zip
$ mv ~/Downloads/terraform ~/bin
FOr example $HOME/bin is a useful directory to add to the PATH variable.
$ which terraform
/Users/david/bin/terraform
$ terraform --version
Terraform v0.13.0
That immediately makes Terraform available to the command shell environment (Bash).
For Windows, the process is similar in that the download is a ZIP file containing a binary. You place the binary somewhere on your disk, like C:\Terraform, then in the Windows control panel you edit the PATH variable to include that directory.
Alternatively there is package-manager-based installation available for some OS's.
To install Terraform on macOS, they recommend using Homebrew: $ brew install terraform
To install Terraform on macOS, it is also available via MacPorts: $ sudo port install terraform-0.12
To install Terraform on Windows, it is available via the Chocolatey system: $ choco install terraform
To install Terraform on Ubuntu/Debian Linux:
$ curl -fsSL https://apt.releases.hashicorp.com/gpg | sudo apt-key add -
$ sudo apt-add-repository "deb [arch=amd64] https://apt.releases.hashicorp.com $(lsb_release -cs) main"
$ sudo apt-get update && sudo apt-get install terraform
To install Terraform on CentOS/RHEL
$ sudo yum install -y yum-utils
$ sudo yum-config-manager --add-repo https://rpm.releases.hashicorp.com/RHEL/hashicorp.repo
$ sudo yum -y install terraform
To install Terraform on Fedora:
$ sudo dnf install -y dnf-plugins-core
$ sudo dnf config-manager --add-repo https://rpm.releases.hashicorp.com/fedora/hashicorp.repo
$ sudo dnf -y install terraform
To install Terraform on Amazon Linux:
$ sudo yum install -y yum-utils
$ sudo yum-config-manager --add-repo https://rpm.releases.hashicorp.com/AmazonLinux/hashicorp.repo
$ sudo yum -y install terraform
In all cases you follow it up by running:
$ terraform -help
Usage: terraform [-version] [-help] <command> [args]

The available commands for execution are listed below.
The most common, useful commands are shown first, followed by
less common or more advanced commands. If you're just getting
started with Terraform, stick with the common commands. For the
other commands, please read the help and docs before usage.

...

$ terraform --version
Terraform v0.13.0
This gives you basic verification that Terraform is installed and ready to go.
Kicking the tires - using Terraform to deploy something to AWS
To go a little further let's learn how to use Terraform with AWS by deploying a simple EC2 instance on AWS.
The source code for this project is in https://github.com/robogeek/aws-ecs-nodejs-sample in the directory aws-ec2-simple.
Create a directory named aws-ec2-simple in which we'll create a few scripts. For the first, let's create a file named main.tf.
provider "aws" {
    profile   = var.aws_profile
    region    = var.aws_region
}
This is what Terraform calls a block. The provider blocks tells Terraform which cloud platform (or platforms) will be used in the project. In this case we tell Terraform to use the AWS Provider, because we'll be interfacing with AWS.
Before proceeding let's talk about the structure of blocks. Blocks have a type, in this case provider, and labels, in this case aws.
The general structure of blocks are as follows:
<BLOCK TYPE> "<BLOCK LABEL>" "<BLOCK LABEL>" {
     # Block body
     <IDENTIFIER> = <EXPRESSION> # Argument
}
There can be multiple labels for a block, and the labels are used to address specific blocks as we'll see. Within each block we place identifiers that are assigned values.
In the provider declaration we not only tell Terraform that we'll use AWS, it also tells Terraform which AWS Profile and AWS Region to use. To learn more about AWS Profiles and AWS Regions, see the guide on setting up the AWS CLI. The AWS Provider also looks in the AWS CLI configuration to pick up the authentication tokens.
Let's return to main.tf and add these entries.
resource "aws_vpc" "example" {
  cidr_block       = var.vpc_cidr
  enable_dns_support = var.enable_dns_support
  enable_dns_hostnames = var.enable_dns_hostnames

  tags = {
    Name = "${var.project_name}-vpc"
  }
}
This declares the VPC (Virtual Private Cluster) that will be used. The VPC is a container for cloud infrastructure elements. The VPC itself doesn't do much, but it is a container.
Blocks of type resource do what they sound like, which is to declare a resource on some cloud platform. For the AWS Provider, the type of resource is declared using the first label, in this case aws_vpc.
This VPC is named aws_vpc.example. The cidr_block attribute declares the address range used by the VPC, and the other two (enable_dns_support and enable_dns_hostnames) says whether to use DNS. The last, tags, is where we can attach informational labels, in this case a Name. AWS displays the Name tag in the AWS Management Console.
There are multiple declarations here in the form var.variable_name. These are what Terraform calls Variables. To declare some, let's take a little detour to create a file named variables.tf, using these:
variable "aws_profile"  { default = "example-profile" }
variable "aws_region"   { default = "us-west-2" }

variable "project_name" { default = "example" }

variable "ami_id" {
    // Ubuntu Server 18.04 LTS (HVM), SSD Volume Type - in us-west-2
    // default = "ami-0d1cd67c26f5fca19"
    // Ubuntu Server 20.04 LTS (HVM), SSD Volume Type - in us-west-2
    default = "ami-09dd2e08d601bff67"
}

variable "instance_type" { default = "t2.micro" }
variable "key_pair"      { default = "example-key-pair" }

variable "enable_dns_support"   { default = true }
variable "enable_dns_hostnames" { default = true }

variable "vpc_cidr"      { default = "10.0.0.0/16" }
variable "public1_cidr"  { default = "10.0.1.0/24" }
A variable resource block declares a data item that is referred two using the reference var.variable_name. The default attribute declares the value for the variable if the value is not specified elsewhere. There are multiple ways to declare the value of a variable, so you should see the default shown here as what it sounds like, the default value which can be overridden if needed.
Let's return to main.tf and finish off its entries.
resource "aws_subnet" "public1" {
  vpc_id     = aws_vpc.example.id
  cidr_block = var.public1_cidr
  availability_zone = data.aws_availability_zones.available.names[0]

  tags = {
    Name = "${var.project_name}-net-public1"
  }
}

data "aws_availability_zones" "available" {
  state = "available"
}

resource "aws_internet_gateway" "igw" {
  vpc_id = aws_vpc.example.id

  tags = {
    Name =  "${var.project_name}-IGW"
  }
}

resource "aws_route" "route-public" {
  route_table_id         = aws_vpc.example.main_route_table_id
  destination_cidr_block = "0.0.0.0/0"
  gateway_id             = aws_internet_gateway.igw.id
}

resource "aws_route_table_association" "public1" {
  subnet_id      = aws_subnet.public1.id
  route_table_id = aws_vpc.example.main_route_table_id
}
The aws_subnet resource declares a network segment, or sub-network. It is somewhat equivalent to an ethernet segment, and you can attach things to a subnet. Doing so will auto-assign an IP address to the thing which is local to the subnet. Notice that the VPC has a CIDR address range of "10.0.0.0/16" while the subnet uses the "10.0.1.0/24" range.
The vpc_id attribute gets the value aws_vpc.example.id, which refers to the id attribute of aws_vpc.example.
The availability_zone attribute declares the specific segment of AWS infrastructure where this will land. We first declared the AWS Region in the provider block. An AWS Availability Zone is a subset of the AWS infrastructure in a given region. Blocks with the type data looks up information held by the provider. In this case data.aws_availability_zones looks up the currently available availability zones, which returns the corresponding array, and we use an array reference to select the first zone.
The aws_internet_gateway is a kind of router which allows resources to be publicly visible to the Internet. By default resources attached to an AWS VPC are private, but of course some resources need to be reachable by the public. The IGW arranges for that to happen.
AWS has a construct named a Routing Table. The aws_route resource describes one route that can be attached to a routing table. This particular route says that for any non-local IP address, to forward the packets to the Internet Gateway. That handles the outbound role of the AWS IGW, which is about forwarding traffic to the public Internet.
We complete the routing table configuration with aws_route_table_association which associates aws_route.route-public with the main routing table of aws_subnet.public1.
This finishes the main.tf file, and comprises the bones of useful infrastructure on AWS. We've created an AWS VPC, a subnet, an Internet Gateway, and the routing table setup. Let's next declare something we can attach to the subnet.
With this VPC we could deploy any number of services offered by AWS. As a simple example, let's deploy an EC2 instance. EC2 is the AWS implementation of the VPS (Virtual Private Server) concept. It is a software emulation of a computer into which we can install an operating system and applications.
The variable var.ami_id contains an identifier for the operating system to install. An AMI means Amazon Machine Image, and the AMI ID says which to use. To find an AMI ID, log in to the AWS Management Console, navigate to the EC2 area, then start the process of launching an EC2 instance. The first screen lets you browse the available AMI's, and lists the AMI ID's. In this example the AMI is for Ubuntu 20.04 in the us-west-2 region.
Create a file named ec2-public.tf containing:
resource "aws_instance" "public" {
    ami           = var.ami_id
    instance_type = var.instance_type
    subnet_id     = aws_subnet.public1.id
    key_name      = var.key_pair
    vpc_security_group_ids = [ aws_security_group.ec2-public-sg.id ]
    depends_on = [ aws_vpc.example, aws_internet_gateway.igw ]
    associate_public_ip_address = true

    tags = {
        Name = "${var.project_name}-ec2-public"
    }

    user_data = file("docker_install.sh")
}
This describes an EC2 instance, with the AMI ID, the instance type, and the subnet ID. The instance type describes how large the virtual computer is to be - with t2.micro being one of the smallest instance sizes, one which qualifies for the AWS free tier.
For the key_name field, what's required is the name for an EC2 Key Pair. The Key Pair is an encrypted PEM certificate similar to an SSH key file we might normally use for passwordless SSH login. The key pair also works for passwordless login, just using a differently formatted encrypted certificate than the normal SSH key file. To generate a key pair you log in to the AWS Management Console, navigate to the EC2 section, and in that area you'll find a choice for generating key pairs. Then you must download the key pair. For the Terraform file, you simply enter the name of the key pair.
The vpc_security_group_ids refers to one or more Security Groups to apply to the EC2 instance. An AWS Security Group describes a kind of firewall that is attached to certain resources, and the firewall limits the kind of traffic that is allowed in and out of the resource. We'll show the security group in a second.
The depends_on field tells Terraform to first create the named things before creating the EC2 instance.
The associate_public_ip_address says to generate a public IP address for this instance. We want this machine to be visible to the public. Hence it is attached to a public subnet, and will use the internet gateway to be publicly visible.
The user_data field is for holding a shell script that is executed during initialization of the EC2 instance. This lets us do things like install or configure software packages. In this case we are using the Terraform file function to read in a shell script.
For that purpose, create a file named docker_install.sh containing:
#!/bin/sh
sudo apt-get update
sudo apt-get upgrade -y

sudo apt-get -y install \
    apt-transport-https \
    ca-certificates \
    curl \
    gnupg-agent \
    software-properties-common

curl -fsSL https://download.docker.com/linux/ubuntu/gpg | sudo apt-key add -

sudo apt-key fingerprint 0EBFCD88

sudo add-apt-repository \
    "deb [arch=amd64] https://download.docker.com/linux/ubuntu $(lsb_release -cs) stable"

sudo apt-get update
sudo apt-get upgrade -y
sudo apt-get install -y docker-ce docker-ce-cli containerd.io
sudo groupadd docker
sudo usermod -aG docker ubuntu
sudo systemctl enable docker

docker swarm init
As the name of the file implies, this file installs and sets up Docker, and configures it as a Docker Swarm. The commands used here are interpolated from the instructions for installing Docker on Ubuntu that are in the official Docker documentation. It starts by updating the package cache, installing a few packages, then integrating the Docker Ubuntu repository, and installing the Docker packages.
The last thing to add to ec2-public.tf is the aforementioned security group.
resource "aws_security_group" "ec2-public-sg" {
    name        = "${var.project_name}-public-sg"
    description = "allow inbound access to the EC2 instance"
    vpc_id      = aws_vpc.example.id

    ingress {
        description = "SSH"
        protocol    = "TCP"
        from_port   = 22
        to_port     = 22
        cidr_blocks = [ "0.0.0.0/0" ]
    }

    ingress {
        description = "HTTP"
        protocol    = "TCP"
        from_port   = 80
        to_port     = 80
        cidr_blocks = [ "0.0.0.0/0" ]
    }

    ingress {
        description = "HTTPS"
        protocol    = "TCP"
        from_port   = 443
        to_port     = 443
        cidr_blocks = [ "0.0.0.0/0" ]
    }

    egress {
        protocol    = "-1"
        from_port   = 0
        to_port     = 0
        cidr_blocks = [ "0.0.0.0/0" ]
    }
}
The ingress rules in a security group describes what kind of traffic is allowed to enter the EC2 instance, and the egress rules describe what traffic is allowed to leave it. If you had to look up ingress and egress in the dictionary, welcome to the club. With these rules we allow SSH, HTTP and HTTPS traffic into the instance, and we allow any traffic to leave.
The last script to create should be named outputs.tf:
output "ec2-public-arn" { value = aws_instance.public.arn }

output "ec2-public-dns" { value = aws_instance.public.public_dns }
output "ec2-public-ip"  { value = aws_instance.public.public_ip }

output "ec2-private-dns" { value = aws_instance.public.private_dns }
output "ec2-private-ip"  { value = aws_instance.public.private_ip }
The output block type describes, as the name implies, an output. Think of the variable blocks as inputs to this module, and the output blocks as the outputs. Terraform works to set up infrastructure matching the declarations in the files, and along the way it gathers up various values. We could have output blocks for any of those values. The outputs shown here are what we will need to know, primarily the public IP address and public DNS name for the EC2 instance.
Deploying AWS infrastructure using Terraform
Now that we've defined some infrastructure, let's see how to deploy it.
There are three steps to deployment using Terraform:
terraform initwhere we initialize a workspaceterraform planwhere we check the deployment to see that it makes senseterraform applywhere we tell Terraform to apply changes to the infrastructure, which results in deploying (or un-deploying) infrastructure resources
Let's start by running the init command:
$ terraform --version
Terraform v0.13.0
$ terraform init

Initializing the backend...

Initializing provider plugins...
- Finding latest version of hashicorp/aws...
- Installing hashicorp/aws v3.2.0...
- Installed hashicorp/aws v3.2.0 (signed by HashiCorp)

...

* hashicorp/aws: version = "~> 3.2.0"

Terraform has been successfully initialized!

You may now begin working with Terraform. Try running "terraform plan" to see
any changes that are required for your infrastructure. All Terraform commands
should now work.
...
Running terraform init creates a .terraform directory that contains data required by Terraform. It is also where the AWS Provider Plugin is installed.
We can rerun terraform init at any time to perform any required updates.
It helpfully tells us our next step is to run terraform plan. So let's do so:
One of the things it does is check the syntax, and check that everything is declared correctly. Such as:
$ terraform plan

Error: Reference to undeclared resource

  on ec2-public.tf line 20, in resource "aws_security_group" "ec2-public-sg":
  20:     vpc_id      = aws_vpc.notes.id

A managed resource "aws_vpc" "notes" has not been declared in the root module.
The problem here is that I copy/pasted the code from another project and have obviously missed something. By the time you see this I will have fixed everything, but it was very useful to show you that Terraform gives helpful messages like this.
After fixing this problem, we get the following:
$ terraform plan
Refreshing Terraform state in-memory prior to plan...
The refreshed state will be used to calculate this plan, but will not be
persisted to local or remote state storage.

data.aws_availability_zones.available: Refreshing state...

...
# aws_instance.public will be created
  + resource "aws_instance" "public" {
      + ami                          = "ami-09dd2e08d601bff67"
      + arn                          = (known after apply)
      + associate_public_ip_address  = true
      + availability_zone            = (known after apply)
      + cpu_core_count               = (known after apply)
      + cpu_threads_per_core         = (known after apply)
      + get_password_data            = false
      + host_id                      = (known after apply)
      + id                           = (known after apply)
      + instance_state               = (known after apply)
      + instance_type                = "t2.micro"
      + ipv6_address_count           = (known after apply)
      + ipv6_addresses               = (known after apply)
      + key_name                     = "notes-app-key-pair"
      + outpost_arn                  = (known after apply)
      + password_data                = (known after apply)
      + placement_group              = (known after apply)
      + primary_network_interface_id = (known after apply)
      + private_dns                  = (known after apply)
      + private_ip                   = (known after apply)
      + public_dns                   = (known after apply)
      + public_ip                    = (known after apply)
      + secondary_private_ips        = (known after apply)
      + security_groups              = (known after apply)
      + source_dest_check            = true
      + subnet_id                    = (known after apply)
      + tags                         = {
          + "Name" = "example-ec2-public"
        }
      + tenancy                      = (known after apply)
      + user_data                    = "dd51d9e9fb92c60970c0e1021ee7ac8b25a6db50"
      + volume_tags                  = (known after apply)
      + vpc_security_group_ids       = (known after apply)

      + ebs_block_device {
          + delete_on_termination = (known after apply)
          + device_name           = (known after apply)
          + encrypted             = (known after apply)
          + iops                  = (known after apply)
          + kms_key_id            = (known after apply)
          + snapshot_id           = (known after apply)
          + volume_id             = (known after apply)
          + volume_size           = (known after apply)
          + volume_type           = (known after apply)
        }

      + ephemeral_block_device {
          + device_name  = (known after apply)
          + no_device    = (known after apply)
          + virtual_name = (known after apply)
        }

      + metadata_options {
          + http_endpoint               = (known after apply)
          + http_put_response_hop_limit = (known after apply)
          + http_tokens                 = (known after apply)
        }

      + network_interface {
          + delete_on_termination = (known after apply)
          + device_index          = (known after apply)
          + network_interface_id  = (known after apply)
        }

      + root_block_device {
          + delete_on_termination = (known after apply)
          + device_name           = (known after apply)
          + encrypted             = (known after apply)
          + iops                  = (known after apply)
          + kms_key_id            = (known after apply)
          + volume_id             = (known after apply)
          + volume_size           = (known after apply)
          + volume_type           = (known after apply)
        }
    }
    ...
    # aws_vpc.example will be created
  + resource "aws_vpc" "example" {
      + arn                              = (known after apply)
      + assign_generated_ipv6_cidr_block = false
      + cidr_block                       = "10.0.0.0/16"
      + default_network_acl_id           = (known after apply)
      + default_route_table_id           = (known after apply)
      + default_security_group_id        = (known after apply)
      + dhcp_options_id                  = (known after apply)
      + enable_classiclink               = (known after apply)
      + enable_classiclink_dns_support   = (known after apply)
      + enable_dns_hostnames             = true
      + enable_dns_support               = true
      + id                               = (known after apply)
      + instance_tenancy                 = "default"
      + ipv6_association_id              = (known after apply)
      + ipv6_cidr_block                  = (known after apply)
      + main_route_table_id              = (known after apply)
      + owner_id                         = (known after apply)
      + tags                             = {
          + "Name" = "example-vpc"
        }
    }

Plan: 7 to add, 0 to change, 0 to destroy.
...
What Terraform does is to read the Terraform files in the current directory, and to construct a directed graph of the declared thingies. If the files parse correctly and make sense it proceeds to the next step. That step is to reach out to the infrastructure provider, in this case AWS, to detect the difference between the currently deployed system and the local declarations.
In this case nothing has been deployed. Therefore everything in the Terraform files must be deployed to AWS. That means, for every declared thing, Terraform prints the known object characteristics, prepended with this: # aws_vpc.example will be created.
What we learn from this is the full extent of object parameters for everything, along with the interpretation that Terraform made of the declarations.
This is an opportunity to review what's been declared. If you agree that Terraform has correctly interpreted your intent, proceed to the next stage.
$ terraform apply
data.aws_availability_zones.available: Refreshing state...

An execution plan has been generated and is shown below.
Resource actions are indicated with the following symbols:

...

  # aws_vpc.example will be created
  + resource "aws_vpc" "example" {
      + arn                              = (known after apply)
      + assign_generated_ipv6_cidr_block = false
      + cidr_block                       = "10.0.0.0/16"
      + default_network_acl_id           = (known after apply)
      + default_route_table_id           = (known after apply)
      + default_security_group_id        = (known after apply)
      + dhcp_options_id                  = (known after apply)
      + enable_classiclink               = (known after apply)
      + enable_classiclink_dns_support   = (known after apply)
      + enable_dns_hostnames             = true
      + enable_dns_support               = true
      + id                               = (known after apply)
      + instance_tenancy                 = "default"
      + ipv6_association_id              = (known after apply)
      + ipv6_cidr_block                  = (known after apply)
      + main_route_table_id              = (known after apply)
      + owner_id                         = (known after apply)
      + tags                             = {
          + "Name" = "example-vpc"
        }
    }

Plan: 7 to add, 0 to change, 0 to destroy.

Do you want to perform these actions?
  Terraform will perform the actions described above.
  Only 'yes' will be accepted to approve.

  Enter a value: yes

data.aws_availability_zones.available: Reading... [id=2020-08-14 19:57:42.175047 +0000 UTC]
data.aws_availability_zones.available: Read complete after 0s [id=2020-08-14 19:57:45.344296 +0000 UTC]
aws_vpc.example: Creating...
aws_vpc.example: Creation complete after 4s [id=vpc-0fb7138419816f1a7]
aws_internet_gateway.igw: Creating...
aws_subnet.public1: Creating...
aws_security_group.ec2-public-sg: Creating...
aws_subnet.public1: Creation complete after 1s [id=subnet-059540f9bbb148077]
aws_route_table_association.public1: Creating...
aws_internet_gateway.igw: Creation complete after 2s [id=igw-08ee67ebdebbf04bc]
aws_route_table_association.public1: Creation complete after 1s [id=rtbassoc-09ef61f97397d8f12]
aws_route.route-public: Creating...
aws_route.route-public: Creation complete after 1s [id=r-rtb-01b13e00011c07aef1080289494]
aws_security_group.ec2-public-sg: Creation complete after 3s [id=sg-083b352a686b4b352]
aws_instance.public: Creating...
aws_instance.public: Still creating... [10s elapsed]
aws_instance.public: Still creating... [20s elapsed]
aws_instance.public: Creation complete after 24s [id=i-0acd44b626c7f6401]

Apply complete! Resources: 7 added, 0 changed, 0 destroyed.

Outputs:

ec2-private-dns = ip-10-0-1-116.us-west-2.compute.internal
ec2-private-ip = 10.0.1.116
ec2-public-arn = arn:aws:ec2:us-west-2:098106984154:instance/i-0acd44b626c7f6401
ec2-public-dns = ec2-34-221-164-64.us-west-2.compute.amazonaws.com
ec2-public-ip = 34.221.164.64
This command again reads the Terraform files, constructs a directed graph, and compares the declarations to the current deployed state. It prints out a similar dump of the proposed changes to the deployed infrastructure. It then asks for your approval to apply those changes.
The last part of this is the log of what Terraform does to the AWS infrastructure, followed by the output values. Usefully this gives us the IP address of the EC2 instance.
Let's log in to the EC2 instance and take a look.
$ ssh -i ~/Downloads/notes-app-key-pair.pem ubuntu@34.221.164.64
The authenticity of host '34.221.164.64 (34.221.164.64)' can't be established.
ECDSA key fingerprint is SHA256:bimJT5eWnEkW8Nit0pIFYtCQNWQdu5CRm82zg17yems.
Are you sure you want to continue connecting (yes/no)? yes
Warning: Permanently added '34.221.164.64' (ECDSA) to the list of known hosts.

Welcome to Ubuntu 20.04.1 LTS (GNU/Linux 5.4.0-1009-aws x86_64)

 * Documentation:  https://help.ubuntu.com
 * Management:     https://landscape.canonical.com
 * Support:        https://ubuntu.com/advantage

 System information disabled due to load higher than 1.0

7 updates can be installed immediately.
7 of these updates are security updates.
To see these additional updates run: apt list --upgradable


*** System restart required ***

The programs included with the Ubuntu system are free software;
the exact distribution terms for each program are described in the
individual files in /usr/share/doc/*/copyright.

Ubuntu comes with ABSOLUTELY NO WARRANTY, to the extent permitted by
applicable law.

To run a command as administrator (user "root"), use "sudo <command>".
See "man sudo_root" for details.
Hurm.. system restart required. That's easy, sudo reboot and then wait a couple minutes and you can log in again. The second time around we're not told the restart is required.
Since we pre-installed Docker, let's take a look.
ubuntu@ip-10-0-1-116:~$ docker ps
CONTAINER ID        IMAGE               COMMAND             CREATED             STATUS              PORTS               NAMES
No currently running containers, because this is a freshly deployed machine on which we've done nothing.
ubuntu@ip-10-0-1-116:~$ docker info | grep Swarm
 Swarm: active
We did run docker swarm init in the initialization, and indeed Swarm mode is active.
ubuntu@ip-10-0-1-116:~$ docker run hello-world
Unable to find image 'hello-world:latest' locally
latest: Pulling from library/hello-world
0e03bdcc26d7: Pull complete
Digest: sha256:7f0a9f93b4aa3022c3a4c147a449bf11e0941a1fd0bf4a8e6c9408b2600777c5
Status: Downloaded newer image for hello-world:latest

Hello from Docker!
This message shows that your installation appears to be working correctly.

To generate this message, Docker took the following steps:
 1. The Docker client contacted the Docker daemon.
 2. The Docker daemon pulled the "hello-world" image from the Docker Hub.
    (amd64)
 3. The Docker daemon created a new container from that image which runs the
    executable that produces the output you are currently reading.
 4. The Docker daemon streamed that output to the Docker client, which sent it
    to your terminal.
And we can run the Hello World image to get this message.
And then since it is running in Swarm mode, let's start a simple Docker service like so:
ubuntu@ip-10-0-1-116:~$ docker service create --name nginx --replicas 1 -p 80:80 nginx
61h7u5ov9tmx68nmh84ss0me1
overall progress: 1 out of 1 tasks
1/1: running
verify: Service converged
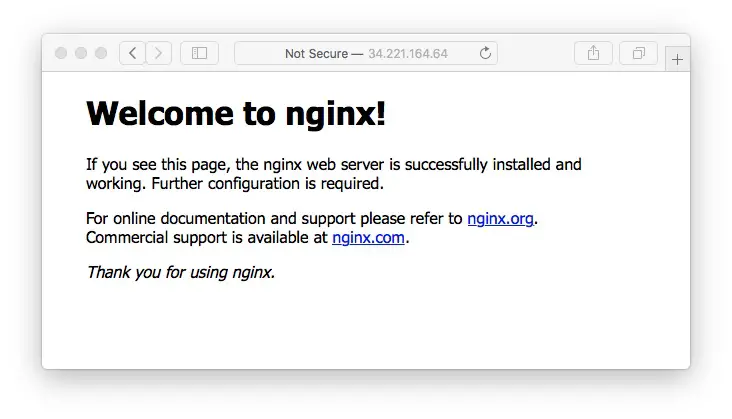
And visiting http://34.221.164.64/ (the IP address for the service) we get this:
Basically - with a few simple commands we've deployed AWS infrastructure using code that can be easily committed to a source repository and version controlled. The actual deployment only took a couple minutes to have a running system.
Now that we've had some fun, it's time to delete the infrastructure.
$ terraform destroy
data.aws_availability_zones.available: Refreshing state... [id=2020-08-14 19:57:45.344296 +0000 UTC]
aws_vpc.example: Refreshing state... [id=vpc-0fb7138419816f1a7]
aws_internet_gateway.igw: Refreshing state... [id=igw-08ee67ebdebbf04bc]
aws_subnet.public1: Refreshing state... [id=subnet-059540f9bbb148077]
aws_security_group.ec2-public-sg: Refreshing state... [id=sg-083b352a686b4b352]
aws_route.route-public: Refreshing state... [id=r-rtb-01b13e00011c07aef1080289494]
aws_route_table_association.public1: Refreshing state... [id=rtbassoc-09ef61f97397d8f12]
aws_instance.public: Refreshing state... [id=i-0acd44b626c7f6401]

An execution plan has been generated and is shown below.
Resource actions are indicated with the following symbols:
  - destroy

Terraform will perform the following actions:

...


  # aws_vpc.example will be destroyed
  - resource "aws_vpc" "example" {
      - arn                              = "arn:aws:ec2:us-west-2:098106984154:vpc/vpc-0fb7138419816f1a7" -> null
      - assign_generated_ipv6_cidr_block = false -> null
      - cidr_block                       = "10.0.0.0/16" -> null
      - default_network_acl_id           = "acl-0585065bceb5481b5" -> null
      - default_route_table_id           = "rtb-01b13e00011c07aef" -> null
      - default_security_group_id        = "sg-0329071196a01f695" -> null
      - dhcp_options_id                  = "dopt-e0c05d98" -> null
      - enable_classiclink               = false -> null
      - enable_classiclink_dns_support   = false -> null
      - enable_dns_hostnames             = true -> null
      - enable_dns_support               = true -> null
      - id                               = "vpc-0fb7138419816f1a7" -> null
      - instance_tenancy                 = "default" -> null
      - main_route_table_id              = "rtb-01b13e00011c07aef" -> null
      - owner_id                         = "098106984154" -> null
      - tags                             = {
          - "Name" = "example-vpc"
        } -> null
    }

Plan: 0 to add, 0 to change, 7 to destroy.

Changes to Outputs:
  - ec2-private-dns = "ip-10-0-1-116.us-west-2.compute.internal" -> null
  - ec2-private-ip  = "10.0.1.116" -> null
  - ec2-public-arn  = "arn:aws:ec2:us-west-2:098106984154:instance/i-0acd44b626c7f6401" -> null
  - ec2-public-dns  = "ec2-34-221-164-64.us-west-2.compute.amazonaws.com" -> null
  - ec2-public-ip   = "34.221.164.64" -> null

Do you really want to destroy all resources?
  Terraform will destroy all your managed infrastructure, as shown above.
  There is no undo. Only 'yes' will be accepted to confirm.

  Enter a value: yes


aws_route_table_association.public1: Destroying... [id=rtbassoc-09ef61f97397d8f12]
aws_route.route-public: Destroying... [id=r-rtb-01b13e00011c07aef1080289494]
aws_instance.public: Destroying... [id=i-0acd44b626c7f6401]
aws_route.route-public: Destruction complete after 1s
aws_route_table_association.public1: Destruction complete after 1s
aws_instance.public: Still destroying... [id=i-0acd44b626c7f6401, 10s elapsed]
aws_instance.public: Still destroying... [id=i-0acd44b626c7f6401, 20s elapsed]
aws_instance.public: Still destroying... [id=i-0acd44b626c7f6401, 30s elapsed]
aws_instance.public: Destruction complete after 31s
aws_internet_gateway.igw: Destroying... [id=igw-08ee67ebdebbf04bc]
aws_subnet.public1: Destroying... [id=subnet-059540f9bbb148077]
aws_security_group.ec2-public-sg: Destroying... [id=sg-083b352a686b4b352]
aws_security_group.ec2-public-sg: Destruction complete after 1s
aws_subnet.public1: Destruction complete after 1s
aws_internet_gateway.igw: Still destroying... [id=igw-08ee67ebdebbf04bc, 10s elapsed]
aws_internet_gateway.igw: Destruction complete after 11s
aws_vpc.example: Destroying... [id=vpc-0fb7138419816f1a7]
aws_vpc.example: Destruction complete after 1s

Destroy complete! Resources: 7 destroyed.
With the destroy command Terraform does the opposite of what it had done before. It again constructs a directed graph of everything declared in the local directory, and compares that graph against the deployed system. It then detects what needs to be destroyed, because the goal is to delete the infrastructure declared locally.
If you approve of the destruction, it goes ahead and does it.
It would be instructive, while the infrastructure is deployed, to visit the AWS Management console to inspect the VPC and EC2 areas to see what was created. Then after running terraform destroy, to visit again and verify that everything was cleaned up correctly.
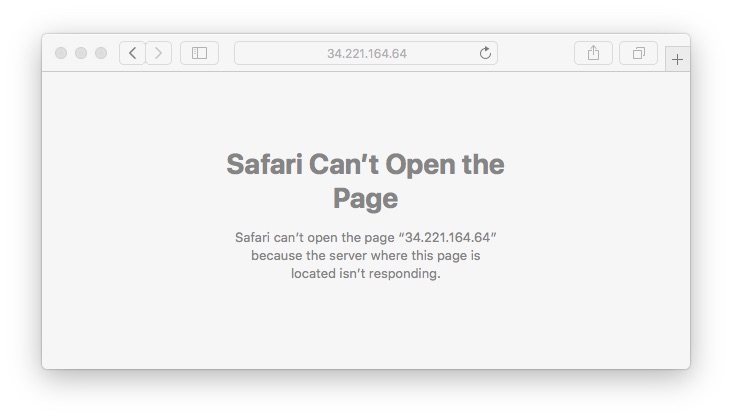
And, visiting the IP address in your browser results in this error because obviously nothing is there at that address any longer.
Summary
In this guide we've learned not only how to set up Terraform in your development environment, but to use it to deploy a simple system to AWS.
This is a powerful tool supporting a long list of cloud services. You can use Terraform not just for AWS deployment, but for many other systems.
Do not expect to directly reuse the AWS infrastructure declarations on another cloud hosting provider. While Terraform supports Azure and Google cloud systems, the precise declarations vary because the object structures are different on each system.
What's useful is that Terraform brings the same methodology to each cloud hosting system. While you won't be able to directly reuse code from one cloud system to another, once you learn to use one cloud system with Terraform you'll have an easier time learning to use the others. Further, Terraform lets you work with multiple providers in one project so that you can mix and match services.


 Starter Kit (32 GB EVO+ Edition, Premium Black Case)")


