David Herron
Tags: MQTT »»»»
A huge part of modern Internet security is SSL/TLS, which encrypts data and authenticates connections. This is the technology behind HTTPS, and can be used to securely run MQTT on the Internet.
Out of the box Mosquitto supports anonymous connections, which is great for test setups but not for production use. In production it's a best practice to authenticate connections to MQTT brokers (Mosquitto). Otherwise rogue clients could send bogus data through MQTT causing all kinds of havoc.
Mosquitto supports user/password authentication in a password file, which is useful for some circumstances. It also supports authentication using SSL certificates. These are the same sort of certificates used for HTTPS to web services. For HTTPS, SSL certificates that a web server is what it says it is, for example that your bank website is actually owned and operated by your bank. For Mosquitto, there are SSL certificates for both the server and for clients connecting to the server. This means SSL certificates can perform the same service as the Mosquitto password file, while adding data encryption.
SSL certificates use a chain of "Certificate Authority" certificates. When we procure an HTTPS SSL certificate, the CA chain is built in. You can view this chain in a web browser - in the location bar click on the "Lock" and a menu will pop up letting you examine information how the connection is authenticated. The menu will offer a choice to display the certificate chain.
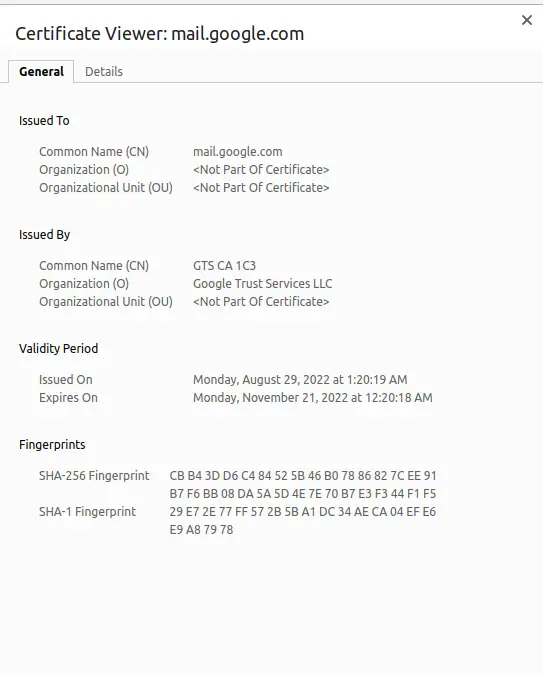
This is the certificate chain for mail.google.com retrieved on October 20, 2022.
I believe that Mosquitto does not use the exact same certificates you'd use on your webserver.
Instead, for a self-hosted Mosquitto setup, we create our own certificate authority and issue our own certificates. If using a commercial MQTT service they'll give us SSL certificates generated by the service. But, in order to learn how things work, it's useful to build things ourselves.
Review setting up the Mosquitto MQTT broker
In our previous article on Mosquitto, Deploying Mosquitto MQTT broker on Linux using Docker, discussed a simple Mosquitto installation. We had the server setup, and authenticated users with password file entries. The resulting directory has this structure:
$ tree .
.
├── data
│   └── mosquitto.db
├── docker-compose.yml
├── etc
│   └── passwd
├── log
│   └── mosquitto.log
└── mosquitto.conf
The docker-compose.yml describes running Mosquitto under Docker, along with logging output in the log directory, a data directory, and a configuration file. In etc/passwd we have a simple password file for authenticating MQTT users. Since it does not use SSL there is no encryption.
Reviewing SSL/TLS terminology
The technology for securing MQTT brokers, the SSL certificate, is the same mechanism used in HTTPS for secure web browsing.
- SSL and TLS -- This is an Internet standard for encrypting data communication over the Internet. TLS, or Transport Layer Security, is an IETF draft standard for secure Internet communications, and it supplants the earlier work on SSL (Secure Sockets Layer). It requires use of an SSL certificate, as well as encryption using based on a pair of keys, the private and public key.
- Public Key Certificate or Digital Certificate -- This is an electronic document that is used for validating the authenticy of a public key. The encryption system allows the public key to be shared openly, and requires the private key to be securely stored.
- SSL Certificate -- These are the certificates used with TLS, for example to ensure your web site is protected with HTTPS you provision an SSL certificate. The certificates are in X.509 format which gives lots of room to explain who owns the website or service, etc. The certificates are provisioned within a PKI hierarchy.
- PKI or Public Key Infrastructure -- This is tools, and infrastructure, for managing public encryption keys. Each PKI is shaped as a tree of services that can generate SSL certificates.
- CA or Certificate Authority -- The root of a PKI tree is a certificate authority, and all certificates used within that PKI are derived from the CA's certificate. It is easy to create your own CA, however only a select CA's are widely trusted. Trusted means that the certificates from trusted CA's are distributed with software like operating systems or web browsers. All other CA certificates are not distributed this way. The effect is that the certificates derived from widely distributed CA certificates are easily verifiable, while certificates derived from other CA's are not deemed as trustworthy.
- RA or Registration Authority -- The authority to validate an application to provision an SSL certificate is delegated to registration authorities. The RA does not sign the certificates, it is the CA that does so, but the RA ensures the certificate request is valid.
Setup the certificate authority (CA) for our private PKI
Remember that the Certificate Authority is the root of the PKI. For this project we'll create a private CA, hence a private PKI, with which to generate certificates.
The ubiquitous OpenSSL package is the primary tool for these purposes. The files involved with operating a CA and issuing SSL certificates are Internet standards (or draft standards). OpenSSL is the most ubiquitous tool for generating and manipulating these files.
Start with this:
$ mkdir -p ssl/ca
This will hold the files related to the CA.
Next, generate a private key for the CA:
# CD into the directory
$ cd ssl/ca
# Generate a key that will have a passphrase
$ openssl genrsa -des3 -out ca.key 2048
# Optionally, generate a key that will not have a passphrase
$ openssl genrsa -out ca.key 2048
In theory a private key with a passphrase is more secure. This is because you must enter the passphrase before the key can be used. But, what if launching your production server meant a human had to be on-hand to type in the passphrase?
In the examples below, ca.key was generated with a passphrase but all other private keys did not have a passphrase. Notice in the examples that anytime ca.key was referenced, we were prompted for the passphrase, but this was not required for other private keys.
From the key, we generate a root certificate.
$ openssl req -new -x509 -days 1826 -key ca.key -out ca.crt
You are about to be asked to enter information that will be incorporated
into your certificate request.
What you are about to enter is what is called a Distinguished Name or a DN.
There are quite a few fields but you can leave some blank
For some fields there will be a default value,
If you enter '.', the field will be left blank.
-----
Country Name (2 letter code) [AU]:US
State or Province Name (full name) [Some-State]:California
Locality Name (eg, city) []:San Jose
Organization Name (eg, company) [Internet Widgits Pty Ltd]:Me, Ltd
Organizational Unit Name (eg, section) []:mqtt
Common Name (e.g. server FQDN or YOUR name) []:test
Email Address []:.
Notice that you go through an interactive process to fill in identifying information. For fields where you do not want to enter a value, do not hit RETURN (that just enters the default value), but instead enter a period character (a.k.a. dot).
In a production setting you'd store the root private key (the ca.key file) offline. That private key is the critical piece to the system you're creating. A miscreant who gets that key can pretend to be you.
Here's a shell script:
cd ssl/ca
openssl genrsa -des3 -out ca.key 2048
openssl req -new -x509 -days 3650 -key ca.key -out ca.crt
A simplification to explore is using an OpenSSL configuration file. In part that file lets you generate certificates without having going through that interview.
Lastly, store the CA certificate in a location where we'll use it for Mosquitto
$ mkdir -p etc/certs
$ cp ssl/ca/ca.crt etc/certs
This gives you the following directory tree:
$ tree .
.
├── data
│   └── mosquitto.db
├── docker-compose.yml
├── etc
│   ├── certs
│   │   └── ca.crt
│   └── passwd
├── log
│   └── mosquitto.log
├── mosquitto.conf
└── ssl
    └── ca
        ├── ca.crt
        └── ca.key
The best practice is to hide the CA key offline somewhere. It is the root of the chain of trust securing your whole system. If that private key fell into the wrong hands the whole system could be subverted.
Generate an SSL certificate for the Mosquitto server
The next step is to generate an SSL certificate to be used by the Mosquitto server.
Generate a private key, note that there's no passphrase.
$ mkdir -p ssl/server
$ cd ssl/server
$ openssl genrsa -out server.key 2048
Generate a certificate signing request, which is a formal request for a CA to sign an SSL certificate.
$ openssl req -new -out server.csr -key server.key

You are about to be asked to enter information that will be incorporated
into your certificate request.
What you are about to enter is what is called a Distinguished Name or a DN.
There are quite a few fields but you can leave some blank
For some fields there will be a default value,
If you enter '.', the field will be left blank.
-----
Country Name (2 letter code) [AU]:US
State or Province Name (full name) [Some-State]:California
Locality Name (eg, city) []:San Jose
Organization Name (eg, company) [Internet Widgits Pty Ltd]:Me, Ltd
Organizational Unit Name (eg, section) []:mqtt-server
Common Name (e.g. server FQDN or YOUR name) []:192.168.1.84
Email Address []:.

Please enter the following 'extra' attributes
to be sent with your certificate request
A challenge password []:.
An optional company name []:.
The model is that a Registration Authority gathers the identifying information, and ensures it is valid. The RA then sends the CSR to the CA, and the CA signs the request.
This is again an interactive process. We gave different values because this certificate is for the Mosquitto server.
From the CSR, create an SSL certificate for the Mosquitto server.
$ openssl x509 -req -in server.csr \
        -CA ../ca/ca.crt -CAkey ../ca/ca.key -CAcreateserial \
        -out server.crt -days 360
Certificate request self-signature ok
subject=C = US, ST = California, L = San Jose, O = "Me, Ltd", OU = mqtt-server, CN = 192.168.1.84
Enter pass phrase for ../ca/ca.key:
This gives us a server certificate that will remain valid for 360 days. You should create a process to regenerate certificates every so often.
The critical value in these two certificates is the Common Name. I don't fully understand, but notice that when asked for the common name it is suggested to use the "FQDN" (a.k.a. fully qualified domain name). This would require that the server have an assigned domain name, and in most production deployments that is the case. For a test on our laptop an FQDN is not readily available (e.g. I tried davidpc.local with no luck). The IP address shown here is the one DHCP assigned, and will of course change in the future.
During testing the error messages included:
# SSL library says it could not verify the certificate
Error: host name verification failed.
OpenSSL Error[0]: error:0A000086:SSL routines::certificate verify failed
# SSL library says not authorized
Connection error: Connection Refused: not authorised.
With the answers given above, neither of these errors occurred within the test environment on my laptop.
There is a
long and detailed discussion of correctly configured SSL certificates for MQTT in the Home Assistant forums that is of interest.
Installing the SSL certificates in Mosquitto
We already created an etc/certs directory. Make sure that ca.crt, server.key, and server.crt are in that directory.
The directory tree should look like this:
$ tree .
.
├── data
│   └── mosquitto.db
├── docker-compose.yml
├── etc
│   ├── certs
│   │   ├── ca.crt
│   │   ├── server.crt
│   │   └── server.key
│   └── passwd
├── log
│   └── mosquitto.log
├── mosquitto.conf
└── ssl
    ├── ca
    │   ├── ca.crt
    │   └── ca.key
    └── server
        ├── server.crt
        ├── server.csr
        └── server.key
Before we edit mosquitto.conf let's start over with the example file distributed by the Mosquitto project. It is instructive to read those comments to have further advice on Mosquitto configuration. In the previous article we instead supplied our own file. To get ahold of the default file, change docker-compose.yml do this:
services:
    mosquitto:
        image: eclipse-mosquitto
        ports:
            # - 1883:1883
            - 8883:8883
            - 9001:9001
        volumes:
            # - ./mosquitto.conf:/mosquitto/config/mosquitto.conf
            # - ./config:/mosquitto/config/
            - ./data:/mosquitto/data/
            - ./log:/mosquitto/log/
            - ./etc:/mosquitto/etc/
The 8883 port is preferred for SSL-protected access to MQTT, hence we're preparing the way for SSL. We've disabled the 1883 port so we can focus on SSL-protected connections. Another change is to switch to having a configuration directory, rather than mounting a single configuration file.
For now we're not going to supply Mosquitto with a configuration. That will leave the default configuration file visible, so that we can fetch it from inside the container.
We should be able to run Mosquitto:
$ docker compose up -d
Notice that docker compose is used (no -) instead of docker-compose. The docker-compose command has been deprecated by the Docker team, and the vast majority of docker-compose functionality is now available as docker compose.
Then gain access to the container:
$ docker compose exec mosquitto sh
/ # cat /mosquitto/config/mosquitto.conf
/ # exit
$ docker compose down
The first line starts a command shell inside the container. Since the Mosquitto container is based on Alpine Linux, the shell is named sh rather than bash. The second command prints the contents of mosquitto.conf. You'll need to then copy/paste the text and use an editor to create your own copy of the file. The directory tree will now look like this:
$ tree .
.
├── config
│   └── mosquitto.conf
├── data
│   └── mosquitto.db
├── docker-compose.yml
├── etc
│   ├── certs
│   │   ├── ca.crt
│   │   ├── server.crt
│   │   └── server.key
│   └── passwd
├── log
│   └── mosquitto.log
├── mosquitto.conf
└── ssl
    ├── ca
    │   ├── ca.crt
    │   └── ca.key
    └── server
        ├── server.crt
        ├── server.csr
        └── server.key
Most (or all) of the settings in the default mosquitto.conf are commented out. To change one, uncomment the setting and change the value as shown.
Start by making these changes:
allow_anonymous false

persistence true
persistence_location /mosquitto/data/
log_dest file /mosquitto/log/mosquitto.log
password_file /mosquitto/etc/passwd
This roughly corresponds to the previous configuration file, other than the listener line.
It was determined that even with SSL certificate authentication, that it was required to use a username/password pair. We discussed setup of the password file in Deploying Mosquitto MQTT broker on Linux using Docker.
In the section for Listeners, add this
tls_version tlsv1.2
listener 8883
There is no listener for port 1883 because port 8883 is used for MQTT with SSL. The tls_version line enables the desired TLS version.
In the section for Certificate based SSL/TLS support add these lines:
cafile /mosquitto/etc/certs/ca.crt
certfile /mosquitto/etc/certs/server.crt
keyfile /mosquitto/etc/certs/server.key
These paths are relative to the container filesystem, and are determined by the volume mounts in docker-compose.yml.
Once you've edited the configuration file, uncomment this ./config:/mosquitto/config/ volume mount so that Mosquitto will use your file.
The result is a Mosquitto server with SSL-protected MQTT on port 8883, using the certificates we just created.
Using the SSL certificate for your CA with MQTT clients
Remember from the previous article that Mosquitto has two client programs. With mosquitto_sub you create a subscriber to a topic, and with mosquitto_pub you publish messages to topics.
To use these commands with our server now requires using SSL certificates. We haven't generated any certificate for MQTT clients, only for the Mosquitto server.
We can get started by using the CA certificate instead:
sudo mosquitto_sub -h 192.168.1.84 -p 8883 \
            -u henry -P passw0rd --cafile etc/certs/ca.crt  \
            -t test/message -d

sudo mosquitto_pub -h localhost -p 8883 \
            -u henry -P passw0rd --cafile etc/certs/ca.crt \
            -t test/message -m 'Hello world!'
We ran the command using sudo to avoid this error:
Error: Problem setting TLS options: File not found.
The permissions the files in etc/certs could prevent the files from being read.
The Mosquitto user/password pair are still supplied on the command line.
Notice that the client programs are being validated using the CA certificate. That is almost certainly a bad practice. Instead, each client should have its own certificate, and it should be possible to revoke a certificate in case a client goes rogue.
As we saw with generating the server certificate, it's easy to generate additional certificates.
Generating SSL certificates for MQTT clients
We just determined it's necessary to generate SSL certificates for authenticating client applications. We should think about how to generate a large number of certificates. Depending on the scope of our project there could be millions of client devices, right?
To review the steps:
- Generate a private key for the certificate. Optionally the private key can be encrypted with a passphrase.
- Generate a certificate signing request for the CA to sign.
- Have the CA generate the signed certificate.
One way to ease the administrative burden is with a shell script:
mkdir -p ssl/client1
cd ssl/client1
openssl genrsa -out client1.key 2048

openssl req -new -out client1.csr -key client1.key

openssl x509 -req -in client1.csr \
        -CA ../ca/ca.crt -CAkey ../ca/ca.key \
        -CAcreateserial -out client1.crt -days 360
This runs the commands to generate a private key and the resulting SSL certificate. To generate lots of these the script should take a parameter, such as a client ID number, that is used in file names.
$ sh -x genclient1.sh
+ mkdir -p ssl/client1
+ cd ssl/client1
+ openssl genrsa -out client1.key 2048
+ openssl req -new -out client1.csr -key client1.key
You are about to be asked to enter information that will be incorporated
into your certificate request.
What you are about to enter is what is called a Distinguished Name or a DN.
There are quite a few fields but you can leave some blank
For some fields there will be a default value,
If you enter '.', the field will be left blank.
-----
Country Name (2 letter code) [AU]:US
State or Province Name (full name) [Some-State]:California
Locality Name (eg, city) []:San Jose
Organization Name (eg, company) [Internet Widgits Pty Ltd]:Me, Ltd
Organizational Unit Name (eg, section) []:mqtt-client
Common Name (e.g. server FQDN or YOUR name) []:client
Email Address []:.

Please enter the following 'extra' attributes
to be sent with your certificate request
A challenge password []:.
An optional company name []:.
+ openssl x509 -req -in client1.csr -CA ../ca/ca.crt -CAkey ../ca/ca.key -CAcreateserial -out client1.crt -days 360
Certificate request self-signature ok
subject=C = US, ST = California, L = San Jose, O = "Me, Ltd", OU = mqtt-client, CN = client
Enter pass phrase for ../ca/ca.key:
In this case the Common Name value is not critical.
Notice that when signing the CSR, we're asked to enter the passphrase for ca.key, but nowhere are we asked to enter a passphrase for client1.key. You will need to consider which keys should have a passphrase, because while this is in theory a security improvement it requires human intervention.
Then, to use the client certificates the two commands should have new parameters added:
sudo mosquitto_sub -h 192.168.1.84 -p 8883 -u me -P w0rd \
    --cafile etc/certs/ca.crt \
    --cert ssl/client1/client1.crt --key ssl/client1/client1.key  \
    -t test/message -d

sudo mosquitto_pub -h 192.168.1.84 -p 8883 -u me -P w0rd \
    --cafile etc/certs/ca.crt \
    --cert ssl/client1/client1.crt --key ssl/client1/client1.key \
    -t test/message -d -m 'Hello World'
Quickly creating another script to generate client2.crt and client2.key we can run this:
sudo mosquitto_pub -h 192.168.1.84 -p 8883 -u me -P w0rd \
    --cafile etc/certs/ca.crt \
    --cert ssl/client2/client2.crt --key ssl/client2/client2.key \
    -t test/message -d -m 'Hello World'
It's the same command, but with a new certificate. The advantage is we can put good identifiation information into each certificate, and in theory if a client goes bad we can individually revoke that certificate.
The directory tree now looks like this:
$ tree .
.
├── config
│   └── mosquitto.conf
├── data
│   └── mosquitto.db
├── docker-compose.yml
├── etc
│   ├── certs
│   │   ├── ca.crt
│   │   ├── server.crt
│   │   └── server.key
│   └── passwd
├── genca.sh
├── genclient1.sh
├── genclient2.sh
├── genserver1.sh
├── log
│   └── mosquitto.log
└── ssl
    ├── ca
    │   ├── ca.crt
    │   └── ca.key
    ├── client1
    │   ├── client1.crt
    │   ├── client1.csr
    │   └── client1.key
    ├── client2
    │   ├── client2.crt
    │   ├── client2.csr
    │   └── client2.key
    └── server
        ├── server.crt
        ├── server.csr
        └── server.key
Notice we are not installing the client certificates and keys with the server. Ask yourself, are those certificates required to be located with the server? Nope.
Further, if we run mosquitto_pub without the client private key, this error is printed:
Error: Both certfile and keyfile must be provided if one of them is set.
Therefore, the client key and certificate belong with the client code, not with the server. Consider a hardware device that connects to MQTT for reporting. The key and certificate files should be embedded in that device. Further, to protect the system individual keys must be revokable.
MQTT Explorer fails because of self-signed certificate -- WITH FIX
You might try using a commercial MQTT client like MQTT Explorer. It offers lots of additional capabilities beyond the command-line tools used above. Unfortunately, while setup for using SSL certificates is simple, it does not work with this situation.
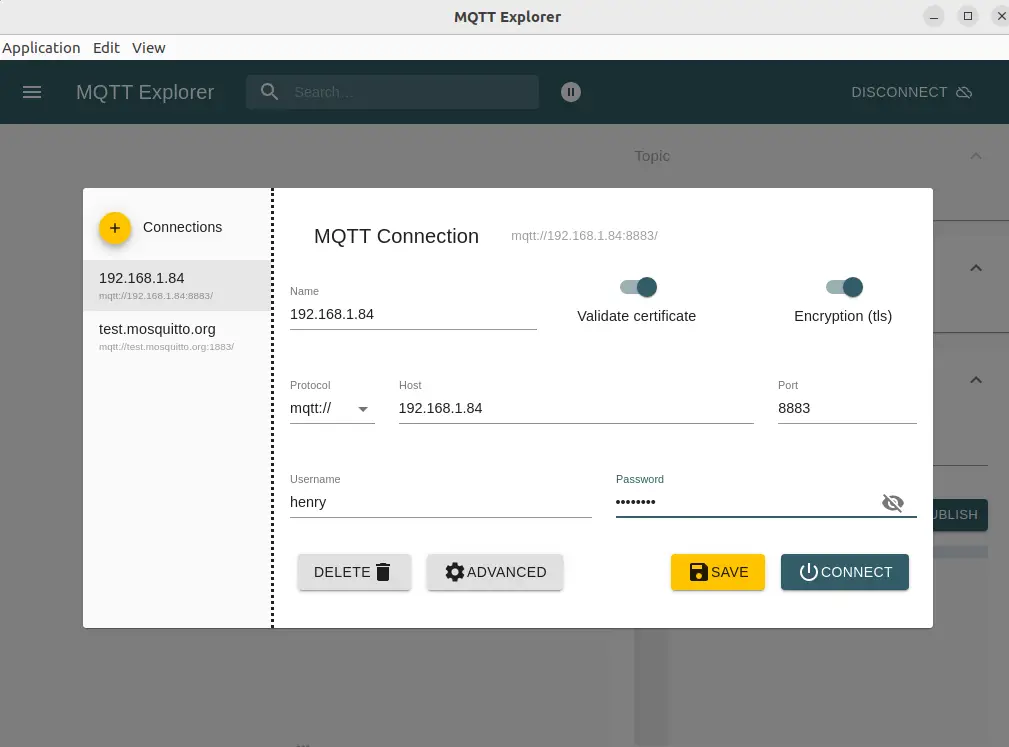
First start by entering connection details. In this case we've entered the IP address along with the user name and password.
To add the SSL certificates click on the Advanced button.
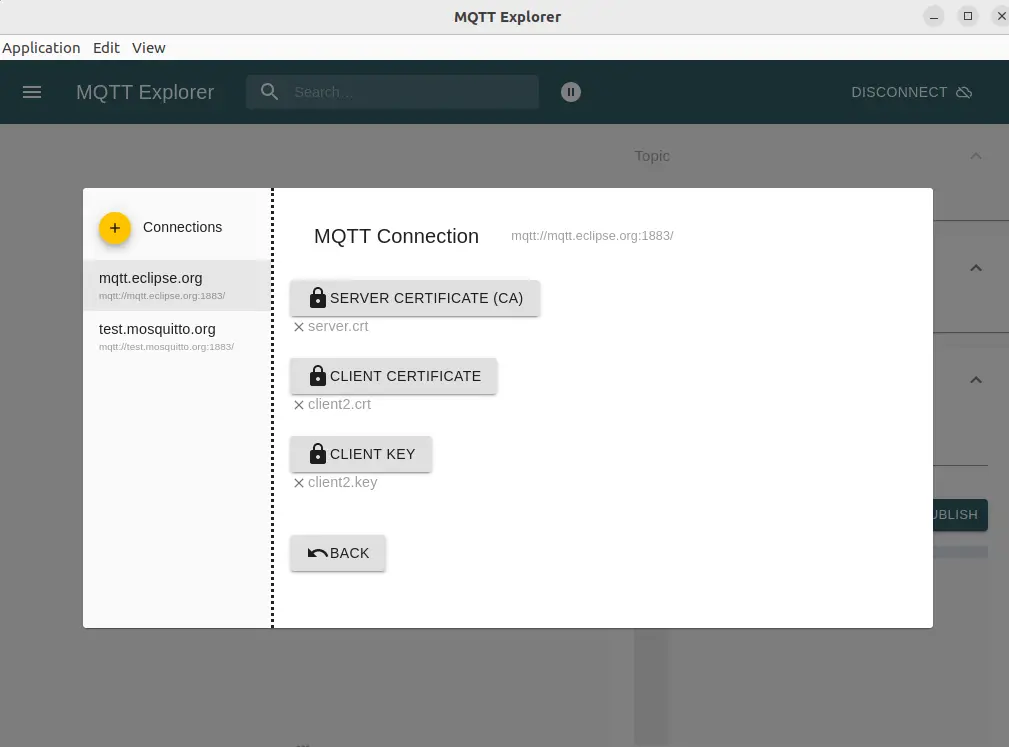
We can add the certificate for the server, the certificate for the client, and the client private key. These are the same options used with the command-line tools. Well, except for one option. This application does not allow us to supply the CA certficiate.
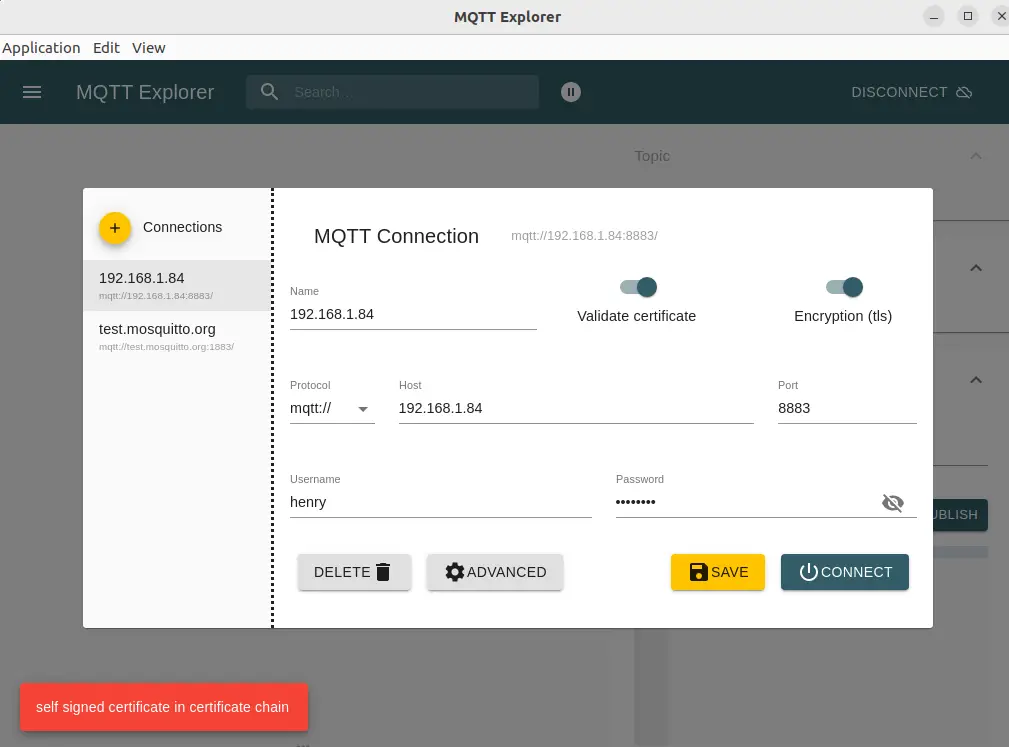
Unfortunately this does not work, saying that there is a self signed certificate being used.
Indeed, that is what we've done, which is to create a CA based on a self signed SSL certificate. The solution for this is to somehow register our CA certificate for use with the application. That's what the --cafile option did. Notice that the CA certificate was specified both in the Mosquitto server config, as well as on the command line of the CLI clients.
MQTT Explorer does not support specifying a CA certificate. But, this is only required for validation of the client certificates. Notice there is a checkbox governing validation. Uncheck that button, and we can connect with Mosquitto.
Afterward we get this:
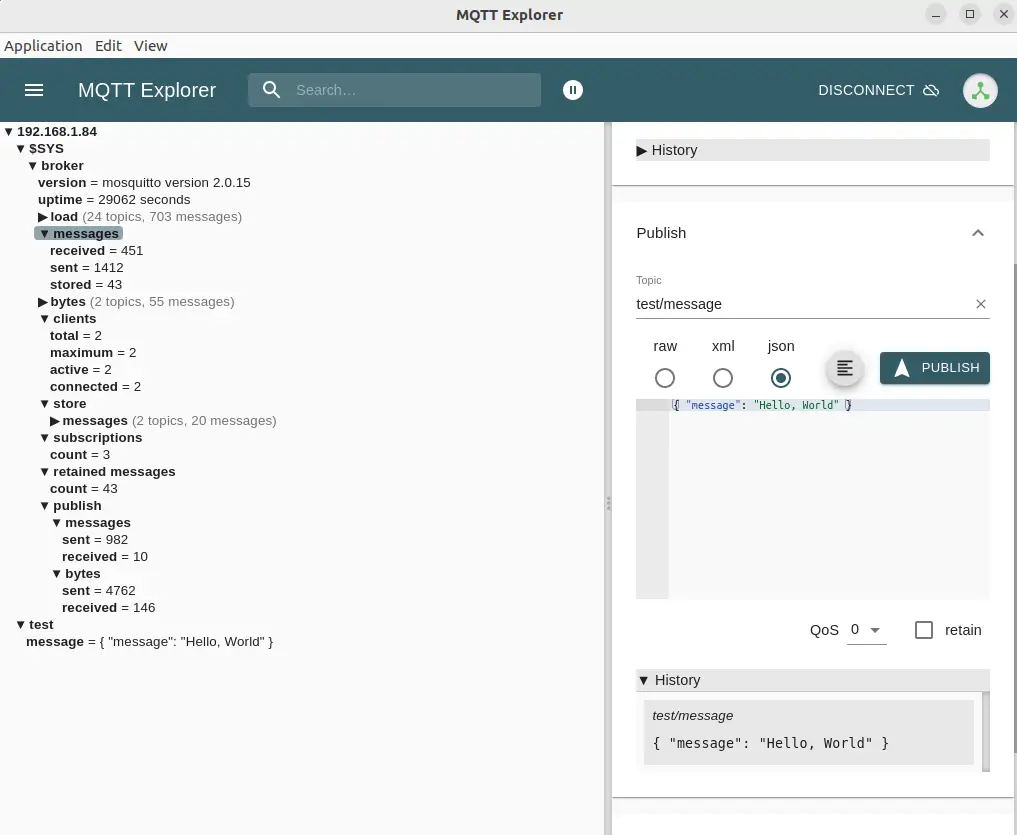
Turning off client side validation lets MQTT Explorer go ahead and connect with the server. The server should reject connections using bad certificates. This application lets us explore what's available via the server, and to both subscribe to and publish messages to topics.
SSL Certificate revocation lists for Mosquitto
We've mentioned several times that the advantage of issuing an SSL certificate for each client is that rogue clients can be blocked by revoking the certificate. An attempt to connect using a revoked certificate will be immediately rejected.
In the Mosquitto configuration file (mosquitto.conf) the crlfile directive lets us tell Mosquitto to use a Certificate Revocation List. These are stored in CRL files, and using openssl commands we can easily add certificates to a CRL.
Unfortunately, setting up the CRL seems to have required using an OpenSSL configuration file all along.
Namely, generating a CRL is this easy:
$ sudo mkdir -p etc/crl
$ sudo openssl ca -gencrl -out etc/crl/root-ca.crl
These commands are run against the directory structure shown above. The sudo command is used because the etc directory ended up owned by the 1883 user ID.
However, when run on my Ubuntu laptop, this error is printed:
Using configuration from /usr/lib/ssl/openssl.cnf
Could not open file or uri for loading CA private key from ./demoCA/private/cakey.pem
The OpenSSL library supports a configuration file that is documented at -
https://www.openssl.org/docs/manmaster/man5/config.html
Every step shown above would be simplified by using the configuraton file. The error message says the library used the default config supplied by Ubuntu, which has default settings in it which do not know about the directory structure shown in this article.
The
Feisty Duck OpenSSL Cookbook contains advice on a different way of setting up a Certificate Authority. The cookbook is worth reading to go deeper into the topic.
They recommend generating the CRL this way:
openssl ca -gencrl \
    -config root-ca.conf \
    -out root-ca.crl
The difference is to specify the configuration file.
And one revokes a certificate with this command:
openssl ca \
    -config root-ca.conf \
    -revoke certs/1002.pem \
    -crl_reason keyCompromise
The -revoke option takes the pathname of a certificate. The -crl_reason option is given a code explaining the reason. Valid codes are: unspecified, keyCompromise, CACompromise, affiliationChanged, superseded, cessationOfOperation, certificateHold, and removeFromCRL.
Notice that both of these commands require a configuration file, and that the error above demonstrates that OpenSSL will not generate a CRL without a configuration file. The
OpenSSL documentation for the
openssl ca command contains some advice for configuration file settings.
Clearly the result will be that entries are added to the CRL file. Mosquitto will then consult the CRL while determining whether a given certificate is valid. Certificates in the CRL are invalid, and would cause Mosquitto to reject the connection.
Summary
The Mosquitto server can use SSL certificates for client authentication. This can greatly improve security of your MQTT infrastructure. For example your application can generate an SSL certificate for each client, then use revocation lists to prevent rogue clients from accessing your server. Additionally, using SSL/TLS ensures data is encrypted.
To implement revocation lists, however, requires going deeper with OpenSSL and how to best use its configuration file with Mosquitto.
An alternative is to use the
OpenVPN easy-rsa scripts to manage your certificates. This is described as a shell script based certificate authority (CA). It includes support for creating a root CA, subordinate CA's, signing certificates, and managing revocation lists. Unfortunately the documentation is lacking.
Another alternative is to use SSL certificates provisioned by Lets Encrypt or other SSL providers. In such a case you do not create your own certificate authority, but are piggy backing off a commercial CA. There is a
HowToForge article showing use of Lets Encrypt SSL certificates with Mosquitto on Ubuntu. A key is that the
cafile setting in mosquitto.conf must be this file, /etc/ssl/certs/ISRG_Root_X1.pem, that is distributed with Ubuntu. The /etc/ssl/certs directory is an example of a certificate store, because the Ubuntu project has collected these certificates and declared their trust in those root CA certificates. Certificates from Lets Encrypt are validated by the ISRG_ROOT_X1 CA.
The bottom line is that we started this wanting to know how to secure a Mosquitto server using SSL/TLS. We were able to go a long way by using a few simplified openssl commands. But, it's clear that going further requires a deeper understanding of OpenSSL and its configuration file.


