David Herron
Tags: Ubuntu »»»» Multipass »»»»
Sometimes we need to run a Linux GUI application but do not have a graphics display on that computer. The X11 protocol lets us display the application remotely, and Canonical's Multipass application lets us manage Ubuntu instances in a lightweight virtual machine on Mac OS X or on Windows. Maybe we have a Linux GUI app that hasn't been ported to Mac OS X, we can run it inside a virtual Ubuntu instance and with XQuartz display it on the Mac desktop.
We have documented a similar solution using a Docker container: Run Linux/X11 apps in Docker and display on a Mac OS X desktop
Another tutorial documents setting up a full Linux desktop session in Multipass using VNC: Use Canonical's Multipass to display Linux desktop on macOS desktop and VNC
This approach is similar, and perhaps there is value to using a full virtual machine instead of a Docker container. For this article we'll skim over some of the details, so for a full discussion of the X11 authentication required see the other article.
In this demo we'll use Firefox but it should work for any Linux GUI application.
What is Multipass
Canonical describes it as a A mini-cloud on your Mac or Windows workstation. Sure... hit all those buzzwords. In more practical terms, it is a light-weight virtual machine hypervisor preconfigured for installing Ubuntu instances. It is like running VirtualBox or other virtual machine environments in that you have a full-fledged computer sitting inside the hypervisor environment.
This is very different from a Docker container. With Docker you do not have a full operating system environment. Otherwise Multipass gives you a somewhat similar user experience - you can quickly create and destroy virtual machines with Multipass just as you do with Docker, meaning you can quickly set up a test machine, run a few commands, then destroy the test machine when done.
Set up and configure XQuartz on Mac
XQuartz is an X11 display server for Mac OS X. Download a DMG directly from
https://www.xquartz.org/ - the DMG includes an installable package, so simply run the installer.
It is recommended to reboot the computer afterwards.
You can also get XQuartz via the Homebrew or MacPorts repositories.
Once you have XQuartz running, go into its Preferences and make this settings change:
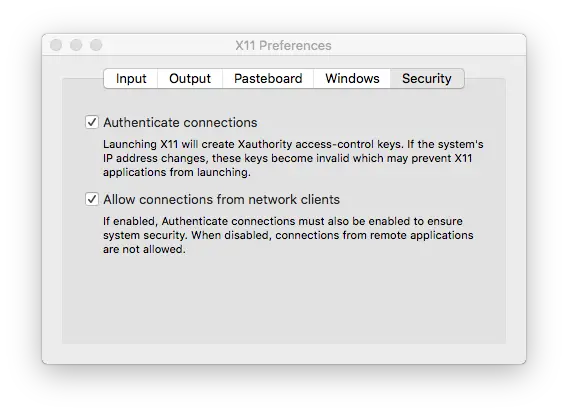
Namely - Allow connections from network clients. This opens the display so it accepts X11 connections from any non-local computer. The Docker container we're about to create counts - as would a Linux machine in your office.
Setting up a Multipass virtual machine to run Firefox
As with the Docker-based demo we'll run Firefox inside a virtual machine, and display on the Mac OS X desktop using XQuartz.
In the Docker-based demo we injected a couple files into the Docker container. We'll be able to do the same with Multipass.
$ multipass launch --name firefox
This tells Multipass to create a new Ubuntu instance giving it the name firefox. There are a number of options such as setting memory limits. But we can go with the defaults.
To inject the /tmp/.X11-unix directory into the virtual machine we do:
$ multipass mount /tmp/.X11-unix foo:/tmp/.X11-unix
The next file to inject is ~/.Xauthority - unfortunately Multipass only lets us mount directories, not files, into the virtual machine. So we had to do this instead:
$ multipass mount ~/.Xauthority foo:/home/ubuntu/.Xauthority
Source path "/Users/david/.Xauthority" is not a directory
$ multipass transfer ~/.Xauthority foo:/home/ubuntu/.Xauthority
The attempt to mount the file failed, as I said. The transfer command copies the file into the virtual machine. So of course this will have to be re-executed every time that file changes.
Another thing is to record your IP address:
$ export IP=$(ifconfig en0 | grep inet | awk '$1=="inet" {print $2}')
$ echo $IP
192.168.1.89
It is useful to configure the XQuartz display server to allow connections:
$ xhost +$IP
With this information collected go into the virtual machine and install Firefox:
$ multipass shell firefox
ubuntu@firefix:~$ sudo apt-get install firefox
.... much output from apt-get
The shell command SSH's you into the virtual machine giving you a login shell.
From there we simply use apt-get to install Firefox as we'd do on any Linux machine. You can also run ps aux to see that indeed this is a full Linux/Ubuntu system.
Once the installation is finished start Firefox as so:
ubuntu@firefox:~$ DISPLAY=192.168.1.89:0 firefox
And you'll see Firefox launch - as so:


