David Herron
Tags: Bitcoin Mining »»»»
Looking at the ever-increasing Bitcoin price and wondering how to get in on the action? One way to dip a toe in the water is to buy a cheap older-model Bitcoin miner, such as the Bitmain Antminer U3. These run around $100 on eBay currently and are a proper ASIC-based Bitcoin miner with very low power consumption. It connects to your computer via USB, and requires software like cgminer to connect to a mining pool. Other USB based Bitcoin miners exist, and while the following instructions are for the Antminer U3, the process should be similar for any other USB Bitcoin miner.
You may already know this - but a little basic preview. Bitcoins are "mined" by a distributed computation process. Chunks of data is distributed over the Internet to mining hardware. The mining hardware runs the computations to prove a new block on the Bitcoin Blockchain. The hardware that successfully completes this computational task wins that block of Bitcoin, and then the Bitcoin network silently moves on to computing the next coin.
Since it's completely impractical for an individual bitcoin mining hardware to compete in the current mining landscape it's necessary to connect your hardware to a mining pool. Several mining pools exist, and in this case we'll use the Slushpool.
For a list of pools see:
bitcoin.it/wiki/Comparison_of_mining_pools
To sign up with Slushpool, go to
https://slushpool.com/ and go through the signup process.
Their help center has a beginners guide that's useful. One thing to note is their warning that ASIC Miners are the only way to go in the current Bitcoin mining landscape. That's because the computational difficulty has grown to where a CPU is simply unable to do the TeraHashes/Second that is now typical.
Configuration parameters
The mining pool you choose may have different policies than this. What you'll need is three items of configuration to connect your mining hardware to the mining pool.
- URL that's to be used to connect with the mining pool -- such as
stratum+tcp://stratum.slushpool.com:3333 - The username for your account with the mining pool -- such as
reikiman - The worker name for the particular piece of hardware -- such as
worker1 - THe password to use in the connection
I lied, that's four pieces of configuration. Slushpool doesn't care what password you use. If you like, feel free to connect to Slushpool using my username. There's no password, and your hardware will connect and start computing hashes. But you will not get any economic benefit, I will. Please, feel free to connect your hardware to my account. I won't stop you.
The next configuration is to set up a payment address. This is a Bitcoin address for your wallet. That address is provided by your wallet provider.
The address might look like 1MKQ2HaCU6SPT4aYqEv8tKeYpXdgjjanzG -- Feel free to use that address if you like, since that's my wallet.
For now just record these parameters somewhere. For the wallet address, go to the Settings area of the mining pool and enter the address in the appropriate place.
cgminer
If you want to install cgminer from source, go here:
https://github.com/ckolivas/cgminer
On x86 Ubuntu you can install it from the package manager
$ apt-cache search cgminer
cgminer - multi-threaded multi-pool Bitcoin miner
$ sudo apt-get install cgminer
THe cgminer version available that way is modern enough to support the Antminer U3 out of the box. It may be that your Bitcoin miner isn't supported with the pre-built binary for Ubuntu, and you'll instead have to compile from source. If so, go through the instructions in the Github repository.
I tried setting this up using ARM-based Linux Single Board Computers (e.g. Raspberry Pi) but did not have success. With the Debian version on the the hardware I tried (the C.H.I.P. and the Orange Pi Zero2) the cgminer version did not support the Antminer U3. I tried compiling from source with no luck.
The problem with using cgminer is that it's a CURSES based application and it doesn't fit well as a background process. But we want it to run 24 hours a day, dictating that it be a background process.
cgminer in the background using screen
Fortunately there's a screwball way to proceed that's kind of ingenuous. The screen application is normally meant to interactively to maintain multiple terminal sessions in one terminal window.
Let's start with this command:
screen -LdmS cgminer /usr/bin/cgminer --config /home/david/cgminer.conf
The options are:
-Lturns on logging of output in each window-d -mStarts thescreenprocess in detached mode, creating a new session without attaching to it. This is great for system-level startup scripts like what we'll do in a minute.-S cgminersets the session name
The rest is a command-line to run, namely the cgminer command pointing to a configuration file.
$ cat cgminer.conf
{
"pools" : [
        {
                 "url" : "stratum+tcp://stratum.slushpool.com:3333",
                "user" : "reikiman.worker1",
                "pass" : "anything-at-all"
        }
],
       "api-listen" : true,
       "api-port" : "4028",
       "expiry" : "120",
       "failover-only" : true,
       "log" : "5",
       "no-pool-disable" : true,
       "queue" : "2",
       "scan-time" : "60",
       "worktime" : true,
       "shares" : "0",
       "kernel-path" : "/usr/local/bin",
       "api-allow" : "0/0",
       "icarus-options" : "115200:1:1",
       "icarus-timing" : "3.0=100"
}
Here's where you configure the pool configuration. Again, feel free to connect your hardware to my account, I won't mind ;-)
If running this manually from the command-line, use sudo as so:
sudo screen -LdmS cgminer /usr/bin/cgminer --config /home/david/cgminer.conf
Once you've run this, you can connect to the screen session as so:
screen -d -r cgminer
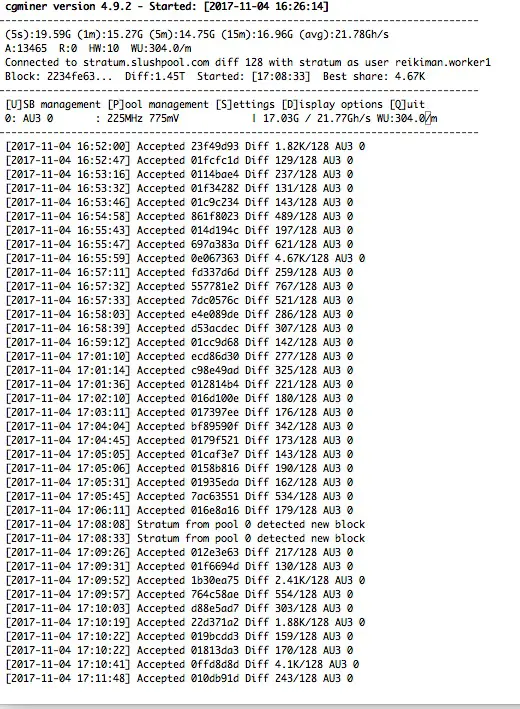
The display may look like what's in the image at the top of this posting. If your configuration is correct, cgminer will connect to the mining pool and start retrieving blocks. The other parts of the display will start showing a hashing rate, and information about each block will be printed as the blocks are processed.
The hash rate is shown here:
(5s):18.29G (1m):14.36G (5m):14.32G (15m):14.31G (avg):16.14Gh/s
And your status is shown on the next couple of lines.
Once you're done browsing the cgminer output, symply type Control-A d to exit the screen session. You can re-run screen -d -r cgminer to hop back into the session to see that you can attach and detach whenever you like.
Making a background service
The above is fine and will keep the cgminer process running -- until the system reboots. This does not automatically restart the cgminer process on rebooting the system. To do so, we need to write a script that manages a background service.
While we could make an LSB-compliant init script in /etc/init.d let's instead create a service.
Create this file: /lib/systemd/system/cgminer.service
[Unit]
Description=cgminer
After=network.target
After=graphical.target

[Service]
Type=forking
# Type=simple
User=david

#Start:
# screen -dm creates detached session that forks.
#  use this with Type=forking
ExecStart=/usr/bin/screen -LdmS cgminer /usr/bin/cgminer --config /home/david/cgminer.conf
#
# screen -Dm creates detached session that doesn't fork.
#  use this with Type=simple
# ExecStart=/usr/bin/screen -LDmS cgminer /usr/bin/cgminer --config /home/david/cgminer.conf

#Stop:
# tell cgminer to quit (not screen), and screen will exit
ExecStop=/usr/bin/screen -S cgminer -X stuff 'q'

# or tell screen to quit and clobber cgminer - not best choice
#ExecStop=/usr/bin/screen -S cgminer -X quit
#Probably need a kill definition in case the miner is hung

#Reload:
# sending the string 'scy' (settings, restart, yes) to cgminer will
#  cause a restart which will re-read config file if using one
ExecReload=/usr/bin/screen -S cgminer -X stuff 'scy'

[Install]
WantedBy=multi-user.target
This has two options - Forking and Non-Forking. You'll see that Forking mode is done with the -LdmS option string, while Non-Forking is done with -LDmS. The service description has commands to Start, Stop and Reload the service, and the commands in each case do the correct thing.
Next you initialize and start the service.
sudo systemctl daemon-reload
sudo systemctl enable cgminer.service
sudo systemctl start cgminer.service
And finally, this lets you verify the service is running:
sudo systemctl status cgminer.service
This command can be useful for examining the startup of the process in case it doesn't start as expected.
sudo journalctl -xe
The next thing to try is connecting to the cgminer session:
screen -d -r cgminer
This is exactly the same as before, but the cgminer session is started automatically when the system reboots. If you want to test that, restart the system.
You may need to manually stop and restart the background service. For example, to debug the configuration and ensure it's starting correctly.
sudo systemctl stop cgminer.service
sudo systemctl start cgminer.service


