Tags: Docker »»»» NextCloud »»»» Self Hosting
NextCloud primarily focuses on storing files, making it an open source equivalent to Google Drive, Dropbox, and the like. Beyond file sharing, it supports document editing, calendars, email, and more, matching up against commercial cloud services. But, as an open source self-hosted service your privacy is protected.
Going by the NextCloud user manual, the recommended installation method is to install it natively on the host system, like with a "Snap Package" on Ubuntu. NextCloud would then be a host system service, with updates managed through the package manager.
But, I strongly prefer containerized services using Docker rather than host system installation. For example, containerization limits damage to the host system if a miscreant breaks through application security. Containerized services should also be simpler to install, since most of the work has been done by the container author. But, not all containerized applications are easy to install, which is the case with NextCloud as we'll see here.
This article gives a complete NextCloud installation, in Docker, that is ready for production use, and solving several common problems. This includes a MariaDB instance for the database, a REDIS instance for performance improvements, and resolving a couple common issues (timeouts and the like) by correctly configuring the NextCloud Docker container.
While the official NextCloud documentation does not discuss Docker installation, there is an officially supported Docker container on Docker Hub. The README for that container gives sample Docker Compose files, but those Compose files have several problems. This post shows a more complete Compose file for NextCloud than what's shown in Docker Hub, as well as discussing configuration of an NGINX proxy for NextCloud using NGINX Proxy Manger.
Links:
-
https://hub.docker.com/_/nextcloud/ - Docker container for NextCloud
-
https://nextcloud.com/ -- NextCloud home page - the official documentation is available on the site
Basic Docker Compose file for NextCloud
Let's start this with a simple docker-compose.yml for NextCloud derived from what's shown in the README for the container.
version: '3'

# volumes:
#   nextcloud:
#   db:

services:
  nextcloud_db:
    image: mariadb
    restart: always
    command: --transaction-isolation=READ-COMMITTED --binlog-format=ROW
    networks:
      - cloudnet
    volumes:
      - ./nextcloud-db:/var/lib/mysql
    environment:
      - MYSQL_RANDOM_ROOT_PASSWORD=true
      - MYSQL_PASSWORD=PASSWORD
      - MYSQL_DATABASE=nextcloud
      - MYSQL_USER=nextcloud

  nextcloud:
    image: nextcloud:24-apache
    restart: always
    networks:
      - cloudnet
    # ports:
    #  - 8080:80
    volumes:
      - ./nextcloud-docroot:/var/www/html
    environment:
      - NEXTCLOUD_DATA_DIR=/var/www/html/data
      - MYSQL_PASSWORD=PASSWORD-as-above
      - MYSQL_DATABASE=nextcloud
      - MYSQL_USER=nextcloud
      - MYSQL_HOST=nextcloud_db

networks:
  cloudnet:
    name: cloudnet
    driver: bridge
This uses two services: 1) MariaDB and 2) NextCloud. The configuration for both is fairly straight-forward. The version is set to 3 because that's the modern version of Docker Compose.
For the volumes, I'm using an absolute pathname rather than an anonymous volume. That's because I want to be certain of the filesystem location for the volume storage.
Another issue with the Compose file supplied in the container README is that it uses links to connect the containers. The links setting has been deprecated or disrecommended for years. Instead, the best practice is to set up a bridge network, and connect the containers to that network.
That's what is done here with cloudnet. All containers for the NextCloud service must connected to cloudnet. Docker then ensures each container has a hostname matching the name of the container. Hence, in the nextcloud container the MYSQL_HOST variable is set to nextcloud_db, because that's the container name and host name of the MariaDB container.
In my case the cloudnet network is managed externally. I use NGINX Proxy Manager for access to all services. The N.P.M. container therefore must connect to the private network of each deployed stack, in this case it must connect to the cloudnet network. We'll go over the N.P.M. configuration later, but let's note that it will connect using http to host name nextcloud at port 80.
There are a couple potential problems with this setup, one of which I do not yet have a solution. These are common problems which have been discussed by many people.
- During installation, when performing NextCloud initial setup, the setup can "time out" in the browser. I was unable to find a solution. A recommended solution is to uncheck the "install common apps" setting, but for NextCloud v24 that setting is simply not there. What I found is that after seeing the timeout, if you simply reload the browser window you'll see that the setup has finished anyway.
- During login, the login button might keep spinning forever. I have a solution for this later.
Running initial setup for NextCloud
Save the docker-compose.yml into an empty directory, then run the following:
$ docker network create cloudnet
$ docker-compose up -d
The first command should be done once, if you need to externally manage cloudnet as I do. Otherwise do not run that command, and only run docker-compose.
This means you must have docker-compose installed. However, be aware that the Docker team appears to be planning to deprecate docker-compose in favor of docker compose. Note that the - is missing. This command, docker compose, has most of the functionality of the venerable docker-compose command.
The docker compose command now works for deploying a docker-compose.yml on the local Docker installation. However, my deployment machine cannot be updated to the latest Docker version, and I am using docker-compose instead of docker compose for this deployment.
It will help to run docker-compose logs -f so you can watch the logs. Once the MariaDB container is finished, you can head to the browser window.
Using the Compose file shown above, NextCloud will be at http://SERVER on port 80. You can of course use the ports directive to remap that to another port number, if needed. For example, you can map the service to port 4080 with this:
services:
  ...
  nextcloud:
    ...
    ports:
      - 4080:80
    ...
In this case you would connect your browser to http://SERVER:4080.
Enter the correct URL in your browser. There will be boxes to enter a user name for the ADMIN user, as well as a password. In older versions there was a checkmark to tell NextCloud to install some recommended applications, but that's no longer there. Click on the Install button, and be prepared to wait for awhile.
Again, my experience was that this step timed out in the browser. I simply reloaded the browser window, and found NextCloud ready to be used. I've looked for solutions and found no recommendations which helped.
During the setup phase, you gave a user name and password for the ADMIN user. Login using that combination, and you'll be in NextCloud. From there, you can explore the features, change some settings, install NextCloud applications, and so forth. What you do with it is up to you, and what we're focused on here is setup of NextCloud.
Handling Setup and Security Warnings
A very important check to make is in the Settings area. In the upper-right corner click on the button, like so:
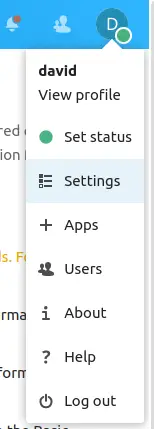
There are many useful choices here, and for now we are interested in Settings. In the Settings area, there is a list of tabs in a column on the left-hand side. Scroll down to the Administration section, and click on the Overview choice. This page gives an overview of your NextCloud instance.
On this page, there is some JavaScript code which will execute to check for common issues. It should show something like this:
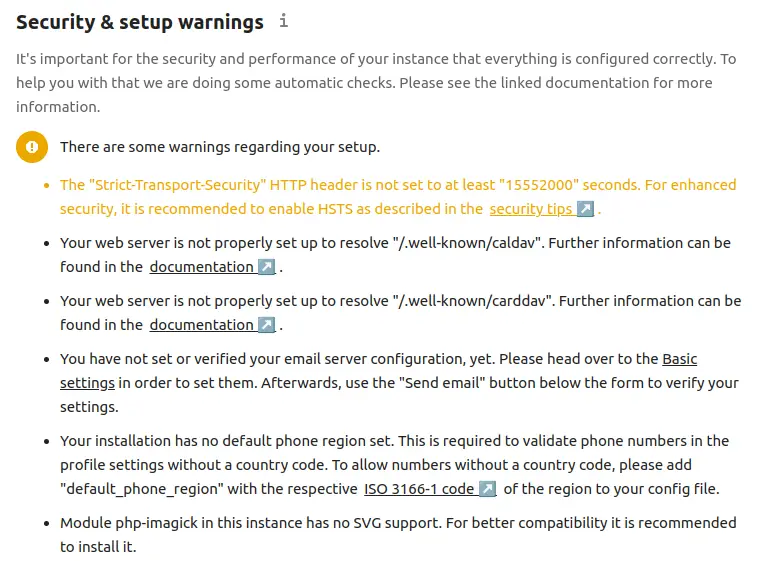
There are several issues shown on this page, so lets take care of them.
- The "Strict-Transport-Security" HTTP header is not set to at least "15552000" seconds. For enhanced security, it is recommended to enable HSTS as described in the security tips.
- Your web server is not properly set up to resolve "/.well-known/caldav". Further information can be found in the documentation.
- Your web server is not properly set up to resolve "/.well-known/carddav". Further information can be found in the documentation.
These three issues will be fixed in the NGINX Proxy Manager configuration in the next section. If you are not using N.P.M., you'll need to fix these in other ways. These messages include a link to the documentation.
NGINX Proxy Manager configuration for NextCloud
NGINX Proxy Manager is an excellent tool for managing access to Docker-based services, especially for a self-hosted home lab setting. In my case, I have an Intel NUC on my desk running several services (Gitea, Jenkins, etc) and use N.P.M. to simplify access to these services, and to help with exposing them on the public Internet.
But, unlike many services where we can use the default N.P.M. setup, NextCloud requires extra settings.
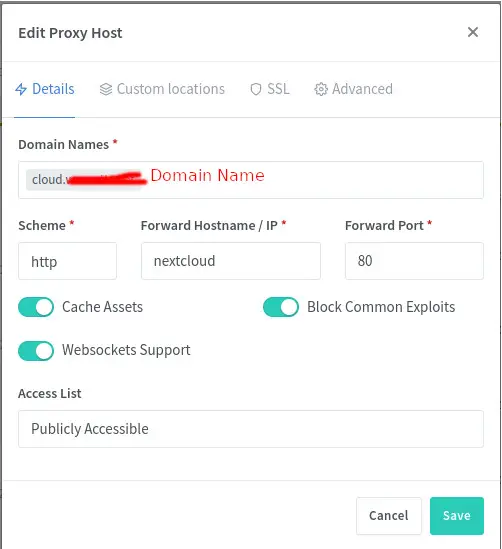
Here we give a domain name for the service. Next we describe access to the backend service, in this case it uses http to the nextcloud container on port 80. We select Cache Assets, Block Common Exploits, and Websocket Support. The latter seems important for NextCloud because some of the buttons seem to rely on this.
On the SSL tab, we can easily use Lets Encrypt to configure an SSL certificate. Once you've done so, select these settings:
- Force SSL will ensure everyone visiting NextCloud will use the HTTPS connection
- HTTP/2 Support will ensure use of this protocol
- HSTS Enabled will fix the message about HSTS shown above. This is a security protocol that will increase safety.
To fix the issues with /.well-known/caldav and /.well-known/carddav we must navigate to the Custom Locations tab. If you read the NextCloud documentation, it describes with Apache setting up .htaccess, and in NGINX setting up location directives in the NGINX config file. With N.P.M. we can use this Custom Locations tab.
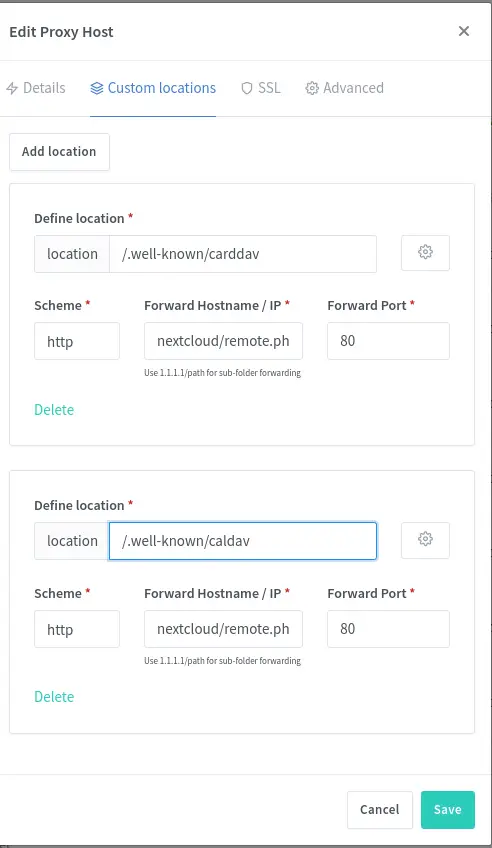
This configures the two URL locations to pass requests to a back-end URL in the NextCloud instance. The URL locations starting with /.well-known are defined by the Internet standards committees, and are a "well known" URL path through which to access specific services. The NextCloud documentation says to pass these locations to /remote.php/dav/, and for the purpose of NGINX Proxy Manager configuration we must enter nextcloud/remote.php/dav/.
There are two locations to enter, so click the Add Location button twice. Enter the /.well-known/caldav and /.well-known/carddav locations as shown in the image. For each, the Scheme box will contain http, the Forward Hostname / IP box will contain nextcloud/remote.php/dav/, and the Forward/Port box will contain 80. Below this box is instructions reading Use 1.1.1.1/path for sub-folder forwarding, which means the text starts with the host name or IP address, and then continues with any additional path. The hostname is nextcloud and the path is /remote.php/dav/.
As soon as you save the N.P.M. configuration, it will rebuild the NGINX config file, and then in the NextCloud overview page the issues named above will be resolved. There are other issues to resolve, however.
Customizing the NextCloud configuration to avoid some timeout situations
This configuration of the N.P.M. proxy fixed a few problems. But, there is an issue I saw relating to logging in. I'd enter my user name and password, click the login button, and the progress indicator spins for 10+ minutes with no change, then reloading the browser shows that I was actually logged in.
In the logs for N.P.M., this error was found:
2022/05/14 07:00:06 [error] 965099#965099: *2145208 upstream timed out
   (110: Operation timed out) while reading response header from upstream,
   client: IP-ADDRESS, server: cloud.DOMAIN,
   request: "POST /index.php HTTP/2.0",
   upstream: "http://172.20.0.5:80/index.php",
   host: "cloud.DOMAIN"
On Reddit, I found
NextCloud self-hosted site times out with some settings in the NextCloud configuration file.
With the docker-compose.yml configuration shown above, this file appears in the host filesystem as nextcloud-docroot/config/config.php, but is protected such that only ROOT can edit the file. Hence, editing or viewing this file requires this command on the host computer:
$ sudo vi nextcloud-docroot/config/config.php
A key recommendation is this change to config.php:
'trusted_domains' =>
array (
0 => '192.168.1.200:444',
1 => 'nextcloud.my-domain.com',
),
'overwrite.cli.url' => 'https://nextcloud.my-domain.com',
'overwritewebroot' => '/nextcloud',
'overwritehost' => 'nextcloud.my-domain.com',
'overwriteprotocol' => 'https',
'trusted_proxies' => ['NginxProxyManager'],
However, all of these changes can be achieved using environment variables in docker-compose.yml. The NextCloud container creates the config.php based on what it finds in environment variables.
Because it only creates config.php on the first time the container is executed, the nextcloud-docroot directory must not be there. If that directory is missing, NextCloud creates the directory, otherwise it skips the directory creation process.
Hence, before editing docker-compose.yml run this command:
$ sudo rm -rf nextcloud-db nextcloud-docroot
This will delete both the database directory, and the NextCloud directory, so that both are created from scratch.
Then, make these changes to docker-compose.yml:
services:
  ...

  nextcloud:
    ...
    environment:
      - MYSQL_PASSWORD=PASSWORD
      - MYSQL_DATABASE=nextcloud
      - MYSQL_USER=nextcloud
      - MYSQL_HOST=nextcloud_db
      # - REDIS_HOST=redis
      - APACHE_DISABLE_REWRITE_IP
      - VIRTUAL_HOST=cloud.DOMAIN
      - OVERWRITEPROTOCOL=https
      - TRUSTED_PROXIES=NginxProxyManager
      - OVERWRITECLIURL=http://cloud.DOMAIN
    ...
I skipped over the trusted_domains setting, which is controlled using the NEXTCLOUD_TRUSTED_DOMAINS environment variable. The documentation in the NextCloud container README for these settings are:
NEXTCLOUD_TRUSTED_DOMAINS(not set by default) Optional space-separated list of domainsAPACHE_DISABLE_REWRITE_IP(not set by default): Set to 1 to disable rewrite IP.TRUSTED_PROXIES(empty by default): A space-separated list of trusted proxies. CIDR notation is supported for IPv4.OVERWRITEHOST(empty by default): Set the hostname of the proxy. Can also specify a port.OVERWRITEPROTOCOL(empty by default): Set the protocol of the proxy, http or https.OVERWRITECLIURL(empty by default): Set the cli url of the proxy (e.g.https://mydnsname.example.com)OVERWRITEWEBROOT(empty by default): Set the absolute path of the proxy.OVERWRITECONDADDR(empty by default): Regex to overwrite the values dependent on the remote address.
It's best to make these changes in docker-compose.yml. But, if your NextCloud instance is already fully set up and in production use, it doesn't make sense to recreate it from scratch. In such a case it is better to make these changes in config.php.
Adding a REDIS cache to a NextCloud setup
You'll notice the environment variables we just showed include REDIS_HOST. Let's see how to add REDIS to NextCloud.
services:
  ...

  nextcloud:
    ...
    environment:
      ...
      - REDIS_HOST=redis
      ...
  ...
  redis:
    image: redis:alpine
    restart: always
    networks:
      - cloudnet
Adding REDIS will theoretically improve performance by caching things in memory.
If you need to install REDIS without deleting and recreating the NextCloud installation, the equivalent in config.php is approximately this:
  'filelocking.enabled' => true,
  'memcache.distributed' => '\\OC\\Memcache\\Redis',
  'memcache.locking' => '\\OC\\Memcache\\Redis',
  'redis' =>
  array (
    'host' => 'redis',
    'password' => '',
    'port' => 6379,
  ),
In the documentation, two purposes for using REDIS are given. The first is to move file locking to the REDIS server, because doing it in the database is very slow. The second is to cache some data in memory to improve performance. For details, see:
-
https://docs.nextcloud.com/server/latest/admin_manual/configuration_files/files_locking_transactional.html
-
Configuring NextCloud to use GMAIL to send e-mails
NextCloud sends a variety of emails like password reset, and various notifications. This requires having an SMTP server for sending email. Installing a self-hosted SMTP server is a large task, and fortunately there is a simple way. You probably have a Google Account, and therefore have a GMAIL account. It's possible to configure NextCloud to use the GMAIL SMTP server.
An alternate is, if your NextCloud is installed on a web hosting service, that you can use the SMTP server of your web hosting provider. Or there are paid SMTP services you can use. No matter the SMTP service you're using, whether it's GMAIL or otherwise, you simply put the particulars in the NextCloud SMTP configuration screen.
The NextCloud documentation includes a
section on configuring SMTP e-mail support. For this tutorial, we'll focus on using GMAIL's SMTP. For a small private NextCloud instance this should be okay, but for an instance with dozens or more users that will generate lots of e-mail it is best to use another SMTP service.
In the Basic Settings area of the Administration settings, there is a section to configure an SMTP server. Before doing this, go to the Personal area in the Personal Info tab, and set your personal e-mail address. Back in the Basic Settings, add these entries for the SMTP configuration:
- Send mode
SMTPwith Encryption set toSTARTTLS - From address set to YOUR-EMAIL at
gmail.com - Authentication method set to Login with Authentication required
- Server address set to
smtp.gmail.comon port 587 - Credentials
YOUR-EMAIL@gmail.com, and then for the password there is special consideration.
You cannot simply use the password for your Google Account as the password for this purpose. Instead it is necessary to set up an App Password for your Google Account. See:
https://support.google.com/accounts/answer/185833
To do this, while logged in to GMAIL click on the identity icon in the upper-right corner, and you'll see a button marked Manage Google Account. Click on that, then select Security and Signing into Google. Under that, select App Passwords, which is where you set up an application-specific password. What I did was tell it the device and application is NextCloud. It then showed me a password string, which I copied into the password field of the NextCloud settings.
After completing that there is a button for sending a test email. Click on that, and if all is well you'll shortly receive an email. If not, there will be an error message, and I found the error messages to be helpful guidance. The above process is based on having resolved the error messages I saw.
Configuring background job execution with Cron for NextCloud
Another issue is that NextCloud has background jobs it can run to maintain the system. Normally these are run from Cron, the venerable program for running background jobs.
There is a complex way to setup Cron support for NextCloud by using a Docker image created explicitly for that purpose. See:
But, there is a far simpler way, which is to use the Cron service on the host where your NextCloud instance is executing.
In my case, the Docker environment is hosted on Ubuntu running on the Intel NUC sitting on my desk. I am already using the host system Cron service for some background tasks.
Running crontab -l lets you view the current list of Cron jobs you have running.
Running crontab -e lets you edit the crontab file.
I added this job to my crontab file:
*/5 * * * * /usr/bin/docker exec -u www-data nextcloud php cron.php
Remember that docker exec runs a command inside the named container. Adding -u www-data ensures the user ID used inside the container is correct. The nextcloud parameter identifies the docker container in which to execute the command. To be certain of the container name, run docker ps -a | grep nextcloud. The past bit of this command is the shell command to execute inside the container.
Notice that in the nextcloud-docroot directory there is a file, cron.php. The whole point of this is to execute that PHP script every five minutes.
In the NextCloud settings, the Administrator section, under Basic Settings, there is a section for background jobs. Simply select Cron.
Summary
NextCloud is an excellent tool for replacing many commercial cloud services. We wish that setup would be more straight-forward, since that would open its use to even more people. That's the goal for this article, to document a simple method of NextCloud installation which results in usefulness.